Sunday 30 September 2018

Nikon Z7 First Impressions and Sample Photos

Photo of Nikon Z7

I’m sure you already know that we’re going to test the Nikon Z7 camera to its limits here at Photography Life. We have six orders coming our way in total, and we plan to put each copy through its paces while we travel to Jordan and Turkey throughout October. So far, one copy has arrived, and I’ve shot with it in Colorado for the past couple days. Here, I wanted to share my first impressions and sample images.


from Photography Life https://photographylife.com/nikon-z7-first-impressions-and-sample-photos#utm_source=rss&utm_medium=rss&utm_campaign=nikon-z7-first-impressions-and-sample-photos

Wednesday 26 September 2018

Five Sigma Global Vision Lenses Announced

Sigma 40mm f1.4 Art

As part of a slew of Photokina-related announcements yesterday, Sigma has announced five new lenses. Four are for full-frame cameras, and one is compatible with Micro 4/3 and Sony E mount crop sensor cameras. The 28mm f/1.4 Art, 40mm f/1.4 Art, 70-200mm f/2.8 Sport, 60-600mm f/4.5-6.3, and 56mm f/1.4 (for crop sensor only) join Sigma’s growing lineup of “Global Vision” lenses. Pricing and shipping dates of most of the lenses have not yet been announced.


from Photography Life https://photographylife.com/news/five-sigma-global-vision-lenses-announced#utm_source=rss&utm_medium=rss&utm_campaign=five-sigma-global-vision-lenses-announced

The “L Mount Alliance” – A Full-Frame Storm is Coming

Leica Sigma and Panasonic

This year is certainly going to be marked as one of the most important ones in the camera history. With both Nikon and Canon releasing their first mirrorless camera systems a few weeks ago, we now have another major competing system, and this time from three different manufacturers: Leica, Panasonic and Sigma. The trio decided to come together to form an “L Mount Alliance”, standardizing their cameras and lenses on Leica’s L mount. This essentially means that the three companies will be able to benefit each other and its customers the same way the Micro Four Thirds system has been able to for many years, by increasing the total number of lenses available to choose, as well as potentially sharing other important technologies between each other. Without a doubt, this strategic partnership will hugely benefit the photography community, as it will not only add yet another strong mirrorless system to the market, but will also push all manufacturers to deliver the best product they possibly can, at very competitive price points.


from Photography Life https://photographylife.com/news/the-l-mount-alliance-a-full-frame-storm-is-coming#utm_source=rss&utm_medium=rss&utm_campaign=the-l-mount-alliance-a-full-frame-storm-is-coming

Tuesday 25 September 2018

Fuji GFX 50R Announcement

Fuji GFX 50R Front

Fuji just announced their rumored (comparatively) affordable medium format mirrorless camera, the GFX 50R, a 51.4 megapixel camera with a rangefinder design, due in November 2018. The retail price is $4500, which, though not cheap, makes it the least expensive medium format digital camera ever upon launch. The GFX 50R’s specifications match those of the GFX 50S in many ways, with the biggest differences being the form factor – more similar to that of the Fuji crop-sensor cameras – and the lower price.


from Photography Life https://photographylife.com/news/fuji-gfx-50r-announcement#utm_source=rss&utm_medium=rss&utm_campaign=fuji-gfx-50r-announcement

Kayaking in Antarctica: Everything You Need to Know

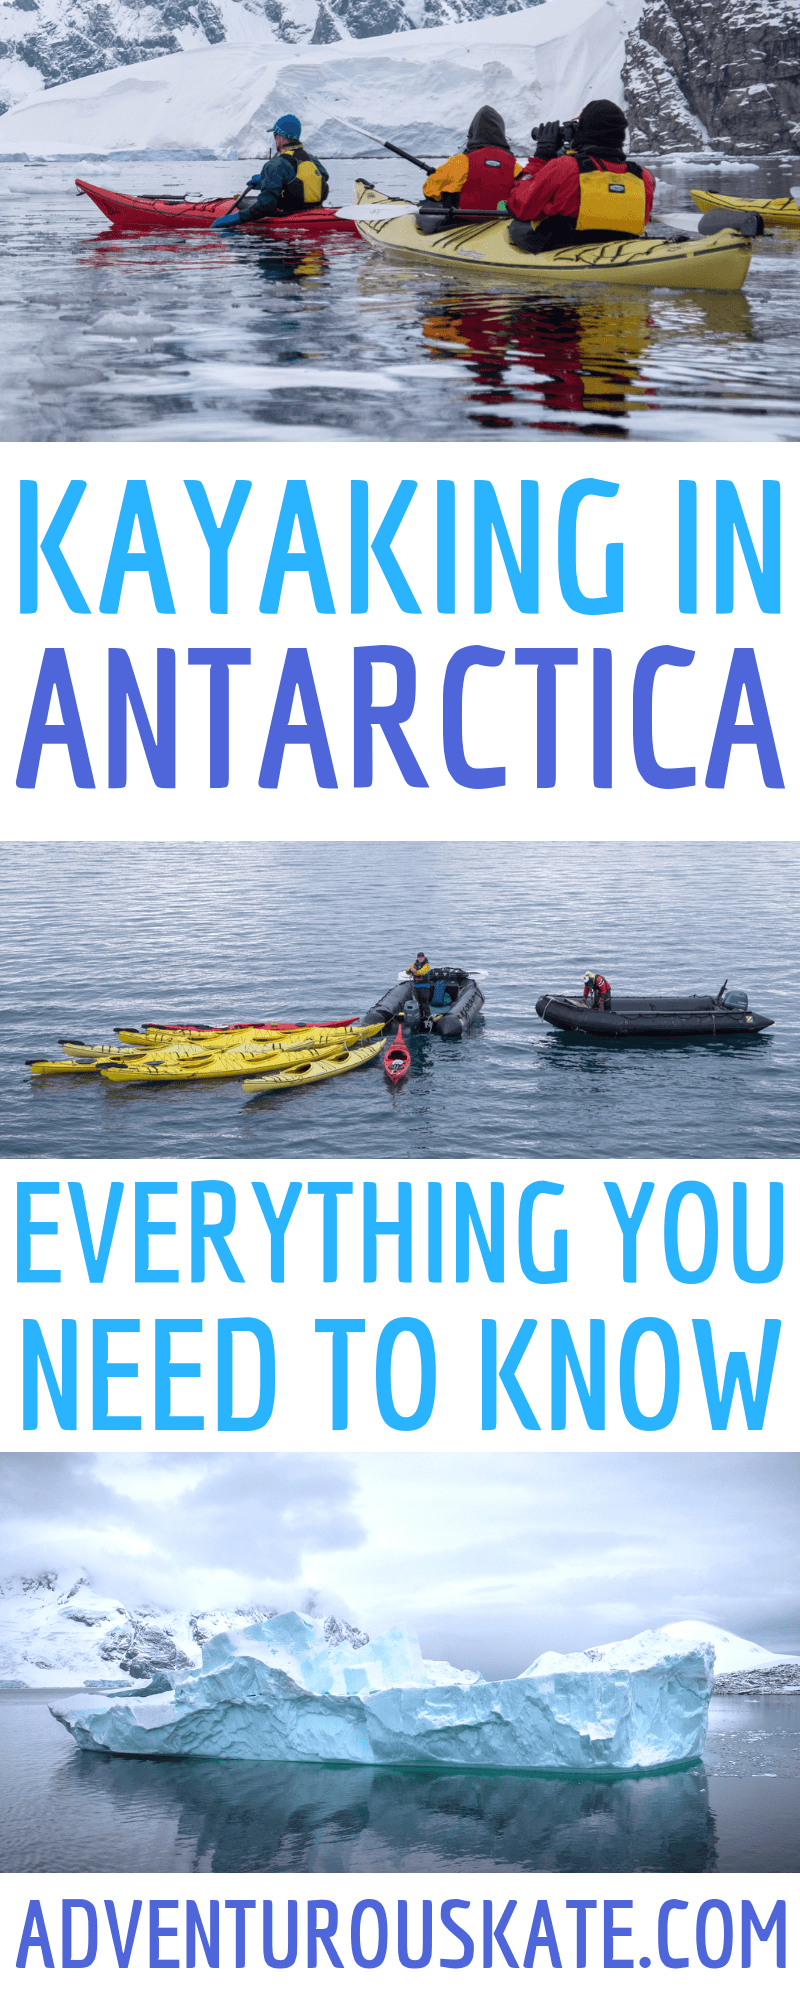
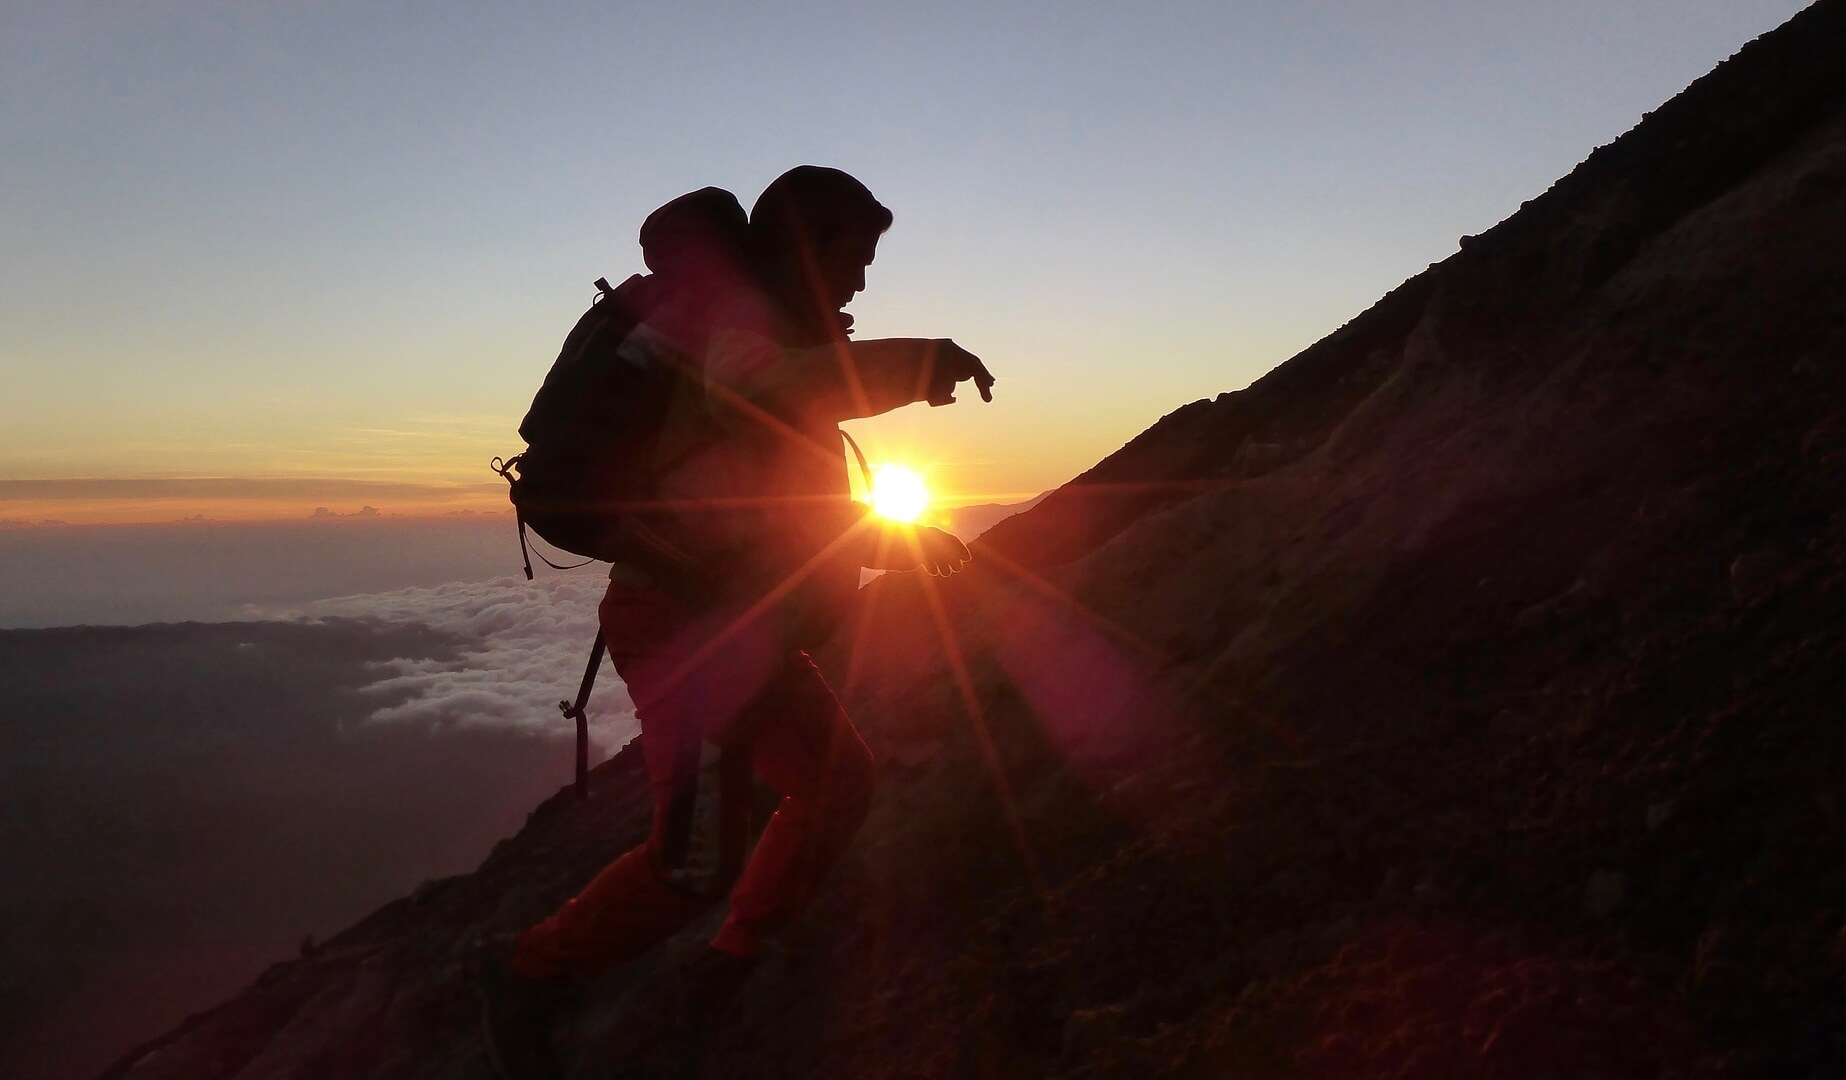
Kayaking in Antarctica is one of the most badass, unique, and special things I’ve ever done while traveling. Antarctica is wild, moving, and breathtaking, and there’s no better way to experience the continent than as close to the water as possible.

I traveled to Antarctica with Quark Expeditions, who sponsored my trip, in March 2018. Quark offers lots of excursions to fill out your expedition: camping, cross-country skiing, stand-up paddleboarding.

But kayaking? Kayaking is the big one, the special one, the one that people rave about.

It’s also very expensive.

How much does kayaking in Antarctica cost? Quark Expeditions charges $995 for the 2018-2019 season. Other companies charge fees in that neighborhood.

In other words, this isn’t an impulse purchase — you should only kayak if you really want to.

But is it worth it? I absolutely think that it is.

What’s it like to kayak in Antarctica? Myths vs. Reality.

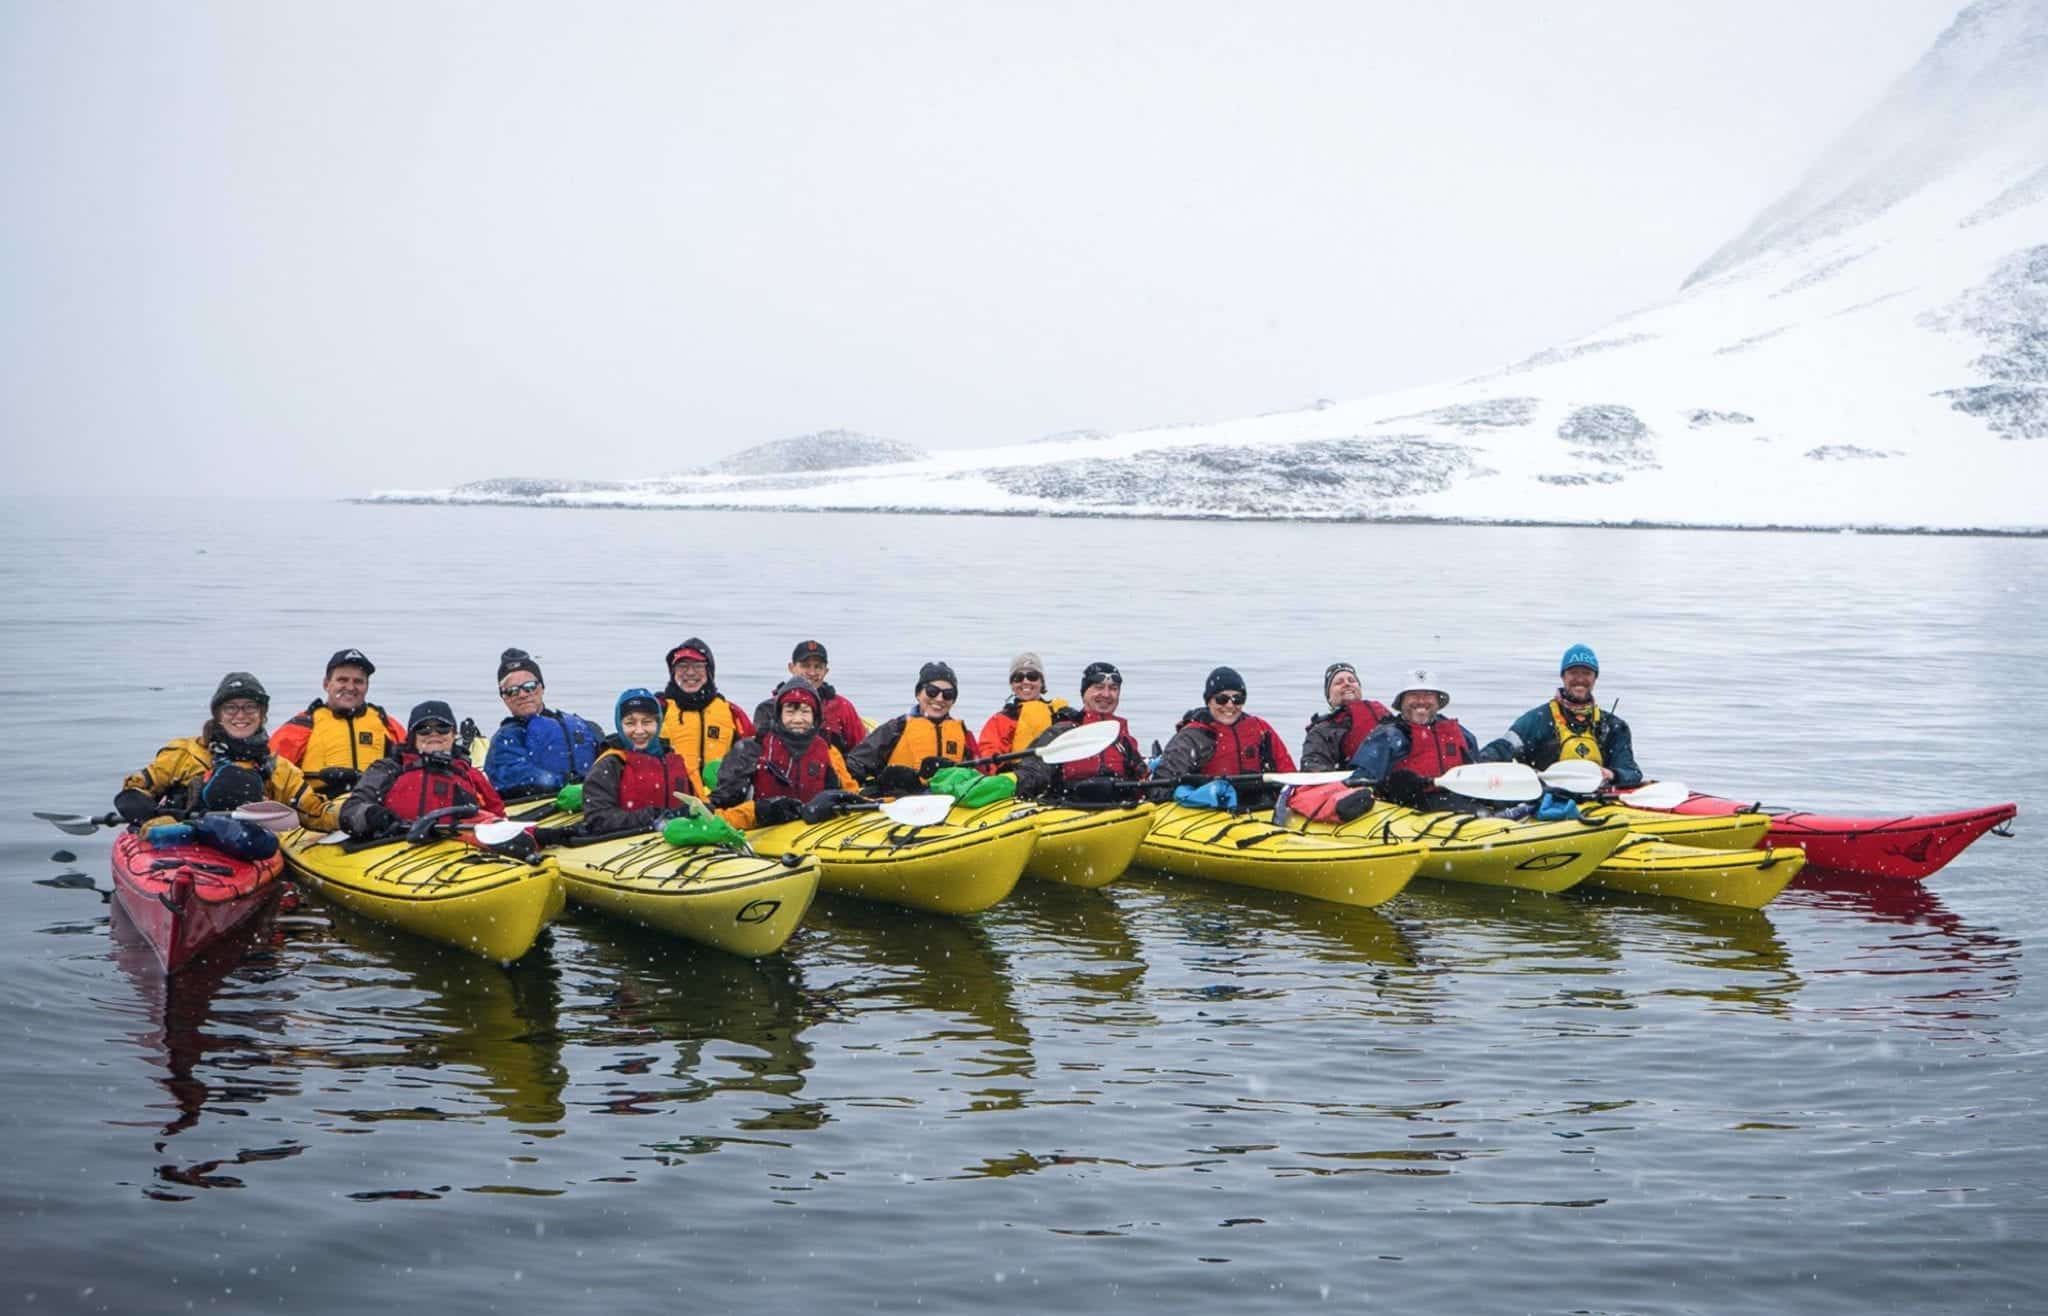
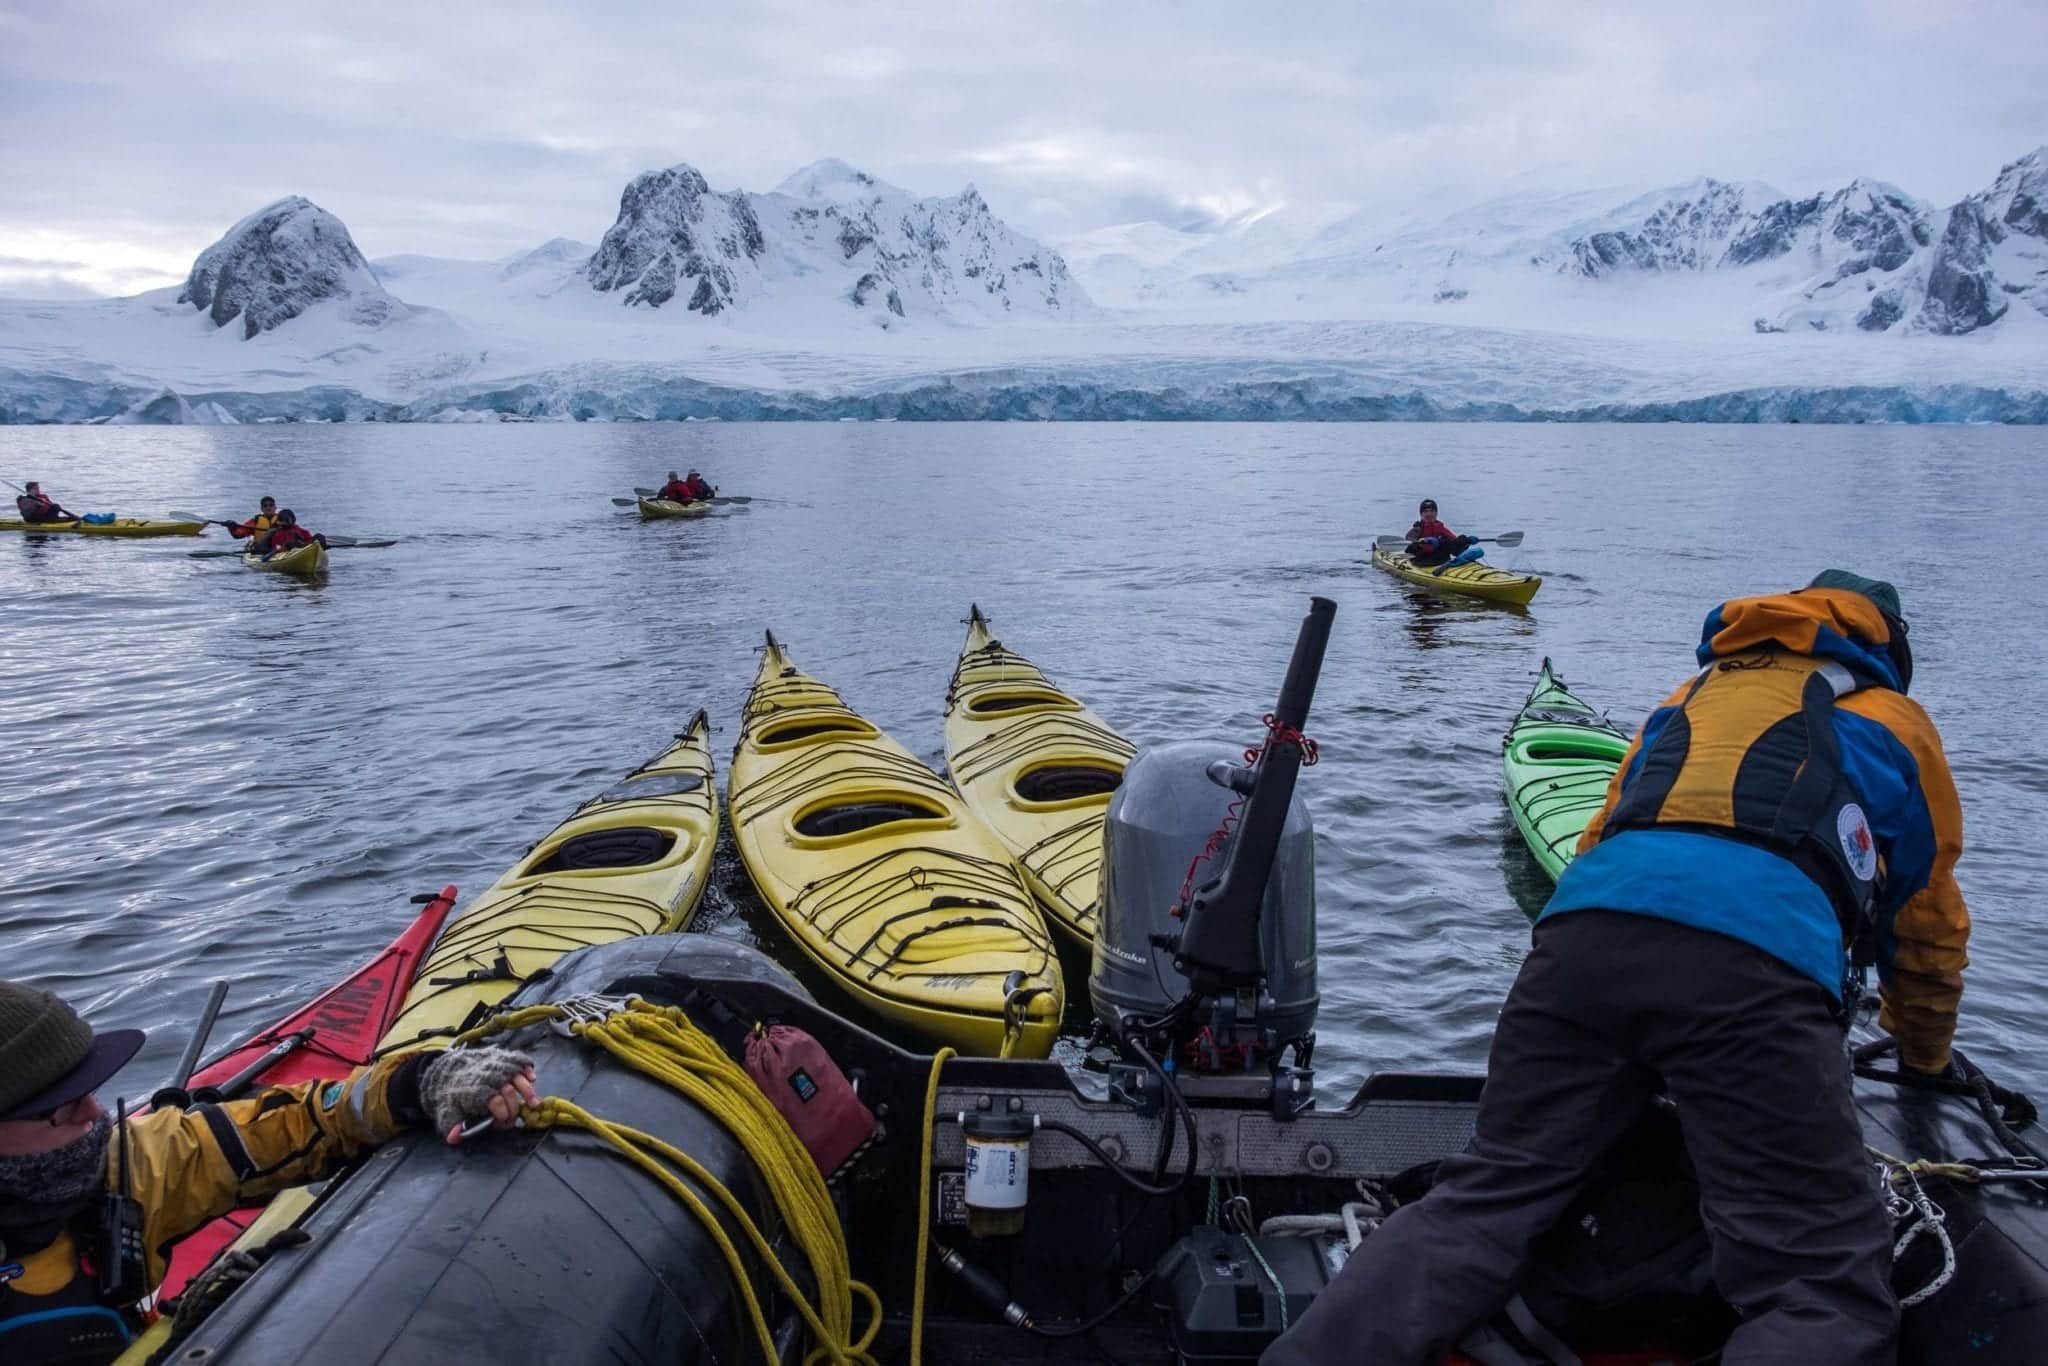
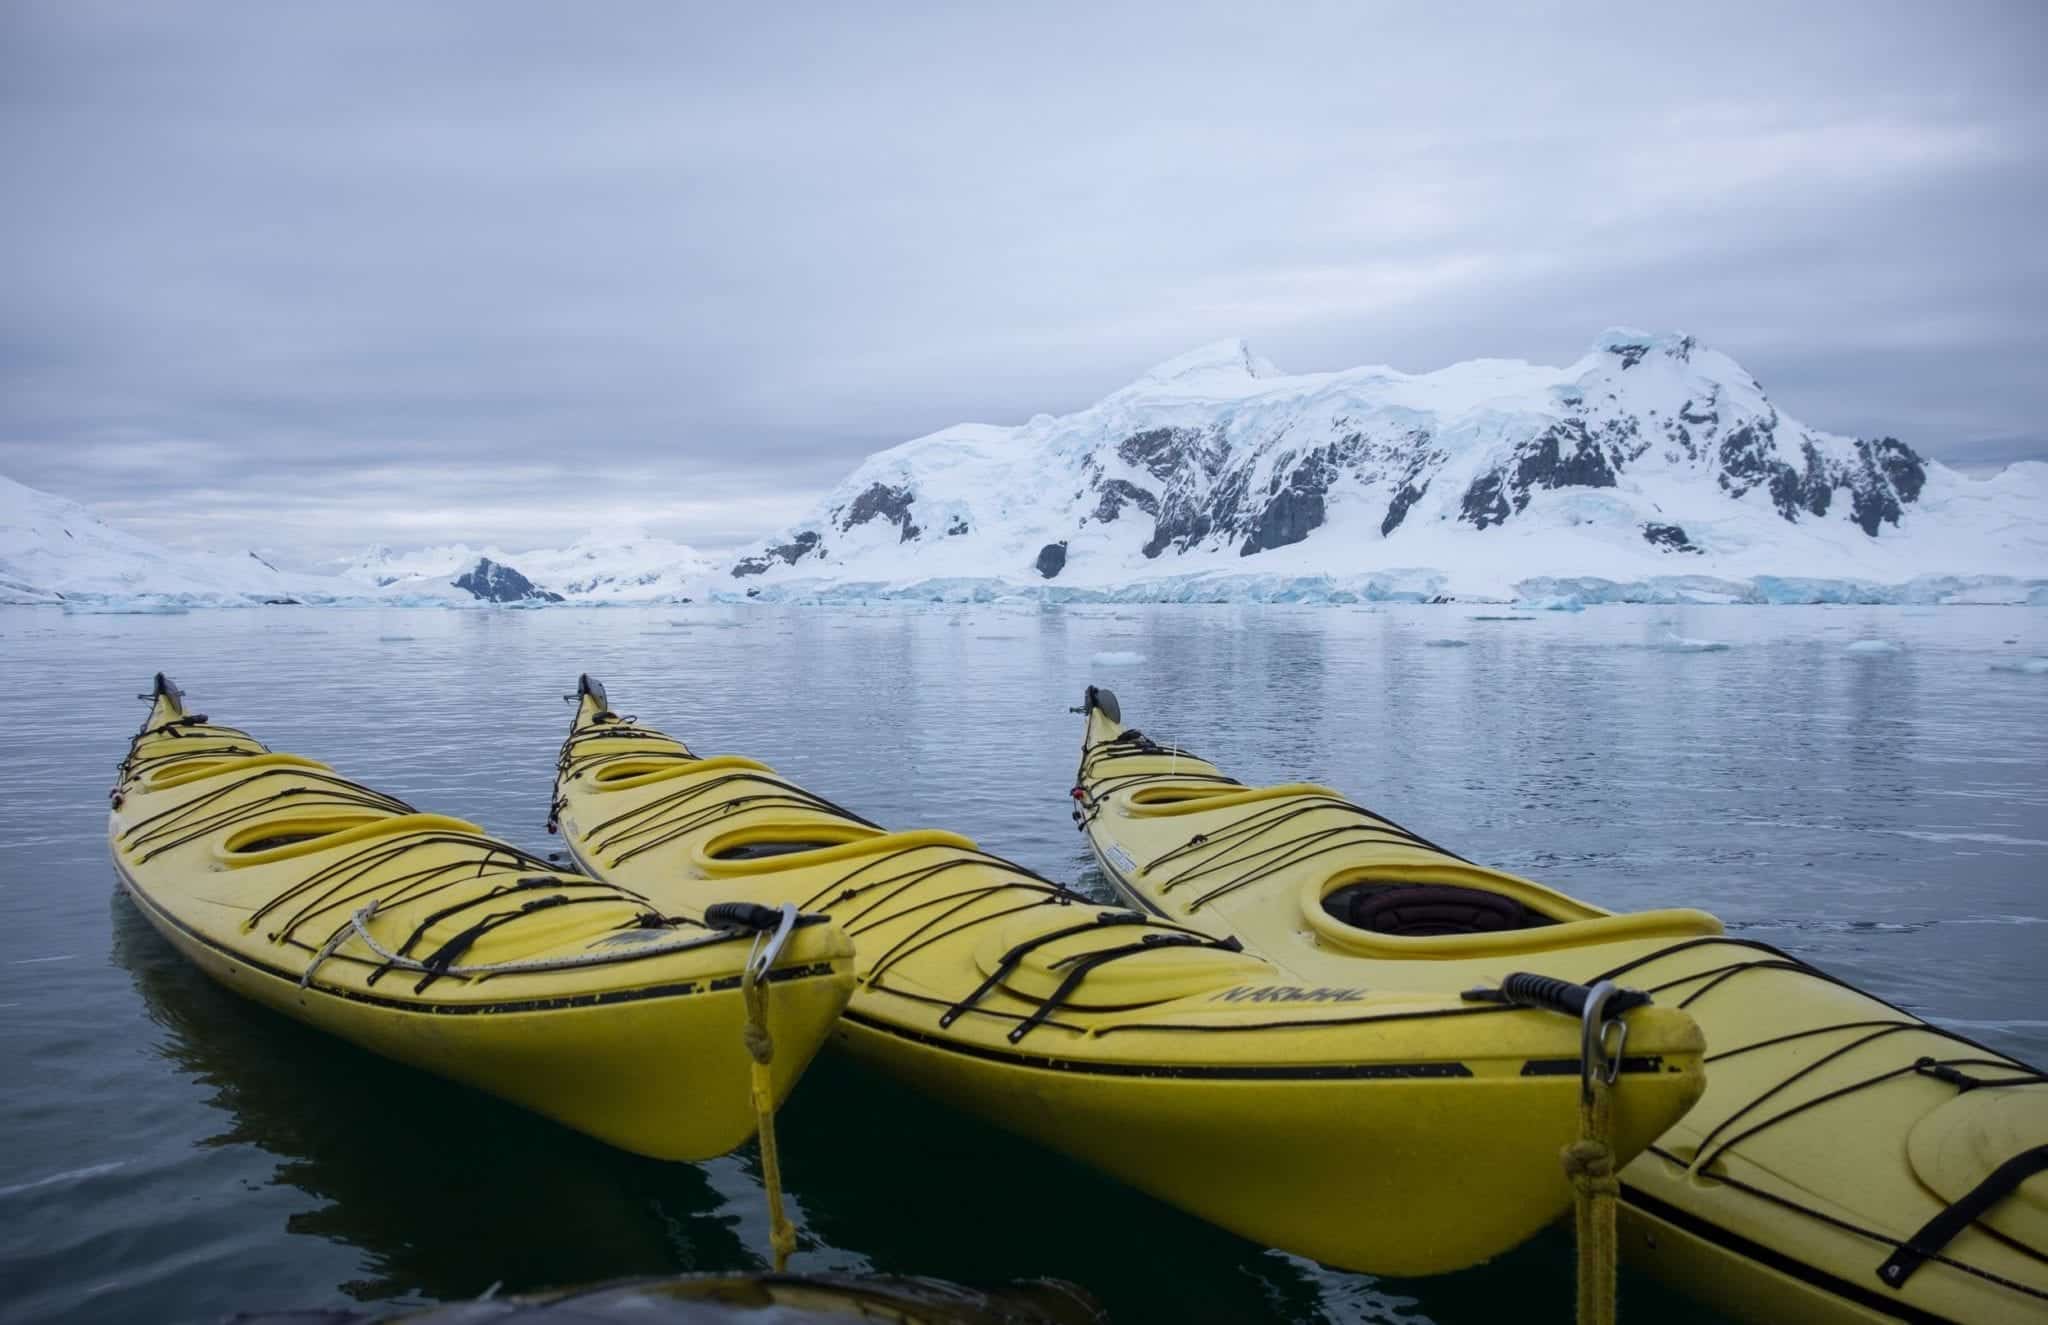
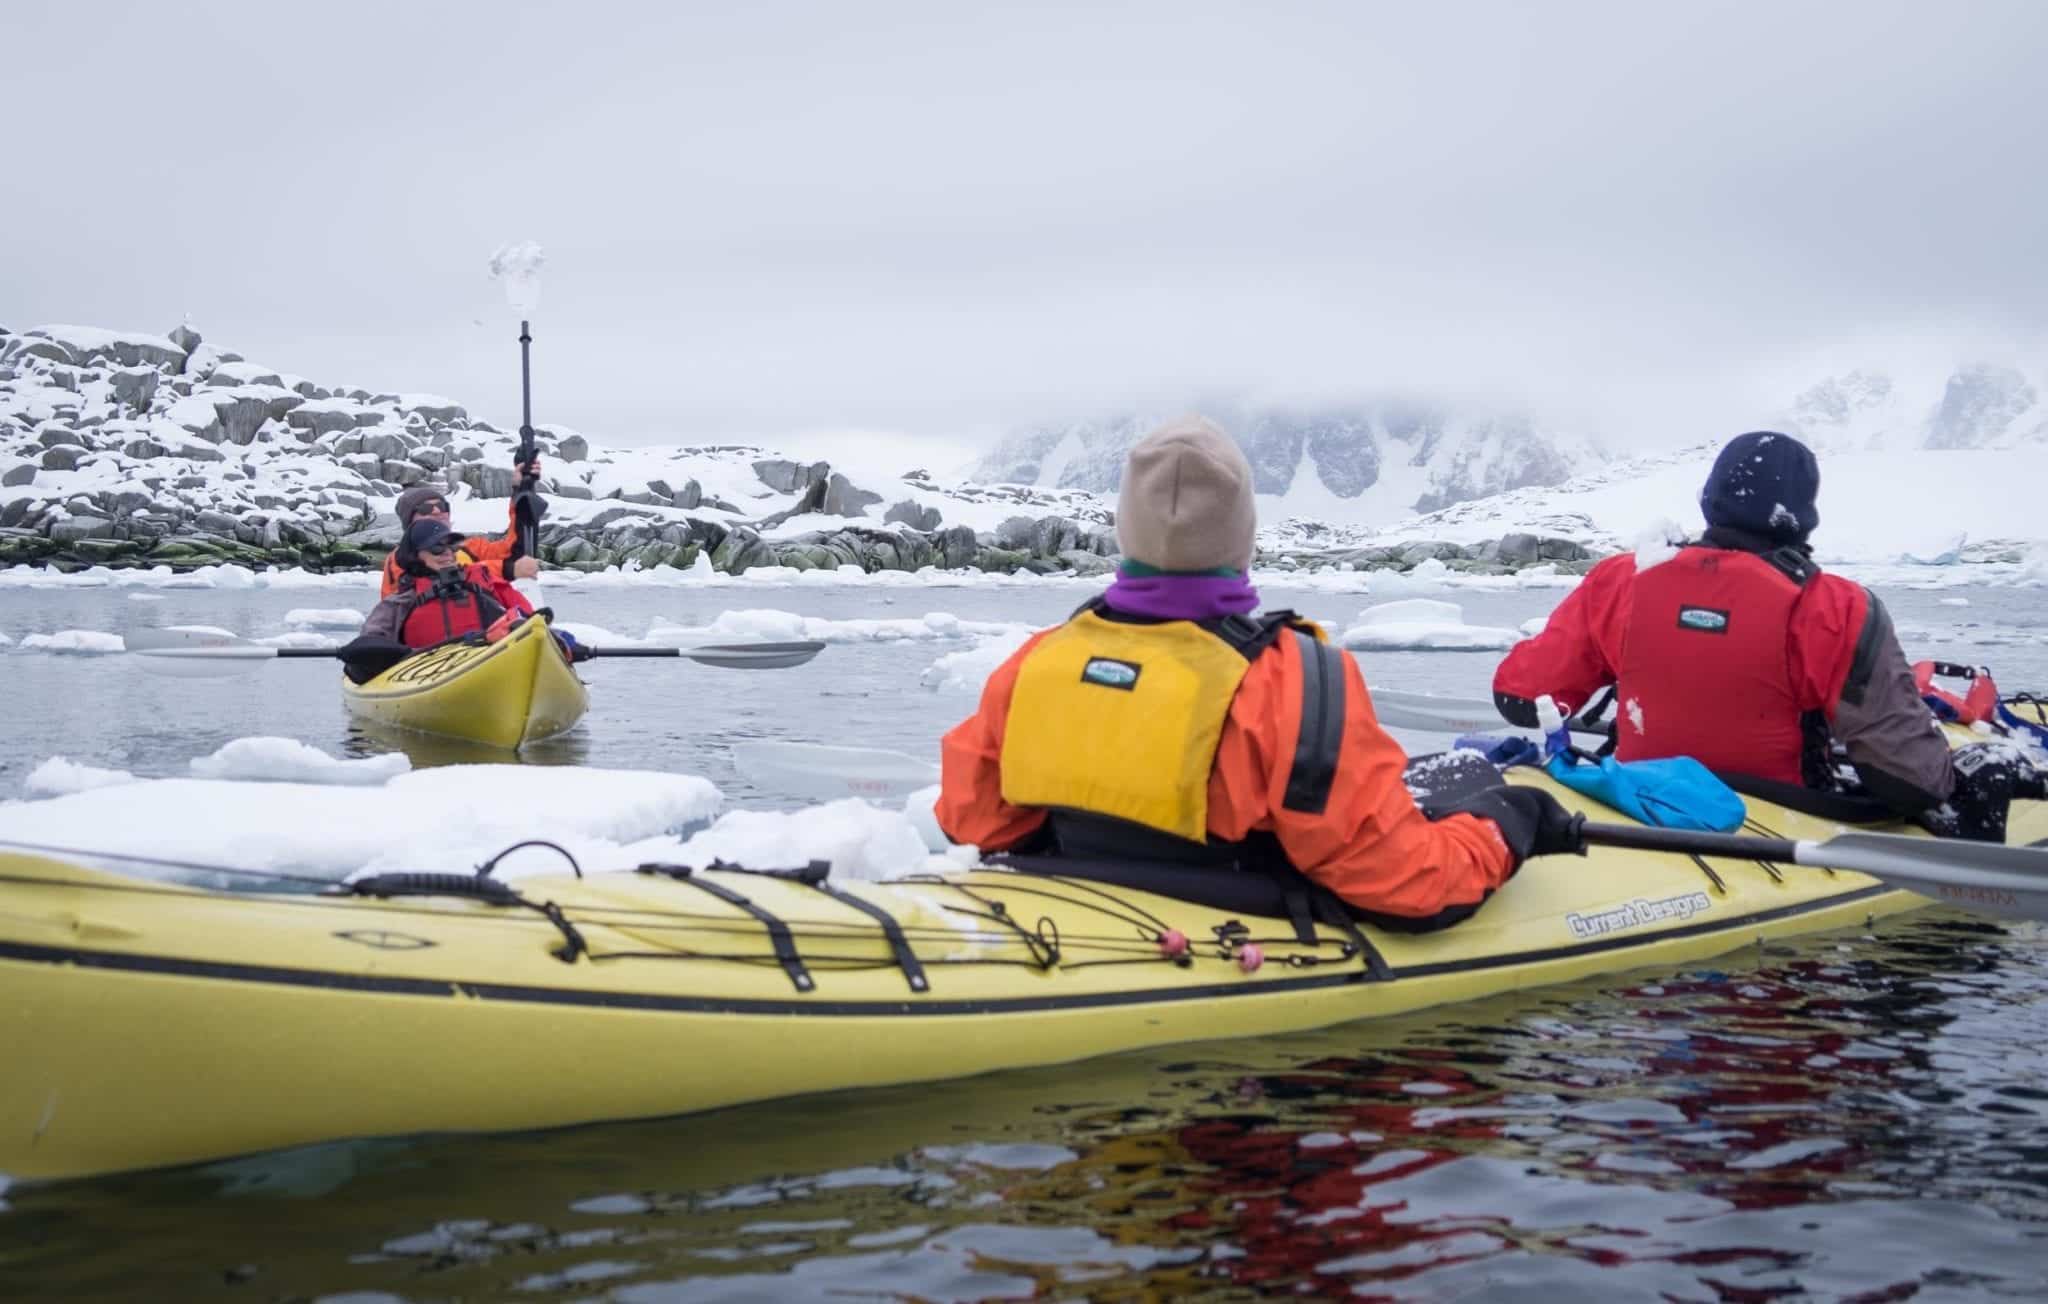
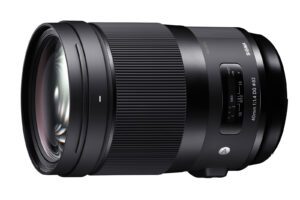
When you choose to be part of the kayaking team in Antarctica, you’re going to be part of a small team that breaks off from the main group and paddles together as often as possible. You have a different experience from everyone else on the ship. Everyone else splits their excursions between zodiac cruises and landings on shore; as kayakers, you go out for a long paddle, then often a shorter landing on shore.

That’s both a good thing and a bad thing: you get to be close

Here are the myths and realities about the Antarctica kayak experience:

You don’t need to be a super athlete in order to kayak in Antarctica. I wouldn’t say that at all — but you definitely need to be somewhat in shape and have a basic level of fitness.

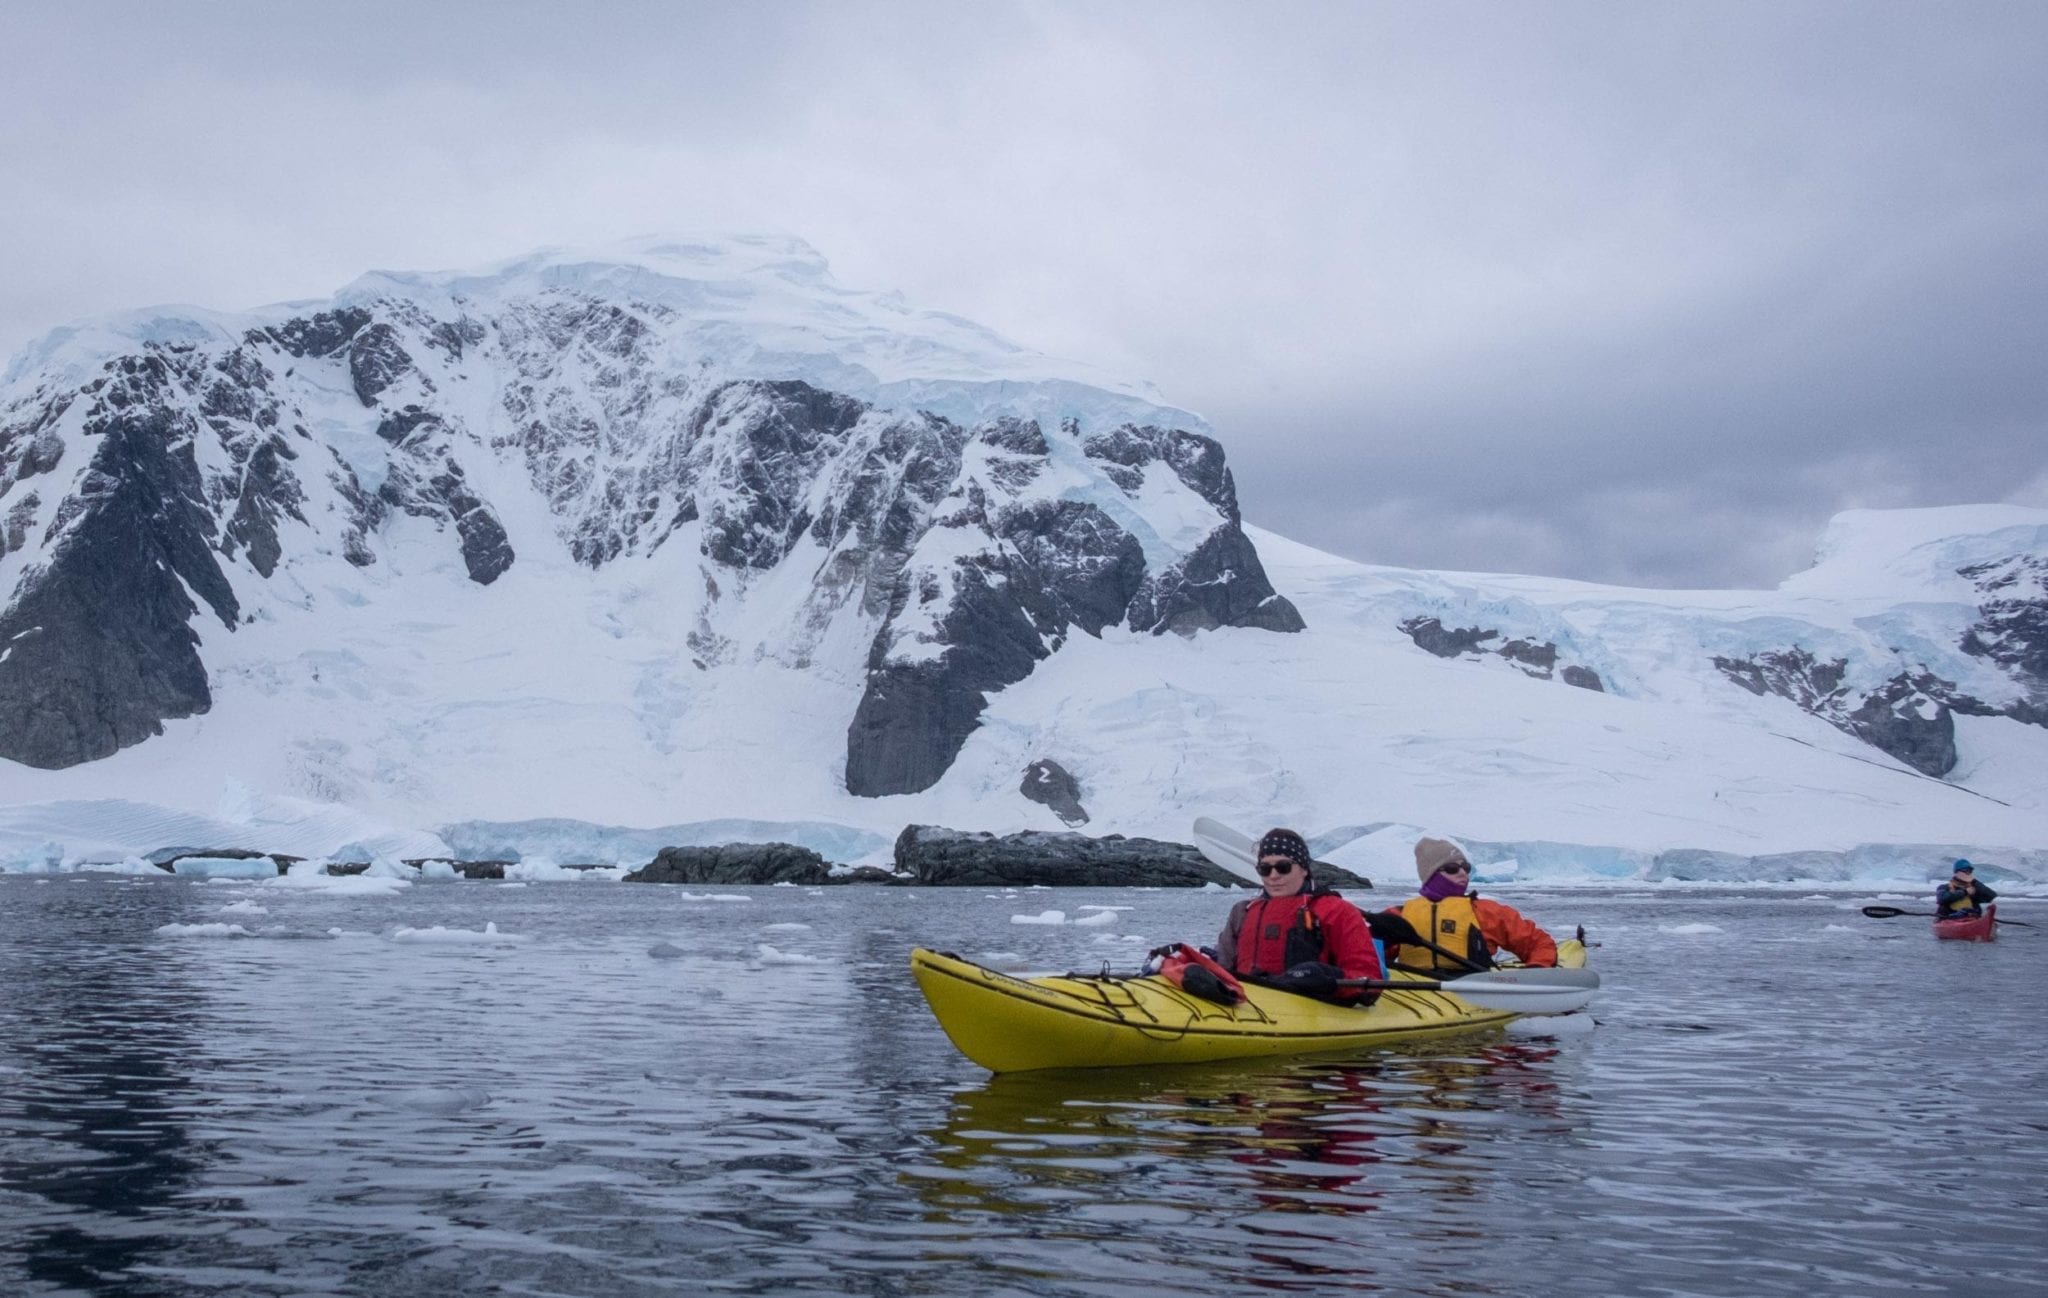
The waves aren’t high or scary at all. Most of our kayaking experiences were on smooth, nearly glassy waters. I’ve gone sea kayaking in many places rougher than Antarctica, and you don’t go out at all if the waves are too high or if the weather is rough.

You go kayaking whenever humanly possible. This isn’t a casual activity that you do once or twice — kayaking is the center of everything you do. Our group ended up going out kayaking eight times. Of course, how often you go out is entirely dependent on the conditions. If you don’t go out, you join the rest of the travelers on zodiacs and on shore.

The guides are there to help you. Our guides were Michael and Vickie, both French Canadians. You don’t be come an Antarctica kayaking guide if you’re not crazy about the polar regions! The guides let you do your own thing but they’re there for you if you need help.

It’s pretty rare for someone to fall in. It happened once on our trip. Steve was pretty good-natured about it. “Well, we did a polar plunge south of the Antarctic Circle, so I might as well do one north of the Antarctic Circle!”

And if it happens to you, you do your wet exit (more on that below), the guides will get you out, and you can either choose to stay out and kayak or have the driver take you back to the boat.

Reasons to Kayak in Antarctica

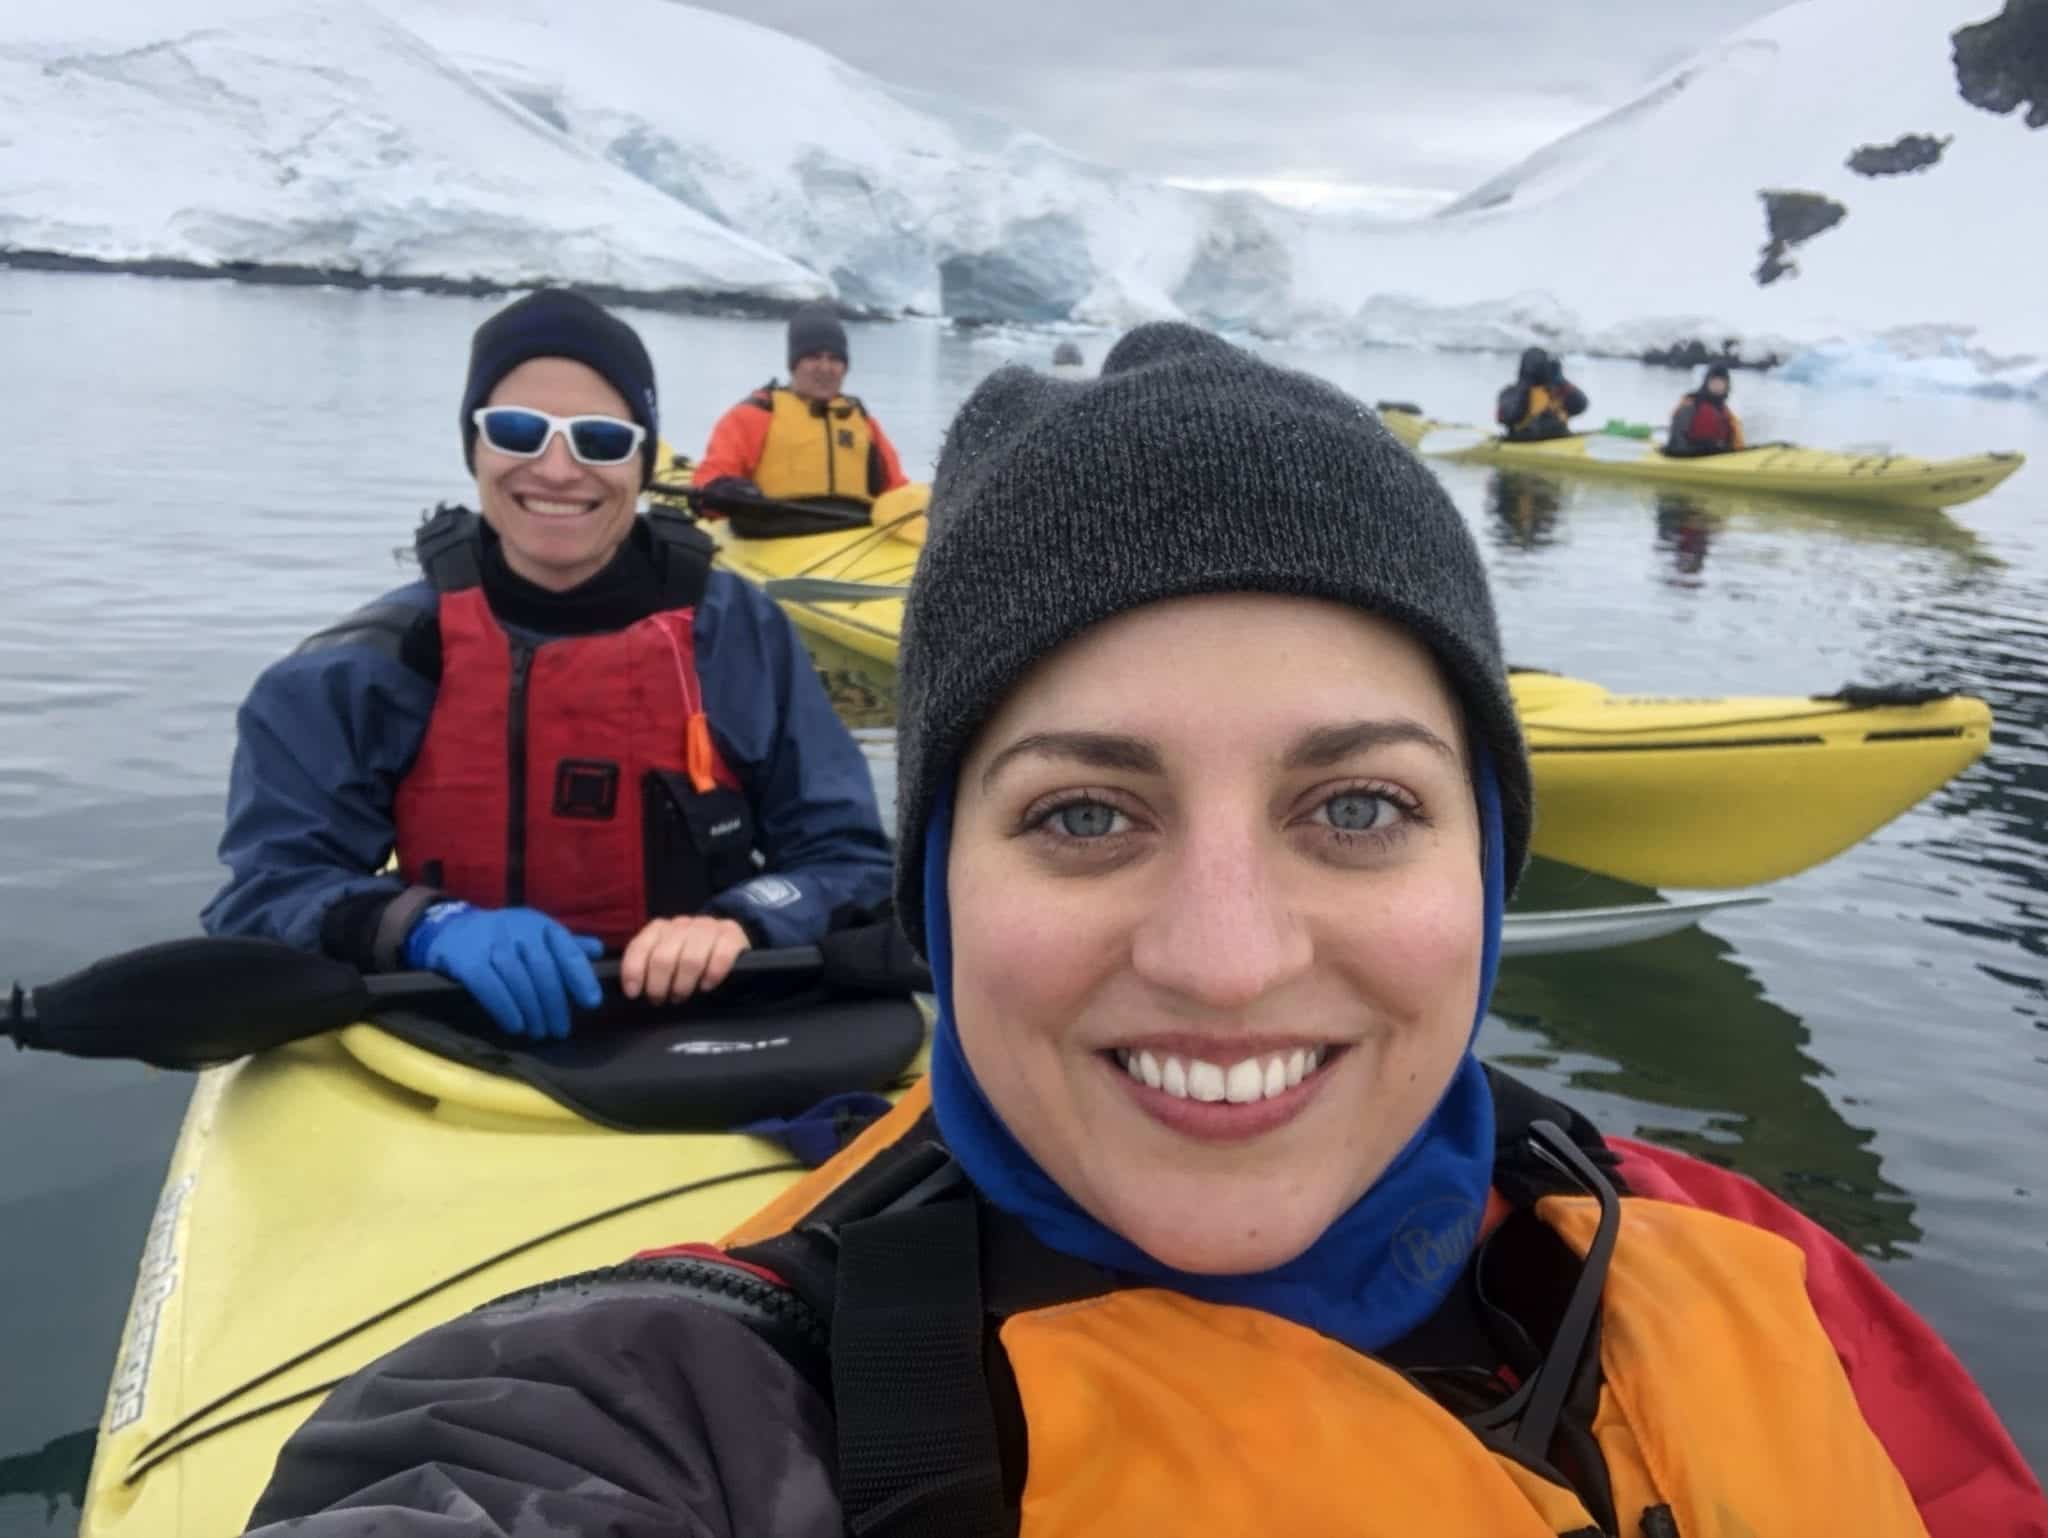
It’s a beautiful way to be close to nature. When you kayak, you can reach down and touch the water. You can grab a piece of ice from the water and suck on it, feeling the air bubbles pop in your mouth. You can watch penguins, seals, and whales glide through the water just inches from you.

It’s a great way to stay active. You’re going to be on an expedition for at least ten days — it’s easy to turn into a lazy slug. While there was a tiny fitness center on board the Ocean Diamond, it was extremely basic and I didn’t feel the urge to work out there. Also, the food on board is excellent and you’ll probably be eating a ton of it, and it’s good to have an option to work it off.

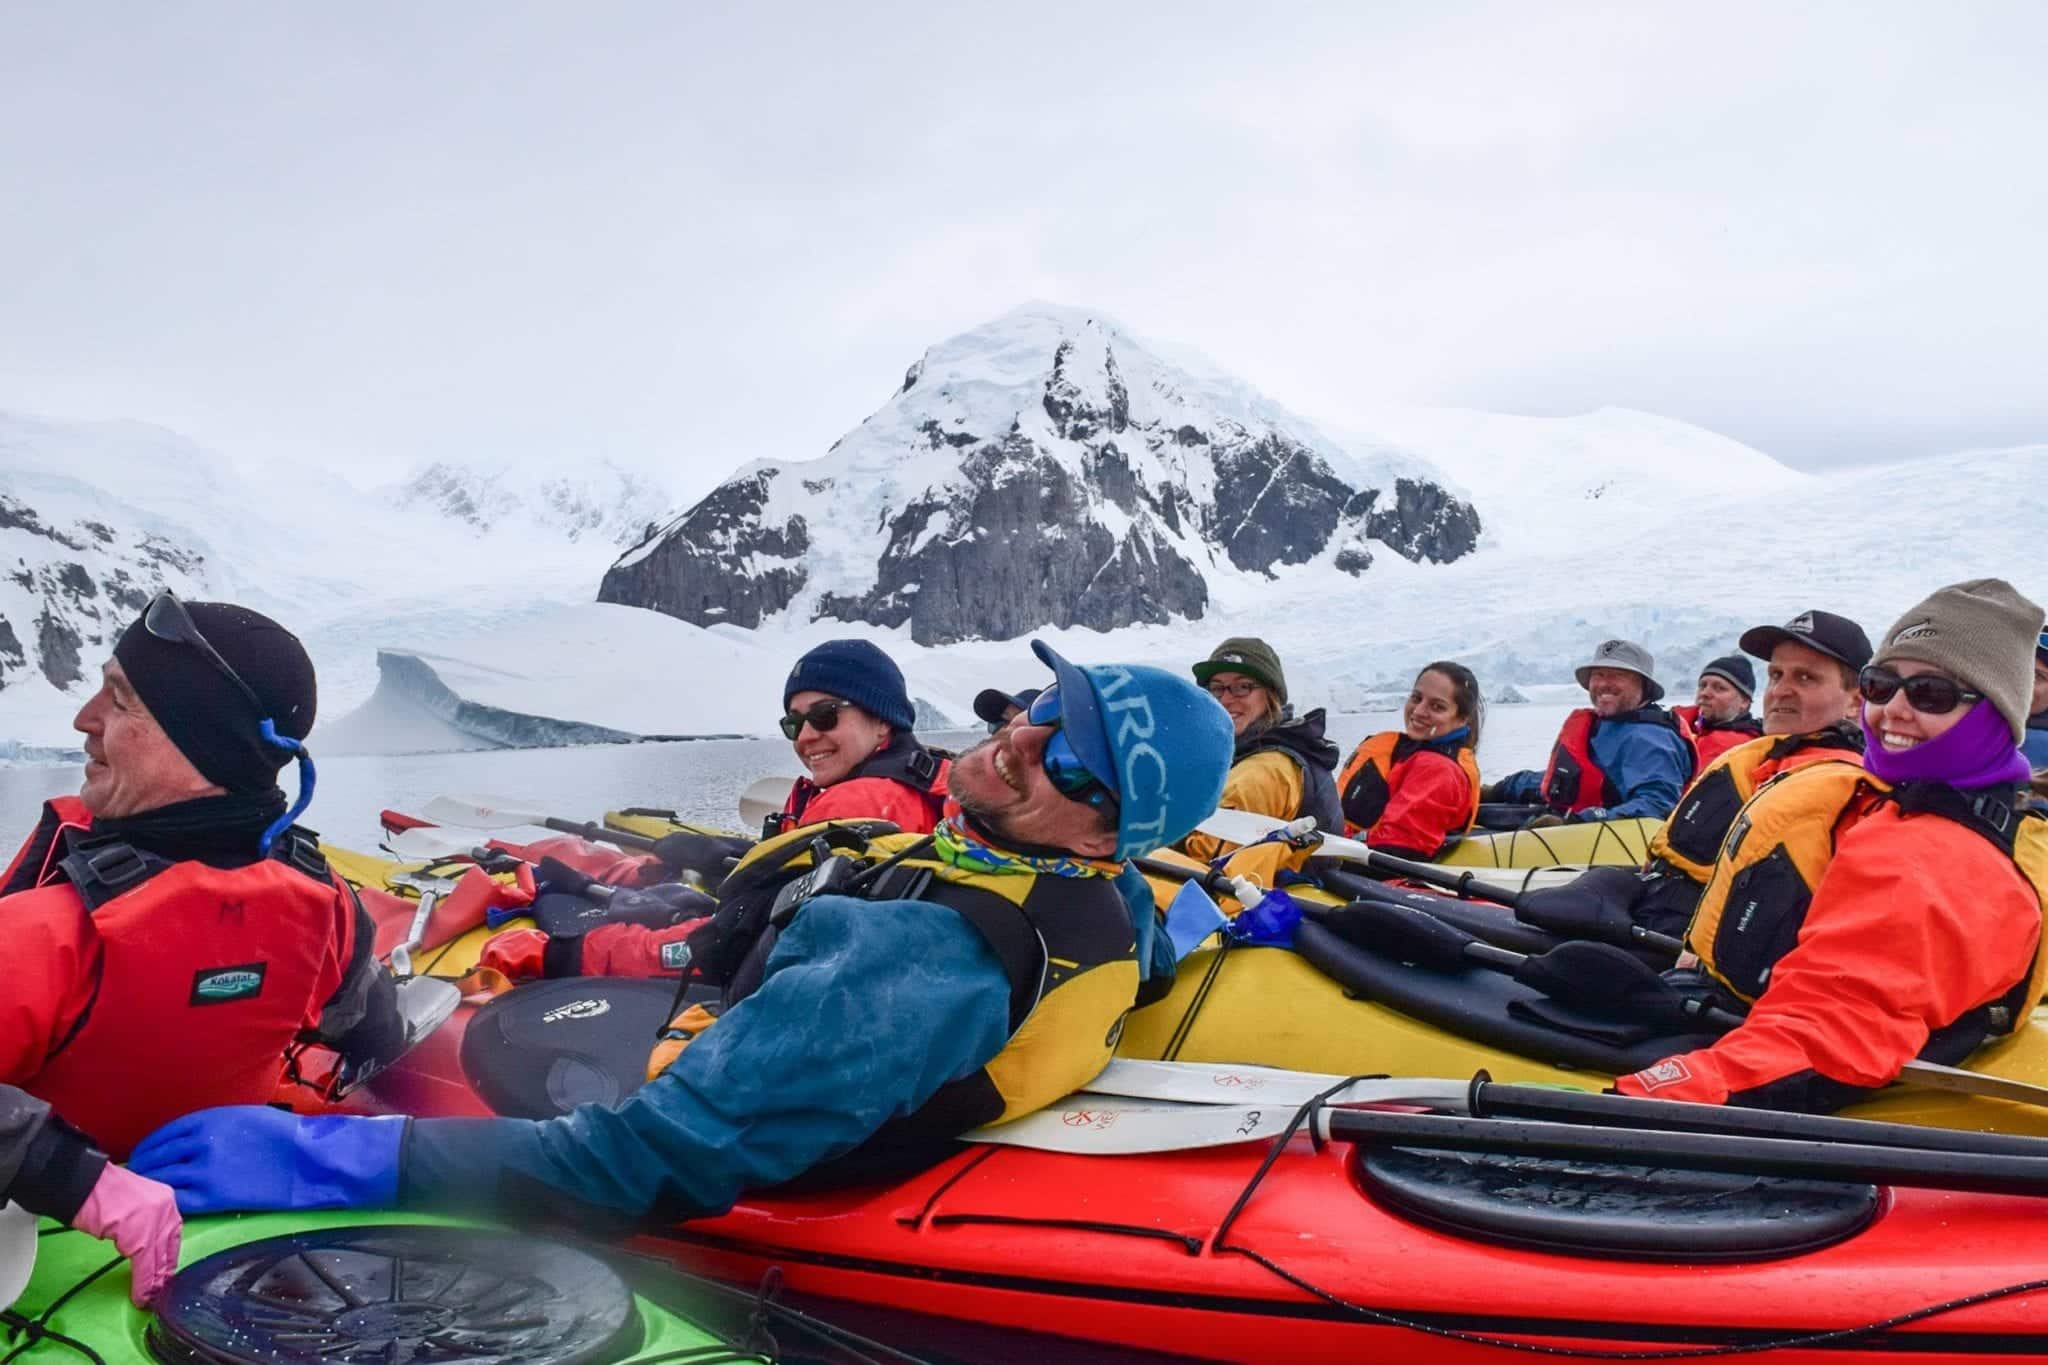
The camaraderie is amazing. The kayakers are a small group of 16 within the expedition of 200, and you really bond with each other. The other people on the ship don’t get that because different people end up in the zodiac each time.

Bragging rights. If you kayak in Antarctica, that’s a pretty badass thing to put on your travel resume.

You feel Antarctica more closely this way. Antarctica is such a moving destination. I threw my soul into writing about it but nothing will ever come close to describing the feeling accurately. When you’re in that environment, it’s so much nicer to be sitting quietly in the water, feeling the chilly droplets fly off the paddle and land on your face.

Reasons Not to Kayak in Antarctica

It really impedes your photography. I’m not going to lie — as a photographer, this is one of the worst things you can do for your work. It nearly killed me that I was missing out on so many photography opportunities.

Why is this? First off, stability. If you’re in a boat, you’re bobbing up and down and it’s hard to get a stable image, especially if you’re shooting from far away.

And secondly, kayaks aren’t designed to be used with fancy cameras. Every time I took my camera out of the dry bag, I felt like I was taking my life into my hands. I would barely shoot and then put it back in my bag, my heart thudding. And that’s when I had a few moments to put the paddle down in the first place.

See further below for tips on how to get the most out of your photography while kayaking.

You can’t kayak casually — you make a commitment for the whole trip. And that’s a big, long-term commitment. A lot of people aren’t up for that much physical activity each day; you may end up tired and regretting it.

You might not see as much quality wildlife. When you’re in the zodiac, your driver guns the motor whenever there’s an amazing wildlife sighting. Kayaking? That just doesn’t happen. You do see wildlife, but it’s more about being in the water and appreciating the nature around you.

You might feel isolated from the other guests. There really is a divide between the kayakers and everyone else. Everyone’s friendly and lovely, of course, but you may feel like you’re missing out.

Best of Both Worlds: Kayak for a Day

Starting in the 2018-2019 Antarctica season, Quark Expeditions will now offer a “paddling excursion,” a.k.a. “kayak for a day.” This is a perfect solution for someone who wants to try Antarctica kayaking but doesn’t want to commit to being a hardcore kayaker.

Michael told us that he was initially skeptical about the idea of inflatable kayaks, but once they tried them out, he was sold. They’re big, they’re extraordinarily difficult to tip over, and they’re made of the same durable rubber as the zodiacs. Perfect for beginners.

Best of all? It’s much cheaper. Currently a paddling excursion costs $225 rather than the $995 of kayaking on the whole Antarctica trip.

I’m really happy to hear of this new activity — it seems like it would be the perfect solution for lots of people.

Tips for Kayaking in Antarctica:

Protect your fingers and toes from the cold. This is perhaps my single most important tip: you will be ABSOLUTELY MISERABLE if you have cold fingers and toes.

For your hands, spend big money on the absolute best gloves or mittens you can find (these are good ones), and glove liners or running gloves underneath. Wear Hot Hands hand warmers in between your gloves or mittens and the liners. For your feet, wear sock liners, thick socks, and more Hot Hands hand warmers in between the liners and the socks.

Base layers are also extremely important. Many people swear by Icebreaker merino wool tops and leggings; I tried them but actually preferred the much cheaper Uniqlo base layer top and leggings.

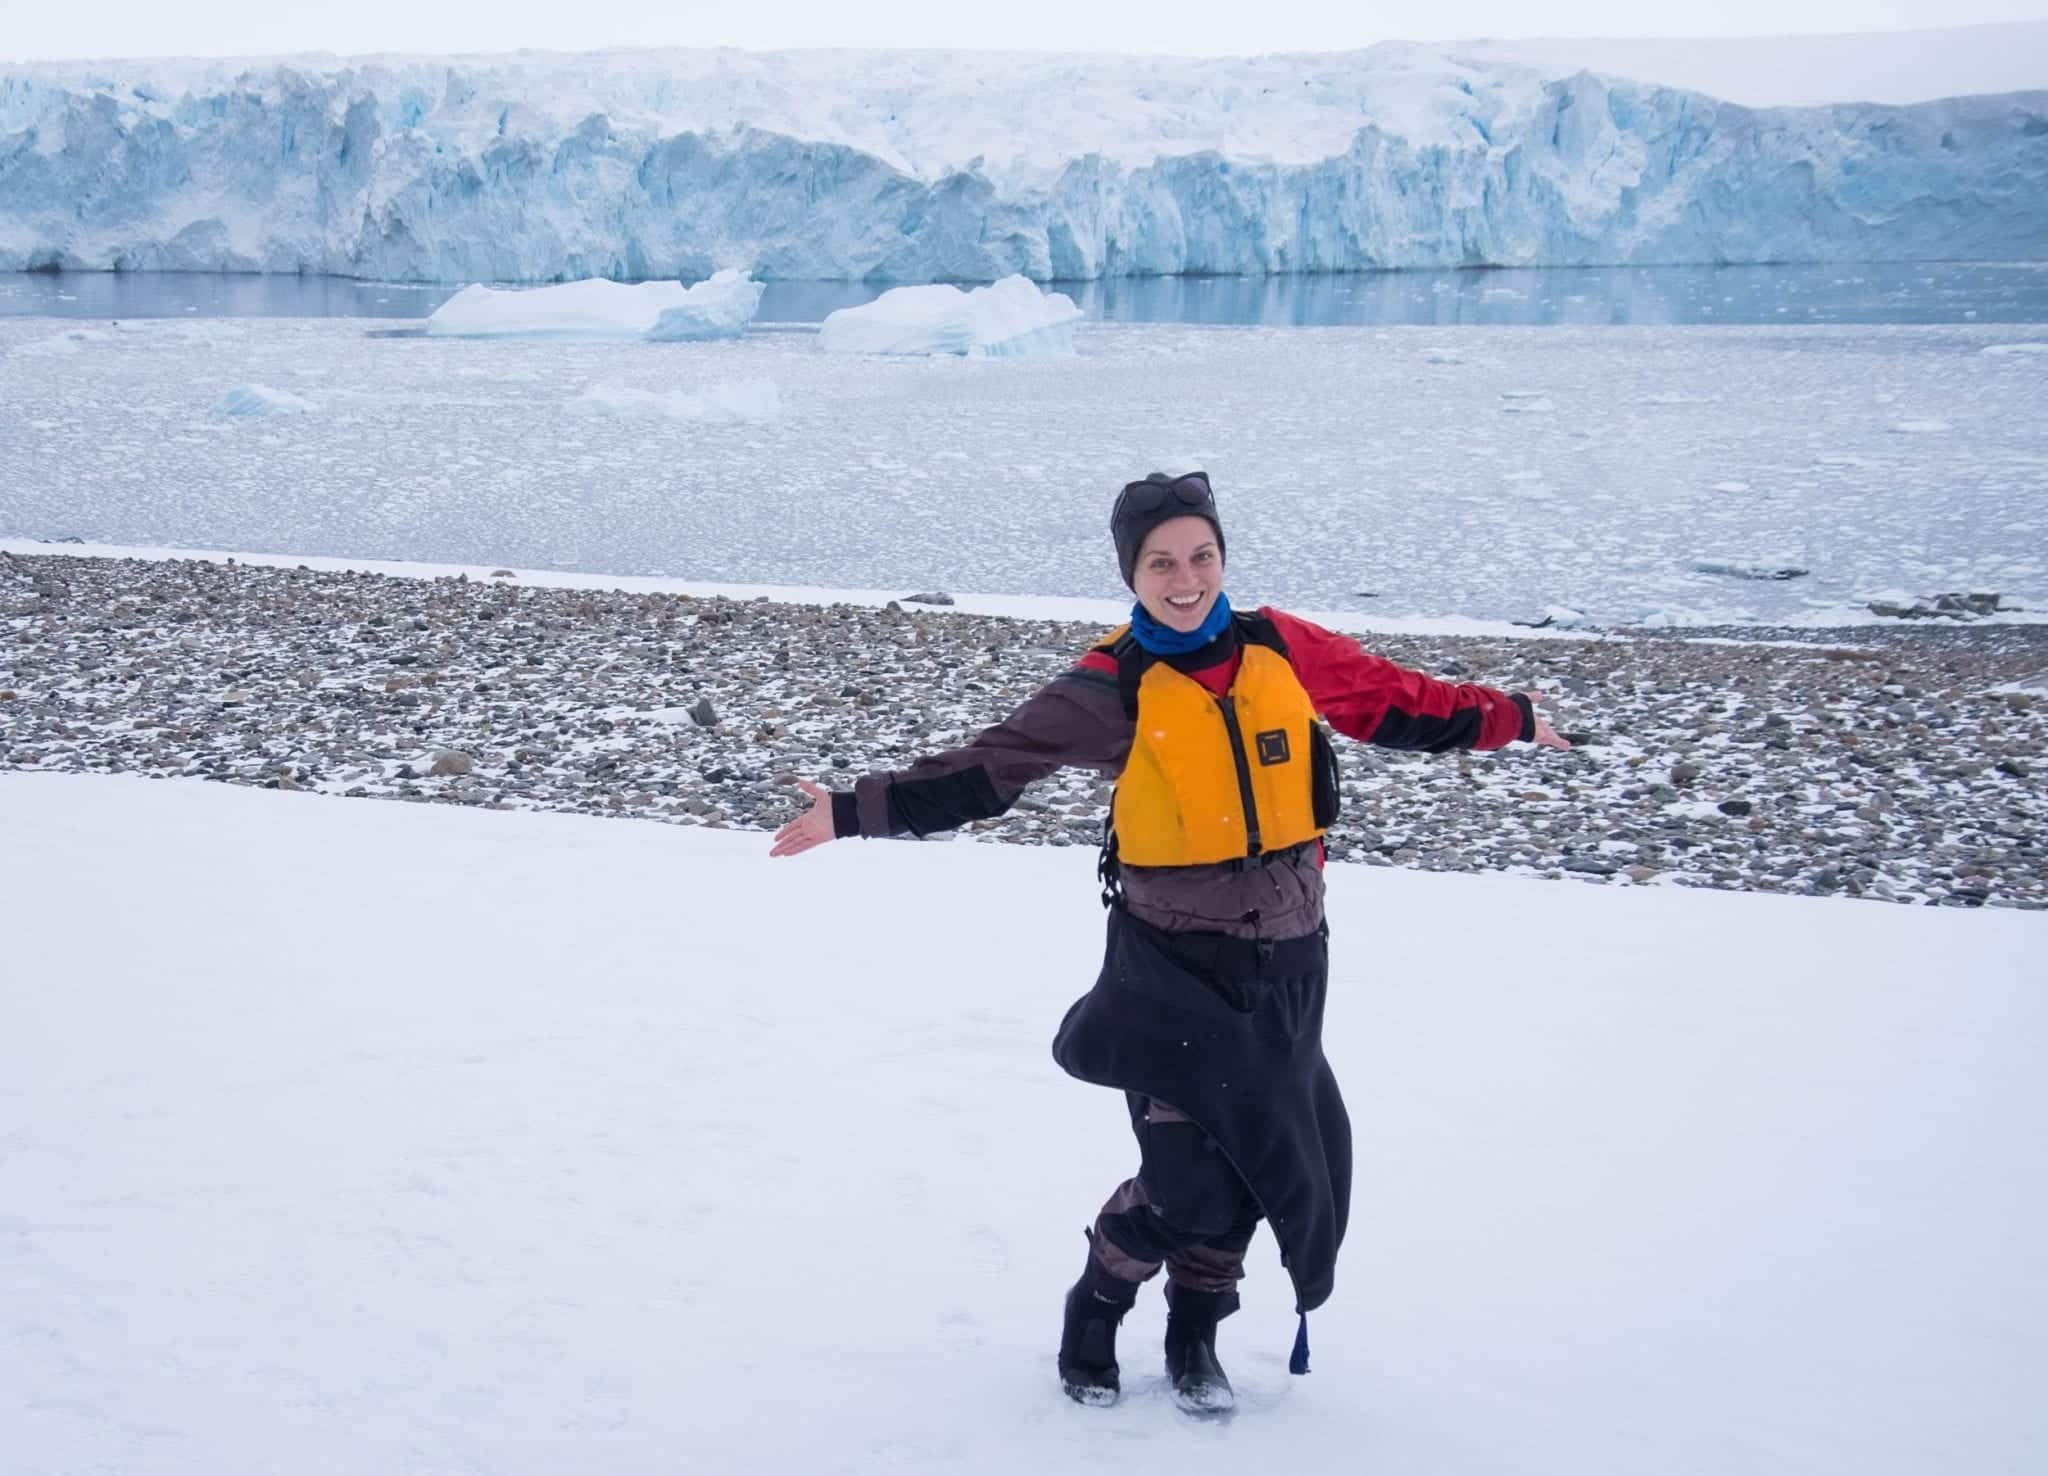
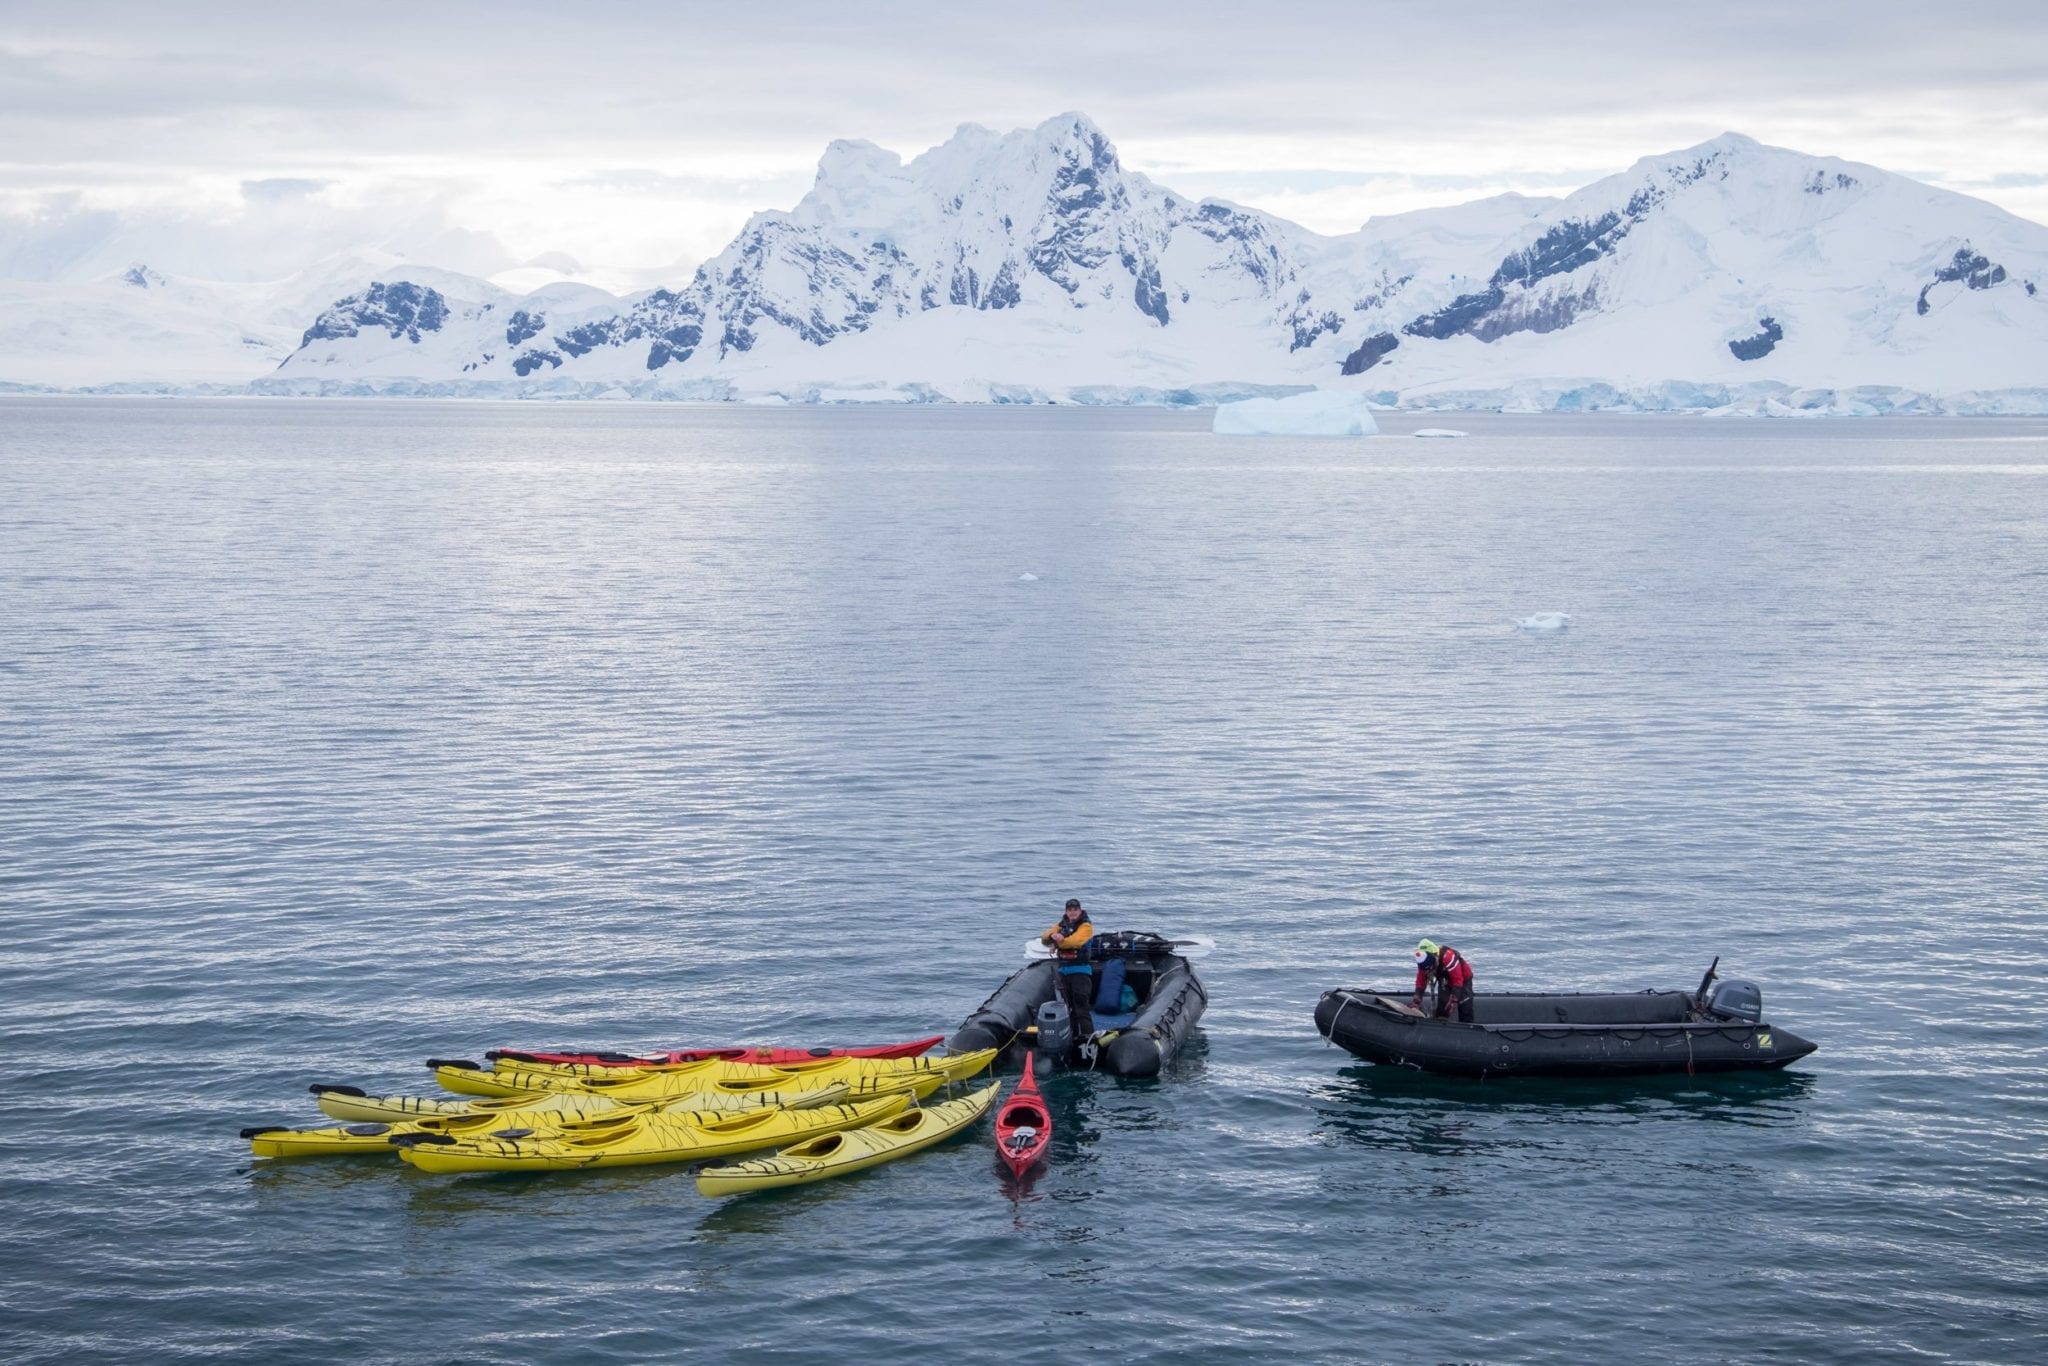
Quark provides all the vital kayaking gear: the drysuit, booties, kayaking skirt, life vest, drybags, and of course the kayaks and paddles themselves. And if you need better gear, you can buy from the shop on board.


READ MORE: Antarctica Packing List


Get yourself in reasonably good shape before you go. You don’t have to be a marathoner, but at least go for long walks on a regular basis and be able to climb a few flights of stairs without having to stop.

Take your boots on the zodiac for landings. You wear booties that you zip over your drysuit while kayaking, but they’re not fun for landings — your feet can get very cold. On days when you’re kayaking and doing a landing afterward, I recommend bringing your boots, leaving them in the zodiac while you kayak, and changing into them before you land. So much more comfortable.

Hydrate. Antarctica can be very dry and you’re physically exerting yourself. Quark provides a bag-like water bottle, but I didn’t like how floppy it was — I recommend bringing a reusable aluminum bottle with a cantilever to connect it to the ropes on your kayak.

Learn how to do a wet exit. This is a requirement in advance. Look into classes around your neck of the woods. You don’t necessarily have to commit to a course, though of course it will be helpful — you can always ask the instructor if he or she would be willing to teach you to do a wet exit independently.

Consider a GoPro. If you don’t want to knock yourself out trying to get top-quality photos, just throw a GoPro on yourself with a head strap or chest strap and set it to shoot continuously. That way you can kayak to your heart’s content without stopping to take photos.

Should Photographers Kayak in Antarctica?

Honestly, if you’re a photographer and you want to kayak, you’re going to be making sacrifices on both ends. It’s nearly impossible to do both well. You’ll be impeding both your kayaking experience and your photography experience.

That said, it can be done. I have some tips.

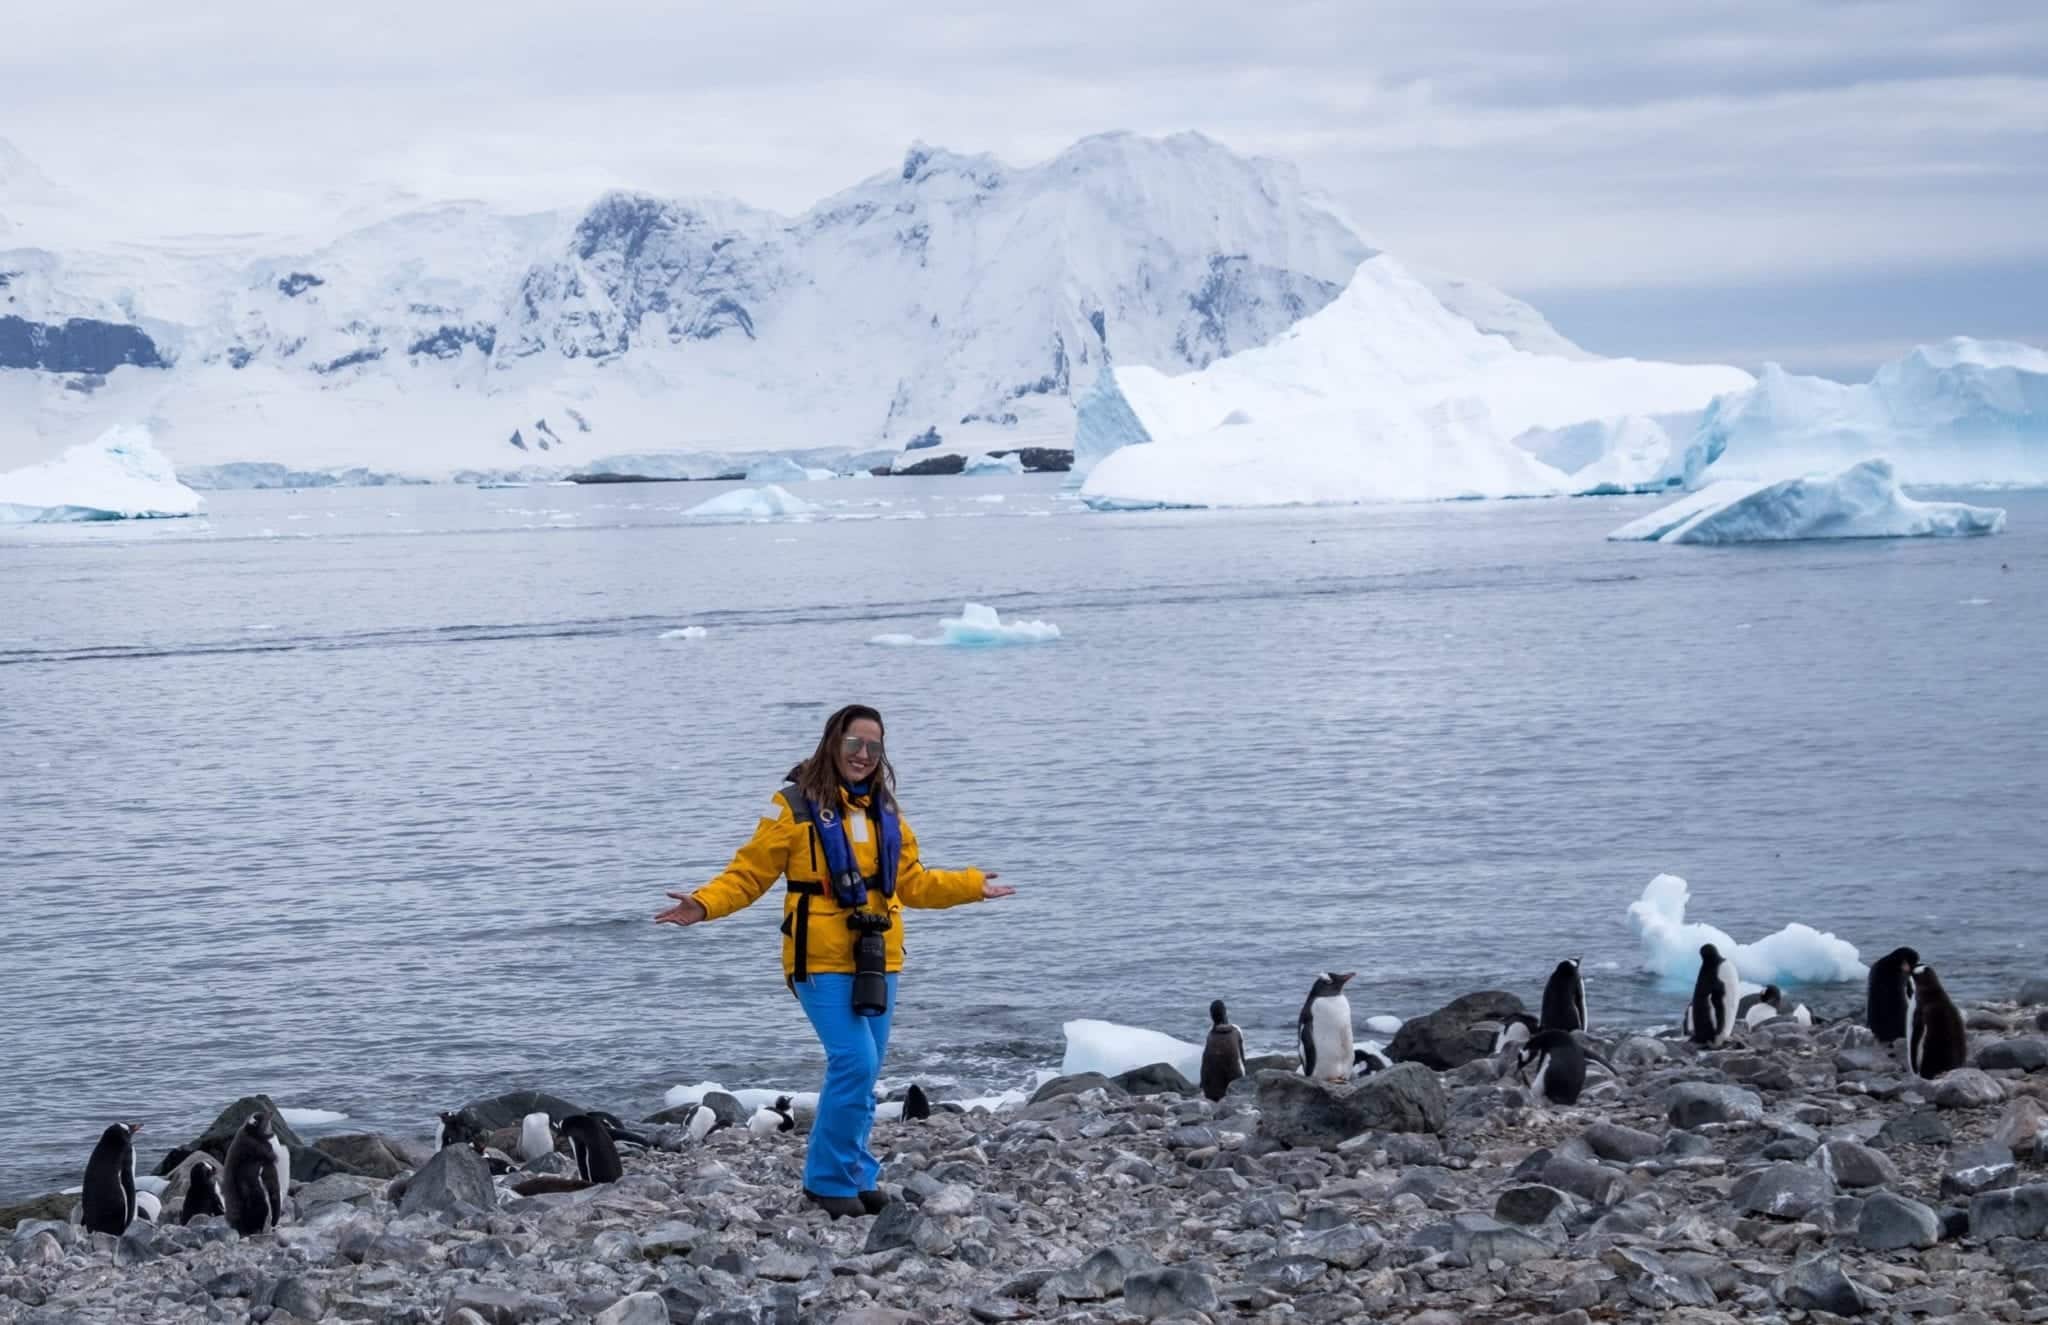
Talk to your guides about your photography priorities and considering sitting out kayaking on the best photography day. While Antartica itineraries change on a whim, as soon as we learned we’d be visiting Cuverville Island, the guides told us that this would be the absolute best day for hanging out with penguins.

I chose not to kayak that day, as did a few other kayakers, and it was absolutely the right decision. I spent this day getting all the penguin photos and me-with-penguins photos in my yellow Quark jacket and blue pants.

Keep this in mind if you want to get good photos of yourself in Antarctica. The drysuits are functional but they look so goofy in photos!

Plan to pair up and be in a double kayak. First off, you could take your DSLR or big camera with you and put it in a dry bag, but the guides urged people with big cameras to only use the double kayaks, as the weight could make the single kayaks prone to capsizing.

Luckily I got paired up with my friend Brian on the first day and we became great kayaking partners. He didn’t mind my photo-taking at all — or if he did, he didn’t tell me! Even so, I tried not to take advantage and kept my photography to a minimum.

Best case scenario is if you’re traveling with your partner, you share a kayak with your partner, and your partner does the lion’s share of the kayaking while you do all of the photography. And it’s optimal if the photographer is the lighter person and sits in the front of the kayak.

Would I kayak again, knowing that I was screwing myself out of photography opportunities? Yes, I would. For me, the kayaking experience was so incredible it made up for me not getting the photos I wanted.

My Favorite Kayaking Spots in Antarctica

Every kayak spot in Antarctica has something special to offer. But for me, there were three that stood out:

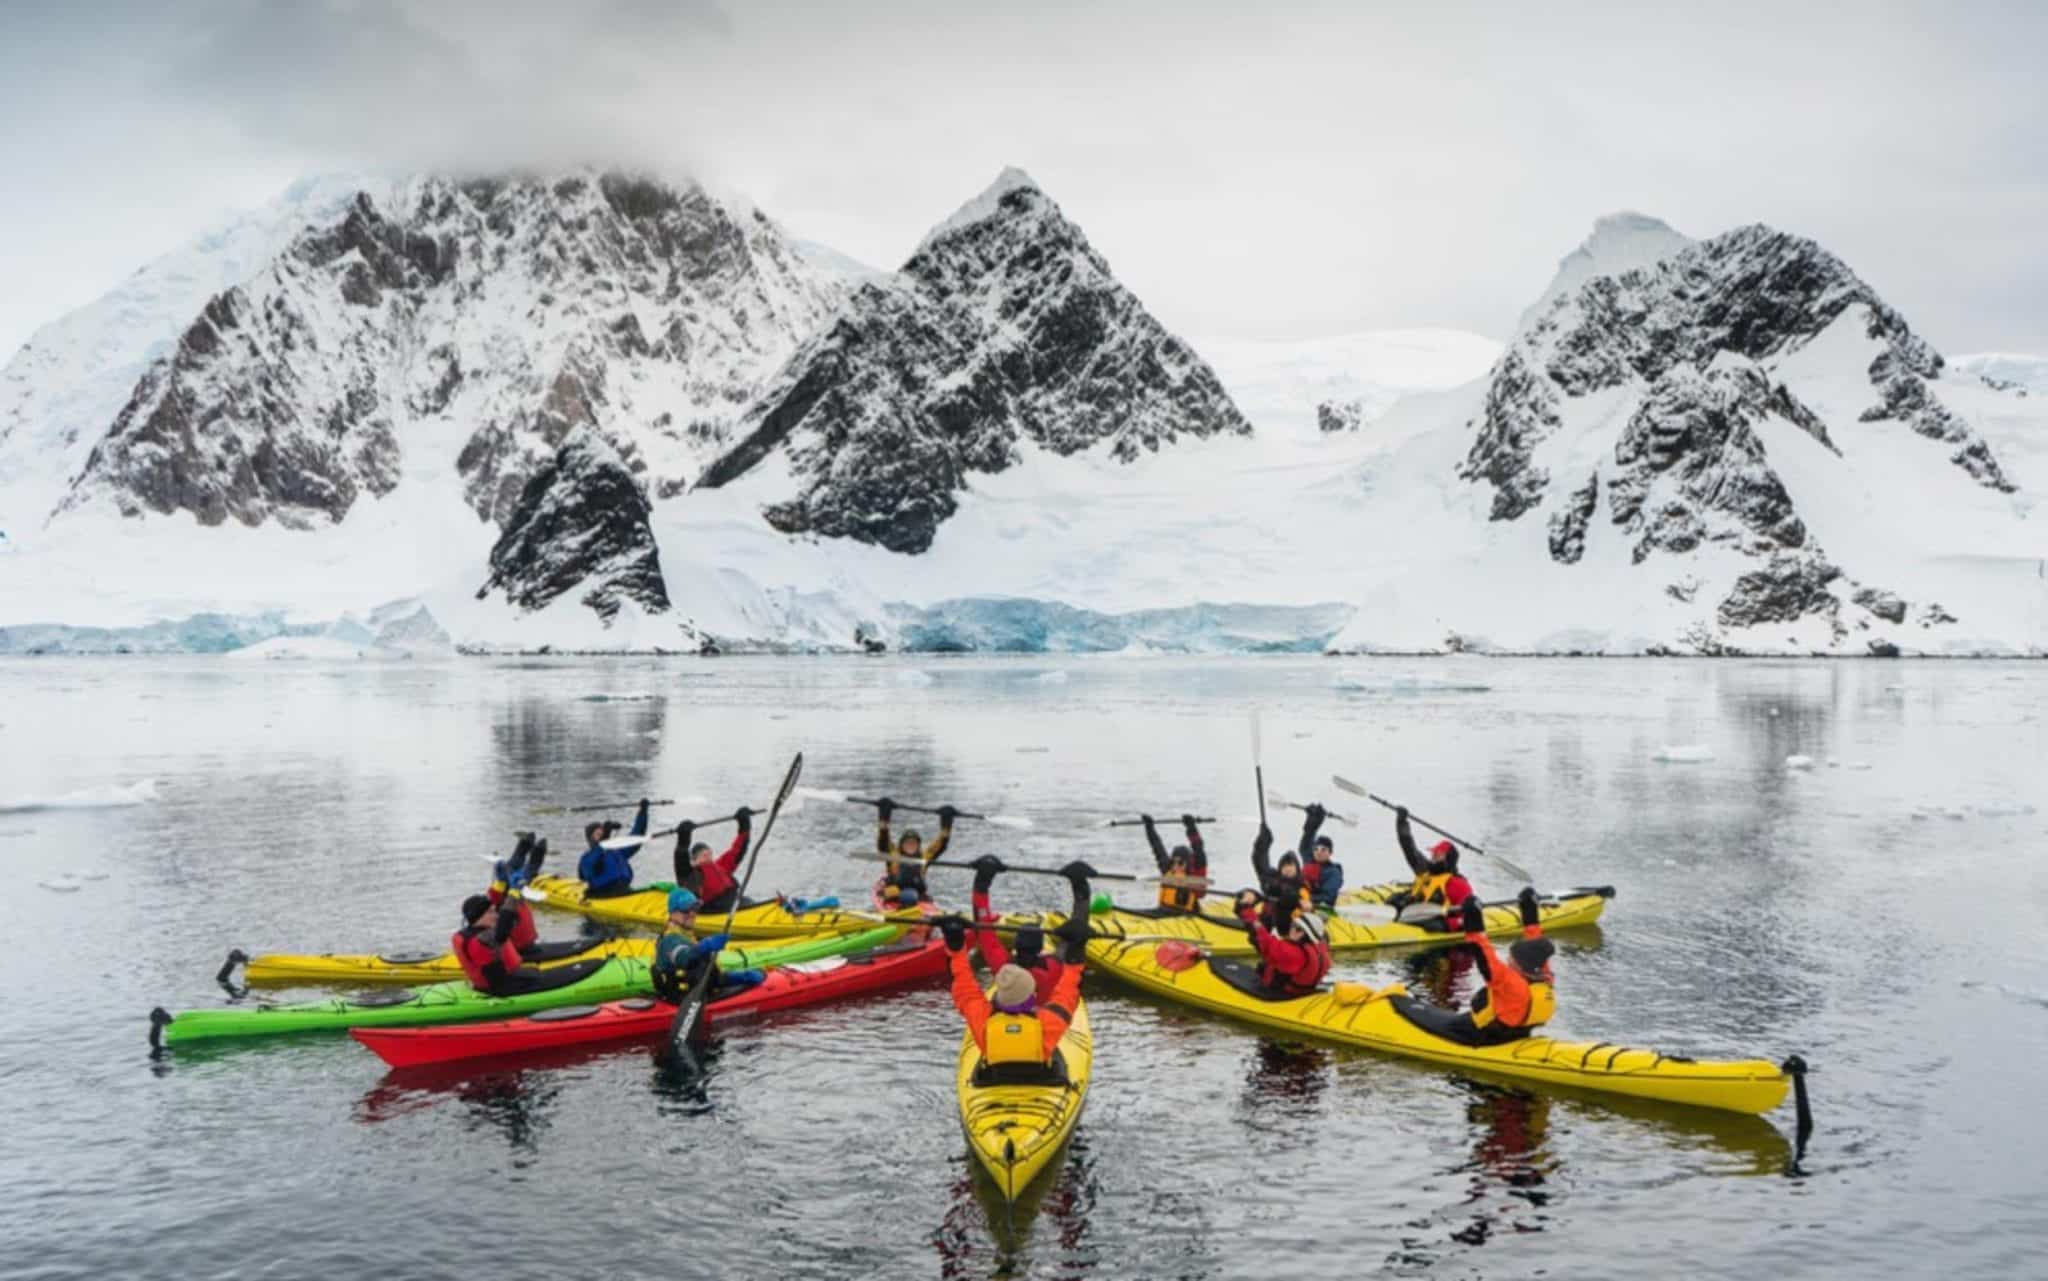
Port Charcot. If you’re on a trip that crosses the Antarctic Circle, you may stop here. Jean-Baptiste Charcot, my favorite Antarctic explorer, landed here with his crew and their pet pig Toby. Port Charcot has lots of brash ice to paddle through. We even had a snowball fight, flinging them with our paddles! I quickly snapped a photo of the fight above.

Paradise Harbour. It lives up to its name — the bay is protected and thus you have the smoothest, most pristine waters, surrounded by mountains on all sides. It was the perfect environment in which to do a primal scream! Paradise Harbour is also home to a cool old Argentine station.

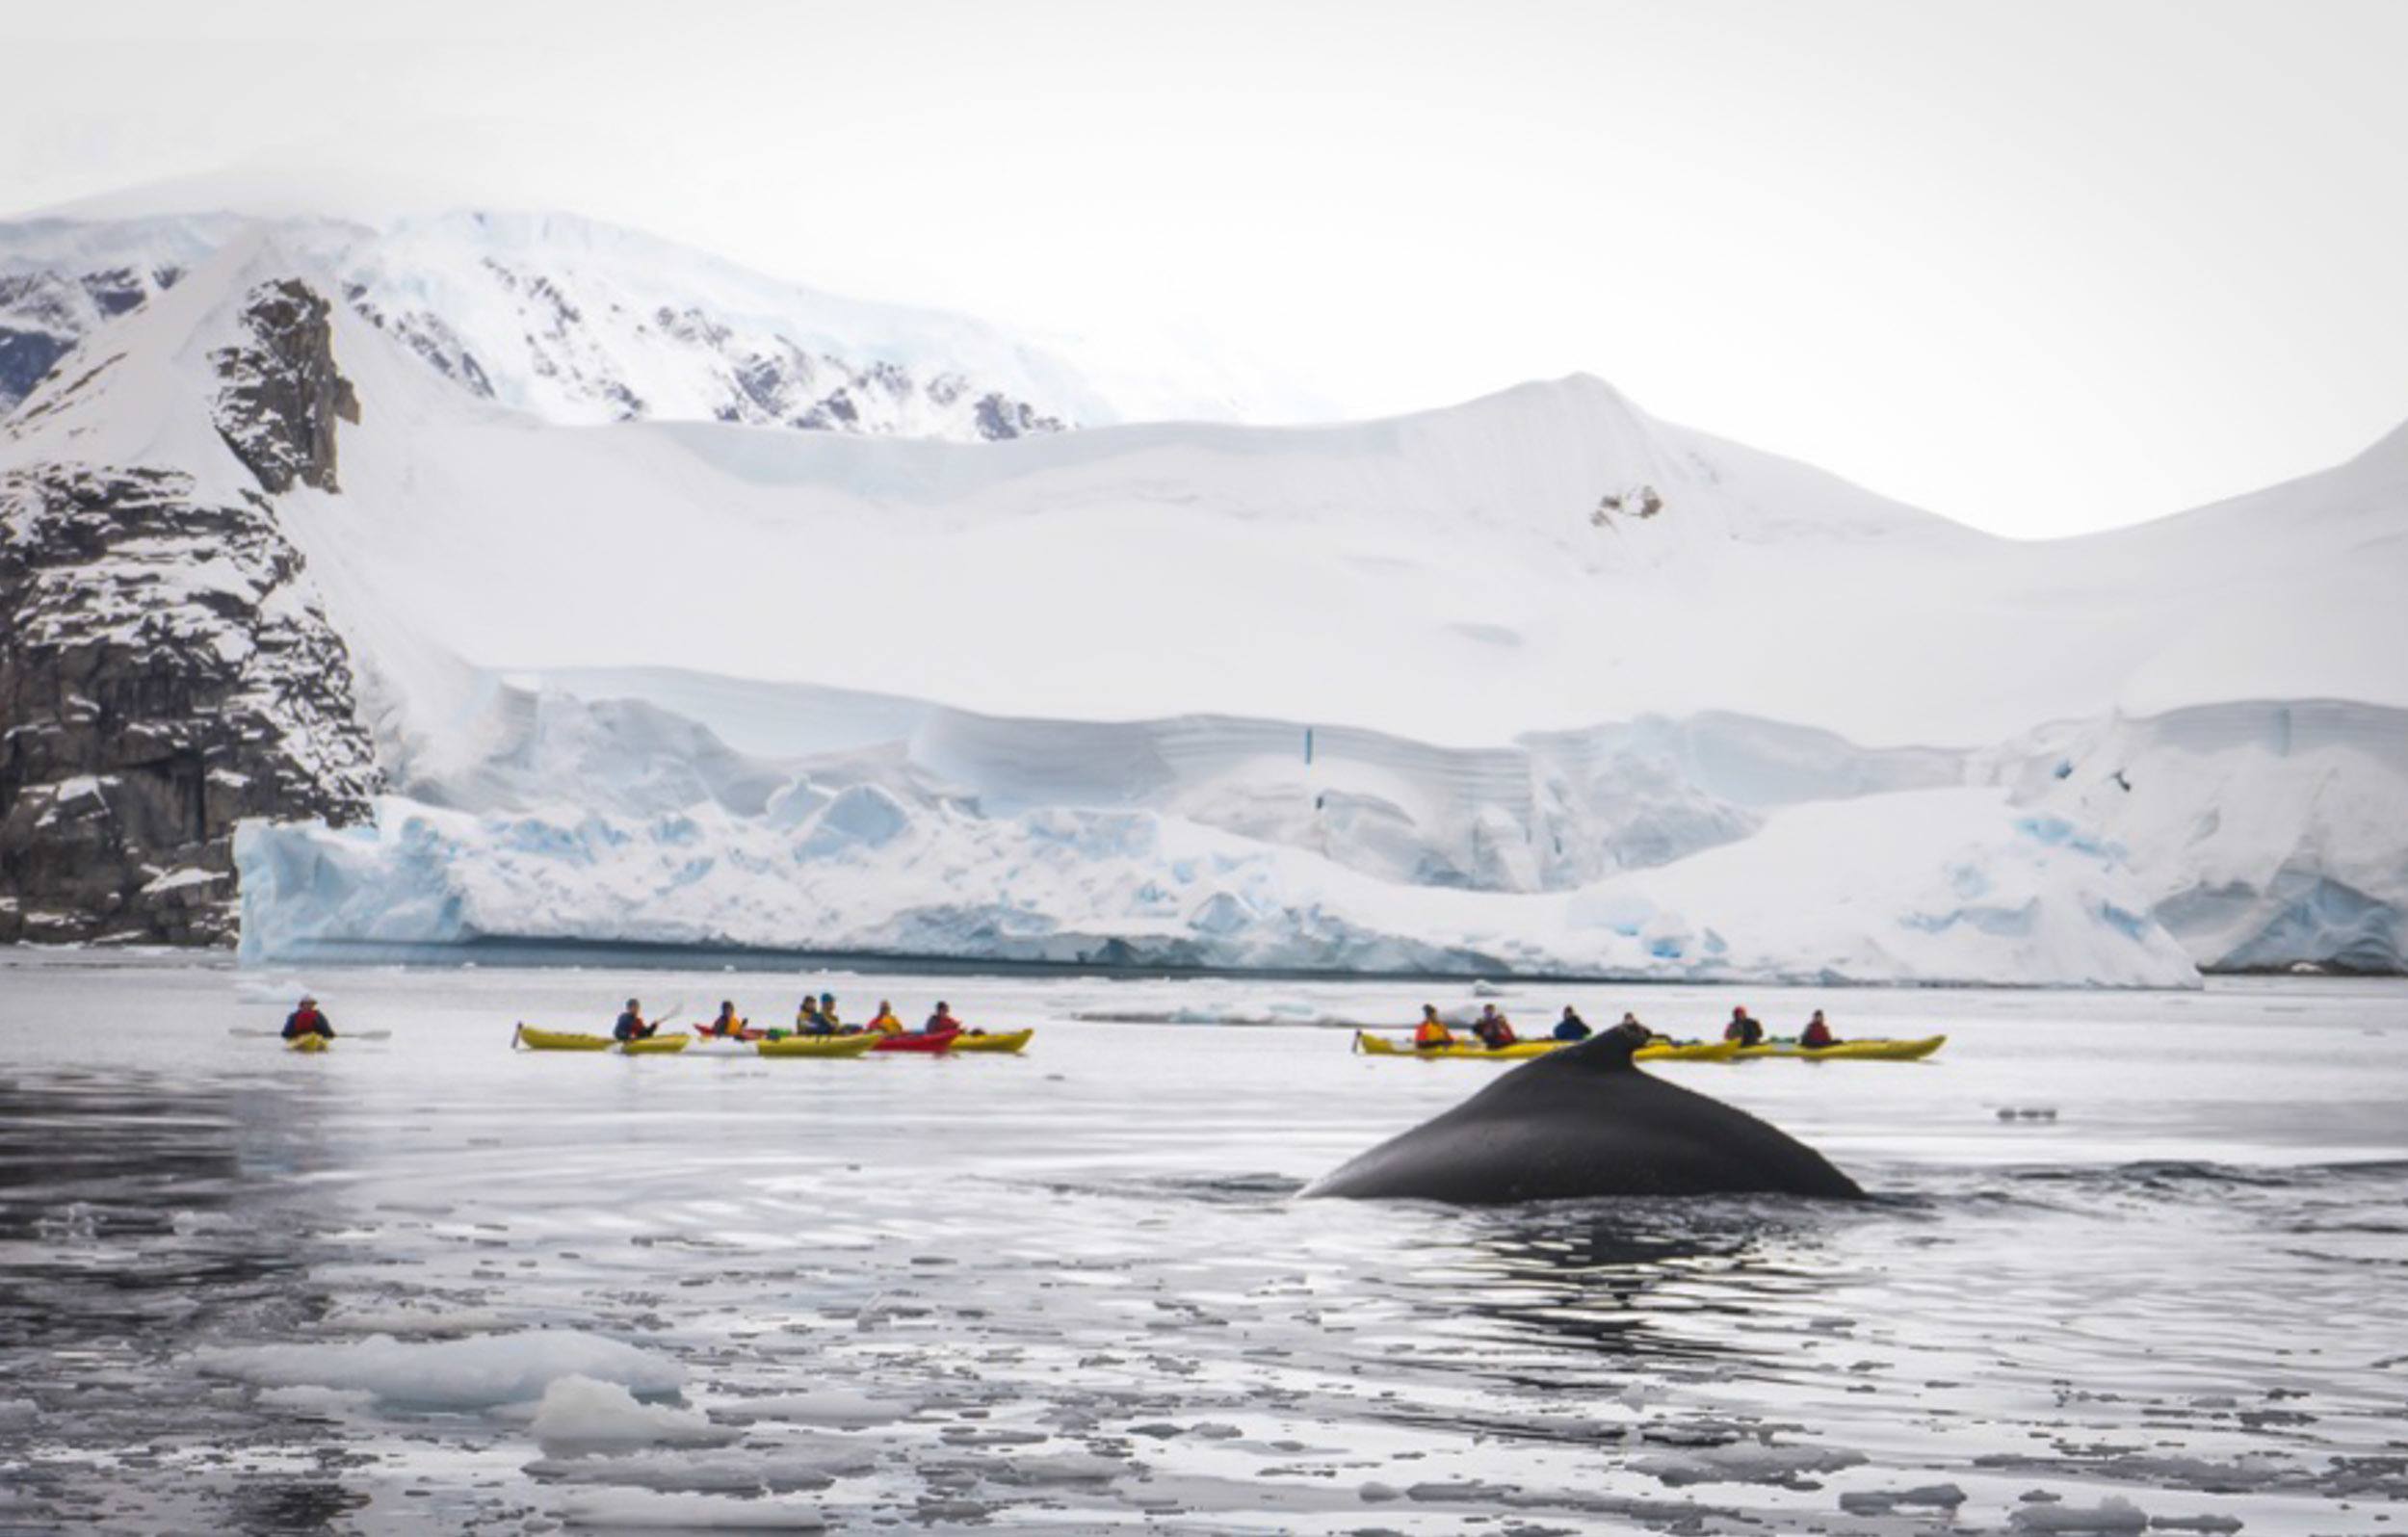
Image via Quark Expeditions

Wilhelmina Bay. More whales than you ever thought could exist in one place. At one point it seemed like every zodiac had their own pod to watch! That was where we had the craziest kayak moment of the trip — where a giant whale came up out of the water, nose first, right in front of us.

And my least favorite spot? Well, don’t expect to kayak on Deception Island. The conditions make it really tough to kayak there, and we had to sit it out. That said, it’s an interesting landing. I got charged by a sea lion.

I beg you: please don’t book kayaking in Antarctica unless you’re 100% committed to it.

Many of the passengers who book Antarctica kayaking don’t understand how much of a commitment they’re making. They don’t realize that they’ll be kayaking twice a day, physically exerting themselves, and missing out on landing time. (One Quark employee told me that this most often happens when people book through travel agents rather than directly with Quark.)

We had 200 passengers on our ship, the Ocean Diamond, and only 16 spots for kayakers. The kayaking spots went extremely quickly — they tend to sell out months in advance. And I can’t tell you how many people on board told me, “You’re kayaking? I’m jealous. I wanted to so badly but it was sold out.”

Another thing: if you’re traveling with your partner and one person really wants to kayak and the other doesn’t, you don’t both have to do it. You’ll make tons of friends and have plenty of time to spend with your partner when you’re on the ship. Let the limited kayaking spots go to people who really want them.

Kayaking in Antarctica isn’t for everyone. And that’s okay. No matter what you do in Antarctica, you’ll be experiencing one of the most remarkable destinations on the planet.


READ NEXT: A Typical Day on an Antarctica Expedition Cruise


Essential Info: I traveled to Antarctica on Quark ExpeditionsCrossing the Circle: Southern Expedition in March 2018. The 2019 voyage starts at $8,995. The kayaking supplement is $995, which includes kayaking throughout the voyage, but starting this summer in the Arctic Quark is offering one-day “paddling excursions” that are better suited for people with less experience who don’t want to kayak every day.

Quark often has sales — I recommend following them on Facebookand checking out their website. Additionally, some people can get deals by flying down to Ushuaia and jumping on a last-minute discounted trip — though this is risky! You never know what will be available. If you’re looking to kayak, book as early as possible, as kayaking slots are limited and sell out quickly.

See my Antarctica packing list for what to wear in Antarctica.

While Quark has Antarctica-specific evacuation coverage for emergencies, you need to have your own travel insurance as well. For my trip to Antarctica, I used World Nomads, which I highly recommend for both Antarctica and elsewhere.

This post is brought to you by Quark Expeditions, who hosted me in full on this trip and covered most of my expenses including the full cost of the expedition, kayaking supplement, two nights’ accommodation in Ushuaia, and round-trip airfare from New York. I paid for all incidentals, staff gratuities, gear excluding the Quark parka, and all expenses in Ushuaia excluding the hotel. All opinions, as always, are my own.

Would you kayak in Antarctica? Share away!

The post Kayaking in Antarctica: Everything You Need to Know appeared first on Adventurous Kate.


from Adventurous Kate https://www.adventurouskate.com/kayaking-antarctica/

Monday 24 September 2018

Hoya Pro1 Digital Circular Polarizing Filter Review

Hoya Pro1 Polarizing Filter

This is a review of the Hoya Pro1 Digital Circular Polarizing Filter in both 72mm and 77mm filter thread sizes. Polarizing filters are designed to reduce glare and reflections of light while at the same time greatly enhancing the natural colors and saturation of an image. This filter is produced by Hoya which is one of the most respected producers of photographic filters, ocular lenses, and optical components in Japan.


from Photography Life https://photographylife.com/reviews/hoya-pro1-digital-circular-polarizing-filter#utm_source=rss&utm_medium=rss&utm_campaign=hoya-pro1-digital-circular-polarizing-filter

Friday 21 September 2018

What is EXIF Data?

ACDSee EXIF Data

When viewing images on the Internet, you might have noticed that some websites provide valuable information related to those images, such as their exposure settings, camera brand, etc. This information known as “EXIF Data” can be an important source of knowledge in figuring out how photographers capture images and what tools they use in the process. In this article, we will take a look at what EXIF data is and how you can extract it from images.


from Photography Life https://photographylife.com/what-is-exif-data#utm_source=rss&utm_medium=rss&utm_campaign=what-is-exif-data

Thursday 20 September 2018

Recommended Fuji X100F Settings

Front of Fuji X100F Camera

The Fuji X100F is the fourth in Fuji’s line of X100 cameras – the X100, X100S, X100T, and X100F. Although it has a refined design and fairly intuitive menu, the camera’s large number of options and controls can make it overwhelming for new buyers. Hopefully, this guide will help clear up some confusion and explain how to use the Fuji X100F, including our recommended settings for each option in the menu.


from Photography Life https://photographylife.com/recommended-fuji-x100f-settings#utm_source=rss&utm_medium=rss&utm_campaign=recommended-fuji-x100f-settings

Wednesday 19 September 2018

Peak Design 45L Travel Backpack Review

Peak Design 45L Travel Backpack

Carrying the right amount of camera equipment in a comfortable, accessible bag is an eternal problem for photographers, or at least for me. At this point, I’ve settled on a system of a technical hiking backpack with a camera insert for my longer landscape photography trips, but I haven’t yet found the perfect bag for more moderate travels. Enter the Peak Design 45L Travel backpack, advertised as Peak Design’s top travel bag. Does it fit the bill?


from Photography Life https://photographylife.com/reviews/peak-design-45l-travel-backpack#utm_source=rss&utm_medium=rss&utm_campaign=peak-design-45l-travel-backpack

Tuesday 18 September 2018

Lens Mounts Explained

Bayonet Mount Terminology

With Nikon and Canon having recently launched brand new mirrorless system mounts and talking about their benefits, there seems to be quite a bit of confusion among photographers in regards to camera lens mounts. This is especially true for things like “throat size” and “inner diameter”, where different measurements are used to wrongly quantify a mount’s potential. Unfortunately, there is a lot of misinformation out there regarding mounts and their exact sizes, which is why I decided to write a detailed article talking about different mounts, their differences and take more precise measurements for different systems to present accurate information.


from Photography Life https://photographylife.com/what-is-lens-mount#utm_source=rss&utm_medium=rss&utm_campaign=what-is-lens-mount

Where to Stay in Tokyo — Best Neighborhoods and Accommodation

Sunday 16 September 2018

The Most Stubborn Myths in Landscape Photography

Photo Composed without Rule of Thirds

Chances are good that you’ve run across plenty of misinformation while practicing photography, landscape or otherwise. Some myths, though, stand the test of time, outlasting years of diligent debunking. Below are four of the most common myths and misconceptions you’ll find in the field of landscape photography, including some which are prevalent even among advanced photographers.


from Photography Life https://photographylife.com/landscapes/most-stubborn-myths-in-landscape-photography#utm_source=rss&utm_medium=rss&utm_campaign=most-stubborn-myths-in-landscape-photography

The Cats of Morocco

Chefchaouen #9

When doing travel photography in a particular location, I find it intriguing to document the lives of all of its inhabitants, not just people. As in the case of a number of countries (particularly in the Middle East), Morocco has a rather large population of stray cats and dogs that roam streets in pursuit of finding food and comfort among its people. Having written an article on What to Photograph in Morocco before, I wanted to add to the series with photographs of our feline friends. I found it interesting that despite the poverty and poor living conditions of the country, many Moroccans did their best to provide food and shelter for stray cats and dogs.


from Photography Life https://photographylife.com/the-cats-of-morocco#utm_source=rss&utm_medium=rss&utm_campaign=the-cats-of-morocco

Friday 14 September 2018

Sony FE 2x Teleconverter Review

Sony 2x Teleconverter

Released in 2016 alongside the Sony FE 70-200mm f/2.8 GM OSS and Sony FE 1.4x Teleconverter, the Sony FE 2x Teleconverter is an essential addition to Sony’s full-frame E-mount lineup. Given the relative lack of dedicated telephoto options available to the mount, the Sony FE 2x Teleconverter dramatically enhances the versatility of the lenses it is compatible with: the Sony FE 70-200mm f/2.8 GM OSS, the Sony FE 100-400mm f/4.5-5.6 GM OSS and the recently released Sony 400mm f/2.8 GM OSS. The teleconverter maintains full communication between the lens and the E-mount mirrorless camera body it’s mounted on, which ensures the proper function of the camera’s exposure metering, autofocus, and image stabilization. The 8 element / 5 group optical design includes one Aspherical Element to minimize chromatic aberration while maximizing resolution. Additionally, Sony claims the lens is dustproof and moisture resistant, which means it should continue working well when used in inclement weather conditions. However, the dramatic teleconverter effect comes with some distinct penalties, including a loss of 2 stops of brightness compared to your lens’s usual maximum aperture, along with a reduction in overall image quality. While all 2x teleconverters degrade the quality of an image, some are better made than others, with the high performing Canon’s EF 2x III Teleconverter coming to mind. I was keen to see if the Sony FE 2x could perform at the same high level and especially intrigued by the prospect of paring it with the FE 100-400mm f/4.5-5.6 GM lens and Sony Alpha 9 camera body.


from Photography Life https://photographylife.com/reviews/sony-fe-2x-teleconverter#utm_source=rss&utm_medium=rss&utm_campaign=sony-fe-2x-teleconverter

Thursday 13 September 2018

BIG UPDATE: GET ALL OUR BOOKS ON KINDLE NOW!

a man planning with his kindle
Posted: 9/13/2018 | September 13th, 2018

Today is a big day over here! While we’ve been creating PDF guidebooks to destinations around the world for years, we’ve lacked the one thing people really want these days: Kindle editions.

For years, you’ve asked me “Matt, can you make a kindle version of your books? That’s how I read these days.”

Well, your wish is my command!

Making Kindle guidebooks isn’t as easy as you would think because of all the maps and images we have but, after we updated the content in all our books in July, we set off trying to format them so they look beautiful on Kindle!

And now they do!

And, to celebrate this, for the next 72 hours all our books – PDF or Kindle – are on sale for only $5 USD.

These guidebooks are meant for travelers looking to get off the beaten path, save money, and have more interesting and local travel experience.

In short, someone like you.

These guides give you the straight to the point information you need to plan your trip. They feature all my money saving tips, suggested itineraries, favorite restaurants, bars, and accommodation as well as maps, practicalities, language sections, suggested walking routes, budget tips, and much more.

They give you all the information you need to save you time in your planning so you can spend less and enjoy your trip more.

Below is a list of all our destination guidebooks. Get one today for only $5 USD (and, if you purchase a book as a PDF, you get the second one for an additional 50% off too):

Additionally, we added two non-guidebooks to kindle:

How to Teach English Overseas – This new edition of our flagship guide to teaching English overseas features expanded country guides, new tricks on finding work, and 24 new interviews with teachers sharing their experience overseas! Get as PDF | Get on Kindle

Conquering Mountains: A Guide to Solo Female Travel – We updated Kristin’s guide to solo female travel earlier this year with 50 pages of new content, including new interviews, tips, tricks, and advice! Get as PDF | Get on Kindle

***

So pick up a copy and get everything you need to travel cheaper, better, and smarter.

If you have any questions, leave a comment below!

– Matt

P.S. – If you’ve purchased one of our guides since our update in July, I’d love you to leave a review on Amazon. Amazon downgrades books without reviews so we need your help to increase their visibility! Or, if you buy one now, please consider leaving a review in the future! 🙂

The post BIG UPDATE: GET ALL OUR BOOKS ON KINDLE NOW! appeared first on Nomadic Matt's Travel Site.


from Nomadic Matt's Travel Site https://www.nomadicmatt.com/travel-blogs/kindle-guide-announcement/

Wednesday 12 September 2018

Finding Love in Tbilisi in 72 Hours

A view overlooking Tbilisi
Post: 9/12/18 | September 12th, 2018

“When did you first hear of Georgia?” Mako asked after a long drag from her cigarette. She was a Georgian tour guide helping my friend Dave, who was also in the country. We were drinking wine outside Fabrika, an old Soviet fabric factory now converted into a multi-use center with bars, restaurants, co-working spaces, shops, artist studios, and a hostel.

“Hmm…” I replied. “That’s a good question. On some level, I’ve known about Georgia for a long time, because I know my geography. But as a place that was more than just a name on a map, I would have to say it’s only been in the last few years — when I started thinking of more unique and off-the-beaten-path places to visit — that I really thought ‘Hmm, Georgia? That could be interesting!’”

When I escaped London for a trip to Azerbaijan, I added nearby Georgia to the itinerary too. Friends had spoken highly of the country, and I wanted to see its mountain towns, beaches, and historic cities, and to taste the food and wine I had heard so much about. I wanted to learn its history, peek behind the veil, and see what this place was really about.

My original plan was to spend about a little over a week there, hitting some of the highlights and whetting my appetite for another trip (to me, a week in a country is just never enough time).

But, after a change in plans that required me to head home earlier than expected, I only had enough time to see the capital of Tbilisi.

From the moment I got off the bus from Azerbaijan, I was in love. Yes, that’s a cliché. But sometimes a destination just hits you in the face the right way, and everything just clicks. The energy — the essence — of where you are just flows through your body, and you feel like you’ve come home to a place you didn’t even realize was your home.

A view overlooking Tbilisi

As if a part of you had always been there, and you were simply returning to make yourself whole again.

Over the next few days, that feeling only increased as I actually began exploring the city.

Before arriving, I had pictured a grimy old city with crumbling, ugly Soviet-era buildings and graffiti. In my mind, it was still frozen in the immediate fall of the Soviet empire.

Instead, I found a beautifully preserved Old Town with cobblestone streets and stunning buildings with ornate balconies; lots of spacious parks, wide streets, eclectic artist spaces, and funky cafés; and modern and sometimes futuristic architecture. It was a lot more like Europe than I had anticipated.

A pedestrian bridge in Tbilisi

I spent my first day wandering the old town. I gazed at the Metekhi Church with its giant equestrian statue of King Vakhtang Gorgasali overlooking the Mtkvari River. This is where the king built his palace when he made Tbilisi his capital in the fifth century. (Legend has it that he founded Tbilisi while hunting and discovered the sulfur baths, but a city existed here long before he came along! He just revived it.) The simple, domed-shaped brick building is popular with locals, as legend says the fifth-century martyr St. Shushanik was buried here.

From there I walked across the bridge, toward the famous sulfur baths, a collection of brick-domed buildings containing subterranean bathhouses. These baths helped make Tbilisi famous, as the waters are claimed to help soothe symptoms in chronically ill patients, like arthritic pain or poor blood circulation. There used to be 63 of these baths in Tbilisi, but there are only a handful left now. They are still wildly popular, though I don’t see the charm in smelling like rotten eggs. But hey, I’m a weirdo, so what do I know?

Buildings in Tbilisi

These bathhouses straddle a small river that feeds them and then meanders through a canyon that you can follow to the amazing Dzveli Tbilisi sulfur waterfall. There, the sound of the city melts away, and you feel more like you’re in a national park than a national capital.

I wandered some more and located the entrance to Tbilisi’s gigantic National Botanical Garden, where I found a zip line, tons more waterfalls and rivers to swim in (which, given the high heat during my visit, were being well utilized by locals), hiking paths, and flowers and shrubbery. Amidst this peace, I often had to remind myself that I was in a chaotic major city and not some little quiet mountain town.

Hiking in Tbilisi

From there it was up to the Narikala Fortress, which dominates the skyline. Dating back to the fourth century, it was once a Persian citadel. Most of the walls were built in the eighth century, but in 1827 an explosion of Russian ammunition stored there wrecked the whole thing. The cliffs the ruins are on offer the best views of the entire city. You can see for miles, which is probably why the site was chosen for the citadel. A cable car connects it with Rike Park on the other side of the Mtkvari River.

The next day, I explored the city’s history museums (which, to my surprise, had a good amount of English translations). I highly recommend the Georgian National Museum, which has a detailed exhibit on the country’s history. There’s also the Nikoloz Baratashvili Memorial House-Museum, which houses materials related to the life and work of the romantic poet, period furniture, folk musical instruments, paintings, and lots of history about 19th-century Georgia. Then, in a former synagogue, there’s the David Baazov Museum of the History of the Jews, which spotlights the history of Jews in Georgia (which has a very close relationship with Israel).

However, after having just hiked a lot in Azerbaijan, walking in the stifling summer heat of Tbilisi wasn’t exciting me that much. I was tired. So, after a day and half of sightseeing, I found myself indoors drinking tea, writing, consuming a (un)healthy amount of wine, gorging on food at Fabrika, talking to other travelers, getting to the know the staff at a local coffee shop, and hanging out with Dave.

I can’t say I really know Tbilisi. Sure, I can get around the subway now. I have an idea of what things cost. I learned about the city and country. I met some cool people.

But do I know it? No, not in the way I know New York or Paris or Bangkok or a thousand other places.

But I feel like I know it.

Tbilisi is a city bursting with activity. A city of art and history. Of enjoyment. Of an energy that seemed to say, “Come enjoy the good life over wine. Don’t fret over things — just be.”

That’s an energy that I love and felt when I got off the bus.

And though it’s terrible to end a travel article with the cliché “I can’t wait to go back,” I honestly can’t wait to go back.

I felt at home there.

And everyone loves the feeling of returning home.

Book Your Trip to Tbilisi: Logistical Tips and Tricks

Book Your Flight
Find a cheap flight to Tbilisi by using Skyscanner or Momondo. They are my two favorite search engines. Start with Momondo.

Book Your Accommodation
You can book your hostel in Tbilisi with Hostelworld. If you want to stay elsewhere, use Booking.com as they consistently return the cheapest rates. (Here’s the proof.)

Don’t Forget Travel Insurance
Travel insurance will protect you against illness, injury, theft, and cancellations. I never ever go on a trip without it. I’ve been using World Nomads for ten years. You should too.

Need Some Gear?
Check out our resource page for the best companies to use!

Want More Information?
Be sure to visit our robust destination guides for even more planning tips!

The post Finding Love in Tbilisi in 72 Hours appeared first on Nomadic Matt's Travel Site.


from Nomadic Matt's Travel Site https://www.nomadicmatt.com/travel-blogs/finding-love-in-tbilisi-in-72-hours/

Tuesday 11 September 2018

World Nomads Travel Insurance Review: What’s Included & What’s Not

man climbing a mountain
Updated: 9/11/18 | September 11th, 2018

For as long as I’ve been traveling the world, I’ve used World Nomads as my travel insurance provider. Though I’ve written about travel insurance in the past, I’ve never properly reviewed World Nomads as a company.

So without further ado here is a review of World Nomad’s Travel Insurance.

Who are World Nomads?
World Nomads is a travel insurance company based in Australia. It was founded in 2002 by Simon Monk, a traveler who wanted to address the three key concerns: freedom, safety, and connection. Insurance was a market fraught with fraud. As a bunch of passionate travelers ourselves, he figured they had a fair idea of what travelers needed and wanted. They people from over 150 countries, with medical and evacuation cover, 24-hour emergency assistance and cover for a large range of adventure activities.

I originally found World Nomads via Lonely Planet but they are also recommended by National Geographic and Rough Guides. I trust those companies so I bought the insurance and have never looked back!

World Nomads is the perfect insurance company for backpackers and travelers. It’s meant for people who are always on the move, and it covers all the essentials you want in travel insurance. I love the management of the company, its competitive prices, its social giving program, and its company ethos of being insurance for travelers by travelers. It is a company a world apart!

What’s included in World Nomads Insurance Policies?

(The prices in the left column are for the Standard Plan, while the prices in the right column are for the Explorer Plan, which offers higher coverage limits.)

MEDICAL COVERAGE

World Nomads Travel Insurance Review
World Nomads provides up to $100,000 USD in coverage, though its more expensive policies will cover you for higher amounts. High coverage limits can be important if you’re doing really crazy activities that might cause serious injury. Or if you get really, really, really sick. (That said, I find $100,000 in coverage is more than enough for what I need).

Its policies also provide coverage for medical expenses and those related to medical evacuation or repatriation if you’re accidentally injured. If you are hiking in the woods and you break your leg, your policy should cover your evacuation to the hospital — and World Nomads does, if the emergency evacuation is ordered by a physician who certifies that the severity of your accidental injury or sickness warrants it.

Emergency dental treatment
World Nomads also covers emergency dental treatment for accidental injuries that occur during the trip.

NON-MEDICAL EMERGENCY EVACUATION

World Nomads Travel Insurance Review
World Nomads also offers coverage for transportation expenses in case there is civil or political unrest in the country you’re visiting. This also applies to natural disasters, or if you’re expelled from a country. NOTE: If you’re a US citizen, certain states are not covered under this. You’ll have to check your certificate.

ACCIDENTAL DEATH AND DISMEMBERMENT INSURANCE

World Nomads Travel Insurance Review
In case the worst happens, your World Nomads plan pays a lump sum to your beneficiary, such as a family member. These policies also pay out if you lose your eyesight or a hand, foot, or limb, etc. on your trip. Moreover, they cover the cost of repatriating your body (i.e., sending your body home).

LOST OR STOLEN GOODS

World Nomads Travel Insurance Review
This coverage reimburses you for baggage and personal belongings that are lost, stolen, or damaged during the trip. Some plans also reimburse you for extra expenses if your baggage is delayed for more than a certain period, such as 12 hours.

TRIP CANCELLATION, INTERRUPTION, OR DELAY

World Nomads Travel Insurance Review
Trip cancellation insurance reimburses you for prepaid expenses if the tour operator goes out of business, you have to cancel the trip because you or a family member gets sick or injured, or there is a death in the family, bad weather, or a natural disaster.

Trip interruption insurance covers you if you have to interrupt a vacation because you get sick or injured, or have to get back home due to a death in the family.

Trip delay coverage covers your expenses if you’re delayed during a trip, such as when a flight gets canceled because of bad weather. Coverage is for additional expenses, on a one-time basis, if you are delayed en route to or from the trip for six or more hours due to a defined hazard (as explained in the certificate or policy).

World Nomads covers all three!

ONE CALL: 24-HOUR ASSISTANCE SERVICES

World Nomads Travel Insurance Review
World Nomads also uses a 24-hour service called One Call to provide help, advice, and referrals for medical emergencies. The service will help you locate local physicians, dentists, or medical facilities. They can also arrange and pay for appropriate transportation, including an escort, if required, to a suitable hospital, treatment facility, or home.

What’s Not Covered

If you’re reckless, you probably won’t be covered. Here’s a list:

  • Accidents sustained while participating in extreme adventure activities such as hang gliding, paragliding, or bungee jumping unless you pay extra.
  • Alcohol- or drug-related incidents.
  • Carelessness in handling your possessions and baggage.
  • You won’t get reimbursed if the problem happened because you were reckless (how “reckless” is defined is a matter up to each company).
  • Pre-existing conditions or general check-ups. For example, if you have diabetes and need to buy more insulin, you won’t be covered. If you want to go see a doctor for a general check-up, you aren’t covered either.
  • Cash
  • Your theft coverage won’t cover you if you left something in plain sight or unattended.
  • If civil unrest makes your destination unsafe but your government hasn’t called for an evacuation, you’re probably out of luck too.

Pros and Cons of World Nomads

Pros:
world nomad logoAffordable prices
Great coverage
You can extend your policy online
You can make a claim online while on the road
24/7 service
Fast service
Book on the road

Cons:
It doesn’t cover people over 70
Its online system can be a little confusing to figure out
The Explorer plan covers up to $3000 total and a per article limit of $1500 on electronics and personal items.

My Experience Using World Nomads

In addition to buying a policy online (even if you’re already traveling), you can also indefinitely extend your insurance policy online. Moreover, as someone who is always on the road and bouncing from country to country, the ability to just take photos of all my documents and receipts and upload them is hugely beneficial! Plus, the whole claims process can be done online.

I’ve had to use World Nomads’ services twice. The first time was when South African Airlines lost my luggage on the way back from Africa. Knowing I had coverage, I called World Nomads to ask what I could do. They told me that I would have to wait to see if the airline would reimburse me first. If the airline would not reimburse me within 90 days, they would. (Travel insurance is about making you whole, not making sure you make a profit.)

The process was relatively easy. I filled out an online form listing what I had in my bag and its estimated value. I submitted the documents that showed I had requested a reimbursement from the airline. Then I waited.

Luckily, the airline paid me and I didn’t need World Nomads, but I learned through this process that if you have all your documents and proof, World Nomads makes submitting a claim very easy.

Another time, in Argentina, I was suffering from anxiety and worried that it was something more. It felt like someone was stomping on my chest. I logged into the portal, got the call center number, and called the hotline. They took my information and symptoms and gave me a list of emergency doctors that they recommended. The One Call system was helpful, quick, and got me a doctor right away. I was very happy with the service and know that if something really does go wrong, they act quickly!

While I have never had to make a claim that required reimbursement, a number of readers have. Here is their feedback on the process:


How to make an insurance claim
All insurance companies have terrible online reviews. This is usually because the traveler didn’t read the wording of the policy and assumed something was covered when it wasn’t. It is very, very important that you read the requirements for making a claim. Generally speaking, if it’s something a sane, sober person wouldn’t do, you’re probably not going to get reimbursed!

For that matter, you should read your whole policy. Seriously. It’s terrible, but reading it is the only way you will know what is and is not covered! If you have questions, call World Nomads. They are very helpful in explaining their policies! Local numbers are on their website!

Also, keep these two points in mind:

  1. Document all your stuff. Travel insurance companies follow a simple rule: no proof, no reimbursement. If you want to make a claim, you’ll need to prove (a) that you bought something (keep all your purchase receipts if you have them), (b) that it was there with you, and (c) that it was stolen. To that end before I go on any trip, I take a photo of my bag and its contents before I leave so I have time-stamped photo with me and my stuff. If anything is stolen, be sure you file a police report too as companies will ask for that!
  2. Document your illness. If you get sick, keep all your paperwork and receipts. The more information and documents you have, the easier it will be to get reimbursed!
***
World Nomads is one of the best insurance companies out there — especially if you are looking for long-term or backpacking travel insurance. It is a company for and by travelers, recommended by tons of other travel companies and writers, and far more affordable than other insurance companies! I highly recommend them. I’ve always had a good experience with them — and as you can see from the people above, so have many of the readers of this site!

Travel insurance only costs a few dollars a day (your policy price will vary by length and where you are from) and, for that price, it’s a no brainer. While there are many travel insurance companies out there that are cheaper, the devil is always in the fine print and they don’t have low coverage limits, don’t let you renew on the road, and have terrible reimbursement rates. Insurance is something you get what you pay for. Pay an extra few cents a day to be covered. A lot of people don’t buy travel insurance when they travel because they think “What can happen to me?” And that’s the point of insurance. No one is Superman and you’re healthy until your not. Insurance covers trip delays and problems, accidents, health care, theft, and a bunch of other things. I’ve been on the road ten years and I can tell you that accidents will happen. And it’s good to always have a company that has your back. I’ve never once regretted my decision to get insurance with World Nomads.

You can use the widget below to look up the travel insurance policy that is right for you (or just click here to go to their website directly:


The post World Nomads Travel Insurance Review: What’s Included & What’s Not appeared first on Nomadic Matt's Travel Site.


from Nomadic Matt's Travel Site https://www.nomadicmatt.com/travel-blogs/world-nomads-review/