Tuesday 28 February 2017
Monday 27 February 2017
Saturday 25 February 2017
Friday 24 February 2017
How to Properly Use and Care for Memory Cards
As photographers, we heavily rely on memory cards, because they store images captured by our cameras and we use them to transfer images to our computers / main storage. In some cases, photographers even rely on memory cards to be their secondary or tertiary backups when shooting in the field. The role of memory cards in a photography workflow should not be underestimated – a failed card may not only lead to many problems and frustrations, but can also create bigger problems, especially when dealing with commercial clients who could make the photographer liable for loss of their images. In this article, I will share some tips on how to properly use memory cards and how to take care of them based on my many years of experience, both as a photographer and as an IT professional.
In my opinion, nothing is worse than telling a newlywed couple that their entire wedding was lost due to a bad memory card. While a commercial photo shoot can be re-shot, even at a great cost, it is nearly impossible to re-shoot a whole wedding. Therefore, it is important to understand that a memory card is not just a simple storage accessory; its role as a reliable storage media tool should never be overlooked. Unfortunately, there is too much conflicting information on the Internet in regards to how one should use and treat memory cards, with very little evidence, which sadly leads to misunderstanding and misuse of memory cards in the field. So aside from standard recommendations, I will also go through such topics and explore them in detail, which will hopefully clear out some of the confusion.
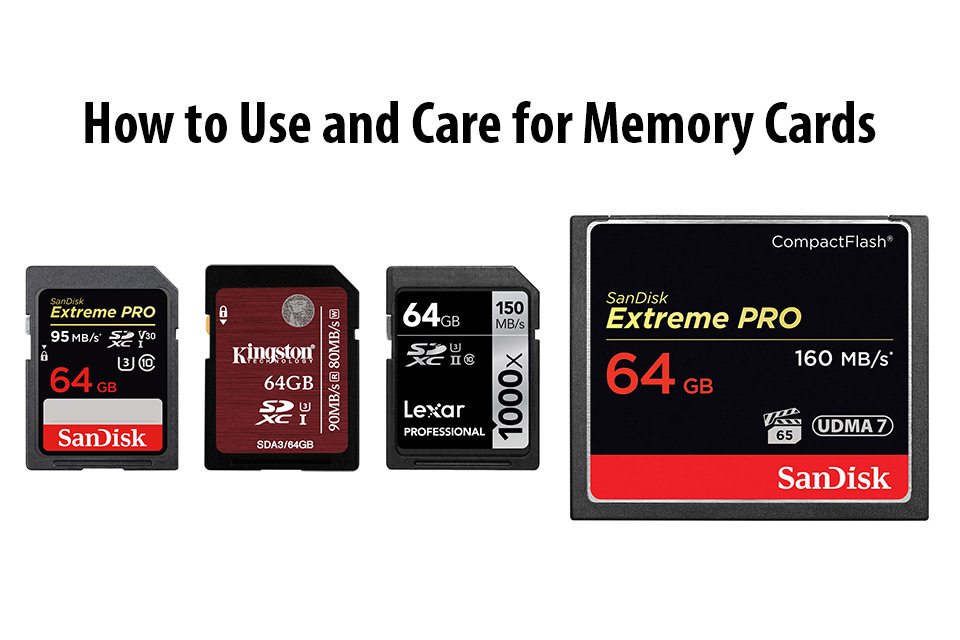
1) Buy Reliable Brand Memory Cards
With so many different memory card brands out there at varying pricing levels, it might be tempting to go for a much cheaper, no-name brand card. However, before you make your purchasing decision, you should seriously decide if you are willing to deal with potential failures and problems of such cards in the future. Also, factor in the cost of replacement – if you buy a no-name brand card and it fails, you will most likely be stepping up to get a much higher quality branded card, so your initial investment becomes a waste. If you start out with a good brand card and anything happens to it, you can count on the manufacturer’s warranty to get you a working replacement. Lastly, don’t forget to value your time as well! If a card fails, you might spend many hours trying to recover the content. Considering how cheap high quality memory cards have gotten nowadays, why even take the risk of choosing a no-name brand? Why not go with a good, reliable brand to begin with?
When it comes to memory card brands you can trust, I personally consider cards from SanDisk, Lexar, Samsung, Sony, Transcend, Kingston and PNY to be often quite good in quality. Over the years, I have used memory cards from all of these brands and found them to work quite well in cameras, with fairly solid performance and reliability. Although there is no statistical data on failure rates of different memory card brands, my personal bias has always been with SanDisk – although it is probably one of the most expensive brands out there, I have never seen a SanDisk memory card fail on me. I mostly own SanDisk Extreme Pro series CF and SD cards and they have always been the cards I pick for important photo shoots. Lexar CF cards have been pretty reliable, but I stay away from their SD cards. They gave me a lot of headaches, as documented in my Lexar SD card review – pins broke off on practically every memory card I used and when I sent the cards for replacement, I got refurbished cards that were heavily used before. Since then, I have been buying SD cards from different manufacturers when they would go on sale to probe them out. After testing out the higher-end Samsung Pro+ SD cards, I realized that they are also excellent cards that rival the SanDisk Extreme Pro series cards in terms of performance and reliability, so they became my second most favorite brand for SD cards. Sony has been a mixed bag – I bought a bunch of Sony pro-grade SD cards that can do 94 MB/s speeds and although they were very cheap, their reliability has been pretty bad: two cards out of eight have failed within a year of use. If I need cheap memory cards for different needs like backup, I might also look at brands like Transcend, Kingston and PNY, which often sell for great prices, especially during holidays when inventories need to be cleared up. This is obviously my personal experience with these brands and cards – your mileage might certainly vary and you might find one brand to be more reliable than another based on cards that have failed you in the past. It is also worth pointing out that memory card specifications and features change every year, so if you have experienced a problem with one particular model, it does not mean that the next model will be as bad. Based on my research and my past experiences, failure rates among different memory card manufacturers vary greatly and it is impossible to say that one brand will always be better than another. There are too many brands, too many models, too many features and too many memory card sizes out there to make meaningful statistical data that could compare different memory card brands for reliability. For me, brands like SanDisk and Samsung are trustworthy, because these two companies have been known to make their own memory chips and their quality control is excellent. Every computer I build has a Samsung SSD or PCIe NVME storage, so my trust in Samsung goes beyond memory cards. In comparison, many other brands simply slap their stickers on OEM memory cards…
So if you want to have less headaches in the future, make sure to buy memory card brands you can trust!
2) Buy Memory Cards From Authorized Sellers
Once you know which brand of memory cards you want to buy, make sure to buy those memory cards from authorized sellers. This one is even more important than #1, because there are too many fake memory cards out there! Remember, all SD cards more or less look the same, so if someone slaps on a SanDisk label on an OEM card, you would have no idea that you are dealing with a fake memory card. Some Chinese manufacturers find ways to not only fake the memory cards themselves, but also closely imitate the original retail packaging, making the card look pretty authentic. So if you found a card that you like at B&H Photo Video or Adorama but the price looks a bit too steep for your liking, don’t fool yourself if you find something much cheaper on eBay. Companies like SanDisk dictate their pricing with retailers, so if their pricing changes at one retailer, it should be mirrored with another (unless the sale is a one-off exclusive, such as the Deal of the Day at Amazon). If you shop for memory cards at Amazon, make sure that the card is sold and shipped by Amazon – there have been reported cases of fake memory cards being sold by third party sellers there.
3) Do not Buy Used or Refurbished Memory Cards
Even if you find a good deal on used or refurbished memory cards, I would highly discourage you from buying those. The problem with used and refurbished memory cards, is that you don’t know how frequently those cards were used before you. If the photographer used those cards heavily, it means that the memory card cells have less life left in them, so you might start encountering issues with those cards sooner than you would expect, especially if you are a busy photographer. Unlike most cameras that can show you total number of actuations, memory cards do not keep a track of how many times write operations took place. So if someone tells you that their card was “barely used”, there is no way for you to check if the seller is telling you the truth. In addition, you don’t know how well the photographer took care of those cards and if there is any warranty left on the cards, you most likely will not be able to transfer the warranty under your name. Memory cards are incredibly cheap nowadays, so I would not try to save a buck or two by attempting to get used ones.
4) Pay Attention to Memory Card Specifications
Sadly, for most memory card manufacturers, it is all about the labels and the numbers they can slap on their memory cards to boost their sales, which means that you should not expect real, honest information on those labels. If a memory card says that it can do 95 MB per second speeds, it does not mean that the memory card is actually going to be able to get to those speeds. In fact, did you know that the published transfer numbers on memory cards often only reflect the read speed, but not the write speed? So if you see something like 95 MB/sec transfer rate on a memory card, that only shows the potential speed of the transfer from your memory card to your computer. The word “potential” is key here, because those advertised speeds are the maximum theoretical speeds a memory card can reach when doing sequential writes of large files.
Over the years, I found that most memory cards cannot reach their maximum advertised speeds, which is disappointing. So if you buy a memory card that claims fast read and write transfer rates, try to copy large-size files to and from the memory card to see if those numbers reflect the reality. But do make sure that you have a fast enough reader that can actually take advantage of those speeds (see #6 below for more information). I have tried to test out my SanDisk Extreme Pro cards that claim to have up to 95 MB/sec read and 90 MB/sec write rates and I have never been able to reach those speeds. At most I was able to get to was around 85 MB/sec read and 73 MB/sec write speed on those cards and they were the best of the bunch – others were even worse in comparison.
So when you are evaluating a memory card for purchase, don’t just look at the label – pay close attention to detailed specifications that show not just the maximum read speed, but also tje maximum write speed. Then once you receive the card, make sure to test it out. If transfer speeds are incredibly slow, you might be dealing with a fake memory card.
5) Don’t Buy Large Capacity Memory Cards
Another tip for memory cards is not to buy the super large capacity ones. If you average a few hundred shots on your memory card, that’s good enough – you don’t need a memory card that can accommodate thousands of pictures (exception would be wildlife photographers, who shoot a lot of frames). Why? Because if that super large capacity memory card fails, you will lose everything on it. This is especially important for those who shoot critical projects and events. If you have a trip of your lifetime, it might sound appealing to just use one single memory card and not worry about changing memory cards. But if anything happens to that memory card and you don’t have backups, then you will lose all the pictures from that trip. Unless you have a very solid backup workflow, where you make sure to back up images after each shoot, you should not stash on those large capacity memory cards.
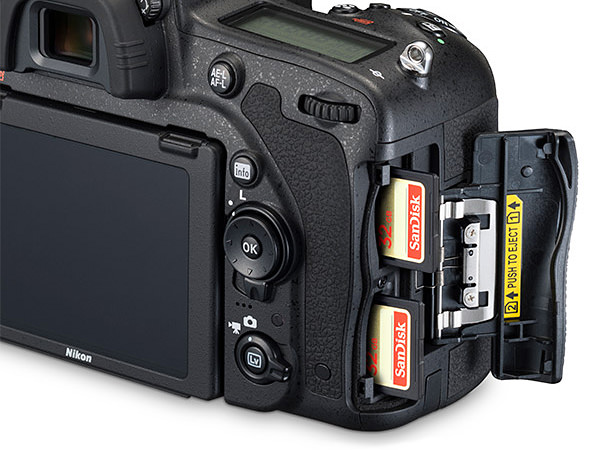
Now if you have an advanced camera that has multiple memory card slots, having a single large capacity memory card could be useful. Many photographers use the second memory card slot as a “backup” and use a large capacity memory card in that slot without taking it out – they just replace the first memory card as needed. John Bosley does this for his wedding work and he is yet to lose files from important photo shoots and weddings he is involved in. If you follow a similar practice, large capacity memory cards are not necessarily evil. Just don’t save all the precious work in one memory card, without any backups!
Also, if you do shoot with multiple memory card slots in overflow mode (one memory card fills up and the camera starts recording to the second one), try not to delete images using your camera! When shooting in overflow mode and deleting images, you never know which particular memory card contains which photos. The camera will automatically place images in the first card that has the available space. This was a hard lesson learned for me, since I was stupid enough to delete pictures from the main memory card and I kept on shooting the best pictures to it without any backups. I then managed to lose that memory card when traveling, which contained the most valuable pictures from the trip! I wrote about my experience in this article back in 2011 and even promised a reward if someone found my card and handed it back to me, which sadly never happened.
How big should the capacity of memory cards be? Well, it all depends on the size of individual files your camera creates. If you shoot 14-bit uncompressed RAW, your files are going to take a lot of space and you might need a bigger card to accommodate a few hundred of those images. If you shoot losslessly compressed RAW with a low to medium resolution camera, you might get away with smaller cards. When shooting with my Nikon D750 and D810 cameras, I often shoot with 32 GB cards. But when doing video work, shooting with a higher resolution camera or shooting a lot of panoramas, I might use a 64 GB card. I only own a single 128 GB card, which I bought primarily for shooting wildlife and for keeping it as a backup.
Keep in mind that requirements for memory cards will change overtime. With the increase of resolution and bit depth in cameras, you might need to start moving up to larger capacity memory cards in the future.
6) Get a Fast and Reliable Memory Card Reader
While it is a myth that you must only buy memory card readers from reputable brands like SanDisk and Lexar, chances of having a more reliable card reader from a better brand are higher simply because of better quality control. Over the years, I have used many different memory card readers from Lexar, SanDisk and other third party manufacturers. I have never managed to damage a memory card because of a bad memory card reader, but there is always a potential to damage a card, especially during write operations. If a memory card reader fails at the time of writing, the chance of killing a card completely is pretty high. So as long as the memory card reader is not a really bad knock-off, it should do just fine. Most SD card readers built into laptops have the same OEM chips you will find on many other standalone memory card readers. So for the most part, the underlying technology is the same in most memory card readers. I personally prefer Lexar card readers over SanDisk ones, because I found them to be reliable and fast. SanDisk just has not paid much attention to its card readers – they are often inferior compared to Lexar ones in terms of technology and features.
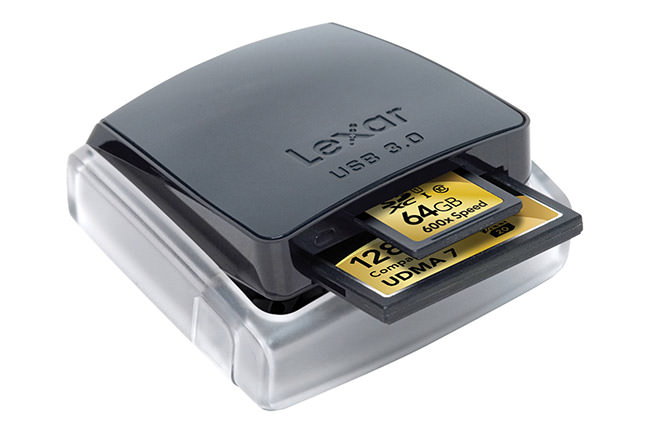
My favorite is the Lexar Professional Workflow, which in my opinion is the best card reader on the market thanks to its versatility – I can use the unit to transfer multiple memory cards at the same time and I could even add SSD storage to the unit for backups. If you don’t need such a setup, the much simpler and smaller Lexar Professional USB 3.0 Dual-Slot Reader is also superb and works out very well for both laptop and desktop use. I usually take the latter when I travel with my Surface Pro, since it does not have an SD card reader. But if your laptop already has an SD card reader, then you don’t need to get an external unit, unless your memory card reader is very old and it cannot support fast transfer speeds of the latest memory cards.
7) Formatting Memory Cards
When using memory cards, it is always a good practice to format those memory cards in your camera, and preferably, the camera brand you are going to be shooting with. While it is not necessary to format memory cards in cameras and you could go through the same process on your computer, I find it simpler and faster to do it in my camera. When shooting with my Nikon DSLRs, all it takes to format a memory card is holding two buttons with red labels on the camera, then confirming the process by pressing those two buttons again. I could format all cards from my memory card holder in a minute or two, which is very convenient. The other reason why you might want to format memory cards in your camera, is because some camera brands like Sony create a small database / index of files on memory cards after formatting them, so if your memory card does not contain those files, the camera will complain that the database does not exist and it will attempt to create the file structure and the database before the memory card can be used. Instead of going through these hassles, I find it better to just format all the memory cards you have in the same camera you are planning to shoot with. This way, you just pop a new memory card in and you are ready to keep on shooting.
If you decide to format memory cards in your computer, make sure that you check the “Quick Format” option as seen below:

You do not want your computer to do a low-level format of your memory cards. In fact, performing a low-level format, where the computer will go through each memory block on your card and fill it with zeros is bad for the overall health of your memory card, especially if you do it often, since those are write operations and each memory cell on your memory card only has so many writes to it before it becomes unusable. Plus, low-level formatting takes forever to complete, and if you ever want to retrieve files in case of accidental formatting, you will never be able to do so. When formatting memory cards in your camera or performing a Quick Format on your computer, the formatting process simply re-creates the index table that stores where files are physically located on the memory card, so existing files are simply written over when a write operation takes place. You don’t see those files on your camera or your computer, but they are still there. That’s why it is possible to restore images from a memory card, even if the card is formatted. It is important to note that memory cards under 32 GB are typically formatted with FAT32 file system as seen above, whereas cards with larger capacities will be formatted with exFAT file system, due to capacity and file size limitations. Keep this in mind when manually formatting cards on your computer.
Some people choose to move contents of memory cards instead of formatting them. That’s a perfectly fine practice and there is nothing wrong with doing that, but I personally stay away from delete and move operations on my memory cards. Reading contents of a memory card is always going to be faster than read + delete. Also, I do have a practice of not using the same memory cards when shooting in the field. If anything happens to my computer when traveling, I still want to be able to have all of my images safe in another location – see my notes under #13 below on best practices for field use of memory cards and their potential value as secondary / tertiary backup.
8) Keep Camera Batteries Charged!
Keeping your camera batteries charged is obviously a no-brainer. However, some of us are guilty of pushing cameras to their limits until batteries fully die. I never thought that a dead battery could cause a memory card card to fail completely until last year. John and I were recording our Level 1 Post-Processing and Workflow Course in the studio and I did not pay attention to the battery level on the primary camera. The battery died while recording and after I popped a new battery in, I saw the dreaded “ERR” message. I knew something was going on with the memory card, so I took it out of the camera, put it on my computer and it was not recognized. The failed write operation completely killed the memory card to the level that I could not even format it anymore! Needless to say, we had to reshoot the whole section the next day because of this and it was not a pleasant experience. Ever since, we have been paying close attention to the battery level – the moment the camera flashes with a red battery sign in live view, we have been swapping the batteries out. Better safe than sorry!
9) Safely Eject Memory Cards – Don’t Just Unplug Them
Another obvious mistake to avoid is unplugging a memory card while any read or write operations are taking place. While a read operation might do no damage to the card, an interrupted write operation often causes memory card corruption, as it happened in the above-mentioned situation. The same goes for interrupting write operations while your camera is taking a picture. If you want to stop a long exposure, don’t just remove the memory card or worse, your camera battery! Powering off your camera should stop the long exposure and safely complete write operations, which is what you want. If something happens to your camera and it seems to be stuck, you always want to wait for the memory card light to turn off before deciding to do anything drastic, like removing camera batteries. There have been cases with some cameras being incompatible with particular memory cards and write operations would take excessively long as a result. Some photographers were not patient enough to wait for the light to turn off and they would take the battery out, which often resulted in memory card corruption. If you take a picture and it takes over 5 seconds for the memory light to go off, you might want to stop using that memory card and replace it with a different one.
The same goes for unplugging memory cards from computers – you never want to just remove a card while data is being read from or written to the memory card (again, write operations are particularly evil). The best practice is to safely eject the memory card via your operating system before removing it, which can be easily done in both Windows and Mac operating systems.
10) Avoid Static Charges
If you are in a very dry environment and you wear clothes that gather a lot of static, you might want to avoid touching memory cards. While the exterior shell of CF and SD cards is made out of plastic, the pins that connect to devices are made from copper and other materials that conduct electricity. And since electrical components can easily get fried with a static charge, you want to avoid touching them. If I know that I might be carrying a static charge, I usually find a piece of metal, such as a doorknob, that I can use to discharge the built-up static before touching any electrical devices, including cameras and memory cards.
11) If a Memory Card Fails, Stop Shooting
Memory card failures are pretty random. Some failures are temporary, with your camera reporting an error but then allowing you to continue shooting, while other errors are permanent – when there is more serious damage to the memory card. If you ever see an error on your camera while shooting to a particular memory card, stop shooting! The last thing you want is make matters worse by adding more images to the card and potentially corrupting the card even more. The moment you see an error, replace the memory card with another one. If the error persists, it might not be related to the memory card. But if the error disappears, your card might be failing.
The best course of action in such situations is to insert your memory card into a memory card reader as soon as possible and try to copy all the files. If the files are not corrupted and you are able to successfully copy all the files, you need to know whether it was a temporary failure on your camera, or the start of a memory card failure. Once the transfer is done, perform a low-level format of the memory card on your computer. If formatting fails or you see errors during the process, it is time to either send the memory card to the manufacturer for a replacement, or if you are outside the warranty period, it is time to trash it. If the low-level format completes and you see no errors, then you should be safe to use it again – just monitor the card and if you ever see another error, it might be safer to get rid of it than to continue using it.
If you cannot retrieve files from a failed memory card, chances of being able to get those files back are very slim. You can try using recovery software to get the files back, but recovery typically only works on deleted files and formatted cards, not on failed cards. If the data on the memory card is extremely important, you might want to reach out to your local data recovery company and ask if they can help. Keep in mind that such companies often charge a lot of money to restore your data!
12) Keep Memory Cards Protected From Direct Sun and Moisture
If you want to prolong the life of your memory cards, always protect them from extreme weather conditions. Never leave out memory cards under direct sun – keep in mind that memory card shells are made out of plastic and plastic can easily melt when exposed to the sun. In addition, by leaving memory cards under direct sun, you might damage electrical components of the cards, which might cause them to fail. Another enemy of electronics is moisture and water containing minerals. While pure H2O is not harmful in any way, saltwater and drinking water with minerals can cause an electrical short, which will certainly cause the device to fail. If you accidentally drop a memory card in water, always make sure to fully dry it out before attempting to read data from it. Make sure that the SD card is not just dry on the outside, but also fully dry inside the plastic cover.
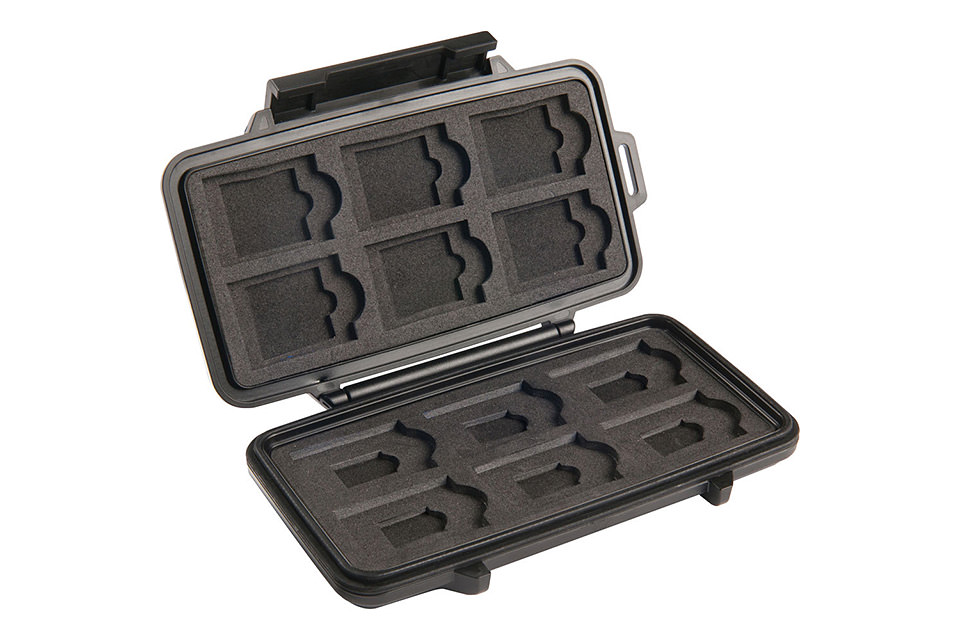
My preferred way to keep my memory cards safe from damage is to always keep them in a protected case. I have been using the Pelican 0915 Memory Card Case for years now and I love it, because it has a water resistant seal when I close the card holder, which keeps my memory cards protected from potential water damage. For only $25, it is a cheap way to protect those valuable images!
13) Use Memory Cards as a Backup
When traveling, I always try to keep a backup of my images in at least two different locations. If all I have is a laptop with me, then the laptop becomes primary storage and the memory cards I have used become secondary storage. If I have a laptop and an external drive, then those two become primary and secondary, while my memory cards become tertiary storage. As soon as I fill up a memory card, I put it back into my memory card case backwards, as shown in the below image:

This way, I know exactly which memory cards have been used and which ones remain for me to use. I never format used cards until I get home and safely transfer everything to my main storage. I can only remember one case when I shot so much that I ran out of cards on a three week-long trip and only after making sure that both my laptop and my external drive contained all the images, I finally formatted the largest capacity memory card to use on that trip. Since then, I bought a few more cards, so that I don’t run into this issue again.
14) The Myth of Leaving Space on Memory Card
Some people argue that a memory card should never be filled completely, that doing so will either make it slower or increase the potential of memory card failure. This is a big myth from people who don’t know what they are talking about. First of all, I have never seen a case of a memory card filling up to the level where there is zero space left. When shooting images, if the camera sees that an image will not be able to fully fit on a memory card, it simply stops shooting and shows a “full” note. So the chances of fully taking up space on a memory card are very slim. Second, memory cards don’t work like other types of storage that might slow down when there is little space left. Third, filling up a memory card does not increase chances of its failure. I have been shooting with digital cameras for over 10 years now and I never had to worry about stopping shooting when the number of frames left is low. I always shoot until my cameras tell me that the memory card is full. Even when shooting video, I have managed to fill up cards and yet I have never seen a card fail as a result.
15) The Myth of Deleting Images from Memory Cards
Another myth is that deleting images from your camera can cause problems with corruption and potential memory card failure. Again, I am not sure where such claims come from, but they have no scientific backing to them. There is no harm in deleting images from your camera, just like there is no harm in deleting images on your computer. I have been doing this for years and I have never seen a card fail because of it! If I shoot a blurry or a badly exposed image, I get rid of it as soon as I see it on the LCD. Why go through the hassle of culling and potentially importing unwanted images? There is no reason at all – feel free to delete images on your camera or on your computer and stop worrying about any potential harm.
The only case where you might want to avoid deleting images is when you have two memory cards setup in overflow mode. As I have pointed out earlier, your camera will place images in the first memory card that has available space, so if you keep on deleting images from one card after the camera already started putting images on another, you might create a mess. Also, if you do decide to delete images from your camera, make sure that you take your time and only delete what you need – some cameras are designed to continue asking if you want to delete images and if you are not careful, you might also accidentally delete previous images.
16) Replace Memory Cards Every Few Years
Some of us stash memory cards in large sizes, thinking that we could use them forever. With any storage type, it is not about the question of “if”, it is the question of “when”. Memory cards fail and the more you use them, the more likely they are to fail at some point of time. So make it a good practice to replace memory cards every so often. Maybe every 3-4 years, maybe sooner or later, depending on how often you shoot. Also, keep in mind that newer memory cards are most likely going to be much faster and potentially even more reliable compared to the really old memory cards – just make sure to check their specifications before buying them. You do not want to use a newer generation memory card that might have compatibility issues with your older camera, or your memory card reader.
The post How to Properly Use and Care for Memory Cards appeared first on Photography Life.
from Photography Life https://photographylife.com/how-to-properly-use-and-care-for-memory-cards/
Sigma Does It Again – 4 New Lenses Announced!
Ever since Sigma decided to revamp its line of lenses with its “Art”, “Contemporary” and “Sport” editions, we have seen a number of innovative lenses from the company, some of which claimed the “world’s first” title. Sigma has been working hard on producing fast, high-performance and durable lenses for Nikon, Canon and Sigma mounts at very attractive price points, allowing the company to quickly grow and establish itself as a reputable lens manufacturer. Today, the company revealed yet another amazing set of lenses in the form of Sigma 14mm f/1.8 DG HSM Art, 135mm f/1.8 DG HSM Art, 24-70mm f/2.8 DG OS HSM Art and 100-400mm f/5-6.3 DG OS HSM Contemporary – four lenses designed specifically for full-frame cameras.
Sigma 14mm f/1.8 DG HSM Art
The Sigma 14mm f/1.8 DG HSM Art claimed yet another “world’s first” title, because it is the first 14mm ultra wide-angle lens ever made that has a very wide f/1.8 aperture. Looking at the specifications and the MTF chart of this lens, I can see how it will quickly become a favorite lens among astrophotographers – with its optical formula optimized for extreme sharpness, which boasts the same aspherical element as on Sigma’s 12-24mm f/4 Art lens, along with the largest glass mold in the industry, it is supposed to deliver outstanding performance at wide apertures, something astrophotographers always long for.
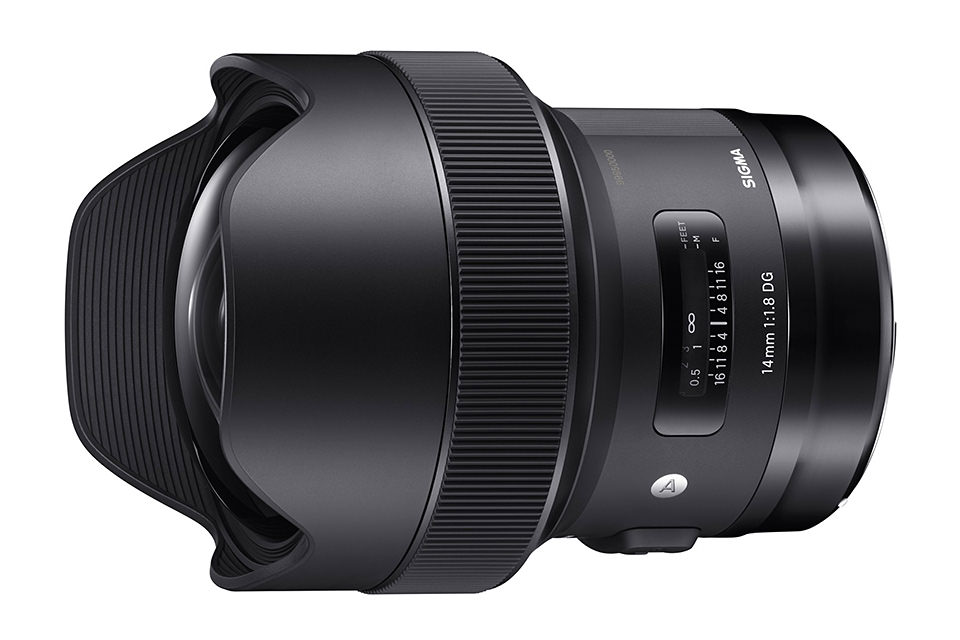
Sigma claims the lens the lens to have virtually no distortion, flare or ghosting, which is very impressive. The optical formula of the lens is pretty complex, featuring three FLD (“F” Low Dispersion) glass elements and four SLD (Special Low Dispersion) glass elements, which not only reduce chromatic aberration, but also help achieve excellent edge-to-edge sharpness. Just like other Art-series lenses, the Sigma 14mm f/1.8 DG HSM will also feature a fast and quiet hyper sonic motor.
Sigma 135mm f/1.8 DG HSM Art
It looks like Sigma is taking advantage of Nikon’s timing with its 135mm lens update with this new Sigma 135mm f/1.8 DG HSM Art. Not only is this lens slightly faster than the Nikon 135mm f/2 DC, but it also promises better edge-to-edge sharpness with high resolution cameras up to 50 MP. In addition, Sigma says that the lens features a newer large hyper sonic motor (HSM) that provides more torque for quicker and more reliable autofocus acquisition and the diaphragm is now electromagnetic, similar to what we have been seeing on the latest generation Nikon “E” type lenses such as the Nikon 105mm f/1.4E.
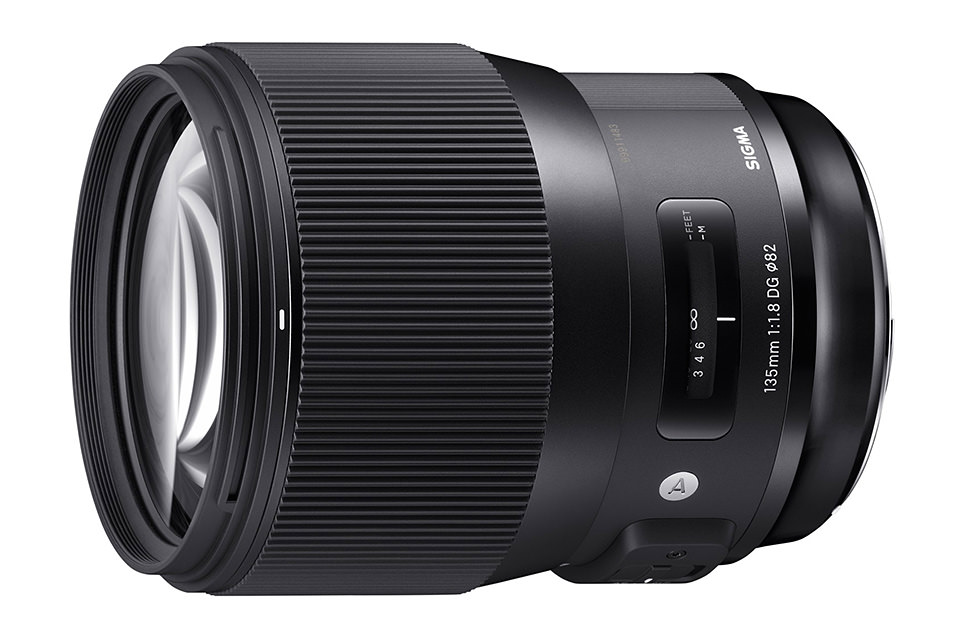
With an optical design featuring a total of two FLD, two SLD and no aspherical elements, the lens should be a superb candidate for portrait photography, delivering excellent bokeh and sharpness at its wide open aperture. In fact, sharpness-wise, if you take a look at its MTF chart in our lens database for the Sigma 135mm f/1.8 Art, it looks like this lens will be a resolution monster. Its MTF chart looks even more impressive than on the Sigma 85mm f/1.4 Art, which is supposed to be the sharpest 85mm lens on the market right now…
Sigma 24-70mm f/2.8 DG HSM OS Art
Sigma has been making 24-70mm lenses for many years and the new Sigma 24-70mm f/2.8 DG HSM OS Art is a brand new refresh of that line which now adds better overall performance and image stabilization features to the lens. In addition to the new look and feel, the fourth generation 24-70mm f/2.8 DG HSM OS features a completely rehashed optical formula comprised of three SLD and four aspherical lens elements to deliver high level of sharpness across the focal range of the lens. Sigma promises better coma, chromatic aberration and distortion performance on the lens compared to its predecessor and says that the optical formula of the lens was optimized to yield pleasing bokeh.
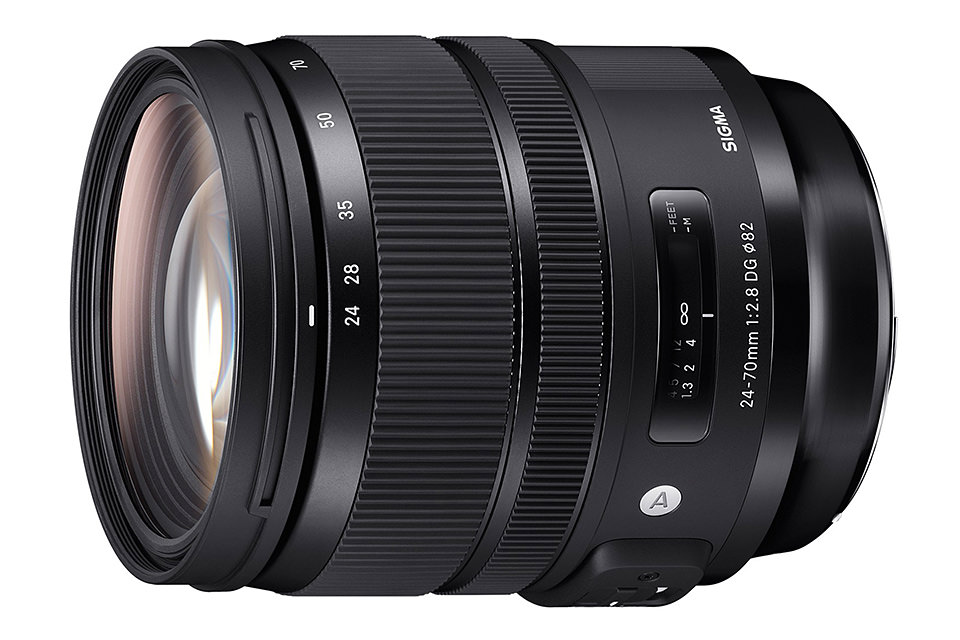
The Sigma 24-70mm f/2.8 DG HSM OS will feature a similar HSM motor as the Sigma 135mm f/1.8 DH HSM Art with a better torque performance, in addition to the latest generation optical stabilizer (OS). The lens has a dust / splash proof design and the external moving parts feature thermally stable composite to resist thermal expansion and contraction, so it should hold up really well in challenging weather conditions. Just like the Sigma 135mm f/1.8 DG HSM Art, the lens will have an electromagnetic diaphragm.
Sigma 100-400mm f/5-6.3 DG OS HSM Contemporary
Sigma calls the new Sigma 100-400mm f/5-6.3 DG OS HSM Contemporary “the light bazooka”, since it is supposed to be a versatile lens with a rather simple push/pull zoom mechanism, compact size and a total of weight of 1,160 grams. Sigma says that the lens is a great all around performer when it comes to sharpness, focus speed and image stabilization performance, which should be comparable to the Sigma 150-600mm f/5-6.3 DG OS HSM, minus the size, the bulk and the weight.

Featuring a fairly complex optical formula comprised of 21 elements in 15 groups, four of which are SLD glass elements, the 100-400mm f/5-6.3 DG OS HSM is not just categorized as a lens with solid optical characteristics – thanks to its impressive minimum focusing distance of 160cm (63 inches), it is also supposed to be a fairly good choice for macro photography. Just like the other two lenses, the 100-400mm f/5-6.3 DG OS HSM will feature an electromagnetic diaphragm.
Sigma has not yet announced pricing for these four lenses. We will publish pricing information as soon as it becomes available.
The post Sigma Does It Again – 4 New Lenses Announced! appeared first on Photography Life.
from Photography Life https://photographylife.com/sigma-does-it-again-4-new-lenses-announced/
Thursday 23 February 2017
How to Visit Malta on a Budget

For centuries, the Maltese archipelago passed between North African Moors and European Crusaders in an epic struggle for control of this important hub. This constant back and forth created a culture that blended architectural, culinary, and cultural styles (in fact, the Maltese language is a mix of Arabic and Italian) unique to nowhere but maybe Southern Spain.
Now, the country draws people less with the whole conquering-empires-thing and more with its warm summer temperatures, pristine beaches, clear Mediterranean water, striking hiking, friendly locals, and cheap prices.
Though I didn’t spend as much time as I wanted in Malta, I spent enough (literally and figuratively) to get a sense of how to travel the country on a budget. Luckily, the country is already very budget friendly (it’s one of the cheapest Eurozone countries out there) so you don’t need a lot to begin with. Even though I was on a holiday and not being as budget friendly as I wanted, I still never spent a lot of money. My most expensive day cost me 70 EUR, and that’s because I rented a car! Even when I was watching my wallet, at no point did I ever feel as if I was missing out.
Though Malta will never break your budget, I always am one to look for a deal as I’m a firm believer that every destination has a way to be cheaper.
So here is your in-depth guide to visiting Malta on a budget:
Getting There
While most European carriers operate seasonal flights, there aren’t many airlines that fly to Malta year round. Ryanair, Air Malta, easyJet, and Lufthansa are the biggest carriers that service the island year-round. One-way flights from the mainland cost 50-100 EUR ($53-106 USD), especially if you book in advance. You can also take the ferry to/from Sicily; it’s 2.5 hours and costs 61-127 EUR ($65-135 USD) each way (depending on the season).
Typical Costs

Malta is cheap. While I went in the middle of winter — without the seasonal increase in prices for accommodation, car rentals, and flights — many friends told me that most prices for food, activities, and public transportation stay the same throughout the year. Here is a list of typical costs in the country:
- Bottle of water: 1 EUR ($1 USD)
- Ferry to Valletta from Sliema: – Single: 1.50 EUR ($1.60 USD), Return: 2.80 EUR ($2.95 USD)
- Pastizzi (cheap snack): 1-2 EUR ($1-2.10 USD)
- McDonald’s value meal: 5-6 EUR ($5.25-6.50 USD)
- Sandwich: 6 EUR ($6.50 USD)
- Bottle of wine: 8-10 EUR ($8.50-10.50 USD)
- Ferry from Malta to Gozo: Pedestrian: 4.65 EUR ($5 USD), Car and Driver: 15 EUR ($16 USD)
- Car rental: 38-48 EUR ($40-50 USD)
- Nice dinner at a sit-down restaurant with wine: 25 EUR ($27 USD)
- Main meals: 10-14 EUR ($11-15 USD)
- Pizza: 6-9 EUR ($6.50-9.50 USD)
- Lunch at a cafe: 8-10 EUR ($8.50-10.50 USD)
- Beer: 3 EUR ($3.15 USD)
- Public bus ticket: 2 EUR ($2.10 USD)
- Taxi prices: 10-20 EUR ($10.50-21 USD)
- Museum entrance: 6 EUR ($6.50 USD)
- Breakfast sandwich: 3-4 EUR ($3.15-4.25 USD)
- Full breakfast: 8-9 EUR ($8.50-9.50 USD)
On average, you’ll be able to visit Malta 30-45 EUR ($32-48 USD) per day, though in the summer I would say you need to budget closer to 50 Eur. At that price, you’re looking at staying in a hostel dorm or splitting an Airbnb with a friend, taking public transportation, mostly sticking to the free activities, cooking your breakfast, and eating to the cheap(er) cafes.
How to Save Money in Malta
Accommodation
There are a couple of hostels on the islands, with dorm prices beginning at 9 EUR ($9.50 USD) per night (though prices double in the peak summer time). Airbnb is ridiculously cheap — I found a whole house for 35 EUR ($37 USD) a night. Most budget hotels cost 40 EUR ($42.50 USD) so I would stick to Airbnb or hostels for accommodation. However, like hostels, the prices for places more than double to around 80 EUR ($84 USD) per night. Budget hotels cost around 40-60 EUR ($42-63 USD) in the summer.
To save money on accommodation, travel off-season and stay in dorms or split Airbnb units with friends. You can use the website eurocheapo.com to find good B&Bs, as they have a robust listing.
Food and Drink

Food prices are relatively inexpensive, though you’ll find higher prices in tourist areas such as Valletta, St. Julian’s, Sliema’s boardwalk, and Marsaxlokk.
To save money on food, stick to the pastizzi (savory filled pastry) for about 1-2 EUR ($1-2.10 USD), eat at the plethora of vegan and vegetarian restaurants throughout the country (see the list below), avoid snacking, and cook as many meals as possible (breakfast will see the biggest wins).
Transportation

There are three ways to get around the island: buses, taxis, and car rentals. Buses cost 1.50-2 EUR ($1.60-2.10 USD) for a two-hour ticket or 21 EUR ($22 USD) for a weekly pass, while car rentals cost 39 EUR ($41 USD) per day (in the summer they start closer to 50 EUR or $53 USD per day. There are a number of local rental companies, but I used Hertz since it was close to my Airbnb. Many of the local car companies don’t take credit cards and want deposits in cash. Going with bigger companies adds another layer of security.
Taxis cost 10-20 EUR ($11-21 USD); while not ideal, they can be ordered ahead of time via Whatsapp and are a good last-minute option if you get stuck because the bus doesn’t turn up.
One thing to note about the buses is that they are infrequent so they fill up fast. We got on one bus, only to have him pull over, kick everyone off, and put us all in another bus, that then waited for 20 minutes to move. It’s a crazy system and, during the summer months when the crowds peak, expect long waits. Don’t be in a rush if you’re using the bus!
Activities

When the weather is nice, there are a bunch of free activities to do, such as enjoying the beach, hiking, swimming, and just walking around. Additionally, all the churches are free. You’ll find a lot of companies that will take you around the island in a boat for 25 EUR ($27 USD). Most museums and attractions cost 5 EUR ($5.25 USD) but you can get a Malta tourism card (there’s one for Mdina and a separate one for Valletta) that will save you about 10-20 EUR ($10.50-21 USD) depending on how many attractions you squeeze in.
On a side note, I found the main tourism center in Valletta unhelpful. The staff couldn’t answer a lot of my questions. The smaller, unofficial locations that littered Sliema’s boardwalk had more information on car rentals, things to do, and prices.
Recommended Bars and Restaurants
Restaurants: Rising Sun (Mdina), Loli (Vegetarian), The Grassy Hopper (Vegan/Vegetarian), the Marsaxlokk fish market, Suruchi, Ta Doni, Cuba, Rocksalt, Ta’ Rikardu (Gozo), Electro Lobster Project.
Bars: Hole in the Wall (Sliema), Native (and any bar on that street as it’s the main hub for nightlife), Dubliner, Legligin, The Thirsty Barber
Looks like all those British retirees were on to something after all!
P.S. – BIG NEWS! This year I’m relaunching the Nomadic Matt group tours. You can come travel around with me and other community members! I’ll be doing four over the course of the summer. You can find out more about them and sign up by clicking here.
The post How to Visit Malta on a Budget appeared first on Nomadic Matt's Travel Site.
from Nomadic Matt's Travel Site http://www.nomadicmatt.com/travel-blogs/malta-budget/
Where to Stay in Barcelona — Best Neighborhoods and Accommodation

Where’s the best place to stay in Barcelona? I called in the experts! After writing my Where to Stay in Paris post, I was inundated with requests to do one for Barcelona, too. At the time, I grumbled, “I’m only one woman — I’m not an expert on every city in the world!”
But you know what? You really want to know. And while I’ve been to Barcelona several times, I don’t know it like I know Paris (and I can’t stand when travel bloggers write ultimate guides to places they barely know). So I hired two Barcelona experts to write the best, most detailed Barcelona accommodation guide possible: Ashley and Alex from the blog In Pursuit of Adventure.
And for the record — my personal favorite Barcelona neighborhood to stay in is Gràcia!
Take it away, guys!
Kate
The enchanting city of Barcelona is our favorite city in Europe to explore, and we love indulging in its unique culture. We’re not alone — tourists around the globe flock to this coastal Mediterranean city year-round, seeking out beautiful beaches, a vibrant culinary scene, and lively nightlife.
Barcelona is part of the region of Catalonia in northeast Spain, and the independence flag hanging off balconies reminds us that they are Catalan, not Spanish. The Catalan residents are proud of their city, their culture, their heritage, and of course their fútbol team, FC Barcelona! Their spirit of independence is contagious and gives the city so much character.

But choosing where to stay in Barcelona can be overwhelming, as it’s a large city broken into many different neighborhoods. Each neighborhood has its own distinct feel, charm, and loyal locals. So what do you do? That’s where we come in!
We know each of these Barcelona neighborhoods like we know the stamps in our passports. So here are our favorite neighborhoods to make your trip memorable. Just remember, no matter where you end up staying in Barcelona, be sure to venture out and sample the charms of each neighborhood from the touristy yet hipster neighborhood of El Born to the gritty and diverse El Raval.

Best Neighborhood Overall: El Born
El Born is the neighborhood to stay in if you are looking to be in the heart of the old city with fantastic artisan shops and hip restaurants. While it can be touristy, El Born is one of our favorite neighborhoods.
El Born is also perfect for anyone looking to be in the heart of Barcelona, as it’s walking distance to Barceloneta, the beach, the Gothic Quarter, and several metro stops that can connect you to all the different major sites in the city.
This neighborhood is perfect for exploring little local shops full of amazing products from handmade ceramics to custom leather aprons (which every trendy restaurant seems to have their waiters wear!) to art galleries. The alleyways are filled with street art, especially la bomba (the bomb), which represents Barcelona’s anarchist spirit, and flags and buntings for the perfect photo opportunities.

Be sure to pop into the Picasso Museum, which showcases the artist’s work from an early age to some of his most famous paintings. Try to visit on the first Sunday of the month when it’s free! Then grab a coffee or a vermouth at one of the many outdoor patios and soak in the relaxed lifestyle here.
Lower El Born is the more touristy side of the neighborhood with the church of Santa Maria Del Mar dominating the area and a large pedestrian area lined with hip restaurants, cocktails bars that go all night and boutique shops.
Upper El Born is quieter, filled with more residential apartments, local bar, and the famous Mercat Santa Caterina where you can go for the best local menú del día, or lunch special, at Bar Joan, which we think is the best lunch deal in town.
Check out hotels in El Born here.

Best Neighborhood for Beach Lovers: Barceloneta
Barceloneta is probably the proudest Catalan neighborhood in Barcelona and you’re never further than five minutes from the beach. The independence flag of Catalonia flies proudly from almost every balcony here.
Barceloneta is also the neighborhood where you will see the most backlash on tourism. Residents want to keep the neighborhood local and have fought ardently to keep it that way.
That doesn’t mean you should stay away, though. Thoughtful tourists who respect the locals are welcome. That means that when you leave the beach, put on some clothes before you pop into a shop or grab a bite to eat. If you are out until the early hours of the morning (which happens easily here), keep your voices down to avoid disturbing people who are asleep.

Also, make an effort to support local businesses here. Head to small, family-run restaurants like La Cova Fumada, where la bomba (not the street art — in this case, a glorious ball of fried mashed potatoes stuffed with minced meat and topped with aioli and bravas sauce) was first invented back during the Civil War. Or head to Vaso del Oro, where they have been brewing their own beer and serving it up in flautas, or beer flutes, for over fifty years.
Take a stroll along the sand and notice all the locals out walking, rollerblading, biking, and soaking up the Mediterranean sun. Barceloneta will treat you well if you treat it well.
Check out hotels in Barceloneta here.

Best Neighborhood for a Cultural Mix: El Raval
El Raval is the infamous neighborhood once known for drinking establishments, cabaret shows, prostitution, crime and Hemingway — and that’s exactly why you should stay there. This neighborhood embraces its gritty past while looking to a modern future. Centrally located near the main port in the historical district of Barcelona commonly known as Ciutat Vella, today El Raval is far more charming than seedy.
The neighborhood is known for its diversity and often referred to as Barri Xinès, or Chinatown, by the locals. Today Chinese, Pakistanis, Filipinos, South Americans, Eastern Europeans and Middle Easterners inhabit the neighborhood, creating a unique melting pot of cultures.

Here you will also find one of Gaudi’s earlier works, the Palau Güell, and the Barcelona Museum of Contemporary Art, more affectionately called MACBA. Here you will find locals of El Raval on the steps drinking wine and watching the skateboarders do tricks in the streets.

Today El Raval has become a treat for young foodies and boozehounds. The neighborhood is filled with restaurants and bars like Bar Marsella (pictured above), an old absinthe bar stuck in the time of Hemingway (the writer himself used to drink here quite often), or Bar Cañete, a modern player in the Barcelona culinary scene using classic Catalan ingredients to make innovative, modern dishes.
Check out hotels in El Raval here.

Best Neighborhood for Foodies: Poble Sec
Poble Sec is the perfect neighborhood to stay in if you are looking for a some peace and quiet but also want to eat like a local. The neighborhood is quiet during the day but really comes to life at night when all the tiny tapas bars along the pedestrian-only Carrer de Blai open up shop and fill with hungry locals. This is the neighborhood to drink vermouth, grab some cheap eats, and revel in being Catalan if only for the duration of your stay.
While there are no major tourist sites in Poble Sec, this neighborhood is well connected by metro and it’s just a hike up the hill to see the castle of Montjuic, the gardens, and to take the funicular down to the beach.

This is also the neighborhood to visit Quimet & Quimet, one of the most famous tapas bars in the city. Here they focus on high quality conservas, or canned food, and montaditos, small open-faced sandwiches.
Squeeze in here, order some cava, a couple montaditos and throw your napkins on the floor like a local — that’s what you do in Poble Sec!
Check out hotels in Poble Sec here.

Best Neighborhood for a Small Town Feel: Gràcia
Gràcia is the neighborhood to stay in if you are looking for that small town charm while still in the big city. One of the more unique neighborhoods, Gràcia was its own village until Barcelona’s expansion absorbed it into the city itself. The locals, however, still very much consider themselves separate to Barcelona and it’s noticeable as soon as you exit the metro. It feels like you’ve stepped into another world here in Gràcia.
We personally love Gràcia as it is lesser-known to tourists but has a wonderful bar and restaurant scene, especially for classic Catalan dishes. Cal Boter is one of those restaurants that features traditional dishes like snails and pig trotter. If that’s a little too old-fashioned for your taste, head over to Bar Bodega Quimet for tapas in their small, bustling, and decidedly local bodega. Don’t forget to grab a drink at La Festival, a modern wine shop focusing exclusively on organic and biodynamic wines.

During the late afternoon, head to Plaça del Sol, the main square, where everyone in Gràcia congregates to gossip, people-watch, and just enjoy their daily life. Grab a beer and join in!
Gràcia exemplifies what Barcelona is all about: individuality and independence against larger outside forces. It’s quiet and quaint with traditional shops but leaves room for modern roots to be established. Gràcia comes as a highly recommended neighborhood to stay in especially if you enjoy that local vibe and you are visiting Barcelona for the second or third time, as it is not located in the old city.
That said, Gràcia is located just beneath Gaudi’s famous park, Parc Güell, and is close to lesser-known Gaudi architecture and Tibidabo, an amusement park from the early 1900s that is still operational.
Check out hotels in Gràcia here.

Best Neighborhood for Hipsters: Sant Antoni
Sant Antoni is the hipster neighborhood and is the perfect place to stay for those looking for a modern vibe in the old city. While still very residential, it is quickly becoming host to a number of hip establishments like Cafe Cometa and La Donutería (yes, you can even find fancy donuts in Barcelona!). You will also find locals of Sant Antoni congregating around the Carrer del Parlament which is host to several very chic restaurants, bodegas and bars.
Sant Antoni hasn’t totally abandoned its roots, however, and here you will also find the much loved old school La Bodega d’en Rafel. They’re also renovating the heart of the neighborhood, Mercat Sant Antoni, which has been around since 1882.

Sant Antoni is a neighborhood that is focused on residential life, making it a great neighborhood to live like a local. However, it is not as well-connected to the city for first time visitors and does not have any tourist attractions. It also doesn’t have any major hotels, so apartment rentals may be the way to go here.
However, with the expansion of restaurants and nightlife, this may change in the future; Sant Antoni is, after all, the chic neighborhood.
Check out hotels in Sant Antoni here.

Best Barcelona Hotels
You can compare rates on hotels throughout Barcelona here. Here are some of our top recommendations:

Best Luxury Hotel: W Barcelona
The W is an icon and the place to stay for luxury in Barcelona. Located on the beach in Barceloneta, across the street from the Desigual headquarters, the W Hotel invites sunbathers with its glass sail-like facade, reflecting the city and the beach below.
There is a pool with a bar located on the 26th floor, so you can soak in views of both the city and the Mediterranean. Plus, during the summer they host a series of parties with local and international DJs on their pool deck. The W is the epitome of Barcelona cool.
Rates from 230 EUR ($242) per night.

Best Mid-Range Hotel: Barceló Raval
Dominating the skyline at Rambla del Raval is the Barceló Raval. This imposing circular hotel offers the perfect place to stay in the heart of the city with 180-degree views. Prices are very reasonable for the quality you receive. Plus, there is a swimming pool and a 360-degree rooftop bar that is the perfect place to catch every gorgeous Barcelona sunset. (That photo above is from the roof!)
Rates from 90 EUR ($95) per night.

Best Hostel: Generator Barcelona
Located in Gràcia, Generator Barcelona is a fantastic hostel to stay in while visiting the city, especially if you’re not a hostel person. The design of this hostel alone makes it less like a hostel and more like a boutique hotel. They also have a range of rooms starting from dorm shares to privates with twin beds to even a penthouse with a terrace!
This hostel has it all — free wifi, a lounge, even a bar, and is the perfect place to decompress after a day of sightseeing or a wild night out. You can meet lots of fellow travelers if you wish or just relax and enjoy your solitude.
Dorm beds from 11 EUR ($12) per night, private rooms from 45 EUR ($47) per night.

Barcelona Travel Tips
Barcelona can be overwhelming at times, so here are some travel tips to ensure you have the best trip possible:
Don’t stay too far outside the city. Barcelona has a very large metropolitan area, which is more than just the downtown and tourist sites, and the easiest way to ruin your trip is to stay too far outside.
Instead, stay within the old city limits of Barcelona, or right outside like in Gràcia, because when you are out in the boonies it can be difficult to find transportation back and forth to downtown. Keep in mind that the metro closes around midnight — you don’t want to take expensive taxis or tear yourself away like Cinderella!
Avoid La Rambla. La Rambla, or Las Ramblas as it is more often called, is the most famous street in Barcelona and at one time would have been a wonderful place to stay. Over the years, however, its popularity has become its downfall with overpriced souvenir shops and tourist traps.
We suggest taking a walk down to see La Rambla for yourself, but avoid spending too much of your precious time there. Barcelona has a lot of amazing things to offer you, but La Rambla is not one of them. Go see it and then hightail it to El Raval or El Born.

Learn a little Catalan. Barcelona’s official language is Catalan, not Spanish. Locals will not expect you to know Catalan, but they will appreciate it. Say bon dia for hello, adéu for goodbye, and mercès for thank you. Learn these three simple phrases and the Catalans will be so appreciative of your respect of their language!
Barcelona is best seen on foot. Despite its large size, Barcelona is a walking city at heart. Most of Barcelona’s tourist sites are clustered around Ciutat Vella, the old city. The little windy streets are like treasures — and you’ll miss them when underground on the metro!
Soak up all the wonderful vibrant energy this city has by taking daily strolls in different neighborhoods. You never know what you may encounter. As a bonus, you will work off all that wonderful food you’ve been eating. Speaking of which…

Eat when the locals eat (yes, they eat late). To truly understand the Barcelona lifestyle, you have to eat when the locals eat, otherwise you’ll be sitting in empty restaurants that are only for tourists. Get up in the morning but not too early, as the Catalans are not early risers, and have a cafe con leche (coffee with milk) with some pan con tomate (bread rubbed with tomato and garlic).
And then between 12:30 and 3:00 PM, enjoy the menú del dia, daily cheap lunch specials that often get you three courses with wine for around 10-15 EUR ($11-16). Locals love the menú del dia!
Drinking and eating is crucial to Catalan life, so grab drinks and tapas between 6:00 and 9:00 PM. Hop from one tapas bar to the next while enjoy a drink and just grab a few tapas at each place. Stand up at the bar or outside as you enjoy the bustling atmosphere.
Next, head to dinner around 10:00 PM and take your time eating. There is no rush in Catalonia, especially when you stay centrally and don’t have to worry about the metro closing! This is what the locals do, so you might as well enjoy it while you’re there.

Don’t Visit Barcelona Without Travel Insurance
A lot of people think travel insurance is an unnecessary expense — that’s far from the truth. Travel insurance is vital. It’s saved Kate hundreds of dollars and for one of her friends, who slipped and broke his back while traveling, his travel insurance saved him literally hundreds of thousands of dollars.
If you get pickpocketed on Barcelona’s metro, travel insurance will refund you what you lost.
If you slip on the stairs at the Parc Güell and break your ankle, travel insurance will refund your medical costs and get you home for free.
If you get appendicitis while in Barcelona, travel insurance will cover your medical costs.
If an immediate family member dies while you’re in Spain, travel insurance will help you get home immediately.
These are unpleasant things to think about, but it’s so important to be prepared for the worst.
AdventurousKate.com uses and recommends World Nomads Travel Insurance. They’re a great fit for almost every traveler. Take a look at their policies before you buy to make sure they’re right for you.

Barcelona is waiting for you!
So there you have it — everything you need to know in order to set yourself up for the best trip to Barcelona. Once you are settled in a neighborhood, just let the infectious energy of the city carry you away and we promise you will love Barcelona as much as we do!

Meet the Barcelona Experts
Ashley and Alex are two travelers from California who are addicted to living local. They run the travel blog In Pursuit of Adventure and focus on eating, drinking, and living locally across the globe. They are currently exploring the cuisine and drinks of Cuba before turning their sights to Peru. They also are the authors of Eat Local in Barcelona: A Guide to Catalan Cuisine, which will be published in March.

Have you been to Barcelona? Where’s you favorite place to stay? Share away!
from Adventurous Kate http://www.adventurouskate.com/where-to-stay-in-barcelona-best-neighborhoods-and-accommodation/