Tuesday 27 September 2016

The Best Place in the World for Amateur Night Sky Photographers

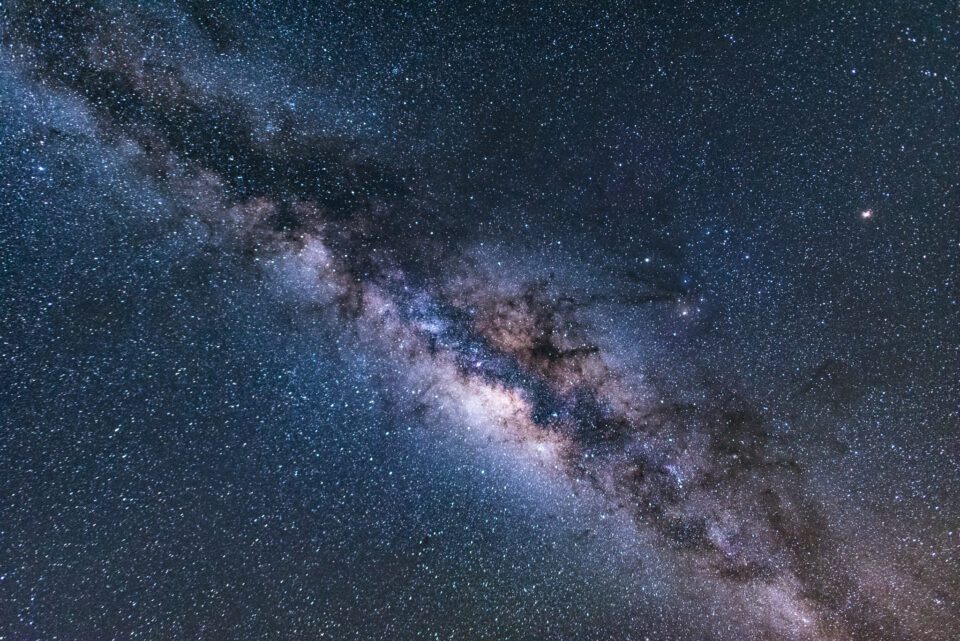
The Atacama Desert on the Chilean high plateau of Altiplano and the Mauna Kea Summit on the Big Island of Hawaii are generally recognized as the two best places for astronomical observations. However, in this article, I argue that the best place for amateur night sky photography is elsewhere. It is in Hawaii too, but on the Island of Maui. It is the extinct Haleakala volcano. Although smaller than the Mauna Kea volcano, Haleakala might actually be better suited for amateur photographers.

Astrophotography_001

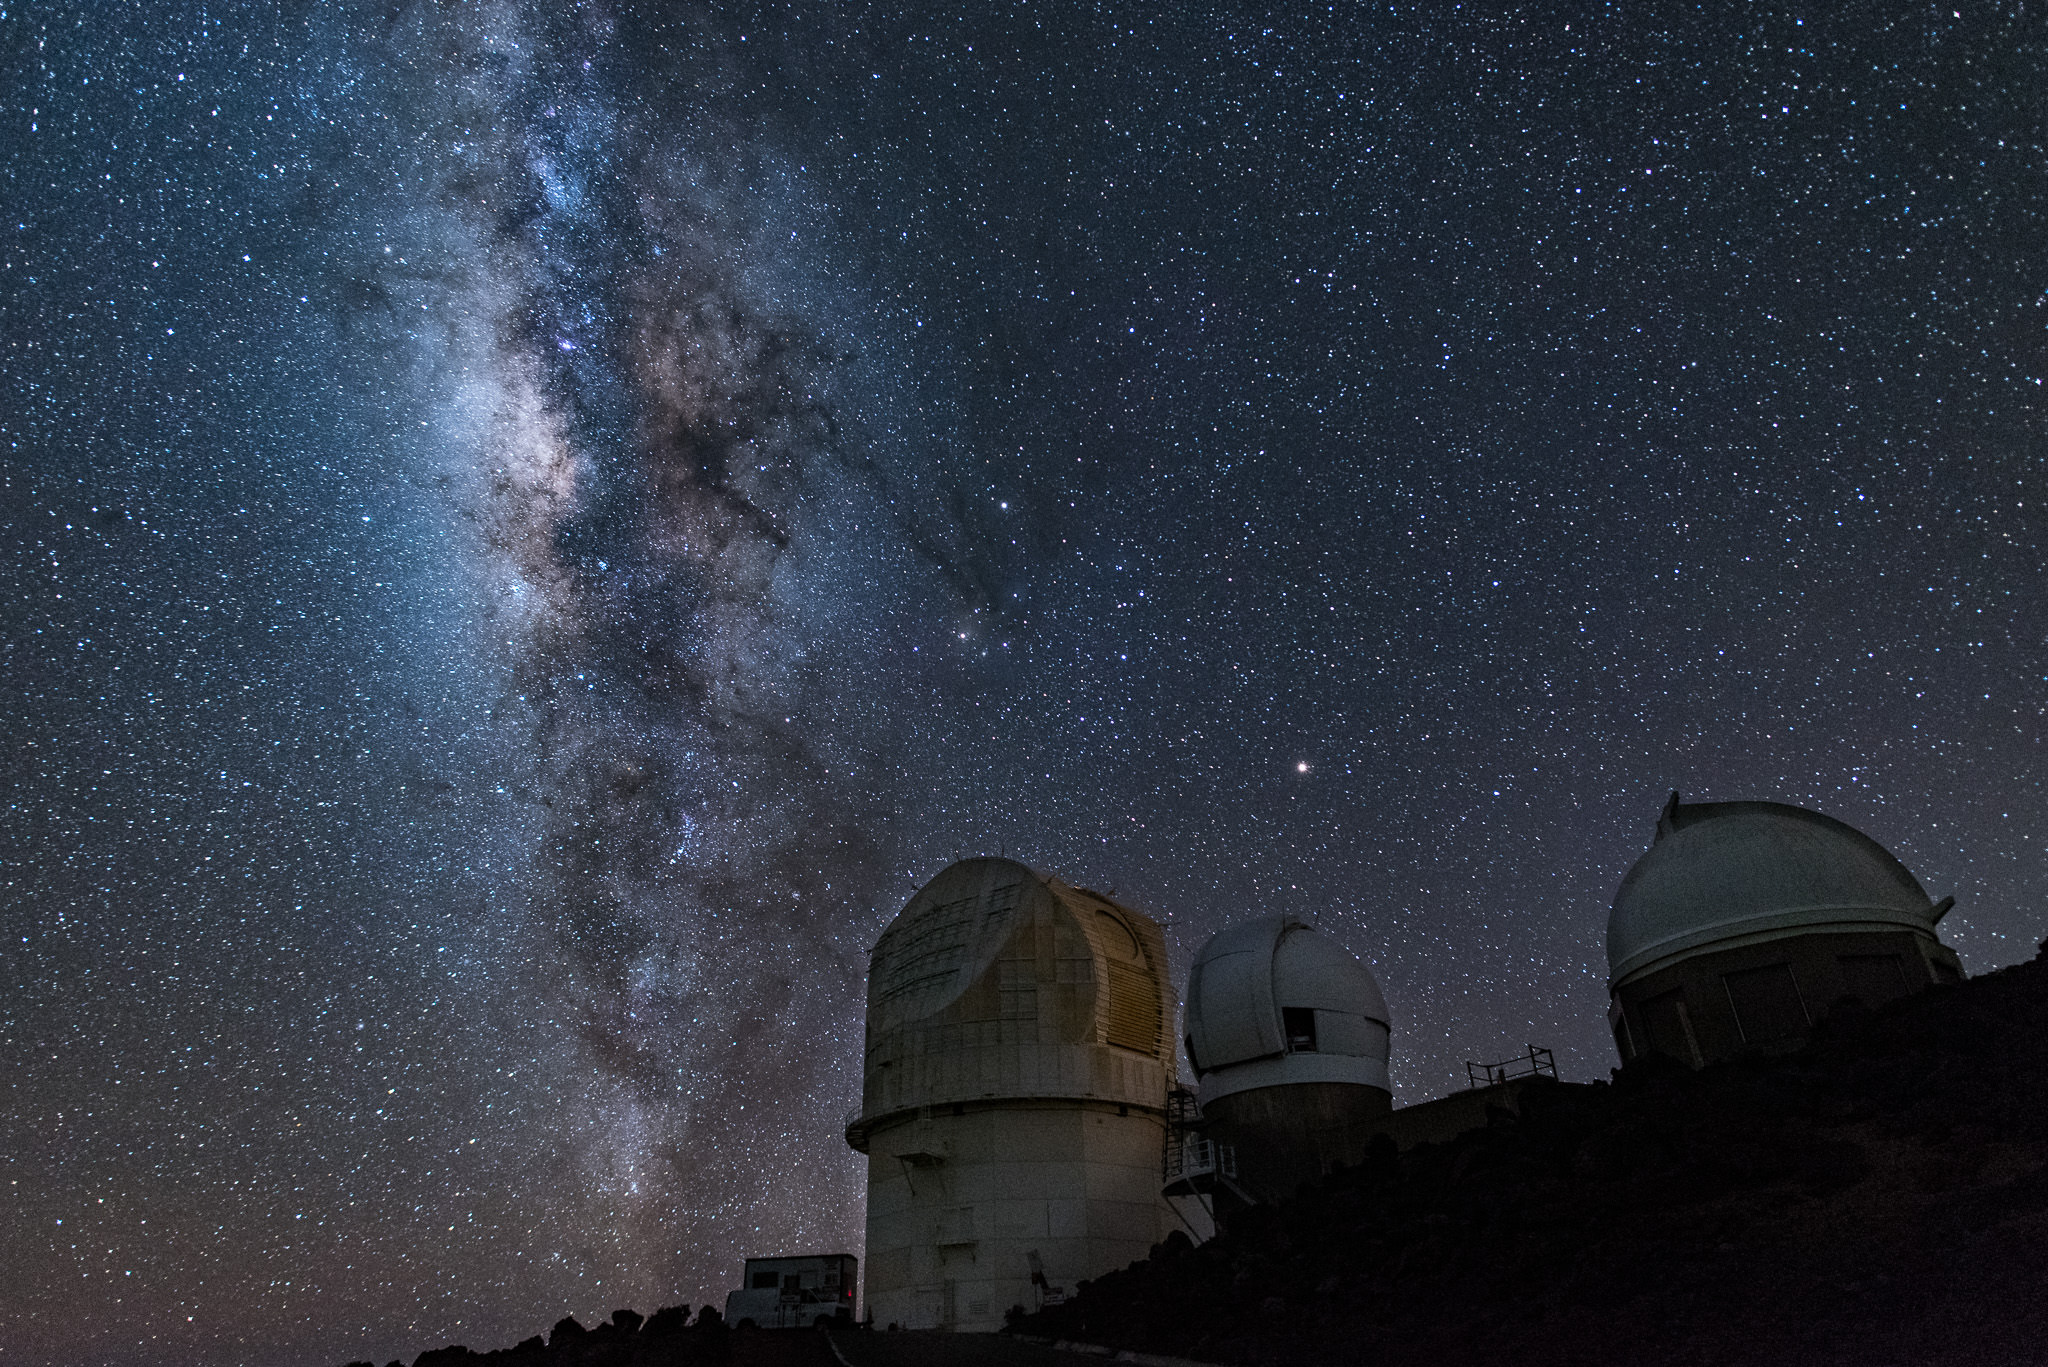
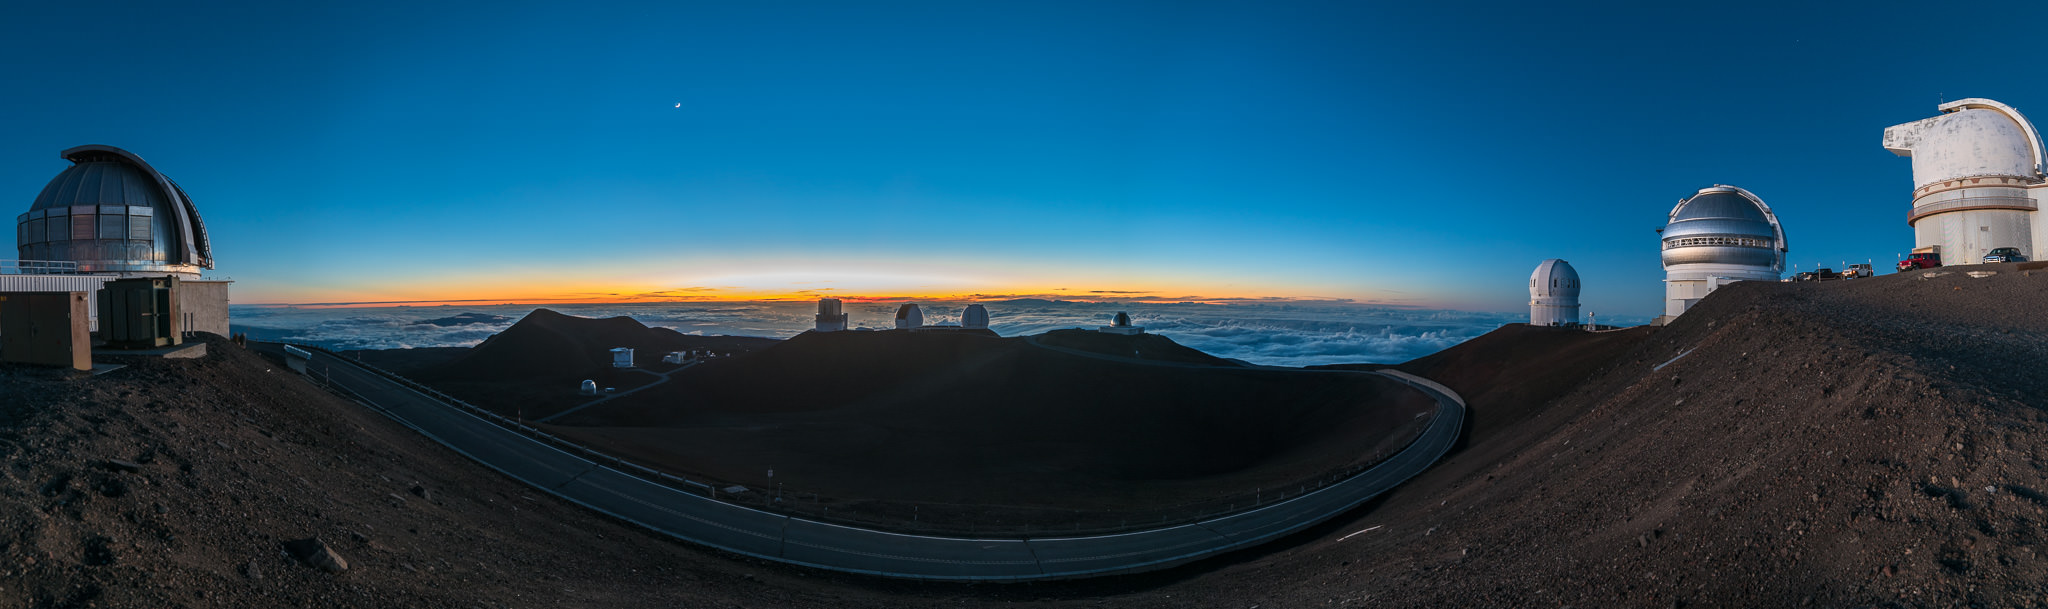
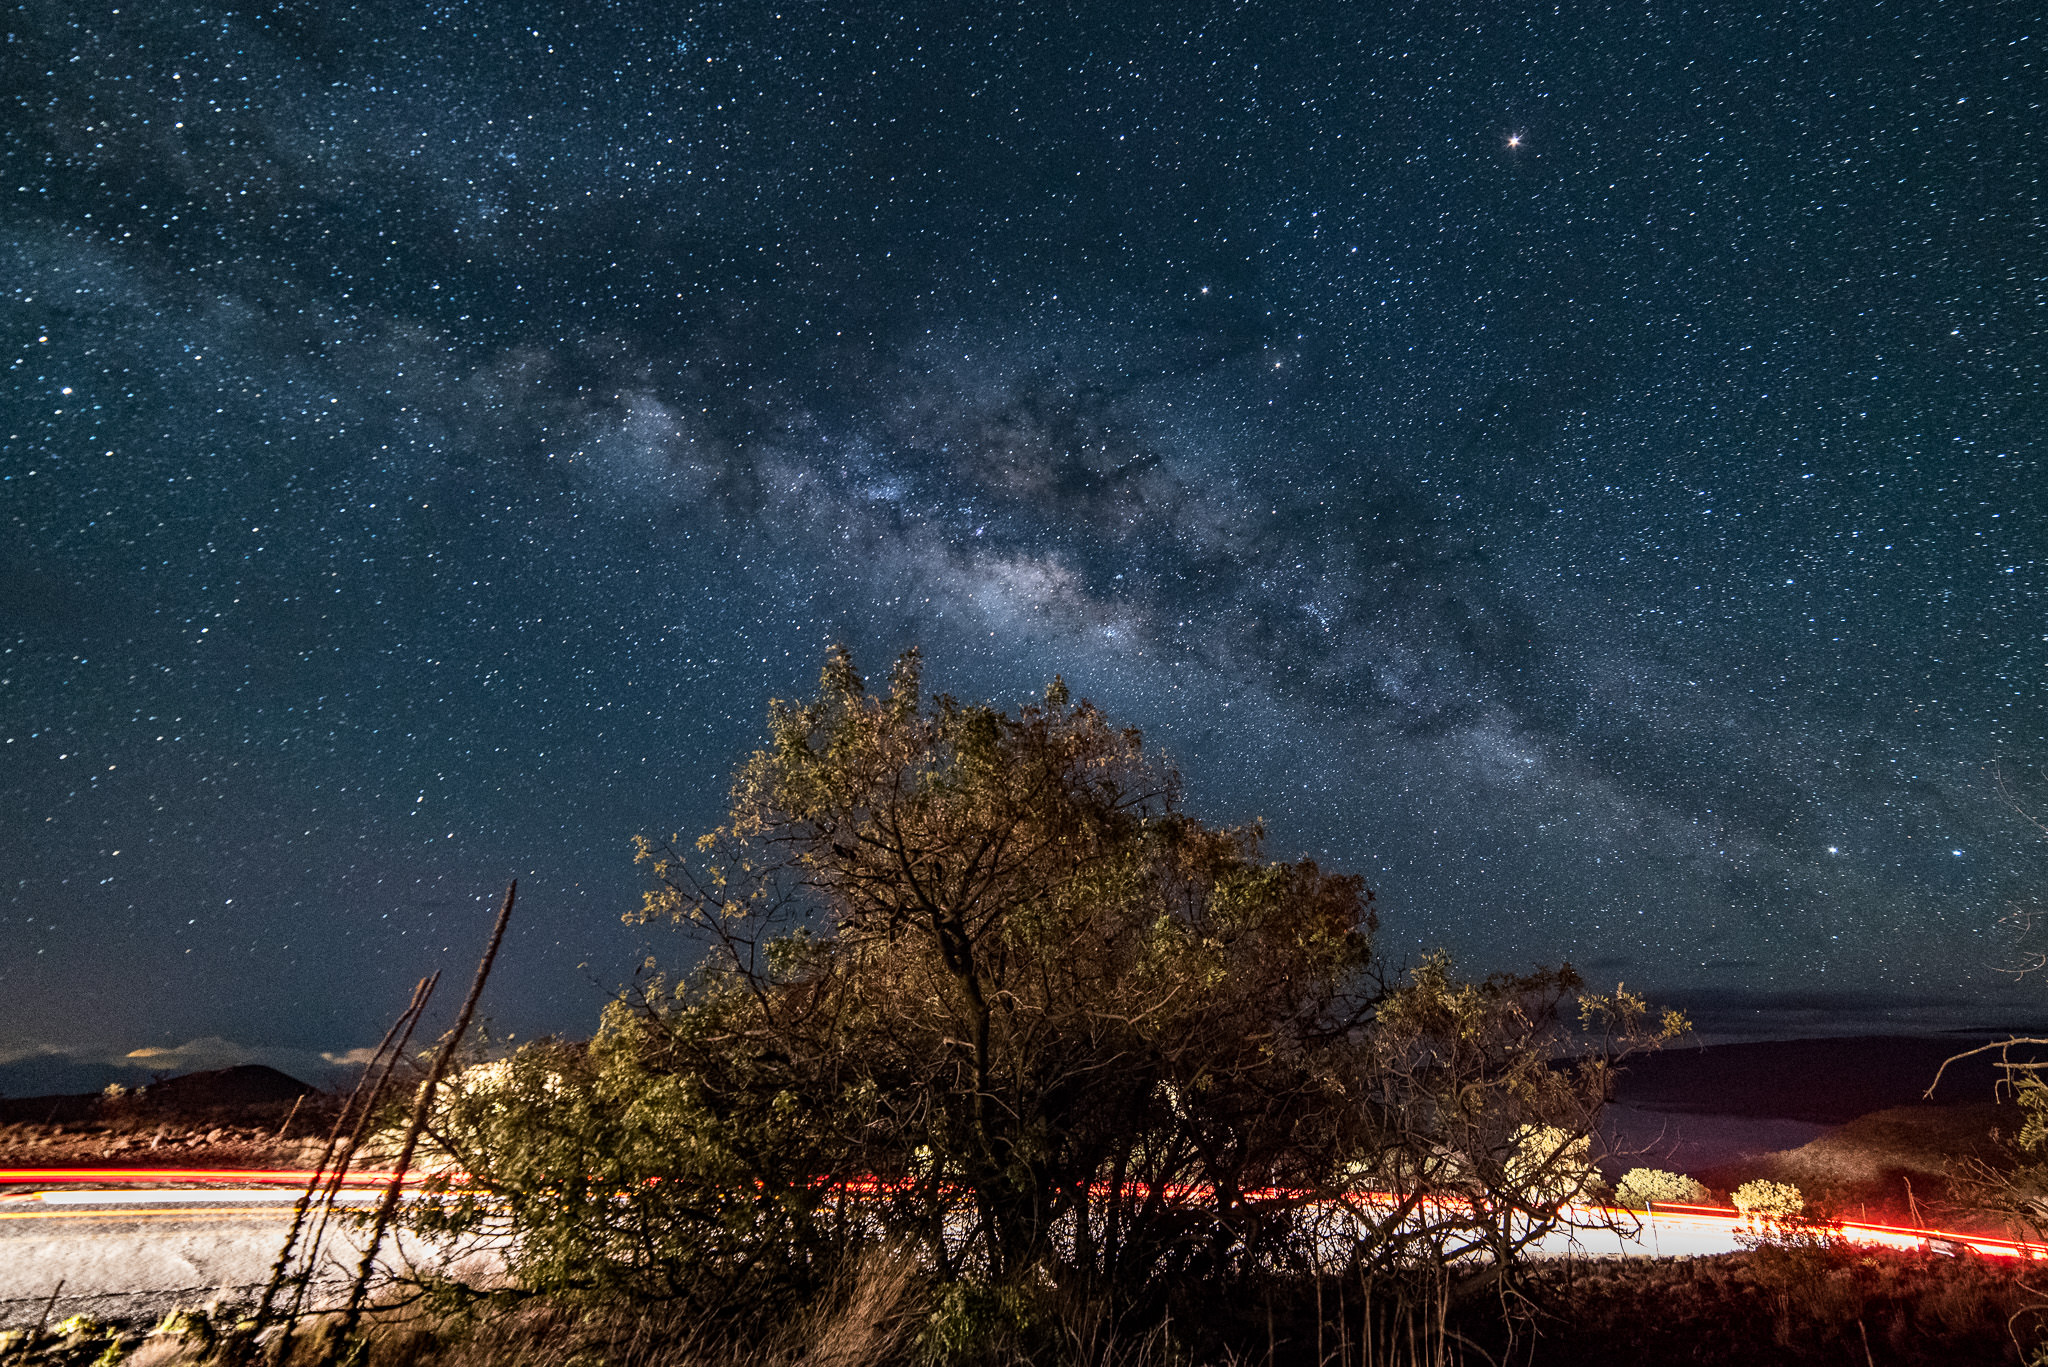
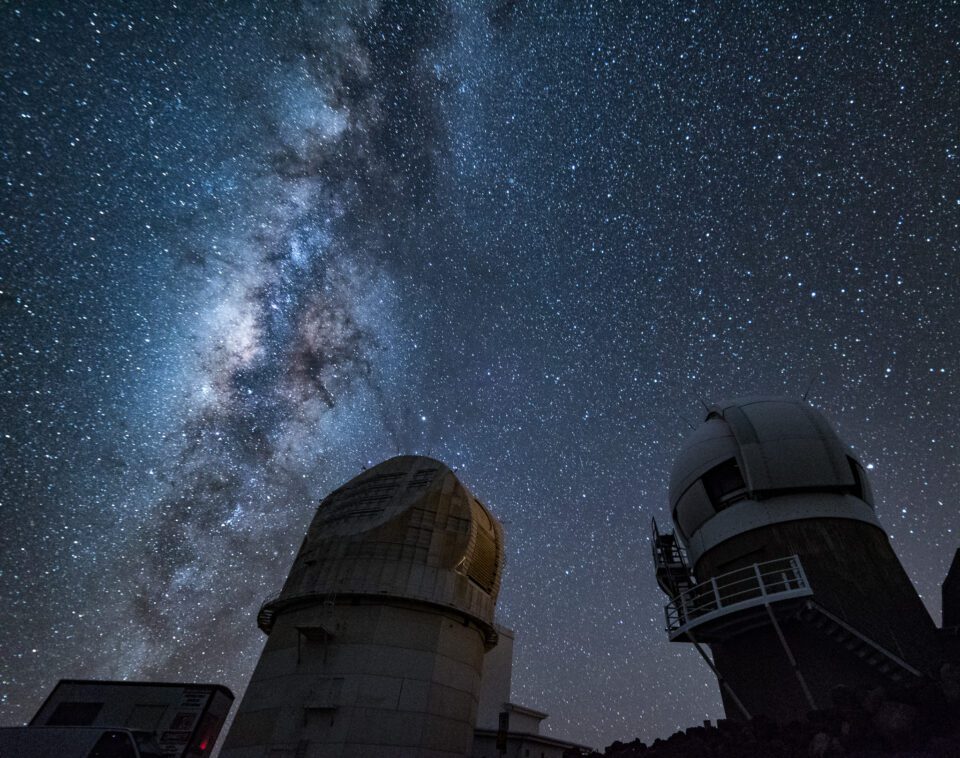
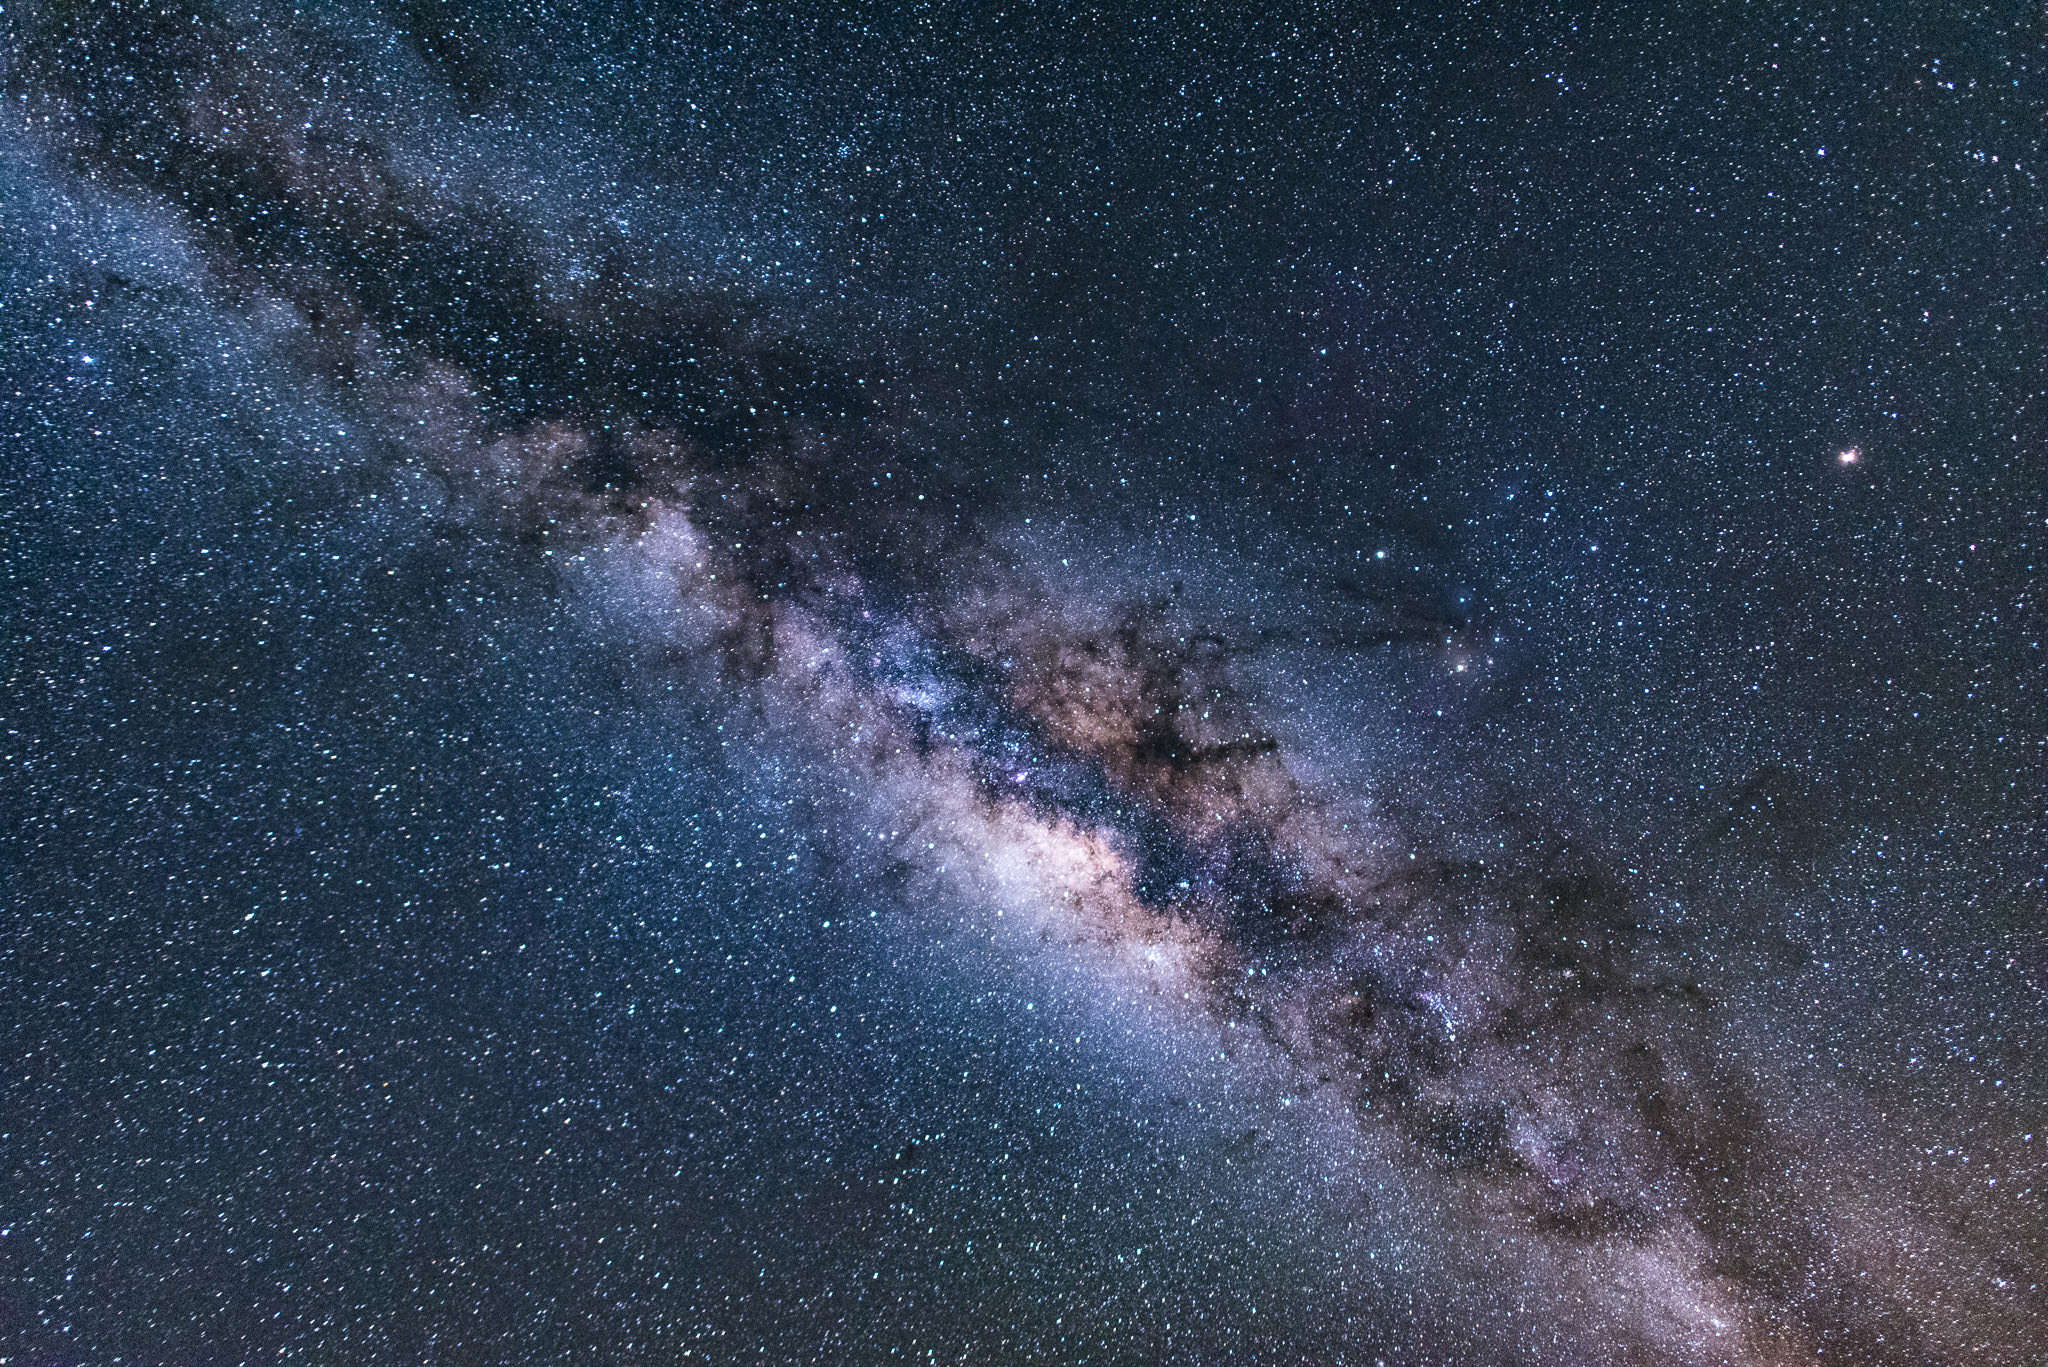
Milky Way and the observatories at the summit of Haleakala volcano
NIKON D750 + 20mm f/1.8 @ 20mm, ISO 6400, 15/1, f/2.5

The combination of dark sky (due to the absence of light pollution) and high altitude with little cloud is what makes the Atacama Desert on the Chile-Bolivian border and Mauna Kea Summit so unique. It is therefore no wonder that one finds state-of-the-art technology telescopes in those sites: in Atacama, the ALMA project as the world’s largest system of 66 telescopes was launched in 2013; Mauna Kea Summit is the second largest observatory for optical, infrared and submillimeter astronomy. I have had the great fortune to have visited both these locations (I was not at the ALMA site itself, as it was under construction back in early 2013, but I went to a public observatory nearby). And that is why I dare pronounce this verdict: those sites are great for experts working for those observatories, but not so great for amateur photographers.

Astrophotography_002

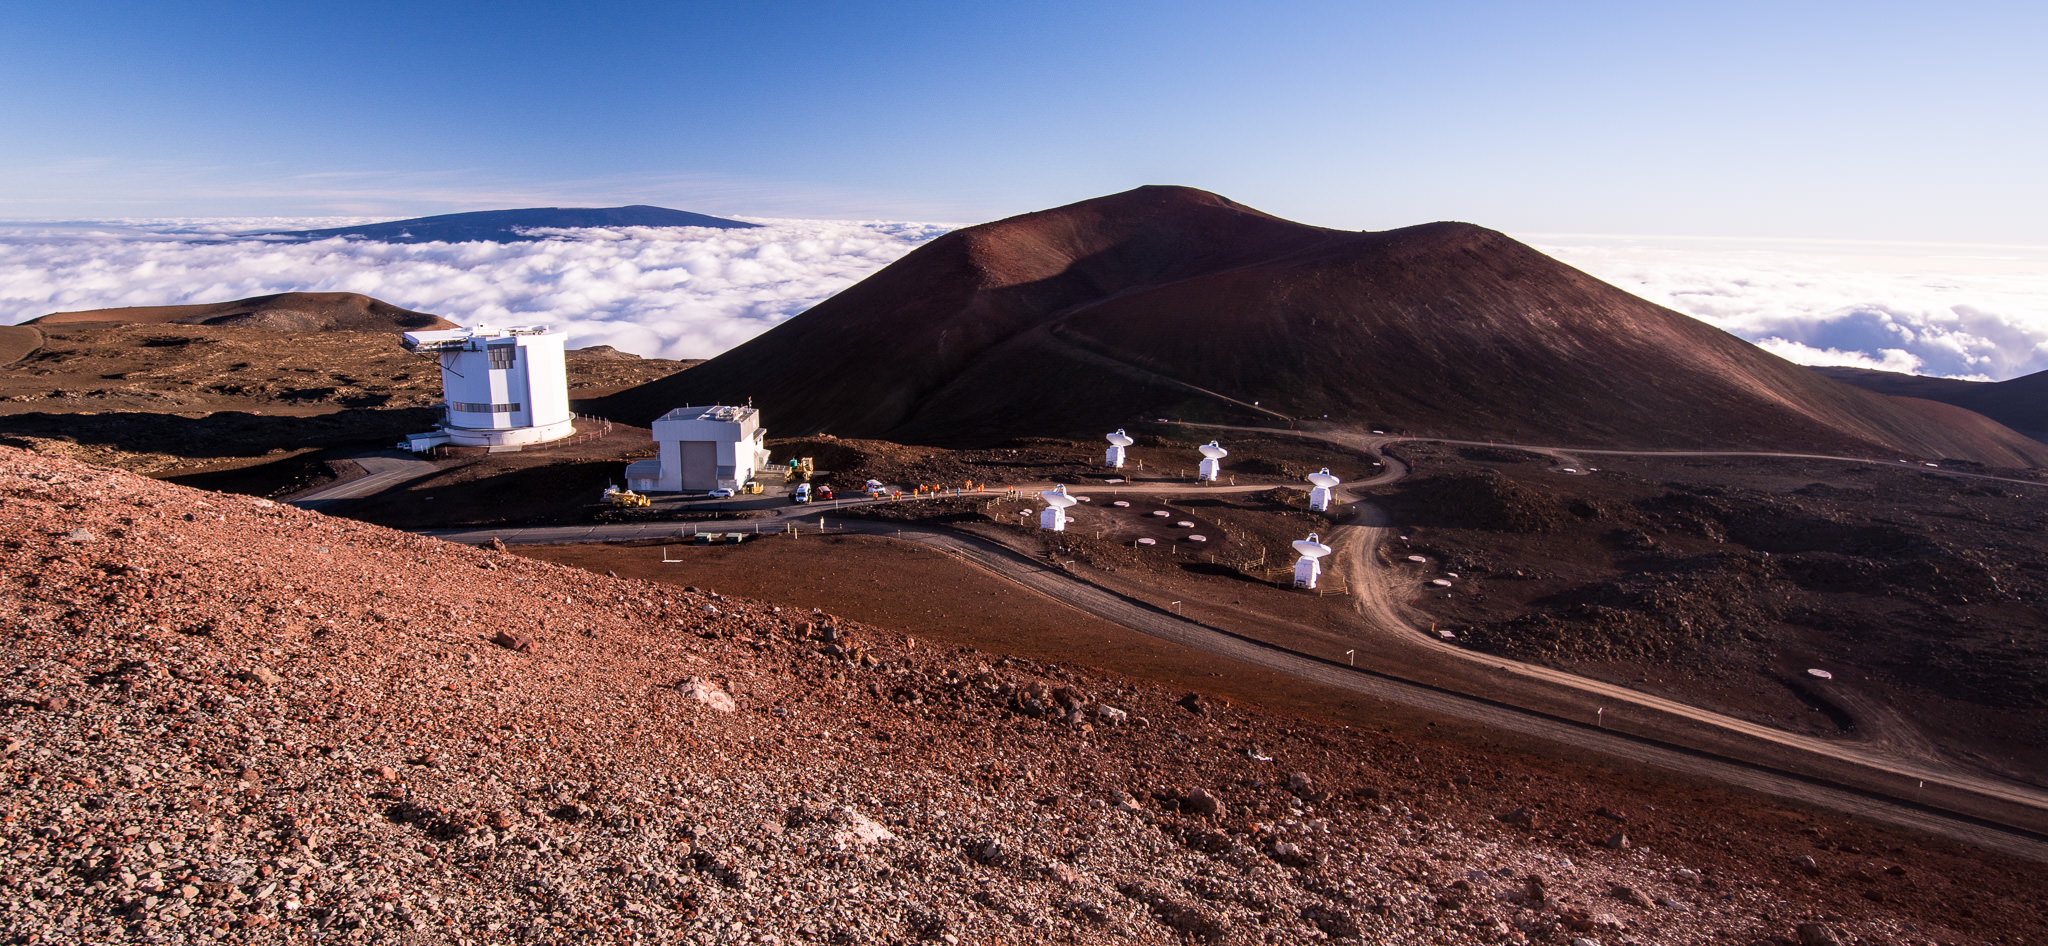
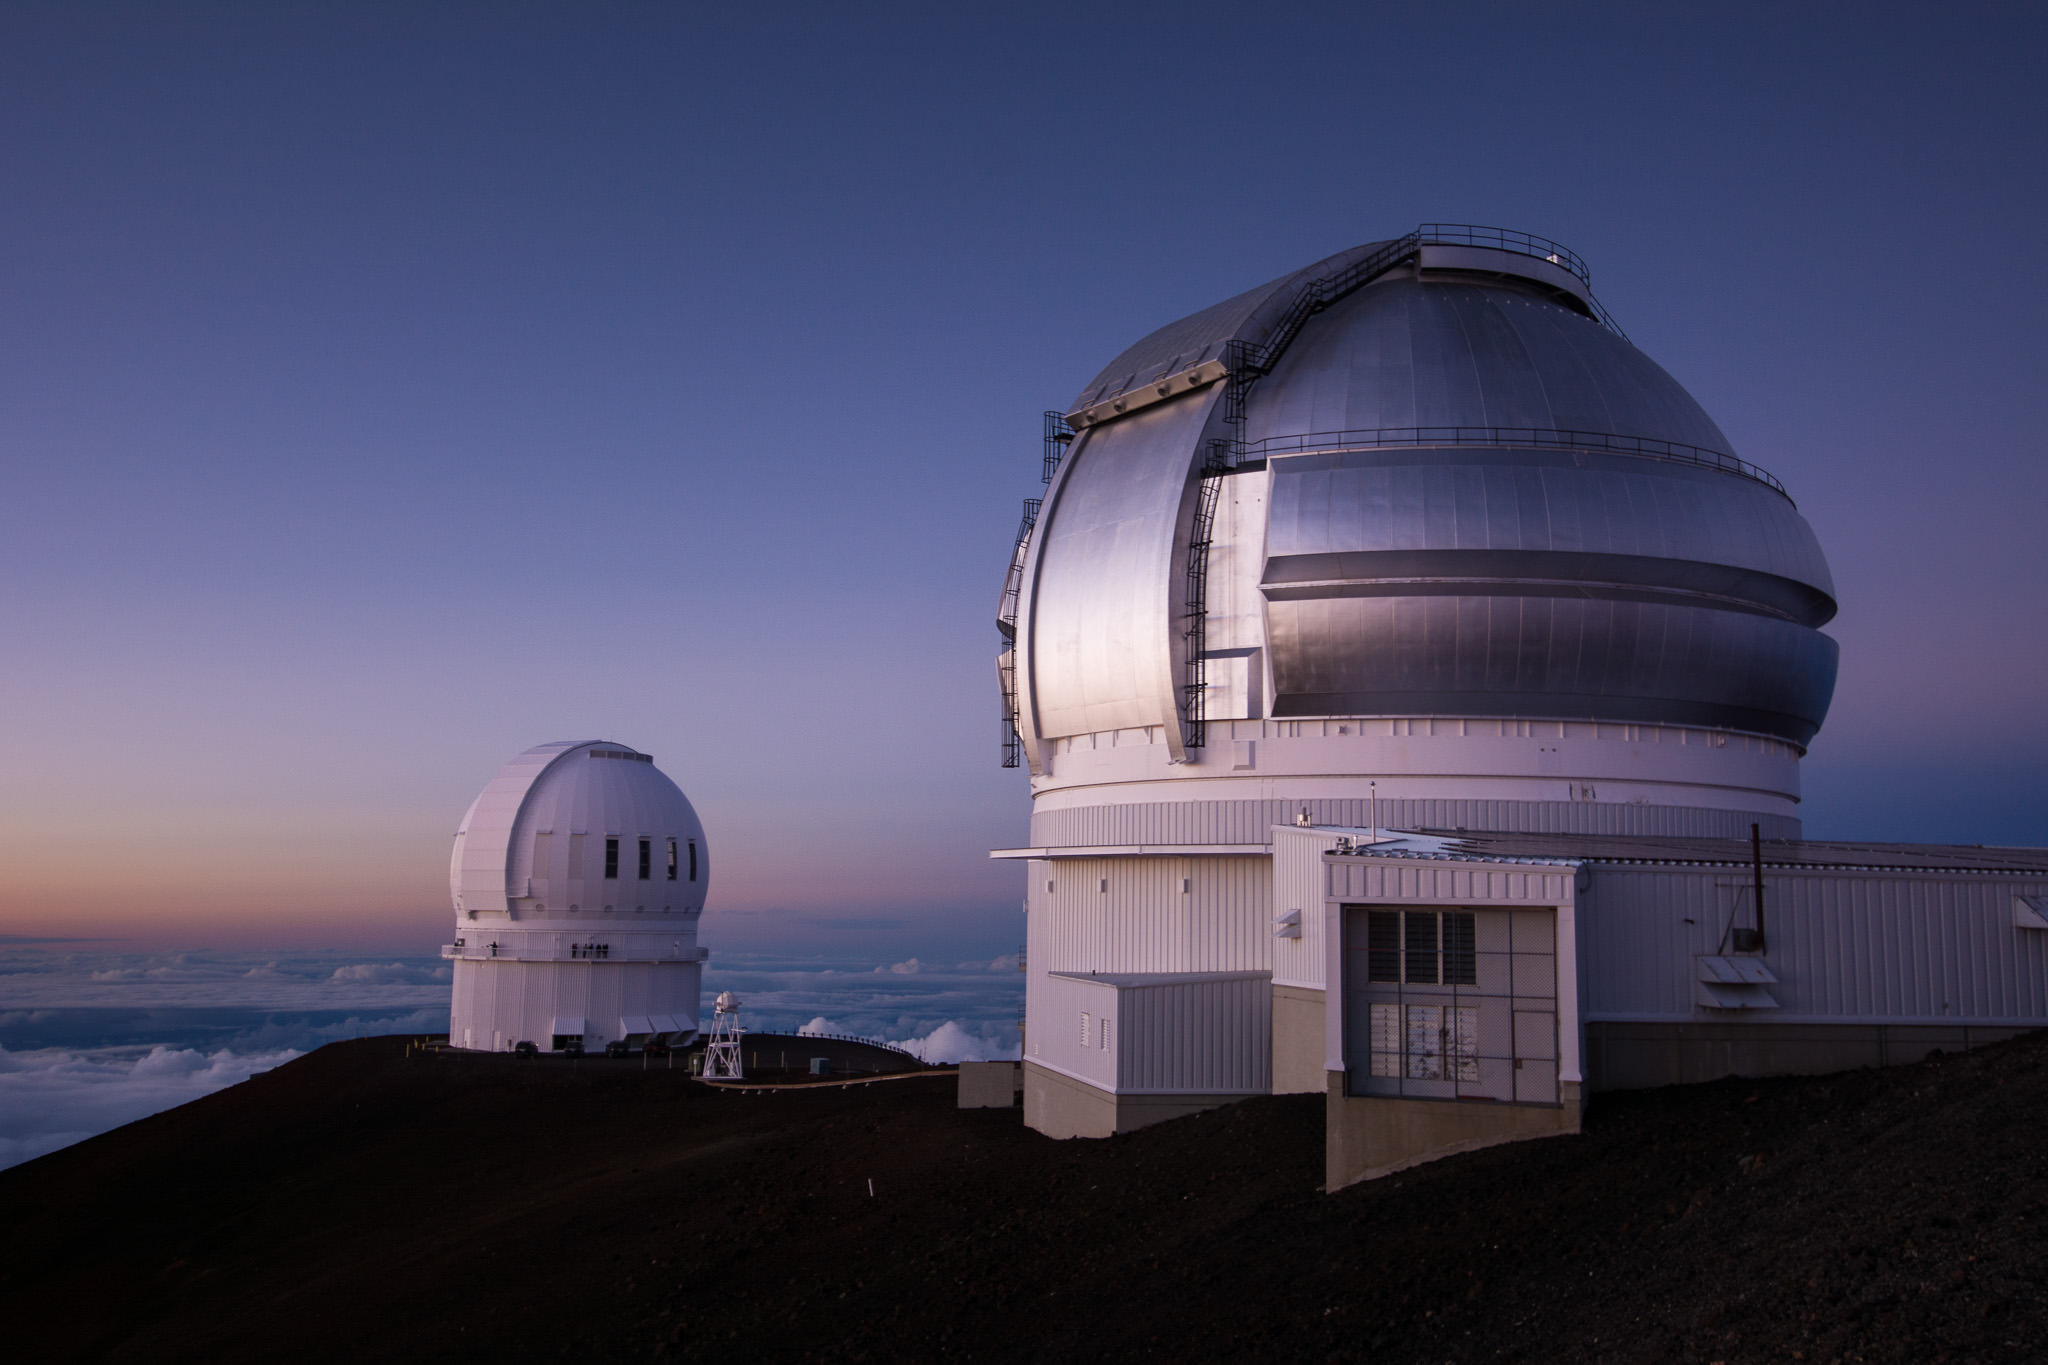
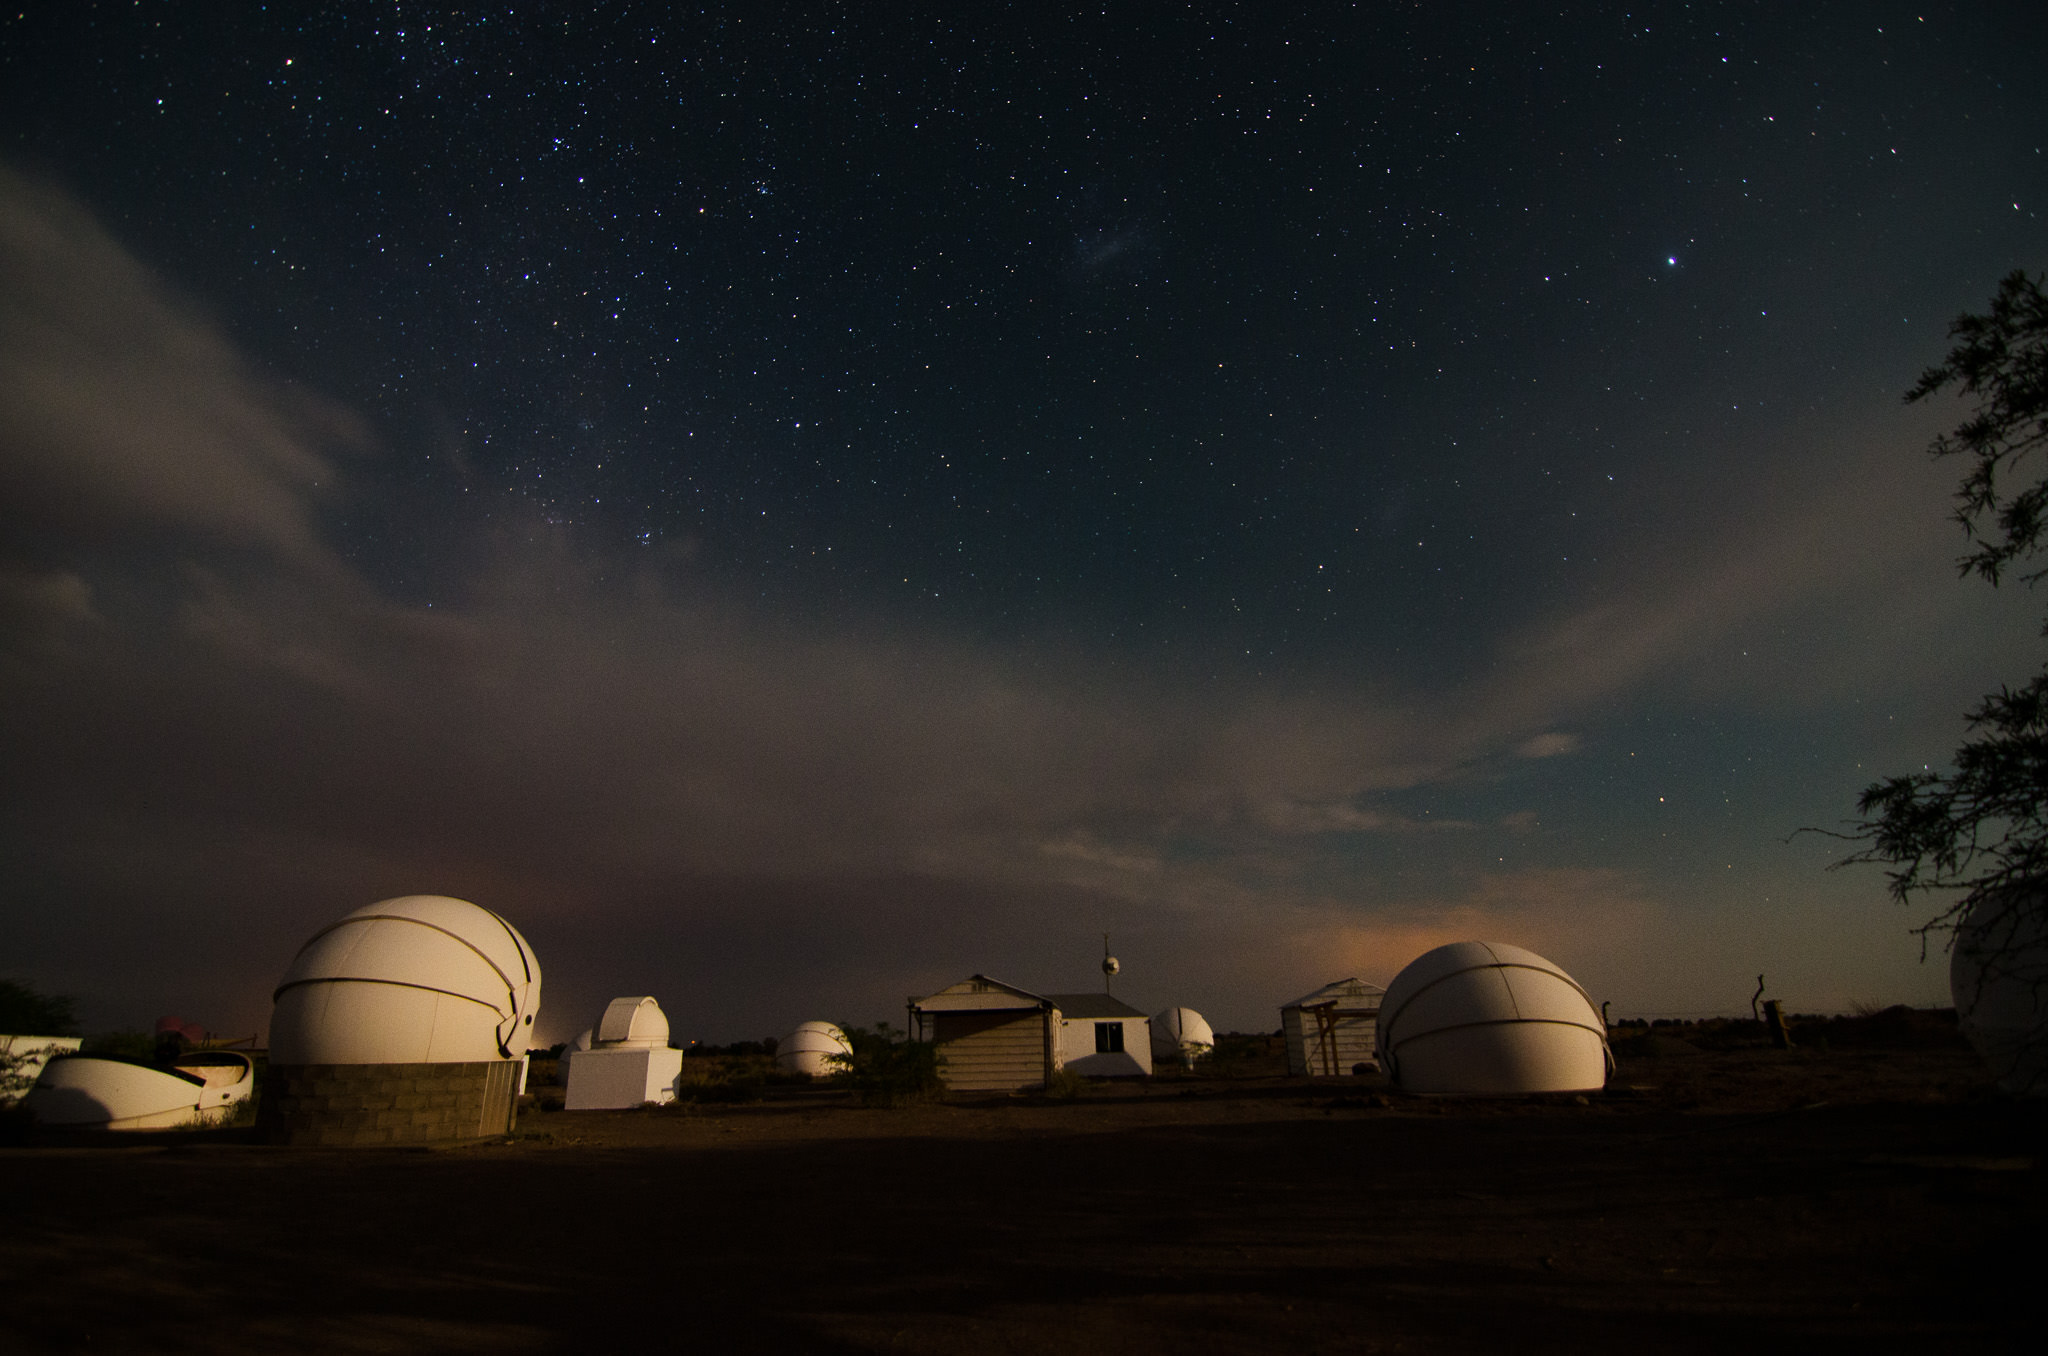
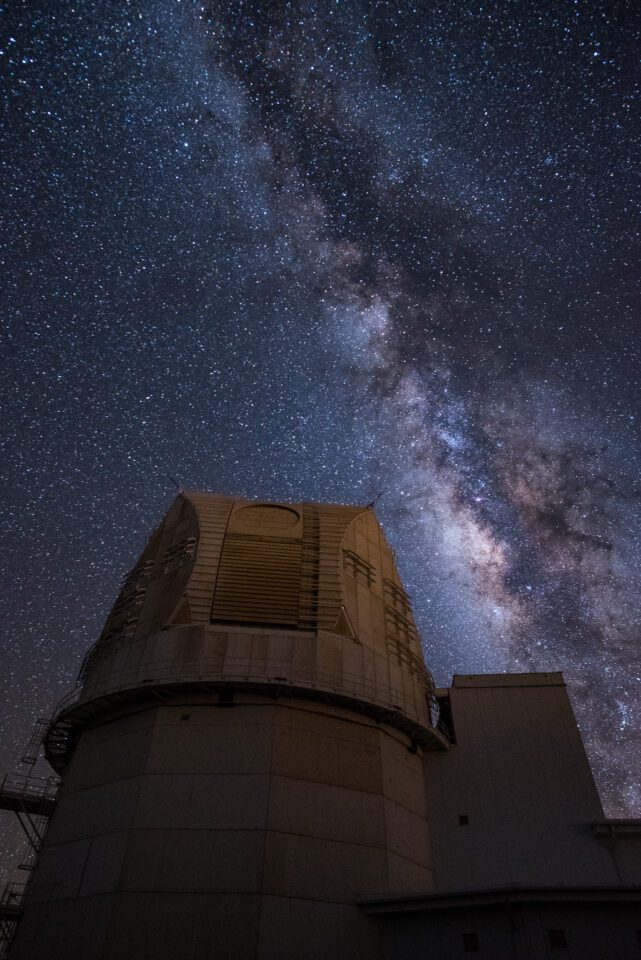
Panorama of Mauna Kea Summit with observatories
NIKON D750 + 14mm f/2.8 @ 14mm, ISO 100, 8/10, f/4.5

Don’t get me wrong, I am not arguing that the Atacama Desert and Mauna Kea Summit are not unique and beautiful enough. They absolutely are and you should visit them, not only because of the dark sky.

Astrophotography_003

Summit of Mauna Kea with telescopes and the Summit of Mauna Loa on the top left corner
NIKON D7100 + 10-24mm f/3.5-4.5 @ 13mm, ISO 100, 1/100, f/8.0

Astrophotography_004

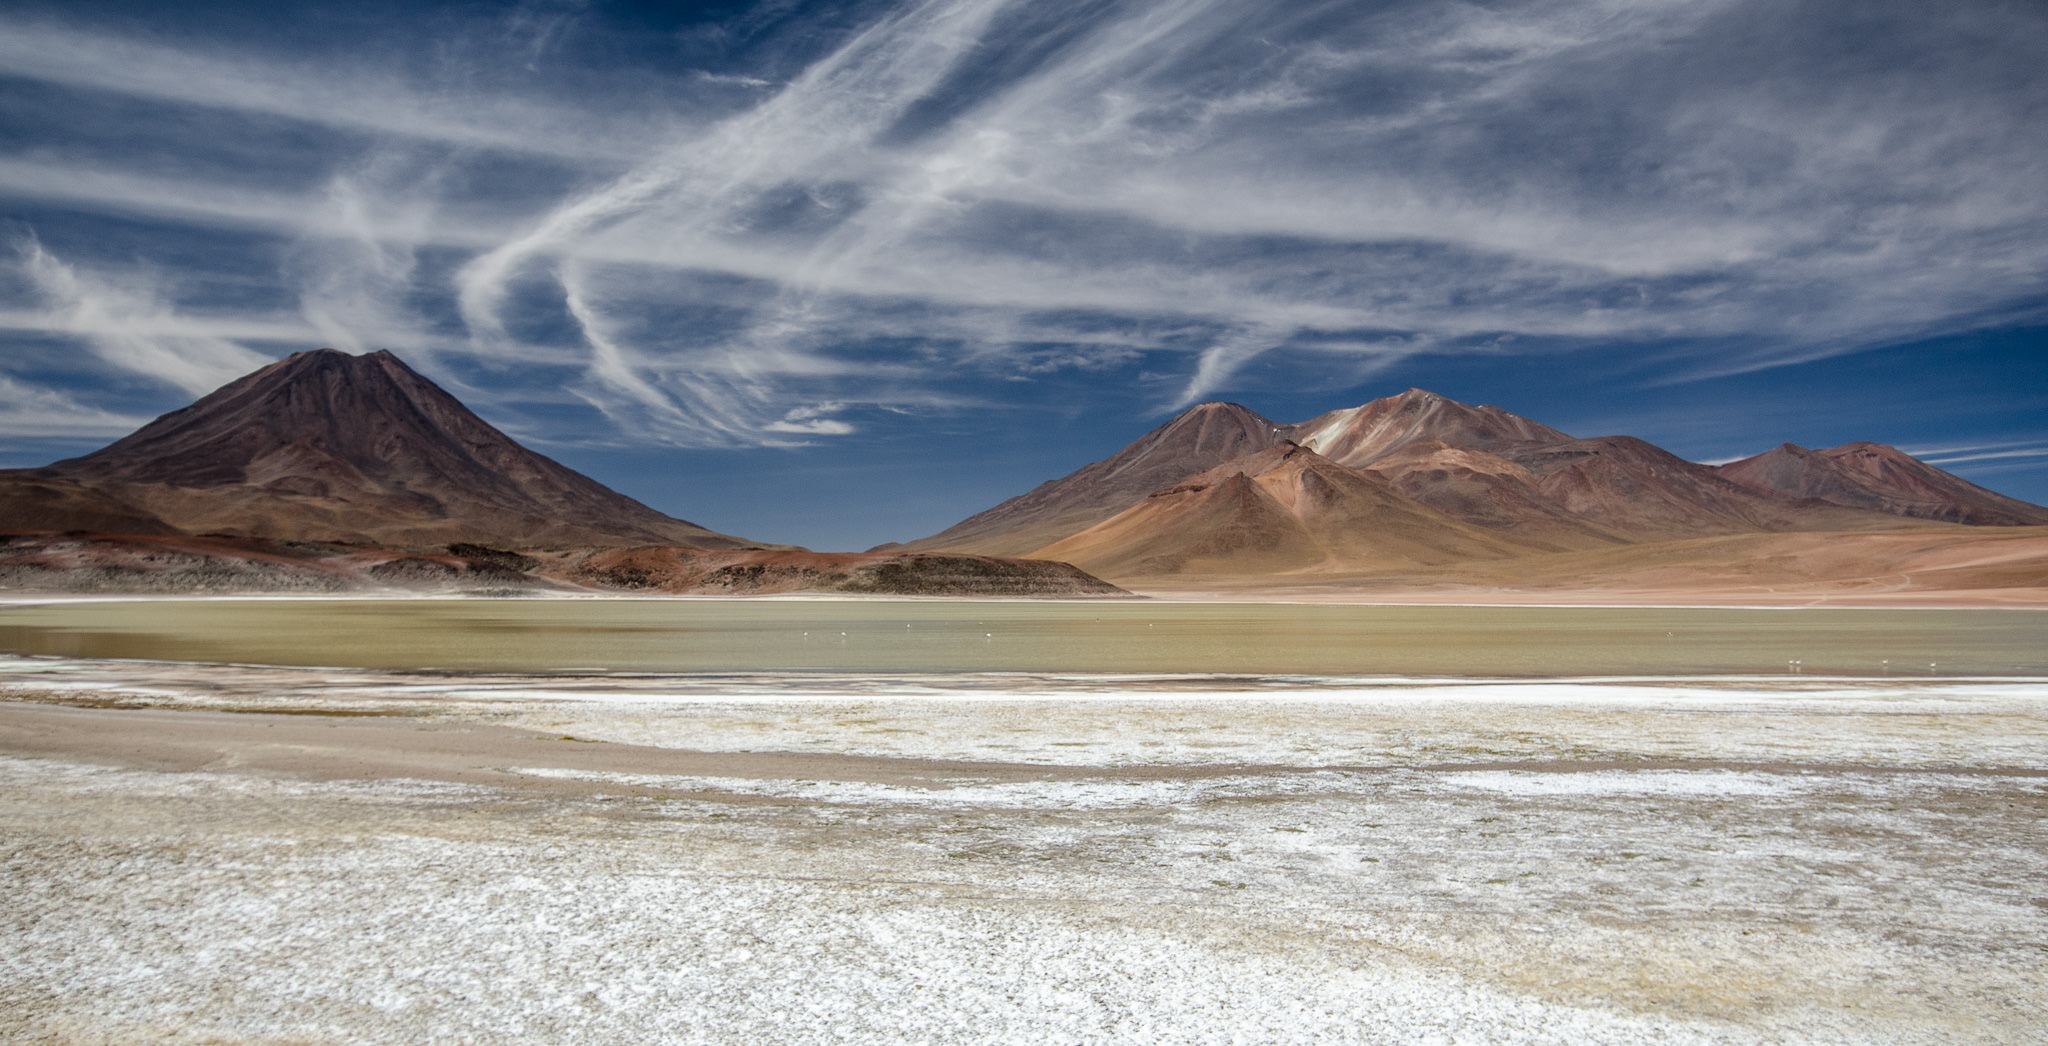
Altiplano landscape and the Atacama Desert are stunning and a true paradise for landscape photographers
NIKON D7000 + 10-24mm f/3.5-4.5 @ 17mm, ISO 100, 1/500, f/6.3

However, if your interest is primarily astrophotography, you should know that taking those incredible Milky Way shots there is not so easy. Why?

Both the Atacama Desert and Mauna Kea observatories lie well above 4 000 m (12 000 feet). For that reason, you need to acclimatize yourself and even then you might still suffer from altitude sickness. But that is by far not the main hassle. Unfortunately, there are further restrictions. Mauna Kea Summit is open to the public, but only from dawn to dusk, when the telescopes are inactive. Staying overnight is forbidden, unless you have a special permit. I found out that it takes a year or even longer for professional photographers with long records in astrophotography to obtain such a permit.

Astrophotography_005

The summit of Mauna Kea can be reached by a standard car, but due to a gravel-road part it is highly recommended to take off-road car
NIKON D7100 + 70-200mm f/4 @ 130mm, ISO 100, 1/200, f/9.0

Astrophotography_006

Shortly after sunset you must leave the Mauna Kea Summit
NIKON D7100 + 10-24mm f/3.5-4.5 @ 20mm, ISO 100, 1/25, f/4.5

Moreover, tourists need to hire an off-road vehicle, since the upper part of the route is on a steep gravel road (actually, I encountered some normal cars too, although most standard hired cars are not insured for the Mauna Kea Summit trip). Anyway, regardless of the type of your vehicle, shortly after sunset, you are kindly but firmly informed by a ranger to leave the summit.

Astrophotography_007

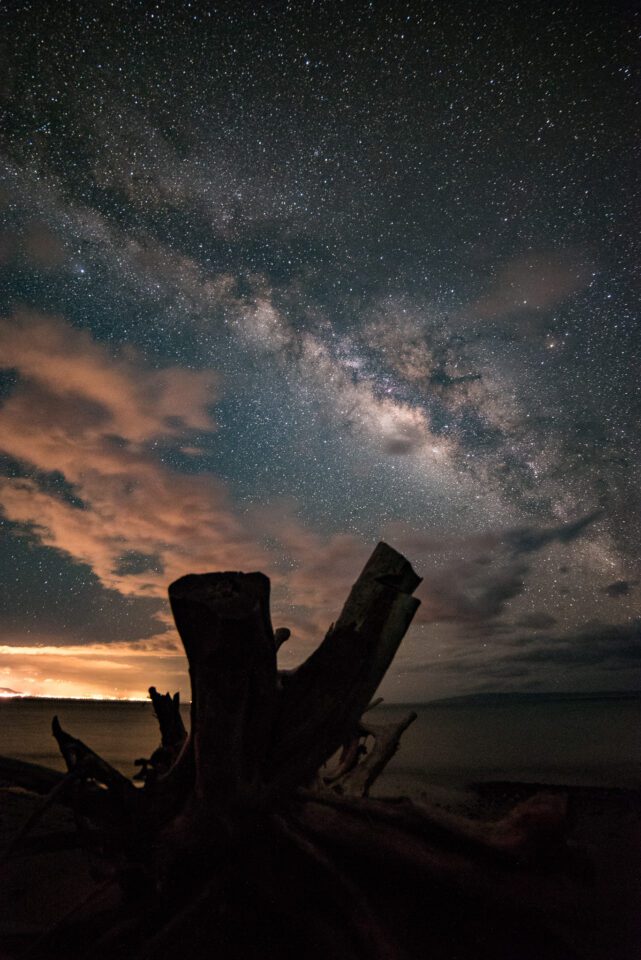
Nightsky with Milky Way shot near the Onizuka Center observatory. Sometimes, the headlights of passing car can lit the landscape in a very nice way, but most of the times, you can get frustrated by too much light coming out of them
NIKON D750 + 14mm f/2.8 @ 14mm, ISO 4000, 30/1, f/2.8

Astrophotography_008

NIKON D750 + 14mm f/2.8 @ 14mm, ISO 5000, 30/1, f/4.0

Photographing below the summit is possible and definitely worthwhile, but since there is an observatory running star-gazing programs that have become very popular, you will encounter crowds and ceaseless traffic. Car headlights can thwart any of your dark-sky shots at any time. I found this very distracting when shooting below Mauna Kea.

Astrophotography_009

I was unlucky when shooting night sky near San Pedro de Atacama – moon was already in the third phase and there were clouds, which happens allegedly only a few times per year
NIKON D7000 + 11-16mm f/2.8 @ 11mm, ISO 1000, 30/1, f/3.5

Shooting in the Atacama Desert is difficult in other aspects. The Atacama Desert is vast and, unlike at Mauna Kea, there is no problem in finding a dark spot to shoot from without any permit. You might have to travel long distances to find an interesting foreground for a good composition. The vastness also makes it a bit dangerous (especially the high-altitude Atacama Desert near the Argentina-Bolivian border) when far from larger cities – the closest town being San Pedro de Atacama. Many surrounding areas do not have any GSM coverage. Running out of gas or water might be a big problem. Furthermore, for a reason I could not understand, when traveling into and out of the town of San Pedro de Atacama, one has to pass through something like Customs control every single time – which can be a very lengthy and rather unpleasant procedure for those who have not mastered the Spanish language.

That is why I find Haleakala Summit on the Hawaiian Island of Maui to be a much more convenient site for amateur photographers. Here are the exact reasons why:

  • The conditions for great night photos are no less perfect; you still get the great combination of dark sky and high altitude.
    Astrophotography_010

    NIKON D750 + 20mm f/1.8 @ 20mm, ISO 6400, 15/1, f/2.0

  • There is zero light pollution to the east and south, very little pollution to the west and north.
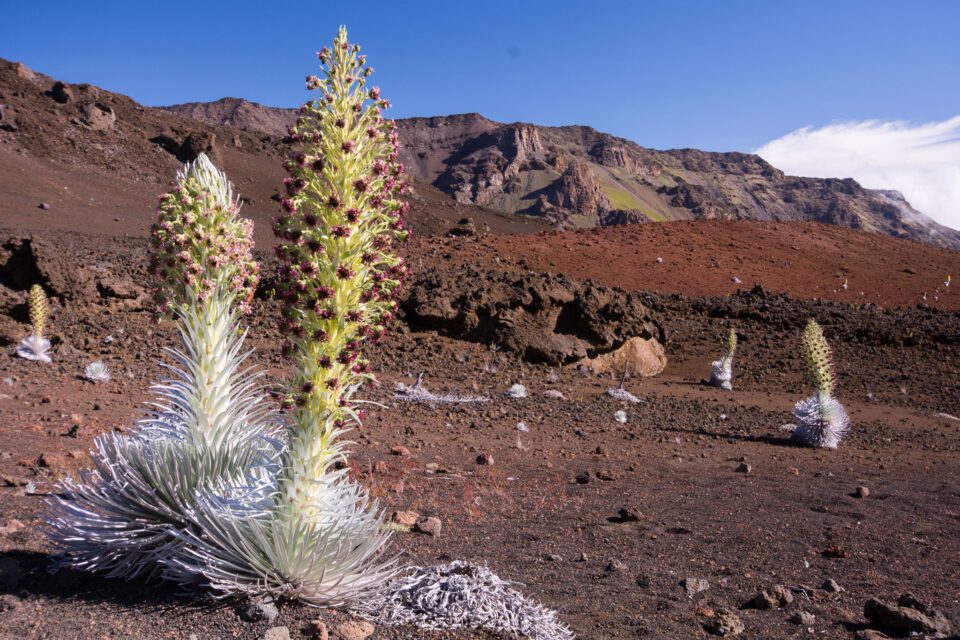
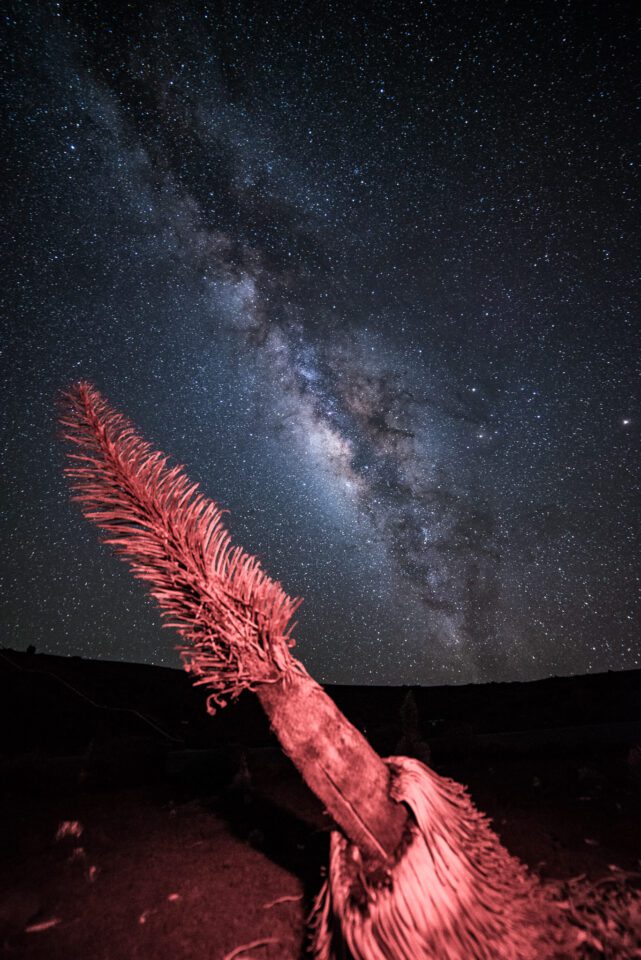
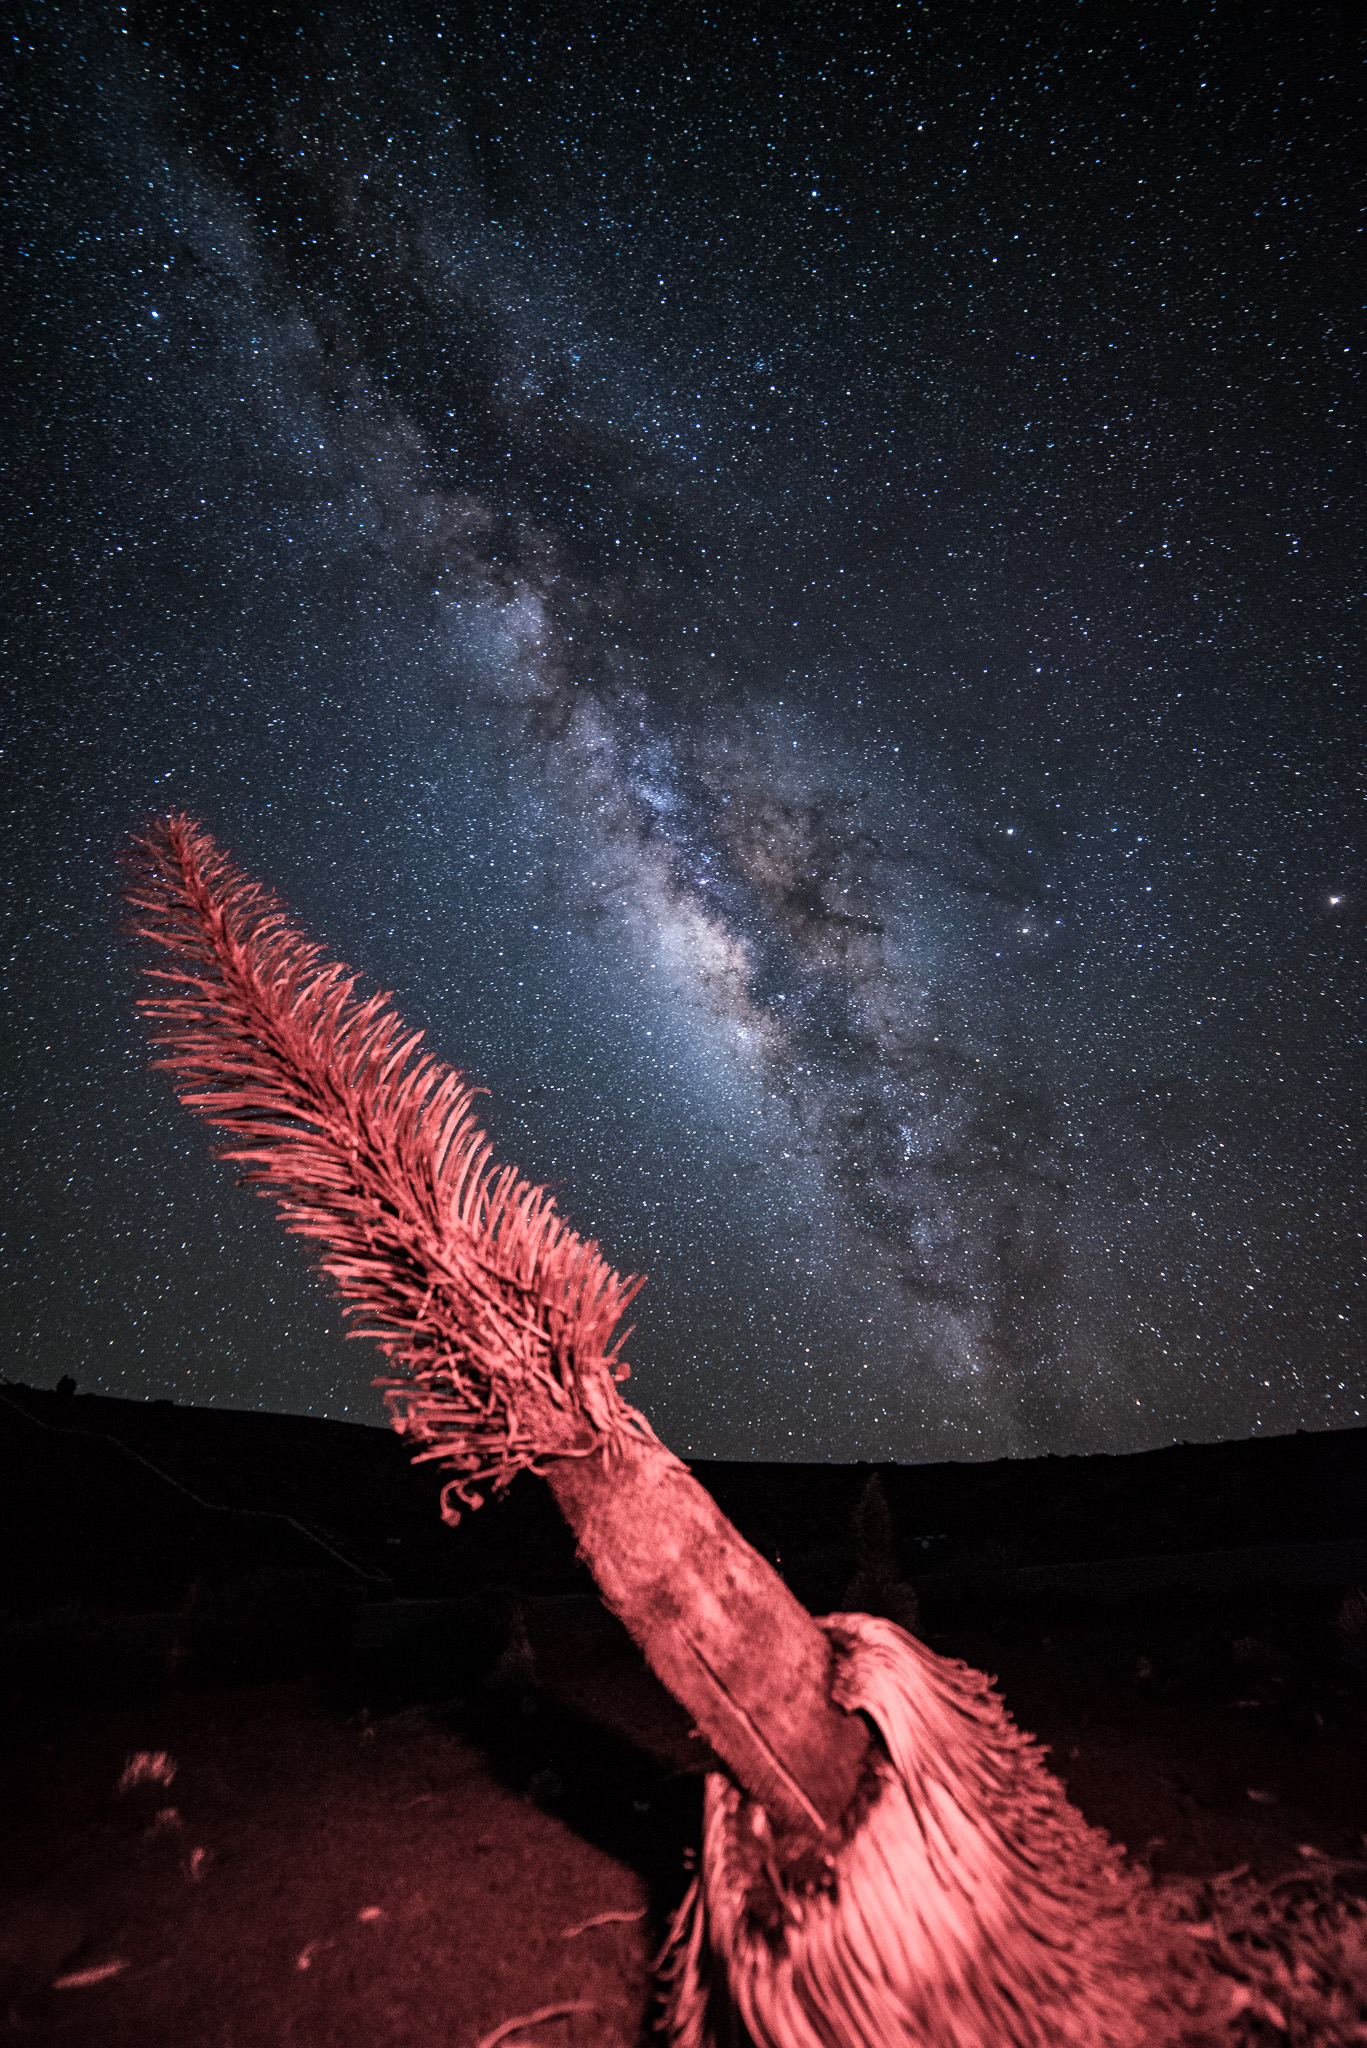
  • Interesting foregrounds are to be found in all directions. There are two parking lots. The lower one is located near the Visitors’ Center, which has a perfect viewpoint to the east over the Haleakala Crater. Here you may take perfect compositions in early March and April. At the very top, there is one more parking lot with another summit building. From here, you can see the observatories to the south. These function primarily during the day, so restrictions here are not so strict and it is possible to get closer to the telescopes and have them in the foreground. They are perfect for compositions from May to September. Moreover, at the parking place, there are many silversword plants that also fit nicely as foreground.
    Astrophotography_011

    NIKON D7100 + 10-24mm f/3.5-4.5 @ 24mm, ISO 100, 1/60, f/9.0

    Astrophotography_012

    NIKON D750 + 14mm f/2.8 @ 14mm, ISO 6400, 30/1, f/2.8

    Astrophotography_013

    NIKON D750 + 14mm f/2.8 @ 14mm, ISO 10000, 30/1, f/2.8

    Astrophotography_014

    NIKON D750 + 20mm f/1.8 @ 20mm, ISO 10000, 25/1, f/3.5

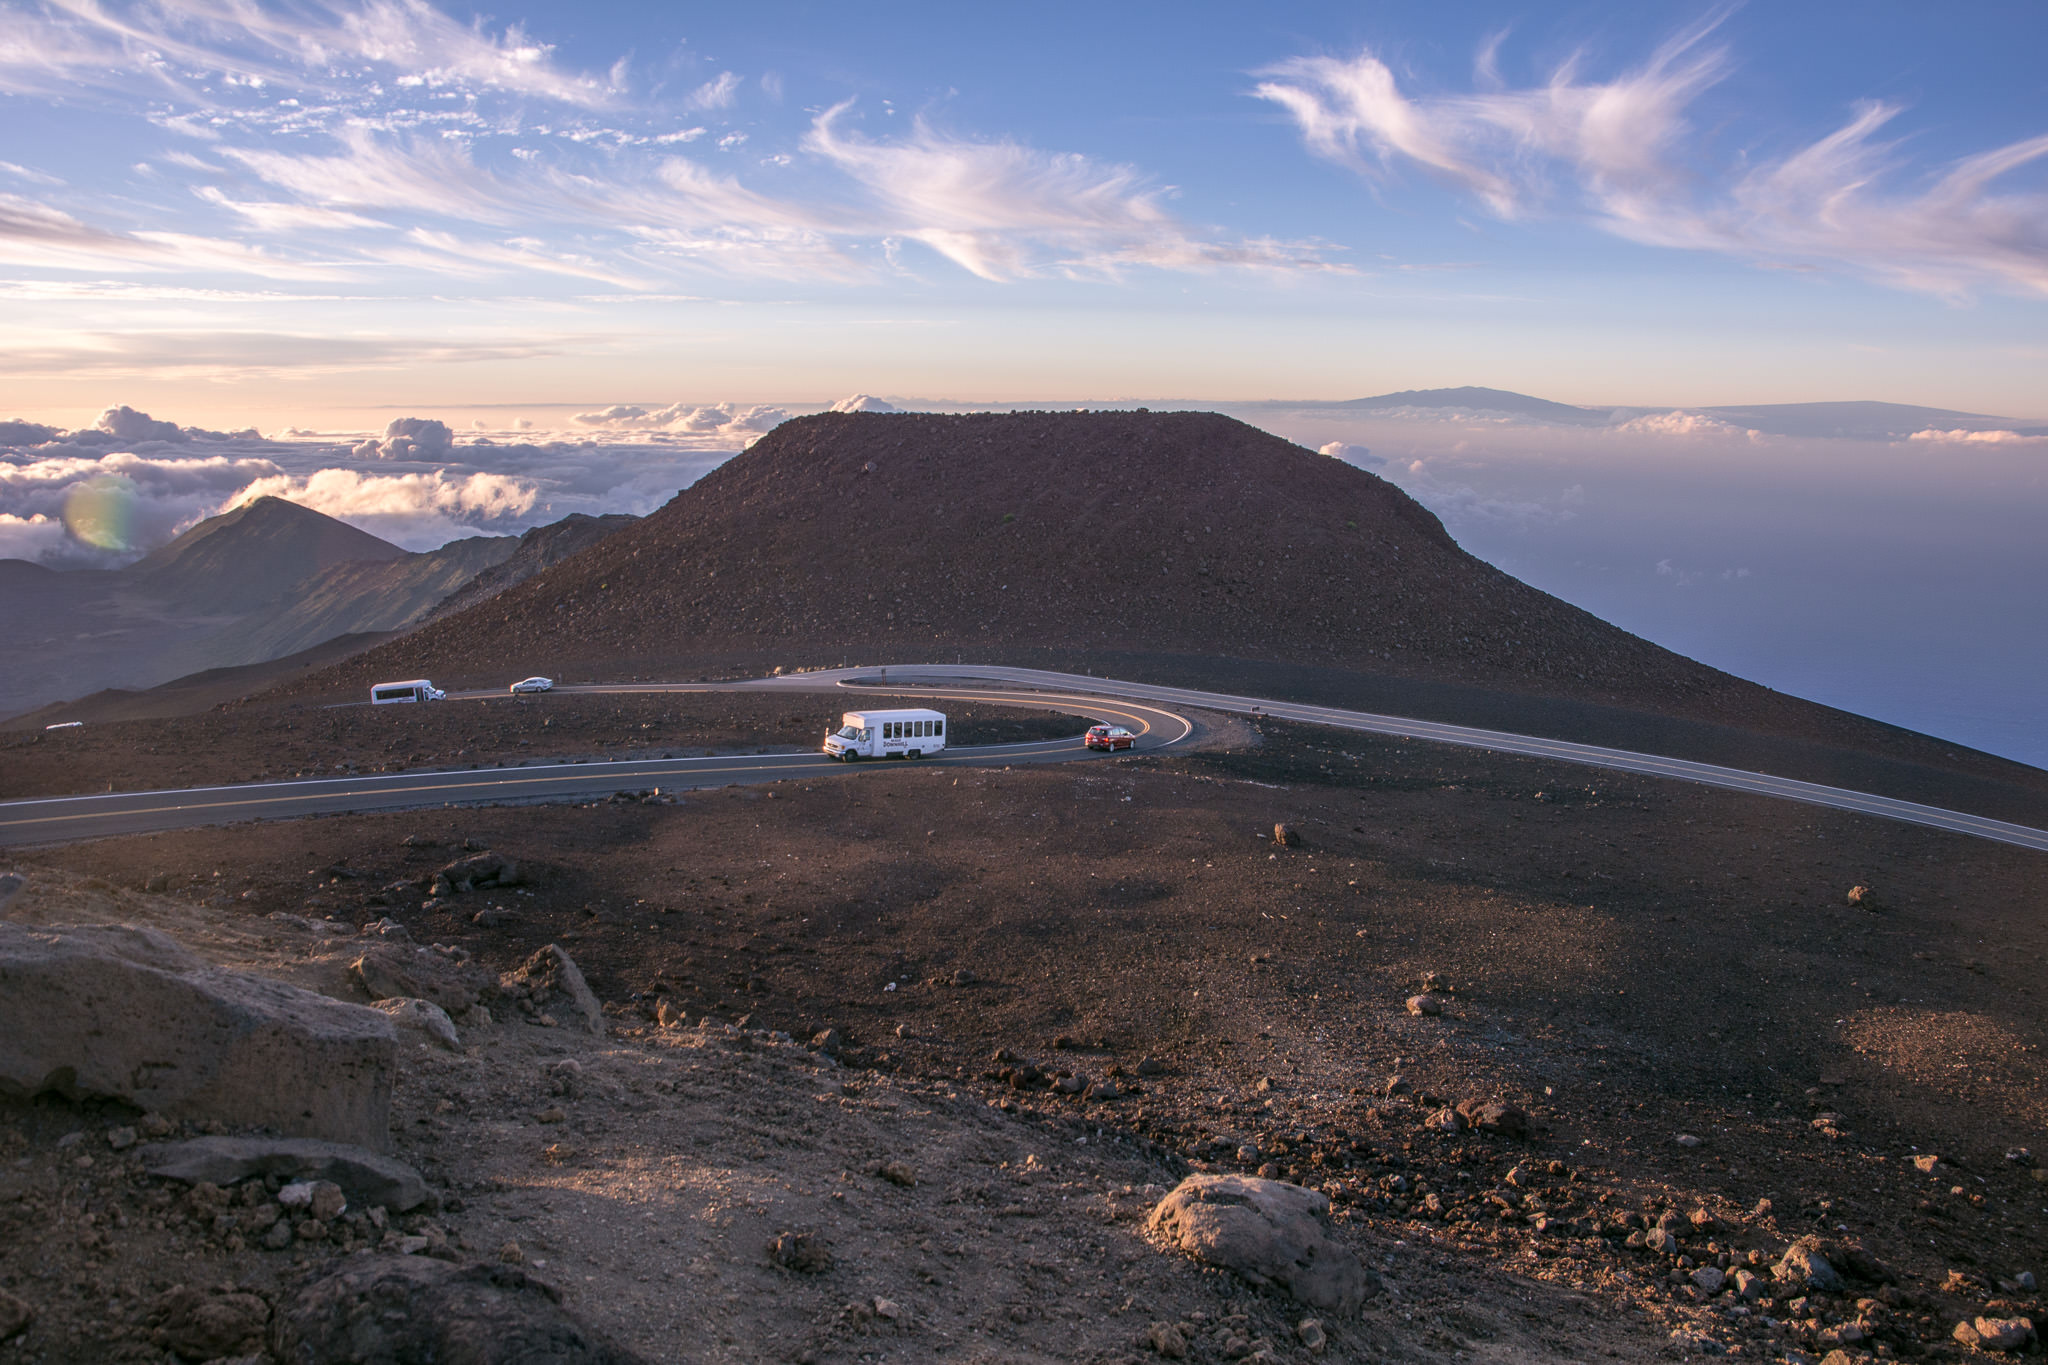
  • Haleakala Summit is easy to access on an asphalt paved road, an off-road vehicle is not needed. There is no problem with the insurance of hired cars, unlike in the case of ascending Mauna Kea.
  • You are 54 km (33.5 miles) away from the sea (and what a beautiful one) and the city of Kahului with all the services, restaurants, shops. There is also a very limited capacity of accommodation in the hotels and motels along the Haleakala road.
    Astrophotography_015

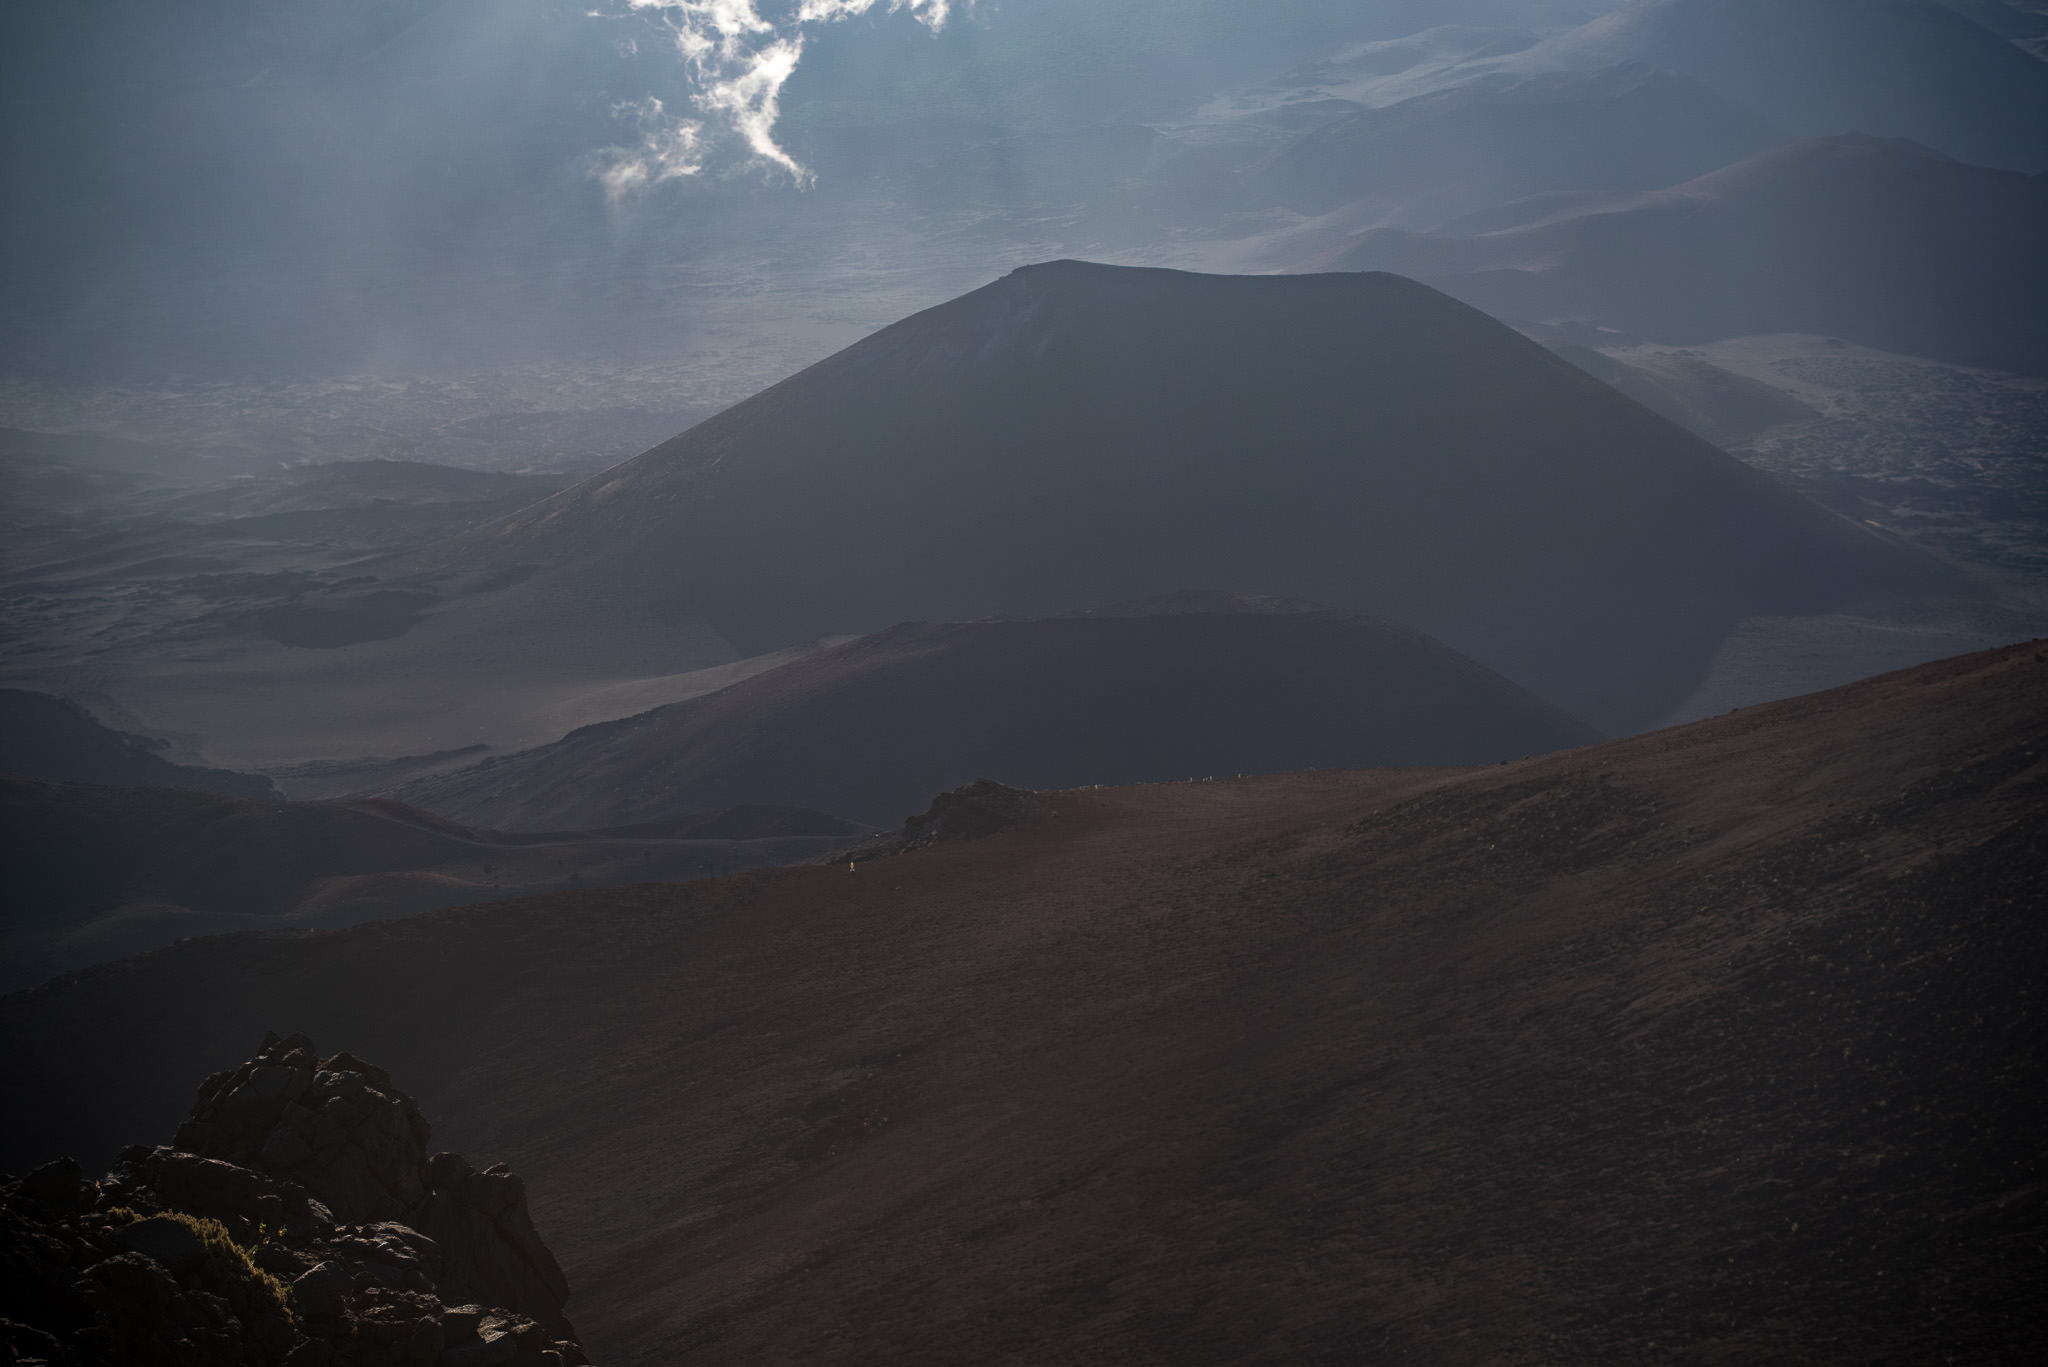
    Magnetic Peak is just next to the very summit of Haleakala where the upper parking place is located
    NIKON D7100 + 16-85mm f/3.5-5.6 @ 16mm, ISO 100, 1/160, f/6.3

  • Even if you get up to 3 055 meters (10 023 feet) above sea level, which is high enough for crisp air, you will most likely not suffer from high-altitude sickness.
  • At night, there are no crowds; I saw some cars with organized groups but they were gone after 11 p.m. There are no rangers, no controls.
  • No special permit to stay overnight is needed; you only have to pay the entrance fee of 15 USD (valid for 3 days) to the Haleakala National Park.
  • It is possible to stay overnight. There are rough and ready conditions in the Visitors’ Center booths at the summit – you need to have your own mattress and a warm sleeping bag. A few miles below the summit, you can sleep in a tent in the Hosmer Grove Campground (no permit needed, on a first-come, first-served basis).
  • If you stay overnight at the summit, you get a very spectacular Haleakala Crater sunrise from the lower Visitors’ Center as a bonus.
    Astrophotography_016

    Sunrise above the Haleakala Crater is spectacular, just do not expect to be alone there, crowds are coming to watch this spectacle
    NIKON D750 + 10-24mm f/3.5-4.5 @ 17mm, ISO 100, 1/50, f/4.5

    Astrophotography_017

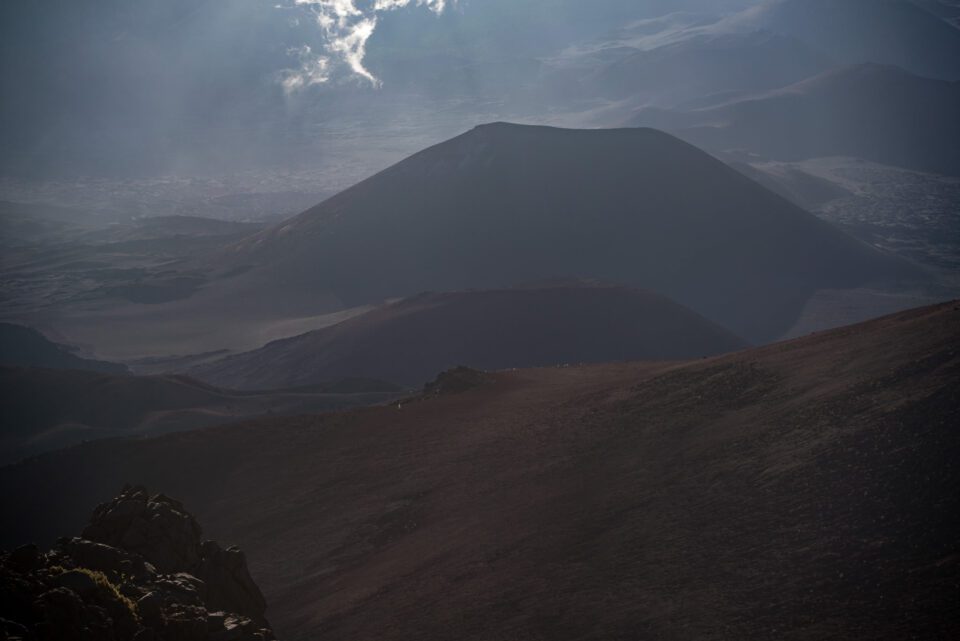
    NIKON D750 + 70-200mm f/4 @ 116mm, ISO 100, 1/250, f/4.5

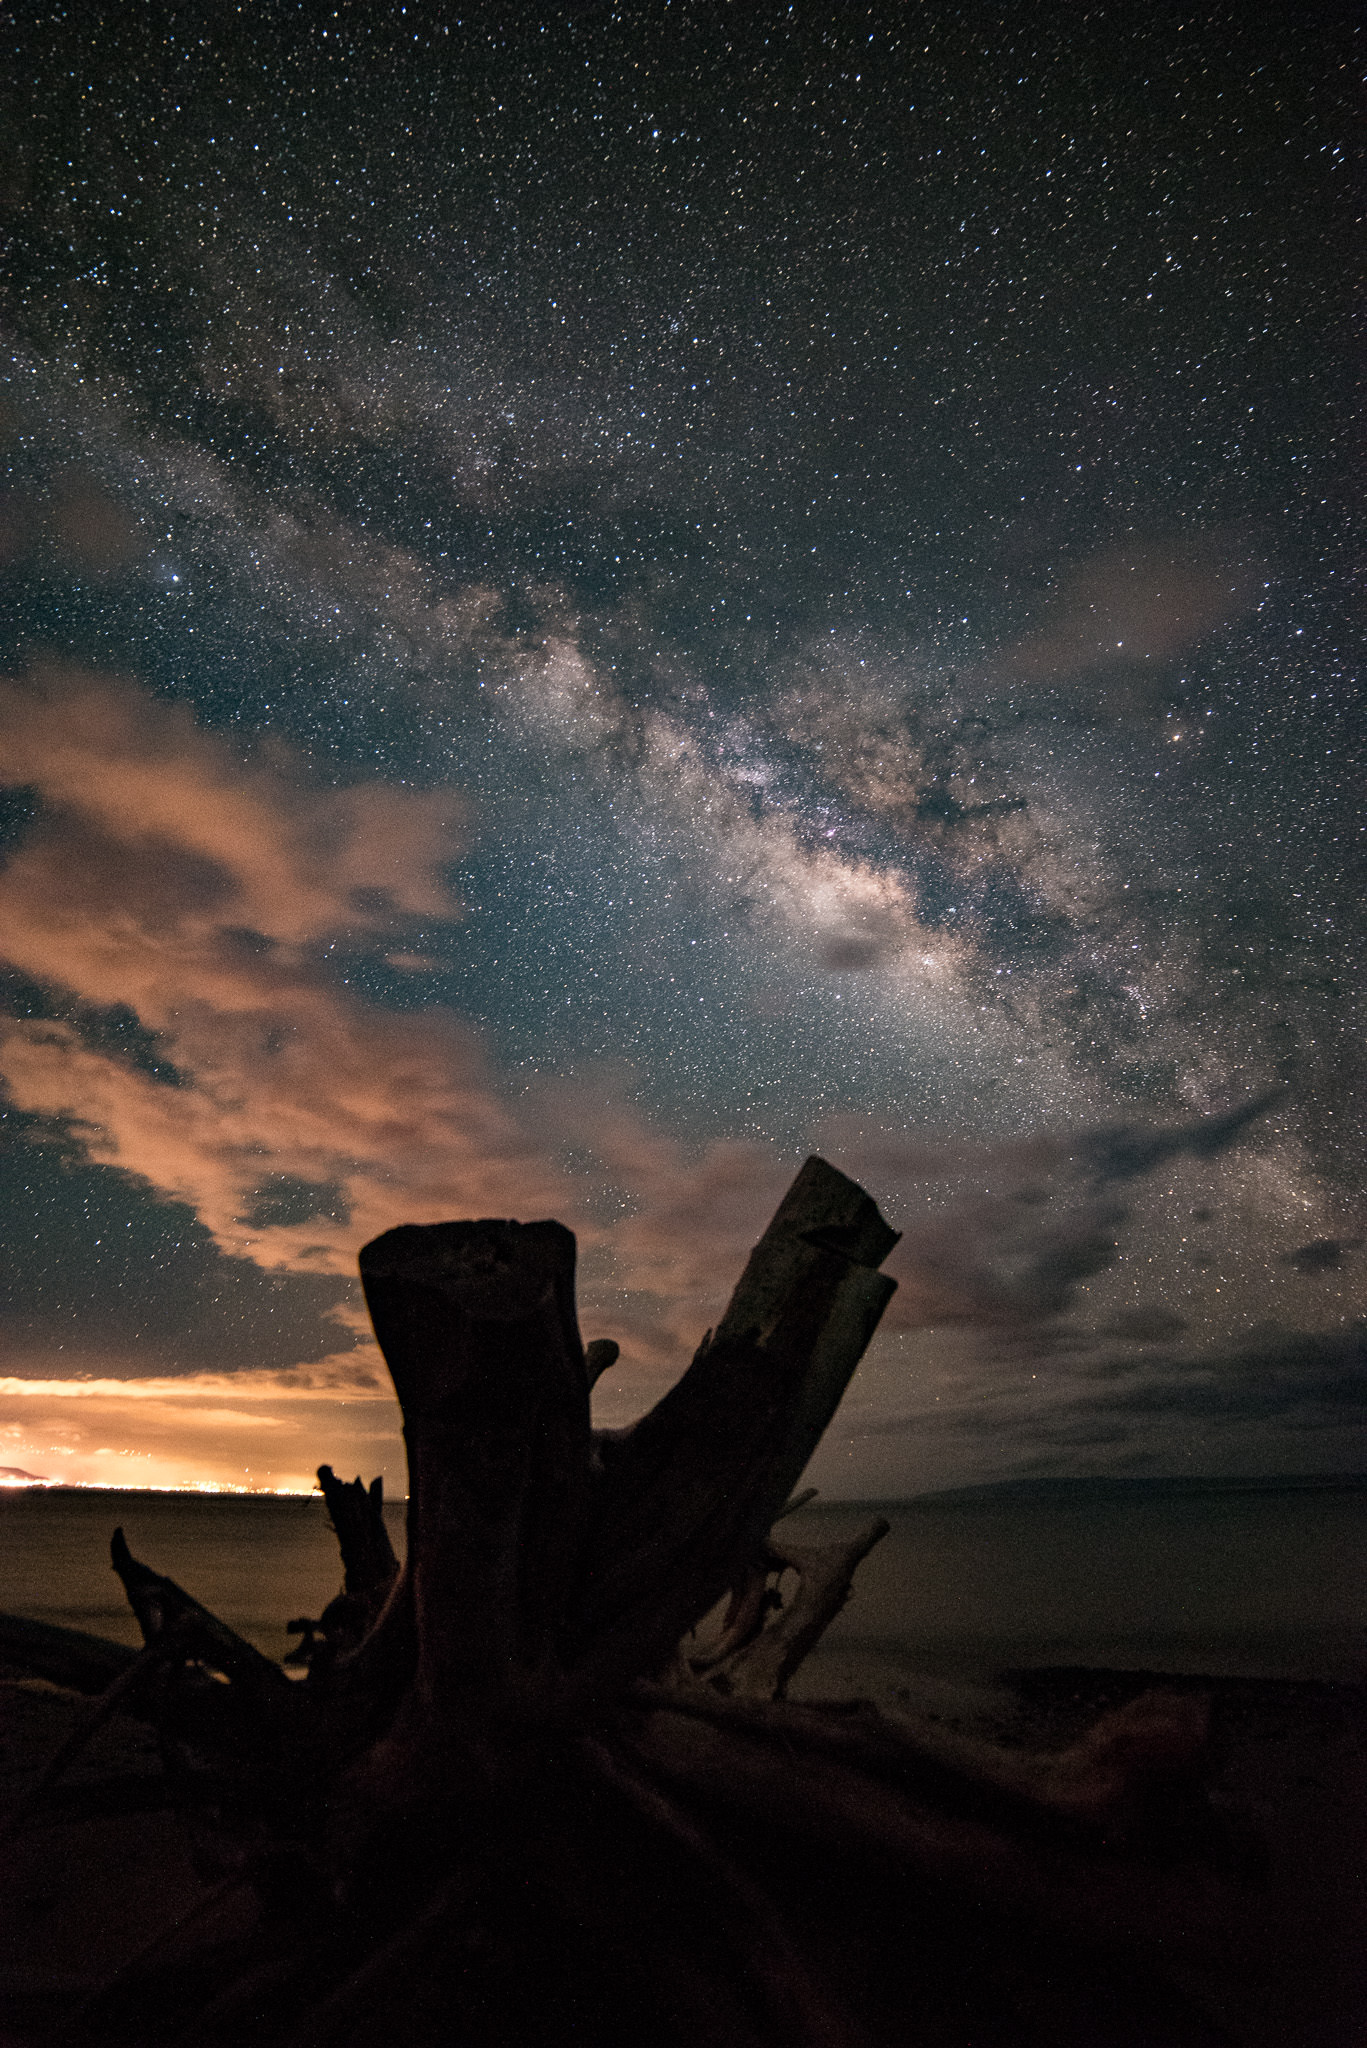
  • Maui offers even more locations for good night photography; theoretically you can shoot the Milky Way both from the seaside and the volcano summit in one night.
    Astrophotography_018

    Milky Way as shot from Olawalu Campground at the south coast of Maui
    NIKON D750 + 14mm f/2.8 @ 14mm, ISO 10000, 30/1, f/2.8

But I should also warn you, even here the conditions may get very rough:

  • It is usually very windy up there; keeping my tripod stable in a gale-force wind was the biggest challenge for me.
  • Needless to say, it gets bitterly cold overnight (freezing temperatures even in summer). Wearing many warm layers of good clothing is crucial.
  • Even if the road is in top quality, it is still a demanding drive – driving the 54-km (33.5-mile) route from Kahului with all the bends takes at least 1.5 hours.
  • The night may not be completely cloudless. The middle layer of clouds is usually below the highest peak, yet there are nights with high clouds (around 10 km / 6 miles), so there is no guarantee of perfect weather (you do not get this at Mauna Kea or the Atacama Desert either).
Astrophotography_019

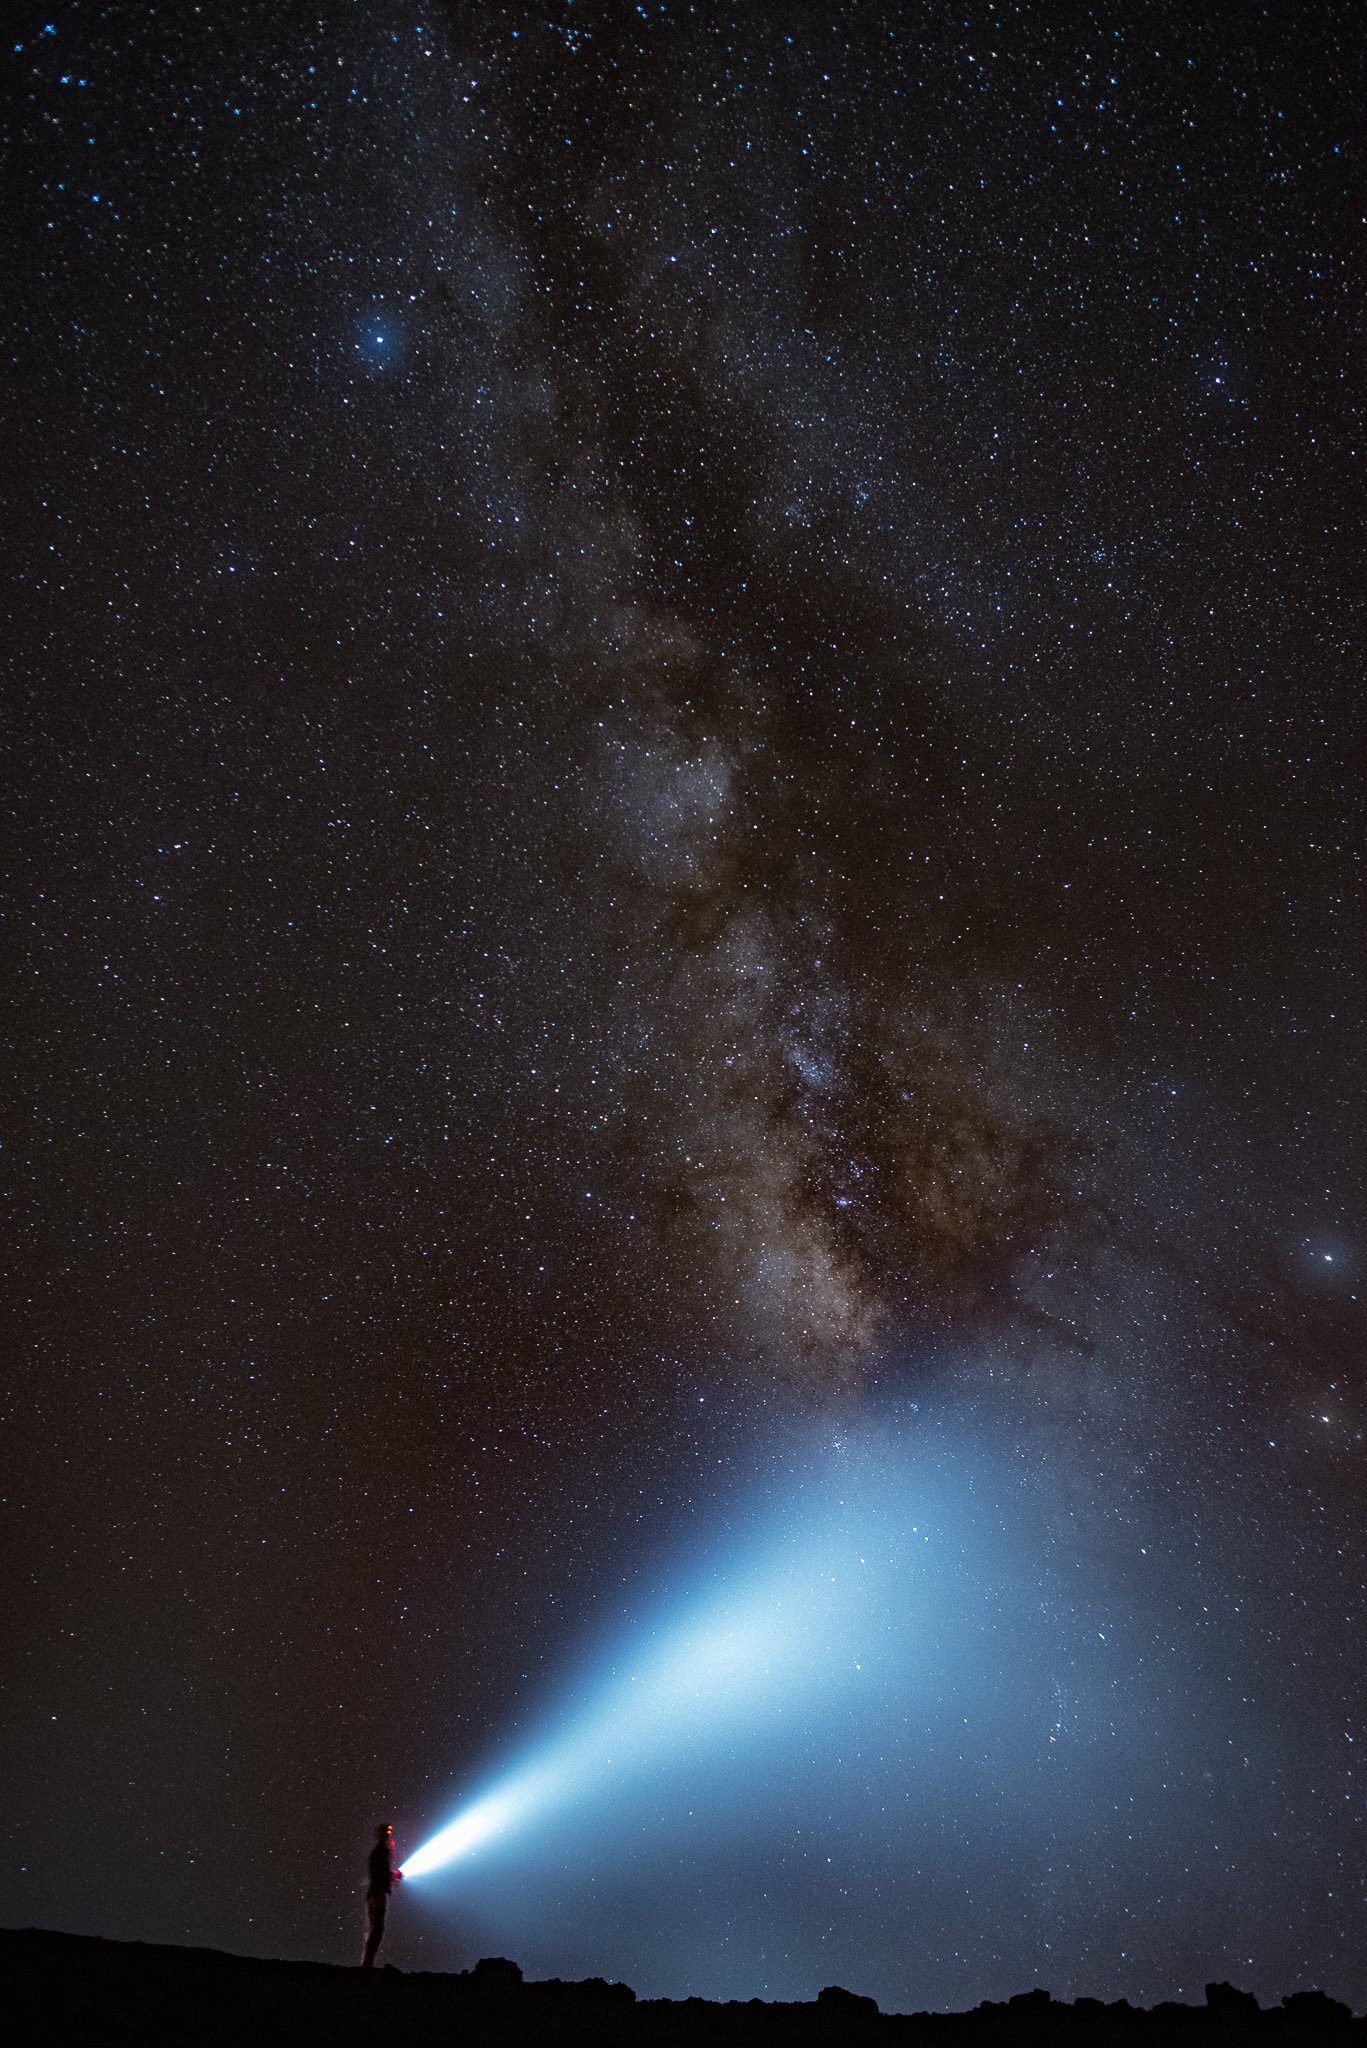
Self-portrait – I was lucky that a thin layer of clouds was passing over the summit exactly at the right time – otherwise the light from my head torch would not be visible
NIKON D750 + 20mm f/1.8 @ 20mm, ISO 10000, 15/1, f/2.5

Last but not least, let me point out that I do not want to tell you guys that, in order to get great astrophotography images, you have to go to Haleakala Summit.

Astrophotography_020

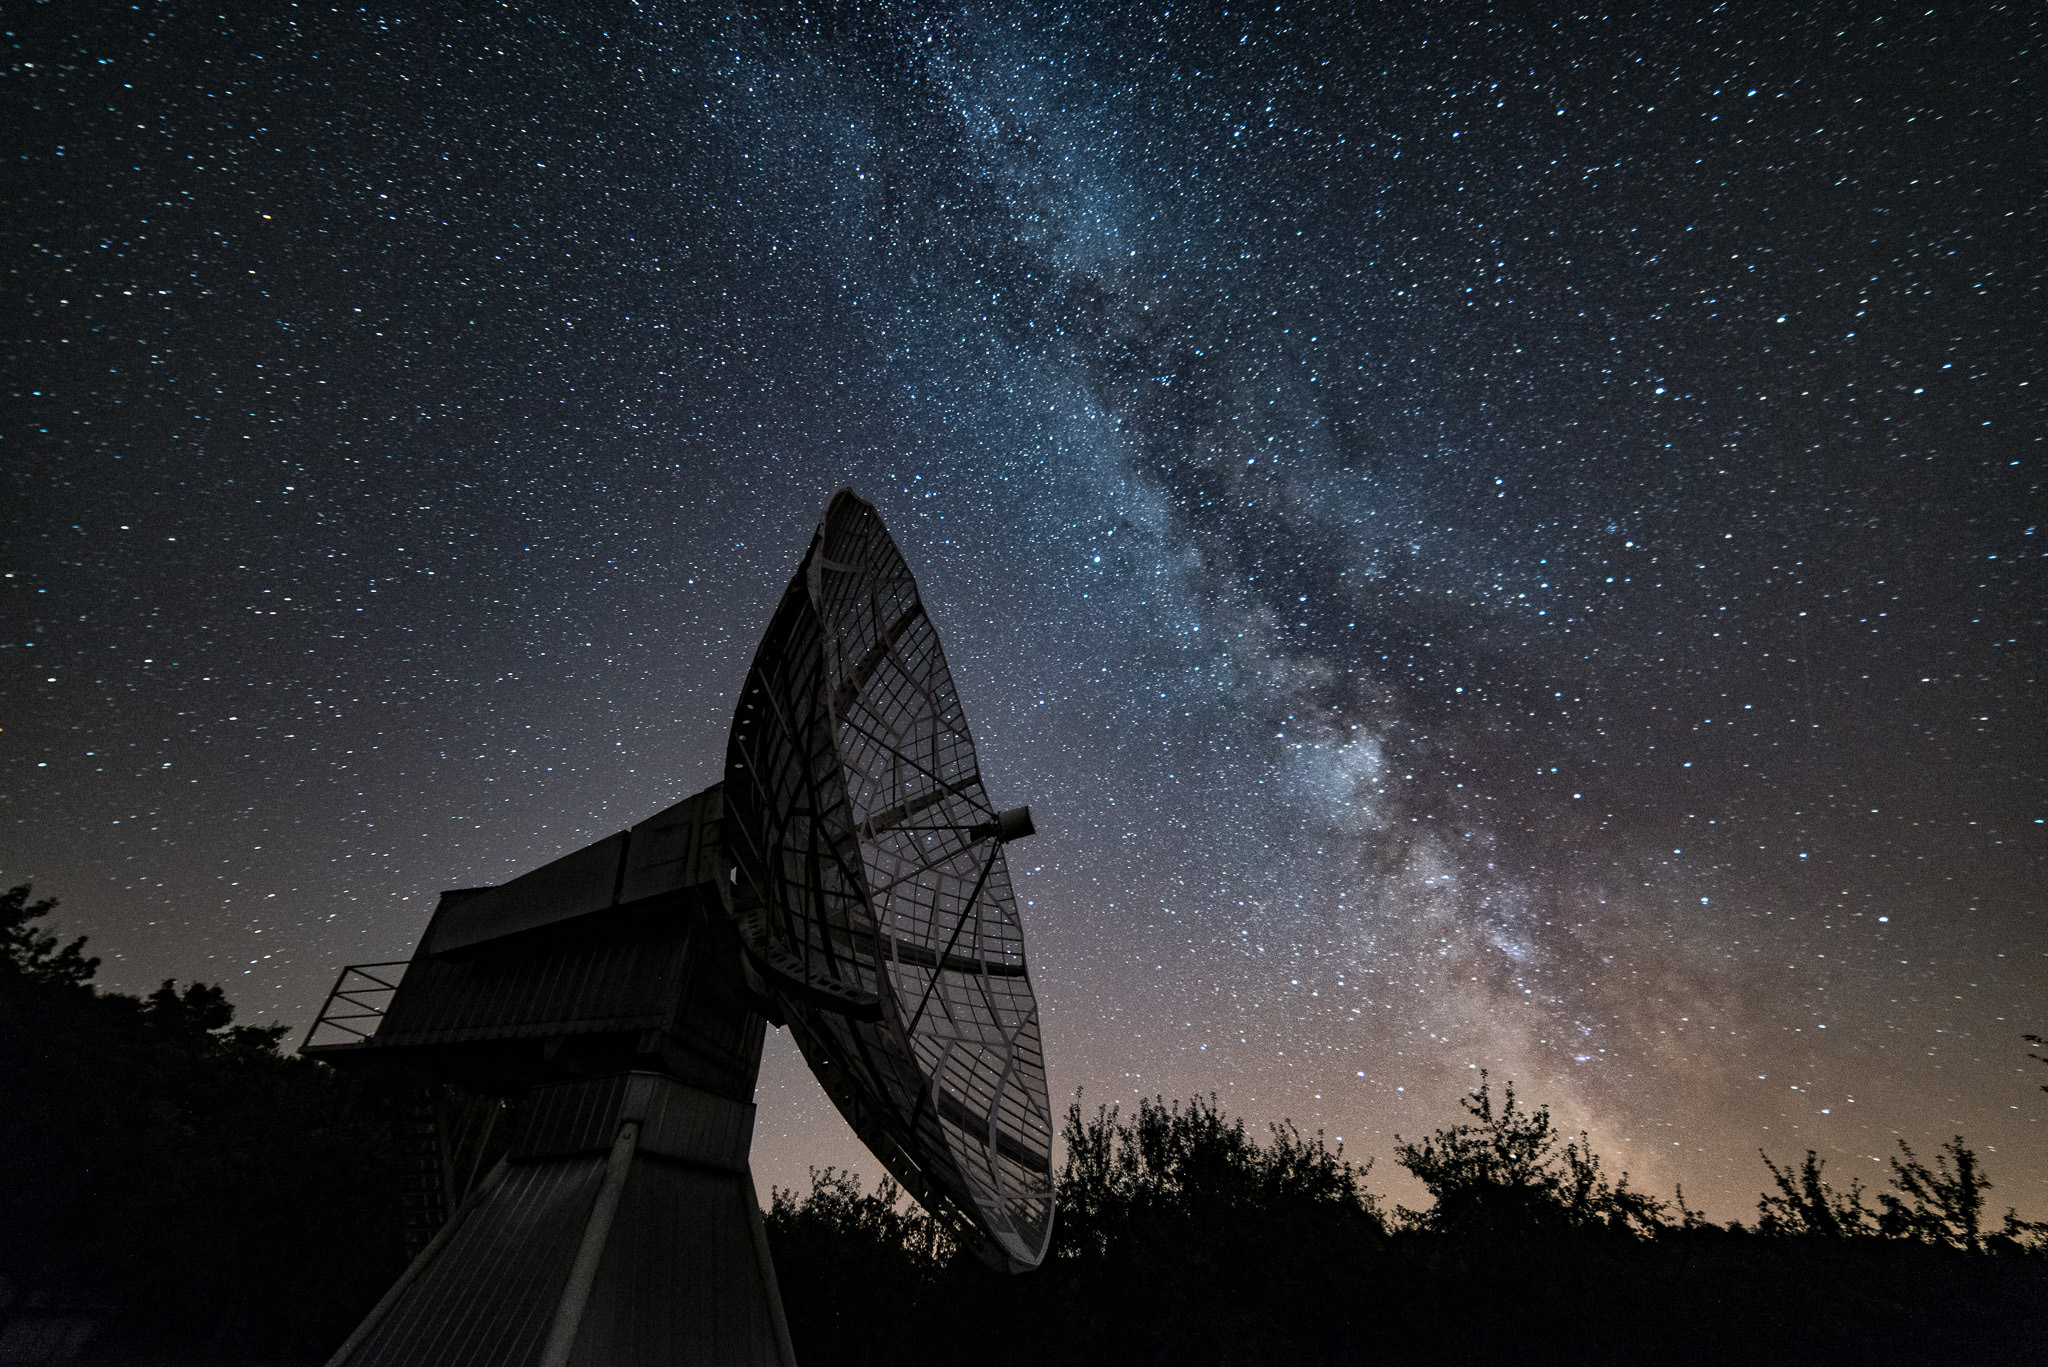
I took this shot in Ondrejov Observatory barely 20km away from Prague – the darkness of the sky is nowhere to be compared with Hawaii and yet I got a decent image
NIKON D750 + 14mm f/2.8 @ 14mm, ISO 3200, 30/1, f/2.8

I enjoy shooting night images in the Bohemian Paradise in Central Europe, where there is a moderate to high level of light pollution according to this map. The conditions are incomparably worse there, yet I immensely enjoy the process of taking the photos. But if night photography becomes your passion or even obsession (as it is in my case), Haleakala Summit in Maui should be on your bucket list.


This guest post was submitted by Vaclav Bacovsky, a photographer from the Czech Republic (in the very heart of Europe). He loves shooting landscapes, architecture, macro and wildlife (see his 500px page). He blogs at www.krasnesvetlo.cz (in Czech language only though). And his infrared photographs are published on his Instagram account.

The post The Best Place in the World for Amateur Night Sky Photographers appeared first on Photography Life.


from Photography Life https://photographylife.com/the-best-place-in-the-world-for-amateur-night-sky-photographers

How to Improve Your Photography

Among the many articles I have read here, at Photography Life, the most controversial are the ones that especially call my attention. Despite being against the polemics, I am in favor of sincere dialogue, because through dialogue we can grow internally too. In my opinion, there are several steps that one can take in order to make better pictures. Therefore, I invite you all to carry out a reflection on the subject.

Portrait-8

The Theme

The most important initial step is having some sort of a theme to your work (you might even call it a “project”). And the more specific, the better! For example, we can dedicate ourselves to take pictures of birds, but if we create a theme within the subject, our photos will be inherently better, as they will be related through something common. For example, one could study and photograph bird migration patterns, or perhaps photograph ecological problems that impact bird populations. With such themes, a variety of situations that normally would not come to mind when thinking about pictures of birds may emerge, making your work even more interesting.

Themes and photography projects are endless. For example, for portraiture, we can use a theme related to coffee workers and that’s exactly what I have done in this article. It is interesting how the more specific the subject becomes, the more captivating photography can get.

Location

The location is obviously very important – that’s where you shoot. Studying it, learning the best moments and times of light, the great possibilities of varying the angles and the best lenses to use for the particular location will be very important in yielding potentially stunning images. You must also know the location in order to be efficient with your time – the more you know, the faster and easier you will be able to execute a project. In the choice of lenses, you must take into account your theme / project, because depending on your approach, things like angle of view, focal length and maximum aperture might vary and change. In the case of coffee workers, for example, I used portrait lenses suitable to my style and I did not just concentrate on the portraits themselves – in many cases, I wanted to highlight the surrounding environment and the working conditions of the workers, which is very important.

The second plan is where we place the subject in the environment and, in this case, a wide-angle might be preferable in order to show what’s going on around the subject. This also does not mean that you cannot use telephoto lenses – sometimes telephoto lenses are even more preferable, as they allow focusing in one particular area of the scene, rather than introduce all the potentially undesirable clutter.

Now that our theme and location are set, it is time to reflect on our possibilities.

Possibilities

Many argue that photography is an elitist profession, full of people with financial possibilities. And it can certainly be true in some cases, especially when it comes to digital photography. If we take two skilled photographers and put them in a jungle in Borneo, Indonesia with different-level equipment and budgets to work with, it is expected that the one with the better gear and resources will yield better photographs. For example, if photographer A has limited gear, such as the Nikon D7100 with a kit 18-55mm lens and say a single telephoto lens such as the 70-300mm VR, with a 7 day deadline, whereas photographer B has a Nikon D5 with a collection of exquisite lenses such as the holy trinity (14-24mm, 24-70mm, 70-200mm), along with high-end super telephoto lenses such as the 200mm f/2, 400mm f/2.8 and 800mm f/5.6, and on top of that has all other tools and resources such as a helicopter, a plane, etc, with unlimited time on his/her hands, it is expected that the latter will produce much better work, simply due to the above factors. So in a way, gear and resources unfortunately do matter when it comes to possibilities, but it does not mean that we should ignore other factors such as knowledge, skill, patience, luck, etc. However, one must evaluate and understand their possibilities and limits – what we can and cannot do with the tools and resources we have today.

Understanding and knowing the tools you have today is very important. For example, if you shoot an event with other photographers who are shooting with 70-200mm lenses and you do not own such a lens, lenses such as the 105mm f/2.8 or other classic portrait lenses can produce similar, if not better quality images. Knowing your lens limitations, you might need to move around more and try different angles, but that’s the beauty – your gear will force you to get more creative than the others, which might actually make your images look better in comparison. If you photograph wildlife, you might not have the $10K 600mm f/4 that your neighboring dentist might be shooting with, but slap on a 200-500mm budget lens on your camera body and it is all about the subject and the light at that point. While he will be busy attaching his lens to a gimbal head, you are already out taking pictures hand-held and capturing those unique moments he is missing out on. Sometimes, it is as simple as waking up earlier than others that will give you the advantage. Many photographers are often lazy to get up early, but you know that it is all about that early morning and late afternoon light that makes a picture go from average to superb.

References

Studying good photographers and having references in your head is fundamental in growing your photography. It would be very naive on our part to think that we are the first to conceive this or that project. We should use tools such as Google before making our projects, and references will certainly arise. Nowadays, the level of photography is highly elevated – there are many amazing photographers out there. Right here, at Photography Life, you can find very young photographers who already get it right, whereas for many of us, it took years of practice to get to where they are today…

Studying known photographers and their work is important. If you shoot in Black and White, you should know who Henri Cartier-Bresson, Fan Ho and Sebastiao Salgado are. You should study their work, study their compositions and how they interpreted light. The same goes for all other types of photography – understanding and knowing masters of particular photography genres will help you in shaping who you are today and where you will be tomorrow. It will be a good reference point in your head and it will make you want to get better.

Humility

You might be a great photographer already. You might have the money to buy a high-end camera with an 800mm f/5.6 to parade everywhere you go. However, you might be walking on a thin line with your pride and arrogance, so watch out! At the end of the day, it is not about you – it is about what you can do for the world around you.

Be open and listen to what others have to say, because sometimes a little phrase might be the biggest tip of your life.

Mood

Be an joyful photographer. Look into your heart to see what you should do next, even if you are on your own and nobody wants to support you. Do not let others make your day gray!

And always remember the following:

“Why worry, there should be laughter after pain
There should be sunshine after rain
These things have always been the same
So why worry now”

Mark Knopfler

Happy shooting my friends!

The post How to Improve Your Photography appeared first on Photography Life.


from Photography Life https://photographylife.com/how-to-improve-your-photography

Monday 26 September 2016

How Was This Picture Made #12: The Answer

Last week, for our How Was This Picture Made? series, I had posted a landscape photograph to share and discuss. Thanks to our PL commentators, Gary Bunton, Brian Webster, and Shane, for their participation and sage commentary on the techniques employed and the overall considerations. Well done!

Let’s review the photograph, which I made along one of the many splendid and uplifting hiking trails at Torrey Pines State Natural Reserve in San Diego, CA.

Our PL commentator, Brian Webster, had remarked on the dark appearance of the original image (which was actually “straight out of the camera”). Indeed, I agree that the overall exposure was a tad dark (more on this below), so I decided to make a modest adjustment in Photoshop. The new rendition is shown below.

Torrey Pines

In terms of the visualization process, after having scouted this scene I desired to create a black and white image that captures the scale, textures, and form of this beautiful sandstone bluff. As I had previously discussed in an article on light, shadows, and visualization, in order for the visual artist to impart shape and depth to a landscape and reveal its textures, ideally the photograph should be made when long shadows are being cast by unidirectional light. Further, I desired to create contrast in such a way that the interplay of light and shadows would draw the viewer’s eyes into the scene.

As I studied the subject through my composing card, I realized that the potential to create a high contrast image was enticing. As the iPhone “scout” photo below reveals, I composed the photograph such that there would be a surrounding rim of sky and sea to the left of the bluff.

Scout shot

iPhone 4S

In order to draw the viewer into the scene and keep the viewer fixated in the center of the photograph, I needed to darken the blue sky and sea. With the juxtaposition of the dark values in the sand in the left lower corner with dark values in the sky and sea, I visualized creating a rim of “vignetting” around the high values in the center of the bluff to create contrast and invite viewer’s mind into this world. The deep shadows (shown within the yellow cartoon) at the front of the bluff juxtaposed with the high values in the center lent themselves well to creating depth and revealing form. Our PL commentator, Gary Bunton, wisely pointed out that the dark values in the sky as well as the deep shadows in the bluff could have been created with the use of a red 25A filter (more on this below).

Based on my previous experience with infrared film in both 35mm and medium formats, an interesting property of sandstone is that it has the potential to appear as “chalk white” when illuminated by infrared light. With this vision in mind, I chose to pursue an infrared rendition. For film I chose Rollei IR 400, which is (sadly) one of the last bastions of infrared film. The previous gold standards, Kodak HIE and Efke, have long been discontinued.

To create an exposure on infrared film, the photographer must employ filtration to block visible and UV light and allow infrared light to pass through the lens. A key technical point is that the spectral sensitivity of the infrared film must be matched with the spectrum of infrared light that is passed through the filter. For Rollei IR, which has a peak sensitivity of 720 nm with extension up to 820 nm, I used the Hoya R72 infrared filter, which blocks visible light up to 720 nm yet allows passage of light above this threshold (i.e., the infrared spectrum). When you examine this filter, it is not completely opaque, as you can still see slightly through it, meaning that this filter allows some contamination from visible red light. This is not that big of a deal for me, as a mix of a high proportion of IR exposure with a small amount of visible red light exposure might impart a unique look to the image, perhaps distinct from a pure IR or a conventional black and white print.

In terms of the quality of light (more on this on an upcoming article), I typically (but not always) choose the unidirectional light of early sunrise or sunset to create long shadows in the landscape. However, for creating an infrared exposure, these times of the day are not ideal since light at these extremes of the day is not as enriched with infrared light compared to the intense and non-unidirectional light from the mid-day sun. So, I made a compromise: a clear blue sky in the late afternoon where there would still be a good amount of incident infrared light along with some degree of unidrectionality, which again is instrumental to creating long shadows to lend form and depth to the landscape and reveal its textures. Our PL commentators, Gary Bunton and Brian Webster, had astutely pointed out that this photo was made in the late afternoon, based on the directionality of the shadows.

Now, for the trickiest part of the shot: the exposure. Conventional camera light meters and external light meters cannot directly meter infrared light (unless they have been specially modified). In order to obtain a proper exposure on infrared film, the photographer must empirically determine the “working ISO” of the infrared film based on the filter factor of the infrared filter and the prevailing lighting conditions. Rollei IR has a box speed of ISO 400 without the use of an infrared filter. Based on the shared experience of other photographers, the Hoya R72 filter has an estimated filter factor of +5 stops, meaning that the exposure must be increased by five stops (in this case, by prolonging the shutter speed) to obtain a nominal exposure. Many photographers have previously rated the ISO of filtrated Rollei IR 400 to be between ISO 6 to 12. Based on my empiric results with Rollei IR 400 on 120 medium format film where I bracketed exposures between ISO 3 and 25, I previously rated the Hoya R72 filter factor at +6 stops of light and rated the ISO of the film at 6.
Once the filter factor and working ISO have been empirically determined, the next step is to properly adjust the exposure (shutter speed) based on the intensity of the light. This is where the time-honored “Sunny 16 Rule” enters the picture. At the time of day of this particular photo (4:45 pm PST), under clear skies, I would have needed to have used a shutter speed (with the aperture set to f/16) that is equal to the reciprocal of the ISO. For example, under clear skies with bright light (as in this exposure), using a film speed of 100 with the aperture set to f/16, a shutter speed of 1100 second (≈1125  second) should render a proper exposure. Therefore, given my chosen filter factor of +6 stops of light and the box ISO speed of 400, the requisite shutter speed for this exposure would be knocked down from 1400 second to ⅛ second at an aperture of f/16.

Notes

But wait . . . this presumes that the photographer intends to use f/16 as the taking aperture for the photo. The photographer may in fact choose to set a different aperture depending on his/her wishes for depth of field (DOF) control. For example, if the photographer desires more DOF than that afforded by f/16 in this scenario, then the aperture will need to be stopped down, requiring a reciprocal increased duration of the shutter speed to compensate. Alternatively, if the photographer desires less DOF that than afforded by f/16 in this scenario, then the aperture will need to be opened with an accompanying reciprocal shortening of the shutter speed to compensate.

So, which aperture did I choose? This brings us to an equally critical stage of the shot: setting up the camera and lens.

Our PL commentator, Shane, astutely surmised that I used a view camera for this shot. Indeed, I chose to use a 4×5 view camera in order to obtain uniform and simultaneous focus of the foreground and background. To frame the perspective as visualized through my composing card, I used a wide-angle lens, the Nikkor-SW 75mm f/4.5S, which is a razor sharp and contrasty lens and my “go-to” wide-angle lens in large format. This lens provides an angle of view that is similar to that seen with a 21 mm lens in the 35mm format.

Of the plethora of technical reasons that I enjoy using a view camera for landscapes is that the design of the camera is such that the lens projects an “inverted” image circle onto the focusing screen (the ground glass) in the same way that images are projected through the human lens onto the retina (before the image is “flipped” by the visual center of the brain). In my humble opinion, viewing an inverted image on the ground glass empowers the photographer to focus more astutely on composition, perspective, shape, and structure. Plus, the use of the dark cloth to shade the ground glass from ambient light in effect isolates the photographer from the distractions of his immediate environment so that he/she becomes “intimate” with the subject. It is a great experience!

Although a full discussion is beyond the scope of this article, the key principle in focusing the view camera is based on the time-honored Scheimpflug Principle, which dictates that the photographer adjust the orientation of the camera such that the plane of focus, the lens plane, and the film plane intersect at a well-defined plane, which renders the foreground and background in complete focus (even before the lens aperture is manually stopped down). The type of camera movements (tilts and swings of the front and rear standards) that are required to arrive at the Scheimpflug “point” vary with the design of the view camera (i.e., base tilts vs axis tilts). The camera that I used here was a Japanese wooden view camera (Ikeda Anba), which is designed to permit tilts of the lens and film planes that pivot at the base of the camera. Other view cameras are constructed such that the lens and film planes must be tilted about a pivot point that is located at the center axis of the front and rear standards. In a nutshell, for view cameras with base tilts, the Scheimpflug plane is best achieved by “tilting (the lens) to the near and focusing on the far”.

Ground glass

Ground glass

There are many excellent checklists to help learn and master this process, but one of my personal favorites is one devised by Howard Bond that may be viewed here. For this shot, following three successive adjustments of tilting to the near and focusing on the far to render the foreground and background in focus, the next step was to stop the down the lens for DOF control. Although DOF in view camera photography is a tricky and complicated subject, the salient feature is that the laws of optics and the view camera are such that there is a “wedge” of DOF extending from the lens to the far distance. Close to the lens, the DOF is poor, but as the distance from the lens increases, so do the outer limits of the DOF. For this shot, what complicated the DOF is that the immediate foreground was a not a level surface: I had positioned the camera near the ledge of the bluff where the drop-off would place the descending bluff (the “green circle” at the upper right corner of the “ground glass” illustration above) well beyond the near limit of the DOF wedge. Thus, in order to render this portion of the subject in “acceptable sharpness”, the lens aperture must be stopped down appropriately. So, with the competing considerations of DOF and diffraction in mind (fortunately, the latter is not as problematic in large format compared to smaller formats, as large format negatives/slides need not be enlarged as much for a given print size), I chose an aperture of f/22.

Incidentally, one benefit of the mechanical design of large format lenses is that the photographer can manually adjust the lens diaphragm with a continuous and fluid rotation of the aperture lever, which allows the photographer to view instantaneously – in real time – the changes in the DOF on the ground glass; it is almost as if you are viewing a live movie as the diaphragm is being smoothly closed or opened and the scene is slowly coming into sharp focus or out of focus, respectively. This is in stark contrast to the clumsy “clicks” of manual focus SLR camera lenses, the automated SLR camera lenses where manual diaphragm control has been stripped out, and the fact that DOF can only be “previewed” with a clumsy DOF button in both manual and automated SLRs.

Returning to the shot, with a chosen aperture of f/22, I adjusted the shutter speed from ⅛ second at f/16 to ¼ second to make the exposure. A tripod was mandatory. As you study the final image, the effect of infrared light on lightening some parts of the sandstone is evident and interesting. The rim of dark values in the sky, sea, and the beach is effective in drawing the viewer’s eyes into the center of the image. This darkening effect of the blue hues was made possible by the heavy blockade of blue light from the infrared filter, which is essentially a heavy-duty red filter.

As I had mentioned above, the original, unadjusted image was a tad dark and underexposed for my taste; if I had to retake this photo, I would have added one stop of exposure (total exposure ½ sec). In retrospect, compared to my previous empiric bracketing exposures with Rollei IR film at high noon, I likely overestimated the intensity of the “f/16 light” at 4:45 pm (likely it was closer to f/11 intensity). Further, I probably would have stopped the lens down to f/32 to squeeze out a little more DOF. Alternatively, for future exposures with this film, I just may re-adjust my filter factor rating for the Hoya R72 to +7 stops and the ISO of Rollei IR to ISO 3. Overall, though, I felt this was an interesting (and fun) first test shot on 4×5 infrared film.

Although I did not originally intend to delve in the following discussion, our PL commentator, Gary Bunton, made an interesting comment on the suggested shutter speed for this exposure: “ . . . based on the wave movement in the background, about 125th of a second.” Indeed, the breaking waves in the distance do appear to be in “acceptable” focus, meaning the shutter speed of ¼ second was sufficient to freeze the motion,which may sound counterintuitive to the beginning photographer in that such a slow shutter speed had this end result. How could a “slow” shutter speed of ¼ second have rendered the distant breaking waves/ripples reasonably sharp? Well, I am glad that you asked! The answer is encapsulated by three considerations. First, the speed of the subject across the image plane (the most obvious one). Second is the magnification: the size that the subject that will occupy on the image area. Third, the direction that the subject is moving (toward/away vs side-to-side). Let’s examine the latter two factors in more depth.

Subjects that have a small magnification (i.e., near infinity focus) need a relatively slower shutter speed to freeze motion compared to a larger magnification. Based on the classic thin lens equations for magnification ( M = image distance / subject distance = f / [subject distance – f] ), for a given focal length and for a given image distance (i.e., lens extension), magnification is inversely proportional to the subject distance. Hence, for a distant subject (i.e., the breaking waves that are about 450 yards away moving at about 3 mph on the image plane), the magnification is small, the subject speed across the image plane is small, the focal length is small relative to the size of the format (i.e., wide angle), all of which results in the need for a relatively slower shutter speed to freeze action (¼ to 16 sec). Further, for a given subject distance, the longer the lens, then the greater the magnification that can be achieved. So, if I had used a normal lens for this photograph, I would have needed a faster shutter speed (115 to 120 second) to freeze the distant waves. And if I had used a long lens for this photograph, I would have needed a much faster shutter speed to freeze the distant waves (probably at least 150 second). I would surmise that a very long focal length, say one that affords an angle of view from a 200mm lens in the 35mm format, would require a shutter speed of 1125 second to freeze the motion of the distant waves. Conversely, if I had used the same 75mm wide-angle lens to photograph a breaking wave at a closer distance, say 10 feet, then the situation again changes: the magnification is increased and the speed of the waves across the image plane is faster. Thus, a relatively faster shutter speed would be needed to freeze the motion.

Finally, a subject that is moving across the image plane (as opposed to away or toward the lens) will require a relatively faster shutter speed to freeze motion. I think this factor is relatively intuitive and straightforward in practice.

Special thanks to Northcoast Photographic Services, in Carlsbad, CA, for providing the film development services for this photograph. Great job, Scott! Please, stay tuned for an upcoming article, “The Quality of Light”, where I will examine the physical factors of light that influence the aesthetics and emotion of a photograph.

The post How Was This Picture Made #12: The Answer appeared first on Photography Life.


from Photography Life https://photographylife.com/how-was-this-picture-made-12-the-answer

Thursday 22 September 2016

Traveling the World Blind: An Interview with Dan

Tyler and Dan strutting
The ability to see all the beauty in the world – from a sunset over the mountains to the mist of a cloud forest to the crystal blue waters of Thailand – is something we often take for granted. Personally, I’ve always wondered what would happen if I were lose the ability to see it. Would I have the fortitude to carry on? How would I adapt? I mean, I’ve never even sprained a finger! A few months ago, I received an email from a reader named Tyler, telling me about how he travels with his friend Dan, who is legally blind (he suffers from extremely low vision). I was immediately inspired by Dan’s story. Born sighted, he started going blind in his teens but adapted and didn’t let it stop him from traveling.

The more Dan, Tyler, and I talked, the more I knew this story had to be shared on the blog. Though I recognize the irony in sharing a text based interview about traveling blind, nonetheless, here is Dan’s inspiring story – and some very wise advice for us all:

Nomadic Matt: Hi Dan! Thanks for doing this! Tell us about yourself!
Dan: I’m 31, from Nobleton, Canada. I started going blind when I was a toddler. A family friend noticed that I was sitting abnormally close to the TV, desperately trying to look at all the awesome planes in Top Gun. I ended up getting a prescription for absurdly thick corrective lenses like Mr. Magoo.

When I was seven, I was kicked in the back of the head by accident by a friend of mine and ended up with a detached retina, leaving me blind in my left eye.

In 2008, the vision in my right eye started to go red. I was told that my right eye’s retina was coming off. For the most part, the surgery to repair the tear was a success, but the scar tissue wasn’t healing properly. I had two more operations over the next two years, but the recovery process was slow. For a large chunk of that time I was totally blind, as I had a patch covering my recovering eye. At first, I was incredibly light-sensitive. It wasn’t until much later I was able to regain some, mostly blurry vision – but with the added bonus of retinal scar damage!

After a recovery and long fight with depression over losing my vision, I realized that I had a choice: adapt or stagnate. I chose to adapt, better myself, and to just keep moving forward.

What it’s like to live a life with a vision disability?
Dan: For me, living with a disability is something I’m almost used to, though there are always challenges. For example, my only big requests for my former housemates were to keep cupboard doors shut, not leave knives in the sink (I’d prefer to keep all of my fingers), and not leave anything on the floor that wasn’t there before.

It’s really the little things that are difficult, and that can honestly be embarrassing. With low vision, you quickly learn to mistrust anything made of glass, specifically glass doors. Who knows where they are, if they’re open, or even if they exist at all!

Many public and private buildings and services simply aren’t accessible by their nature. One case being train stations: I can’t see the board with the arrival/departure times, or the platforms. Usually there is assistance available but my pride and independence mean I try my hardest to navigate situations myself. I use an iPhone to take a photo of the train times and zoom in on it, letting me move at my own pace. Using a small, high-resolution screen lets me have a better look at the world around me without having to get within inches of the subject.

Related: Everything You Need to Know About Using Smartphones When You Travel

On the Iles du Frioul outside of Marseille, France
What’s fuels your passion for travel?
Dan: My passion for travel comes from my family. Both of my parents are nomadic at heart. My father traveled all over the world in his youth for various reasons, eventually leaving his native France to come to Canada. My mother is a brilliantly independent woman who travels across Canada and beyond, speaking on behalf of the Lions Foundation of Canada, an organization that provides dog guides to people with a wide range of disabilities, not just the blind.

In fact, she’s totally blind and travels with a dog guide herself. Our disabilities aren’t really connected on a hereditary level. She’s been totally blind since before I was born, and has worked with dog guides since 1989. She’s a huge inspiration to me and a major part of why I do my blog and YouTube channel.

Beyond family, I travel for the people. You can’t walk through a hostel without a happy Australian sticking their hand out with a “how’re ya goin’?” I realized people are genuinely curious about my vision, my cane, and my travels. I feed off of their curiosity, and I love being in a position to tell stories. I just love learning about how the person across from me got to be across from me.

What challenges did you face traveling with low vision? Were some countries easier to travel in than others?
Dan: Luckily for me, Western Europe (where I mostly travel) tends to be fairly accessible. While it’s nearly impossible to retrofit a thousand-year-old church with accessible ramps and touch tours, to their credit, most have usually made some sort of effort. Sometimes it’s as simple as a large-print or braille guidebook, or sometimes you’ll have a full-blown exhibit in which people can feel the objects on display.

When I first started traveling back in 2012, I had the most difficulty in Barcelona. I was still learning how to work with abnormal street crossings. Anyone who has been there can attest that, for better or worse, their intersections are octagonal. It’s also insanely busy.

But then I went to Morocco. We made a video about it, but holy cats, Barcelona is like walking through an empty grocery store by comparison. Imagine all the vendors calling out to you, the cars and scooters going at road speed wherever they want, the scammers coming up to you with their sleight-of-hand and silver tongues. Imagine holes in the sidewalks, beggars splayed out and blocking pedestrian traffic, and the heat. Combine that with the din: the noise of all those people and cars, the music blaring from shops and stalls and cars, the shouting of hawkers. Now imagine that with one hand occupied holding a cane and only half of your vision, and that blurry, foggy, and tired. Morocco was, understandably, intense for me.

I know this a stupid question but how do you manage to travel if you can’t see? Do you always have someone with you? Like, what are the mechanics of it?
Dan: I’d say my travel style is very much like most other backpackers’ but slower. For example, say I’m taking a train from Vienna to Munich. I know the train is at 11:00. So, what I do is find the display board. Any ounce of clarity I may have with my vision sort of peters out after a few feet so what I do is find as large a group of people as I can. If they’re all facing the same way, they’re probably staring at the train timetable board. I’ll look the same direction they are and find the inevitable big, black, square blur. I figure that this is the train board, take a picture of it with my phone, and shuffle away to a quieter, calmer area. I’ll then have a gander at the photo and find my train’s time at my own pace.

I like to travel with another person, but it’s more because I’m a social person than I need assistance. I’m currently on the road with one of my best friends, Tyler. He’s been a hugely integral part of Three Points of Contact, a passionate traveler, talented musician, and natural videographer. He and I met four years ago while he was working in Lyon, France, and became friends straight away. There are few people out there I would trust as much to travel with.

Beautiful view in Iles du Frioul
What specific advice do you have for low-vision or blind travelers? What are some important logistics to consider?
Dan: The best advice I can give to them is the same as I’d give to anyone: use common sense and trust your instincts. If something feels wrong, make it known, ask questions, and don’t be afraid to change your situation. For the most part, people are good and naturally look out for us, because the cane is an internationally recognized symbol of blindness.

That’s a double-edged sword, though: we’re also easy targets so trust your gut. Get out there and travel, show people you can pull it off the same as anyone else, no matter how poor your eyes work.

What kind of resources are there for blind or visually impaired travelers on the road? Is there a network out there? Meet-ups? Communities that you could join?
Dan: Blind or low-vision travelers are living in a fantastic time to be abroad. Services and support groups are easily accessible on the Internet, and many organizations reach across the world. In Canada we have the CNIB, the UK has the RNIB, and across the planet are other resources and contacts for the blind. By contacting these resources, you can find accessible routes, get in touch with transit specifically for people with low vision, and simply have a support net if required.

Resources that aren’t blind-specific, like Facebook and Reddit, are excellent to connect with other disabled people as well. Couchsurfing is fantastic to meet people who are willing to show you around, even if you don’t crash at their home. Creating contacts and asking questions expands our range of movement!

Do your family and friends support your traveling escapades?
Dan: My family is a well-traveled bunch. My sister and I were lucky enough to explore Europe more than a few times growing up. My mother travels all over Canada doing speaking engagements, and my father is originally from France and has been all over the world. Even my grandparents have been circling the globe for over 50 years. So, it really came as no surprise to them in 2012 when I announced I was going on the road.

They were, of course, nervous at first. But they also knew that trying to dissuade me from the idea would be futile: I’m stubborn and they know it. My parents, my sister, and my extended family have all been incredibly supportive since the first rumblings of this idea.

Dan on an extremely windy hike after a rough boat trip
Can you tell us about your next adventure?
Dan: After this current trip in Europe is over, I have no idea what my next port of call will be. I’m really drawn to Australia and New Zealand, Japan, and the lower half of South America. But truthfully, I think it’s time for me to explore my own country. Canadians travel the world because it’s so hard and expensive to visit our own, which is a shame. It’s the second-largest country in the world, and we see woefully little of it.

Tyler may join me for a part of it and our friend Amy (a Chicagoan who features in a few of our Portugal and Spain videos) has expressed interest in joining for a leg as well!

What’s on your bucket list?
Dan: I’d absolutely love to learn to sail. I’ve got this image in my head of catching the wind and feeling a control over a boat like no other. With any luck I’ll have the opportunity next summer to give it a go out on Lake Ontario.

A long time ago, when I was fully-sighted, I had planned a few road trips as well. One across Canada and down the western coastal highways. I’ve never seen the Pacific, and I really have to change that. Another trip would have taken me on a sort of blues/music tour: Chicago, Memphis, New Orleans. I’ll hopefully make it to Chicago soon, at the very least.

Dan on top of the rock of Gibraltar
O.K., one last question: What advice do you have for people who are blind or have some other disability? 
Dan: My advice is to remember that nothing is worth doing if it isn’t a little bit scary. There will be times when you will screw up. You will get hurt, embarrassed, and confused. You have to take these moments and learn from them. Adapt from them. Take those opportunities to educate others. Because while the majority of people are kind, generous, and helpful, the only person you really have to answer to is yourself. Own the difficulties and hard times and they’ll never own you!

You can find Dan’s story his YouTube channel at youtube.com/threepointsofcontact. His ever-changing blog is at www.threepointsofcontact.ca, his Instagram is @threepointsofcontact, and @3pointscontact is where he can be found on Twitter and Periscope.

More posts on traveling with a disability:

P.S. – The application for the FLYTE Summer 2017 Program is now available! If you are a teacher or know a teacher who wants to take their classroom abroad (and have it paid for), head to our website to learn how to apply!

The post Traveling the World Blind: An Interview with Dan appeared first on Nomadic Matt's Travel Site.


from Nomadic Matt's Travel Site http://www.nomadicmatt.com/travel-blogs/interview-about-blind-travel/

Wednesday 21 September 2016

The Decisive Moment in Landscape Photography

The name Henri Cartier-Bresson does not immediately remind most people of landscape photography. It shouldn’t; he wasn’t a landscape photographer! Instead, of course, Henri Cartier-Bresson was a street photographer — arguably the founding father of the genre. However, although he rarely took photos of nature, his intimate approach to street photography still has value to people who prefer the company of grand landscapes. One technique is especially worth learning, no matter what genre of photography you do: the decisive moment.

1) What is the Decisive Moment?

Sometimes, a photograph is taken at such a perfect moment that it feels as though no other point in time could express the essence of the event so perfectly. Henri Cartier-Bresson defined that as the decisive moment.

How does this work in practice? Every time that someone moves — or does anything, really — there is some point along the way which perfectly encapsulates the moment. If someone jumps, it is the moment that they are in the air. If someone catches a baseball, it is the moment their glove touches the ball. Henri Cartier-Bresson aimed to capture this exact moment in his street photos.

In street photography, one good way to capture the decisive moment is to stand in front of an interesting background and wait for something to happen. The goal is to be prepared. For example, if you point your lens at a billboard advertising cat food, it is inevitable that someone will walk their dog past the location. If you are ready to take a quick photo, you could capture an interesting and ironic image.

This is, admittedly, a simple example from someone who rarely takes street photos. Instead, I tend to photograph nature and landscapes. So, why is the decisive moment relative to such a different type of work? Quite simply, everything moves. Even landscapes, which tend to be relatively static, move and change dramatically as the day goes by. This means that you can apply the concept of the decisive moment just as easily.

2) Landscape Photography

On the recent Photography Life visit to Grand Teton National Park, our first goal was to find a good location to take sunset and sunrise photographs. I assume that this is the case for many landscape photographers — you go out in the middle of the day, search for locations, and find somewhere interesting to set up for sunset.

This process is also known as scouting, and it is one of the hallmarks of landscape photography. Every time that you visit an interesting location, even if the conditions aren’t right for taking photos, you can still lay the groundwork for a successful photograph in the future. For example, take a look at the image below:

Spencer-Cox Grand Tetons

NIKON D800E + 35mm f/1.8 @ 35mm, ISO 100, 1/80, f/8.0

I took this photograph at an overlook in the Grand Tetons. A lot of things are wrong with this shot. First, the light is relatively uninteresting. There aren’t any beautiful colors or unusual cloud patterns, and the entire image just feels a bit like a snapshot.

At the same time, there are some good qualities to this photograph. The mountains are beautiful, of course, and so is the river in the foreground. It’s not a bad location or a poor composition; the main problem is the light.

So, it was time to wait for better light. This sunset didn’t turn out to be very exciting — there still were no clouds in the sky — but the next day’s was very beautiful. The photograph below is the final result:

Spencer-Cox Grand Tetons Sunset

NIKON D800E + 35mm f/1.8 @ 35mm, ISO 100, 3/10, f/5.6

How does this relate back to the decisive moment? Although there are a few differences, the path that I followed is very similar to what Henri Cartier-Bresson described. I found a subject (my landscape) and waited for the defining moment (a good sunset). In some sense, every landscape photo is a combination of these two components.

3) The Subject and the Moment

In landscape photography, the “decisive moment” is all about light. How has the sun changed? Where is it in the sky? How do the colors look in your scene?

Landscape photography is as much about the decisive moment as is street photography. You can take a good photograph if you have an interesting subject, and you can take a good photograph if you capture the right moment. However, to take a great photograph, you need to capture an interesting subject at the right moment.

How does this look in landscape photography? Consider the photograph below:

Spencer-Cox Great Sand Dunes

NIKON D800E + 20mm f/1.8 @ 20mm, ISO 100, 1/50, f/11.0

This image was taken at a wonderful location, with dramatic lines in the foreground and interesting mountains in the distance. However, there is a crucial problem with it: the moment is completely wrong. For one, there are no clouds in the sky, but that isn’t the main issue. Instead, what bothers me about this photograph is the position of the sun: it is too high in the sky.

If I had taken the image a couple minutes earlier, there would have been a few differences. First, I could have captured the sun while it barely peaked over the distant mountains, not while it was above them. This would have shrunken the size of the sunburst in the frame, which is a big deal — currently, it just takes up too much space. Also, if the sunburst were smaller, there wouldn’t be the unusual colors around the sun, caused by a slight amount of flare. In short, the image would be much more interesting.

So, that was an example with an interesting subject taken at the wrong moment. What about the reverse? The photograph below is a good example:

Spencer-Cox Storm Clouds

NIKON D800E + 24mm f/1.4 @ 24mm, ISO 100, 3/10, f/16.0

Here, the light is absolutely incredible. I am a big fan of deep, dark shadows, along with dramatic clouds, so the weather here is exactly what I wanted. In other words, the moment is right — in fact, this is some of the best light that I have ever seen. So, why isn’t the final photograph one of my personal favorites?

Although I was able to find an interesting foreground, it wasn’t a stellar foreground. It was just… good. The mountains in the background are interesting, and the farm buildings aren’t bad, but they don’t have the same drama as other places I have photographed. This is what happens when the moment is right, but the subject is wrong.

It is worth noting something: the two images in this section aren’t terrible. The first one is close to being a great photo, but the sun is a bit too high. I still display the second one on my website, and it has even won a travel photography award as part of a set, so it isn’t a bad shot either. However, neither of them are world-class images by themselves.

Imagine, though, the landscape in the first photo underneath the light of the second photo. That would be an amazing shot! That’s the power of the decisive moment — good light and good landscapes work well on their own, but your goal is to combine the two in a single photo.

Finally, before moving on to the next section, it is worth mentioning that these are just my personal evaluations of the two shots, and you may feel different about their quality, either positively or negatively. The point, though, is the same — a world-class photo needs to be a combination of the right subject and the right light. In other words, it needs to capture the decisive moment.

4) Differences

The decisive moment in landscape photography is different from the decisive moment of street shots. When you are photographing people, everything moves much more quickly. It is harder to predict exactly what will happen, and it is harder still to capture it at the perfect moment.

In landscape photography, though, everything tends to change slowly. Sure, you may end up photographing a rainbow as it fades, but even then you often have a few seconds before it’s gone. Street photography, though, is impossibly quick. To capture his famous “jumping man” photo, Henri Cartier-Bresson had to be within a few milliseconds of the perfect moment. I understand that this is sometimes true in landscape photography, too. If you are photographing ocean waves or explosions of lava, you may have a fraction of a second to take the right shot. However, these are outliers for most people, not the norm.

Similarly, landscape photography has more predictable changes than does street photography. We all know when the sun will rise and set. I even have an app on my phone to calculate it, as I am sure many readers also do. Street photography isn’t random, but it is much more difficult to predict how a scene will look several minutes or hours in the future.

Finally, as I have mentioned a bit so far, landscape photography’s decisive moment typically involves a change in light. While street photographers often wait for objects in their scene to move into place, landscape photographers wait for the right light. It is a subtle difference, but it means that landscape photographers have the ability to return to the same spot — even several years in the future — and capture exactly the image they want.

Despite all these differences, though, the decisive moment is just as important in landscape photography as in street photography. You may not have to capture the exact fraction of a second that someone jumps in the air, but you will need to plan how to spend your time photographing good light before it changes.

Spencer-Cox Decisive Moment

NIKON D7000 + 24mm f/1.4 @ 24mm, ISO 100, 1/80, f/10.0

5) Conclusion

Perhaps it will help to think of your landscape photography as capturing the decisive moment, much in the same way as street photographers do. Ultimately, the goal is to maximize the amount of time that you spend in amazing locations under the right conditions. This may sound intuitive, but it is the real secret to successful landscape photography.

The post The Decisive Moment in Landscape Photography appeared first on Photography Life.


from Photography Life https://photographylife.com/the-decisive-moment-in-landscape-photography

Tuesday 20 September 2016

How Was This Picture Made #11: The Answer

It has been a while since I posted the “How was this picture made #11?” article, where I showcased a very high resolution image of sand particles with tons of detail. The image was massive in size and resolution when I extracted it out of Lightroom. In fact, the image was so big, that I had to downsize it to 4096 pixel long resolution in order to keep the size at less than 10 MB with as much JPEG optimization as I could. When dealing with so much detail, even the highest JPEG compression levels will still yield large files, since there is so much pixel-level data. And that’s what you get when you have an image produced from a sensor that moves one pixel at a time in order to create a super high resolution image! And combined with the power of focus stacking multiple images, you get insane levels of detail from a macro shot like this. So how did I do it? Let’s talk about the specifics of this particular shot.

Sand and Pebbles

I have already kind of revealed the answer in the opening paragraph – the image was captured by the Pentax K-1 DSLR, the camera that has the amazing pixel-shift technology capable of creating extreme details, something typical sensors with a bayer filter are unable to reproduce. Stephen Bennion, great job at guessing the setup! :) The lens that I used was the Pentax 24-70mm f/2.8, which is basically a re-branded Tamron 24-70mm f/2.8 with its VC disabled. Although I had the Pentax 70-200mm f/2.8 with me as well, it would have been a bit too long to use for this particular shot, since I was pointing my camera directly down from my tripod. I zoomed to around the 70mm mark to get the details and the tight framing I wanted and at that distance and focal length, it would have been impossible to capture all the details in the frame from the center all the way to the extreme corners, even if I stopped down significantly. I personally try to stay away from small apertures past f/11 for these kinds of shots, because diffraction can seriously hurt resolution, so my choice was to take multiple shots focused at different areas of the frame, then stitch them together for a single shot in Photoshop.

Before I talk about how I did that, let me first talk about the advantage of the pixel shift technology, particularly for such shots. What kind of additional detail can cameras such as the Pentax K-1 add? Just take a look at the following two images (studio scene to soon be published in the upcoming Pentax K-1 review):

I know what you are thinking – one looks like blurred mess, almost like an out of focus image, while the other looks quite detailed in comparison. But I can assure you, both images are 100% in focus. The “before” image was shot with the Nikon D810, whereas the “after” image was shot with the Pentax K-1. The difference is literally in the bayer pattern – even without an anti-aliasing / low-pass filter in place, the Nikon D810, which is supposed to be a camera that can produce tons of detail, is not capable of providing full pixel-level details of the scene. The Pentax K-1, on the other hand, has the ability to shift its sensor one pixel at a time (thanks to its IBIS), in order to resolve every bit of detail available. Now that’s amazing!

Of course this pixel shift technology does not work for every type of scene, especially if there is a lot of subject movement. However, for static shots like this and when there is no wind, pixel shift technology is absolutely amazing. In fact, the detail level one can get with such a mode is pretty darn close to what a medium format camera can do, once images are down-sampled.

Now imagine the potential of using pixel shift, along with focus stacking for a single composite. And that’s exactly what I did here. I started out by focusing on the bottom edge of the frame, then moved up bit by bit, by capturing a total of 6 images. Take a look at the following sequence of the last three images:

Focus Stack (2) Focus Stack (3) Focus Stack (4)

As you can see, there is a slight change of framing between the three shots. And that’s the unfortunate issue you are going to get with most lenses – when you focus at different areas of the frame, there is a potential for a change in focal length, which can mess up the framing! This means that if you were to take such images to Photoshop and try to automatically stitch them, they might not stitch properly due to alignment issues.

After right-clicking the six images in Lightroom and selecting “Open as Layers in Photoshop” and letting Photoshop do its initial work, I selected all layers, then went to Edit->Auto-Align Layers:

Auto Align Layers

What this does, is align layers and cut off parts that are not present in all layers. After the process was complete, I cropped the image a little bit to only be left with the full image. Next, I visited Edit->Auto-Blend Layers and picked “Stack Images”. I deselected both “Seamless Tones and Colors” and “Content Aware Fill Transparent Areas”, since I did not need them.

Once blending was done, I ended up with layer masks on top of each layer. Although Photoshop did a wonderful job, I still selected a soft brush and brushed off the abrupt edges manually from some areas. The image was ready and it only took me about 3-5 minutes to get this all done.

The pixel shift technology offered by some modern cameras is amazing. If manufacturers continue to work in advancing this feature a bit further by taking quicker shots and processing them, finding ways to blend images better and take care of other issues and limitations, this will be a very desirable feature to have on every camera.

Pentax has done an amazing job with the K-1. If Pentax had a comparable lens line-up to Nikon, I would seriously consider switching. The Pentax K-1, being a sub-$2K full-frame camera, offers so much amazing technology, that it is now becoming a reference camera when it comes to rich set of features, image quality, dynamic range and overall performance. I hope Nikon and Canon wake up from their deep sleep and shake the industry once again. Abandoning the Nikon 1 mirrorless system or releasing cameras such as the EOS M5 that can barely compete with other mirrorless offers won’t get the two far…

The post How Was This Picture Made #11: The Answer appeared first on Photography Life.


from Photography Life https://photographylife.com/how-was-this-picture-made-11-the-answer