from Travel news http://telegraph.feedsportal.com/c/32726/f/568425/s/4ded78b4/sc/31/l/0L0Stelegraph0O0Ctravel0Ctravelnews0C115527840CThe0Eworlds0Emost0Epowerful0Epassports0Bhtml/story01.htm
Monday 29 February 2016
The world's most powerful passports
The British passport has been knocked off its perch - but which has replaced it as the world's most powerful?


from Travel news http://telegraph.feedsportal.com/c/32726/f/568425/s/4ded78b4/sc/31/l/0L0Stelegraph0O0Ctravel0Ctravelnews0C115527840CThe0Eworlds0Emost0Epowerful0Epassports0Bhtml/story01.htm
from Travel news http://telegraph.feedsportal.com/c/32726/f/568425/s/4ded78b4/sc/31/l/0L0Stelegraph0O0Ctravel0Ctravelnews0C115527840CThe0Eworlds0Emost0Epowerful0Epassports0Bhtml/story01.htm
Four Hidden Lightroom Features
Adobe Lightroom is a complex piece of software, and it includes countless features that are buried beneath the surface. In this article, I will cover four useful Develop options that aren’t obvious at first glance, ranging from precision cropping to local color adjustments. If you are a Lightroom guru, you certainly may use each of these already; however, for most Lightroom users, these features are somewhat difficult to find.
1) Precision Cropping
One thing that bothers me about Lightroom is that you cannot crop your images to pixel-level precision. Especially on a small monitor, it is difficult to crop to exactly the right spot in a photo. You can get close, certainly, but Lightroom’s cropping tool does not allow the fine adjustments that I sometimes need.
This doesn’t matter for the vast majority of images, but there are some scenes where it is important. Consider a landscape where you want to include as much of the sky as possible, but there is a tree branch at the upper corner; by cropping at the pixel level, you could include the absolute largest amount of sky possible. If you plan to make a large print, Lightroom’s standard level of precision simply is not enough.
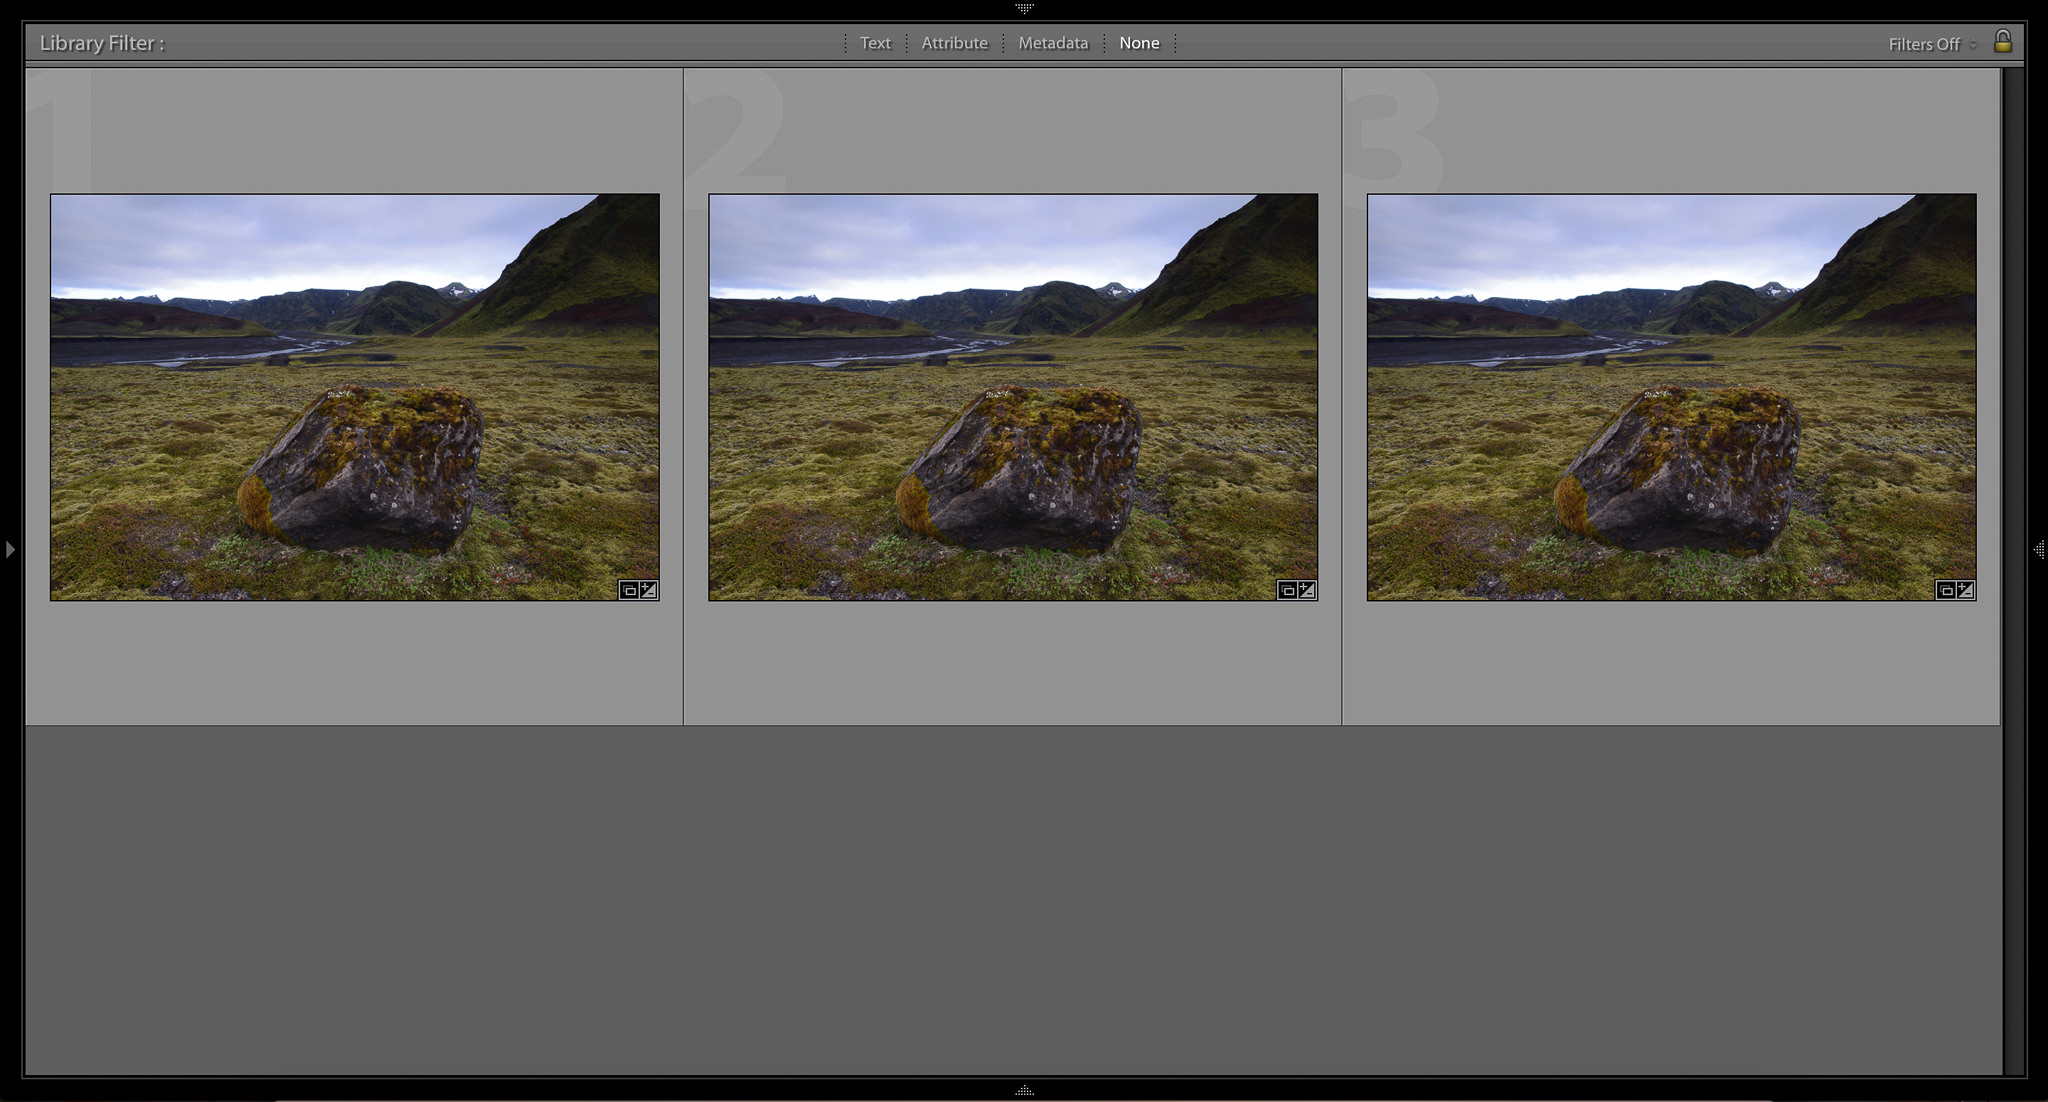
Luckily, there is a way to remedy the problem. It certainly is not perfect – and not everyone needs such a careful crop in the first place – but you can make more precise adjustments simply by clicking the “crop” tool, then closing the sidebars of your editing window. By doing so on a small computer monitor, you can nearly double the size of your photo on-screen, which correspondingly improves your cropping precision. Look at the image below:
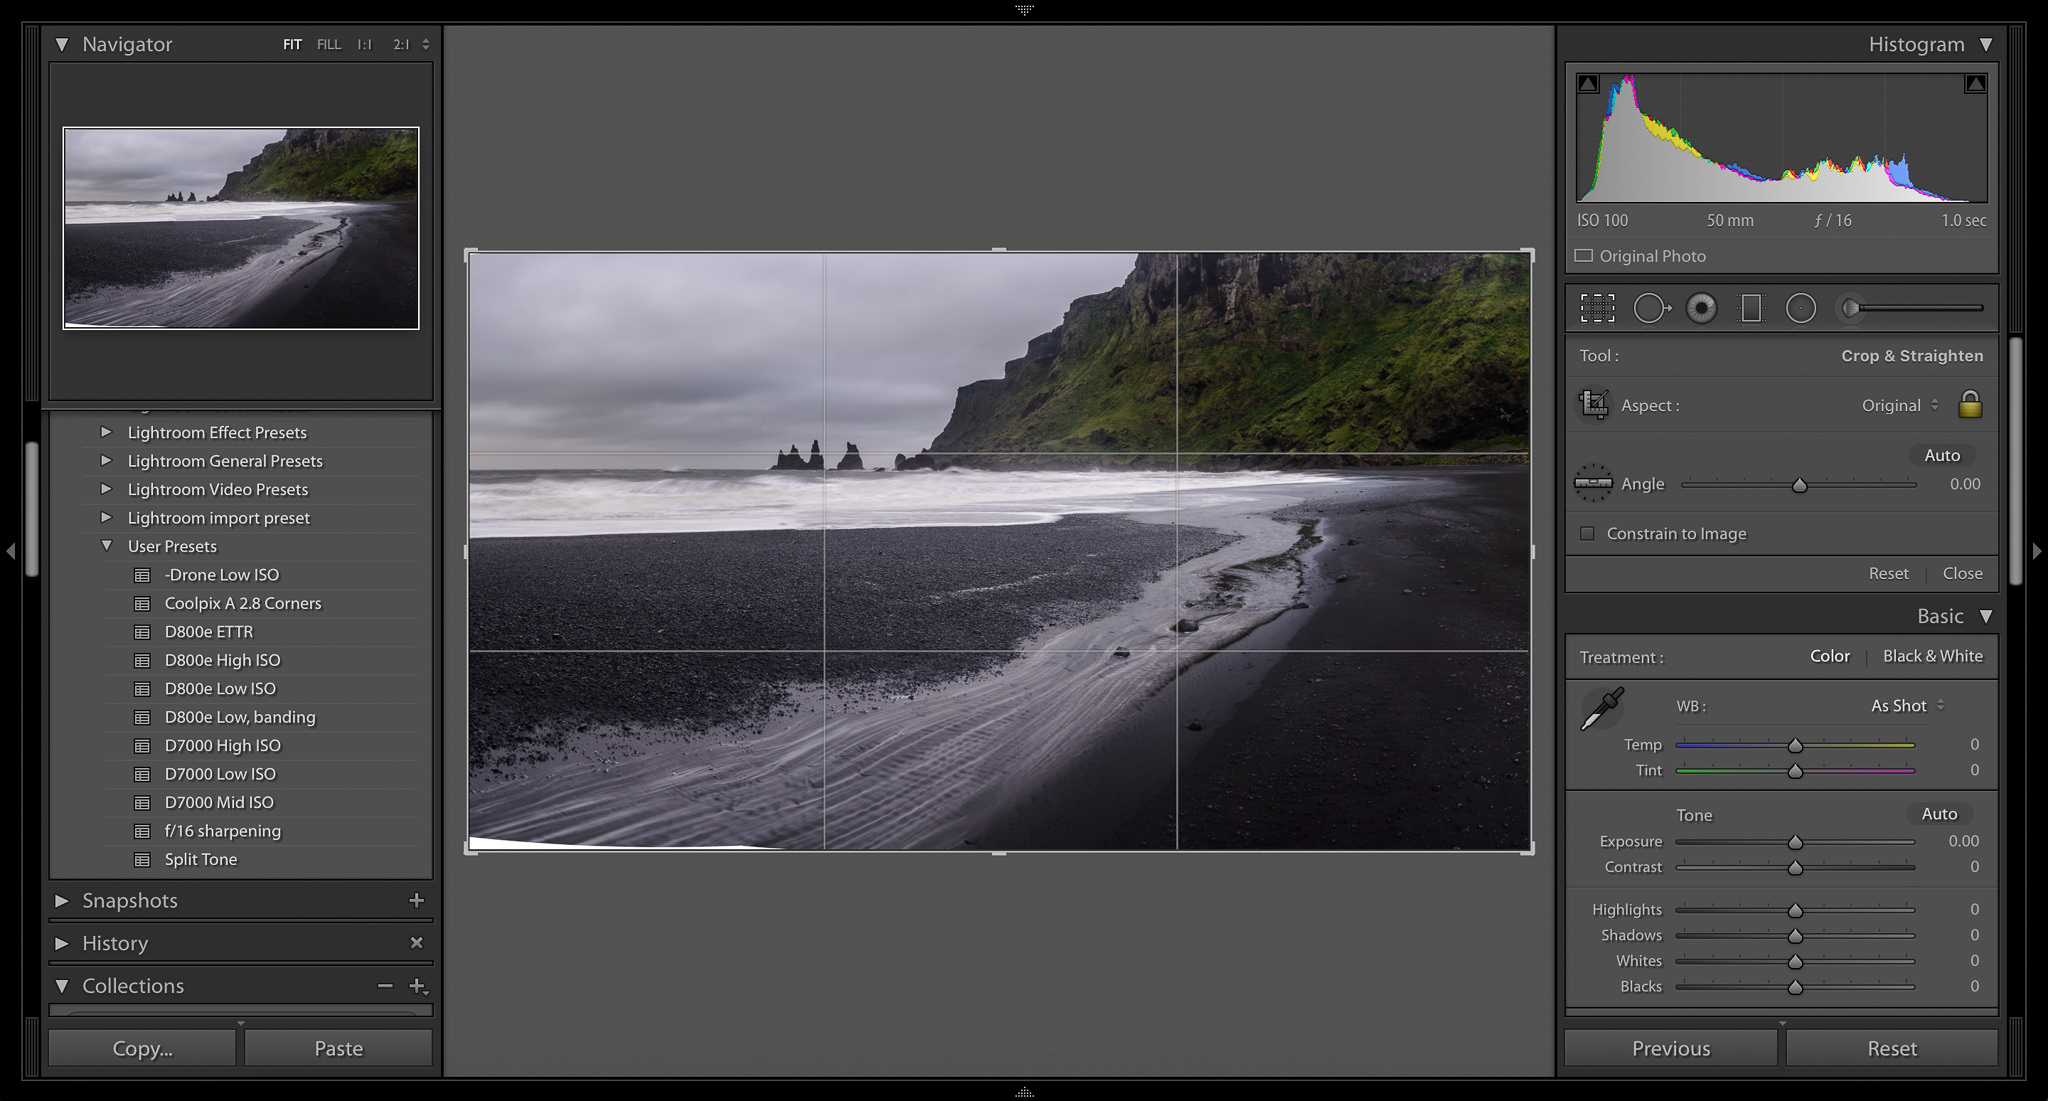
This is the standard cropping window in Lightroom. As you can see, the bottom-left corner of this image is white and featureless. (This is a panorama, and the lack of detail is a result of the photo-merging process.) I want to include as much detail as possible above that corner, but I clearly didn’t want to include any of the white area itself. Here, though, the cropping tool is not very precise; it is difficult to adjust the image exactly how I want.
To make the most precise crop possible – getting rid of the white space without removing any of the beach itself – I needed to collapse the left and right sidebars. See the screenshot below:
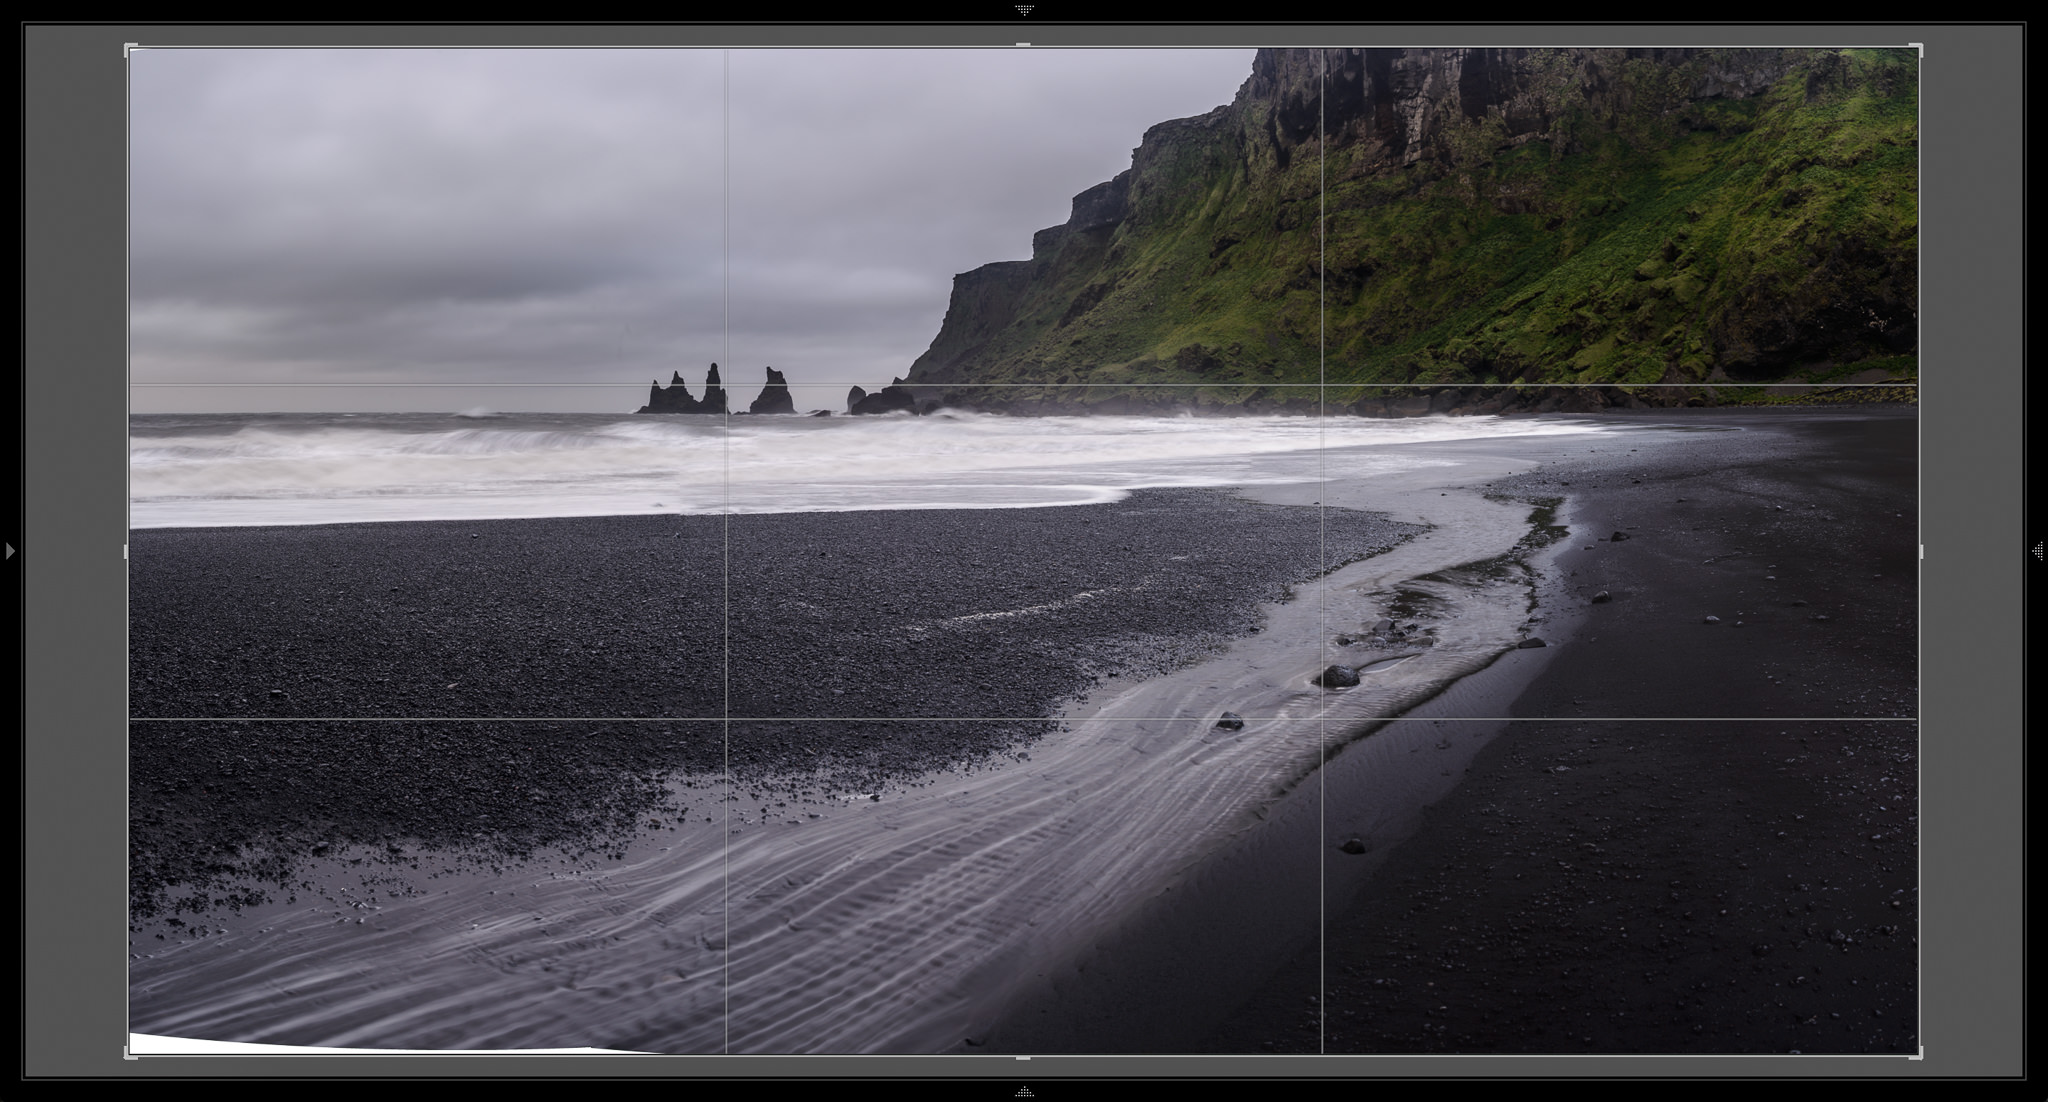
This gives me much more room! I can collapse the sidebars without closing the crop tool. Now, it is much easier to get the exact frame that I want. The final version is below:

NIKON D800E + 50mm f/1.4 @ 50mm, ISO 100, 1, f/16.0
I don’t use this technique very often, but it is invaluable for certain photographs. For your trickiest images, this extra precision is more than welcome.
2) The Alt Key
One of my personal favorite Lightroom tricks is the unassuming Alt key (Option for Mac users). If you are in the develop module, hold down Alt while making an adjustment; chances are, something about your screen will change!
The Alt key functions as a preview. If you hold Alt while adjusting exposure, Lightroom will show you which highlights are blown-out to white; the same is true if you adjust highlights or whites. Likewise, if you hold down alt while adjusting shadows or blacks, you will see which areas of your photo have gone completely dark.
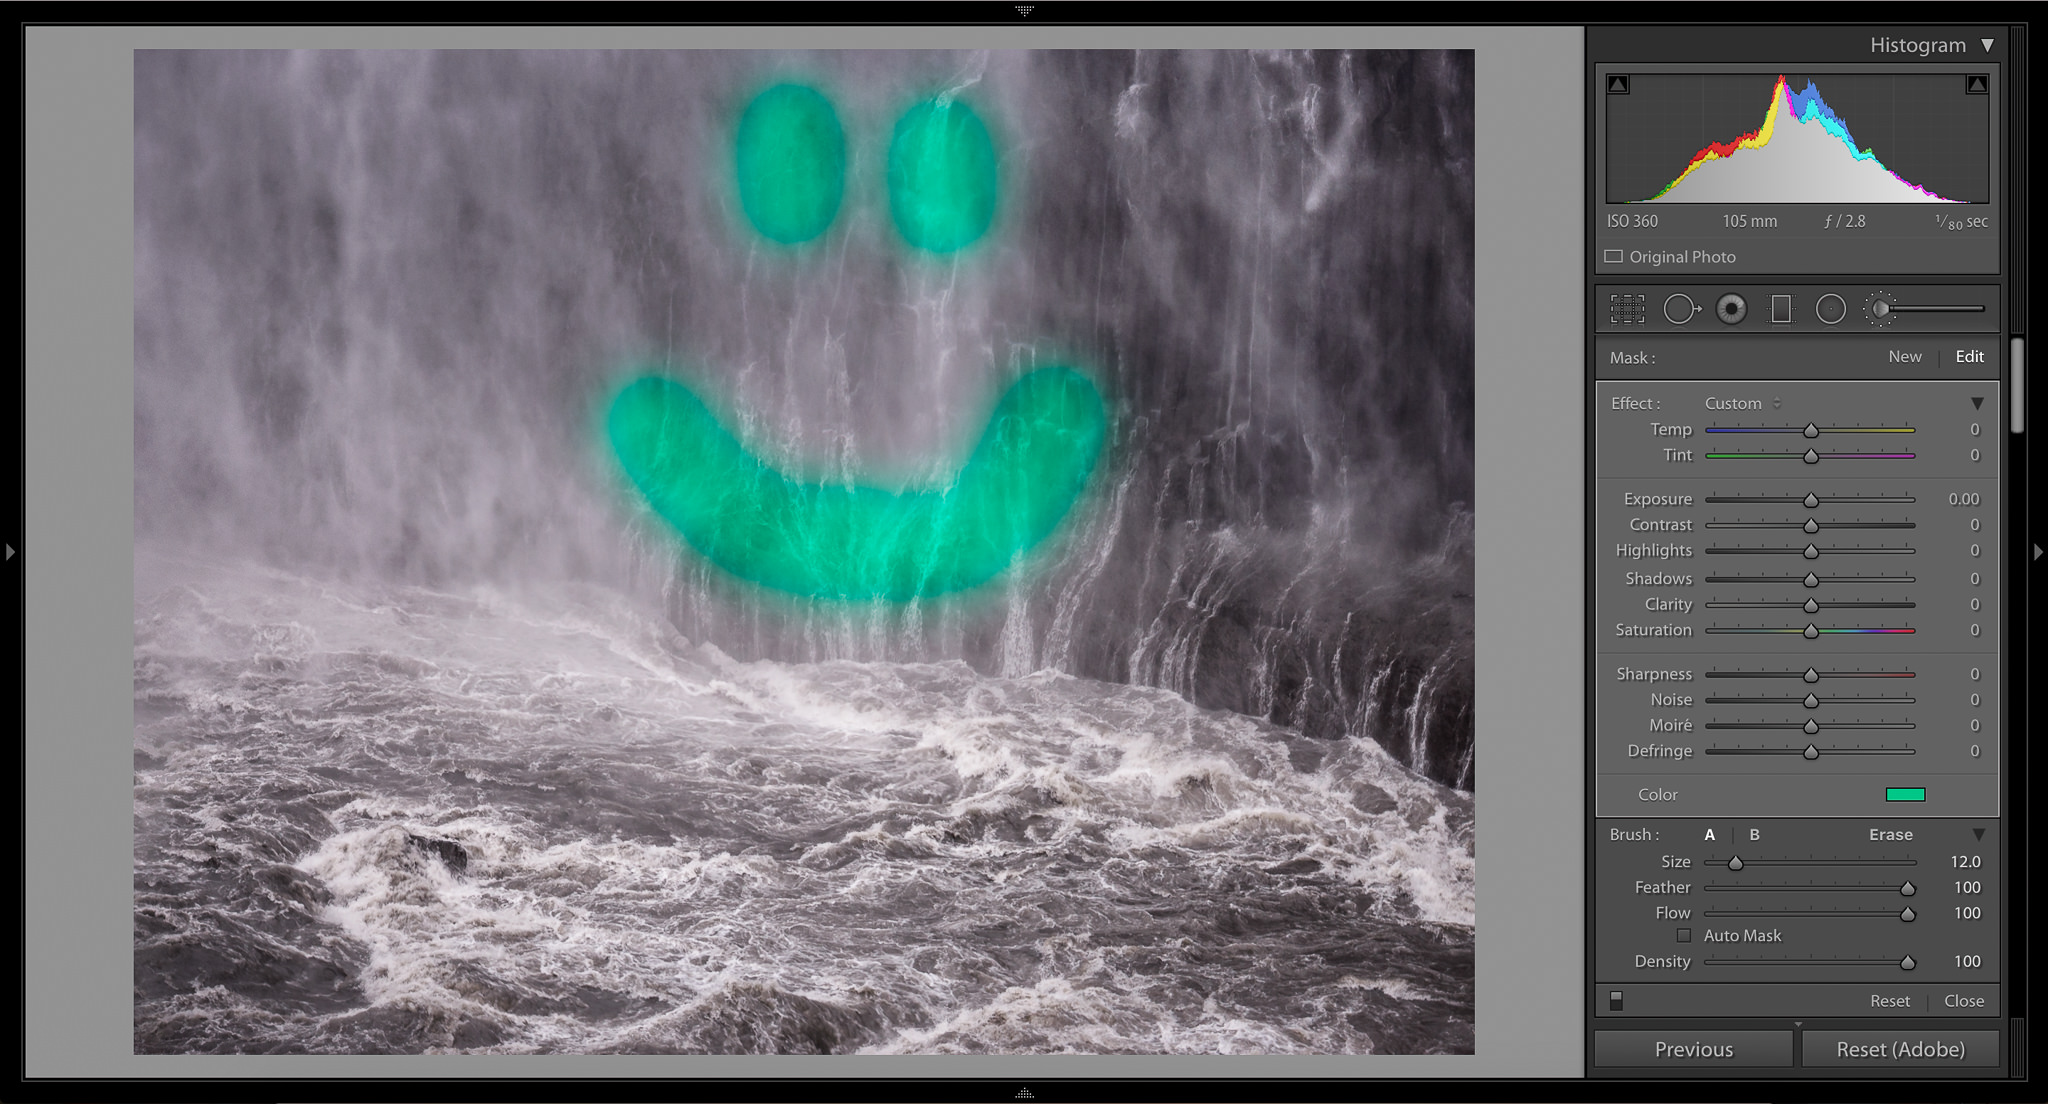
Many common adjustments have a built-in preview. One of my favorites is the Defringe option under Lens Corrections > Color. This option lets you remove color fringes, or longitudinal chromatic aberrations (as explained in this article). When you hold down the Alt key, Lightroom shows you all the colors that can be removed through the fringe correction tool. This is incredibly useful! Check out the photograph below:

In the image above, everything in purple can be eliminated by a strong fringing correction. (In this case, there wasn’t actually color fringing; this is simply an example photo with a lot of purple.)
Here is a list of all the adjustments that open previews with the Alt key:
- Basic
- Exposure: Shows which highlights are blown-out to white
- Highlights: Shows which highlights are blown-out to white
- Shadow: Shows which shadows are completely black
- Whites: Shows which highlights are blown-out to white
- Blacks: Shows which shadows are completely black
- Split-Toning
- Hue sliders: Previews the hue that you are adding to your shadows or highlights
- Balance: Previews the balance between shadow and highlight colors (read more)
- Detail
- Sharpening amount: Makes the photograph black-and-white to preview sharpening without any color noise
- Radius: Exaggerates sharpening adjustments to show the radius, as if you have applied a high-pass filter
- Detail: Again, appears as if you applied a high-pass filter – only shows the edges that will be sharpened
- Masking: Very useful – darkens everything that won’t be sharpened
- Luminance noise reduction: Makes the photograph black-and-white to preview without any color noise
- Luminance detail: Makes the photograph black-and-white to preview without any color noise
- Luminance contrast: Makes the photograph black-and-white to preview without any color noise
- Lens Corrections
- Defringe amount: Shows which colors are detected by the Defringe tool
- Defringe hue: Turns black everywhere that is affected by the Defringe tool
- Effects
- Midpoint: Darkens the vignette that you have applied, allowing for a better preview
- Roundness: Darkens the vignette that you have applied, allowing for a better preview
- Feather: Darkens the vignette that you have applied, allowing for a better preview
- Highlights: Darkens the vignette that you have applied, allowing for a better preview
There are other adjustments that change when you press the Alt key – the gradient mask centers itself, for example – but the items above give you a preview of your edits. Depending upon the photograph that you are processing, they can be incredibly helpful.
3) Match Total Exposure
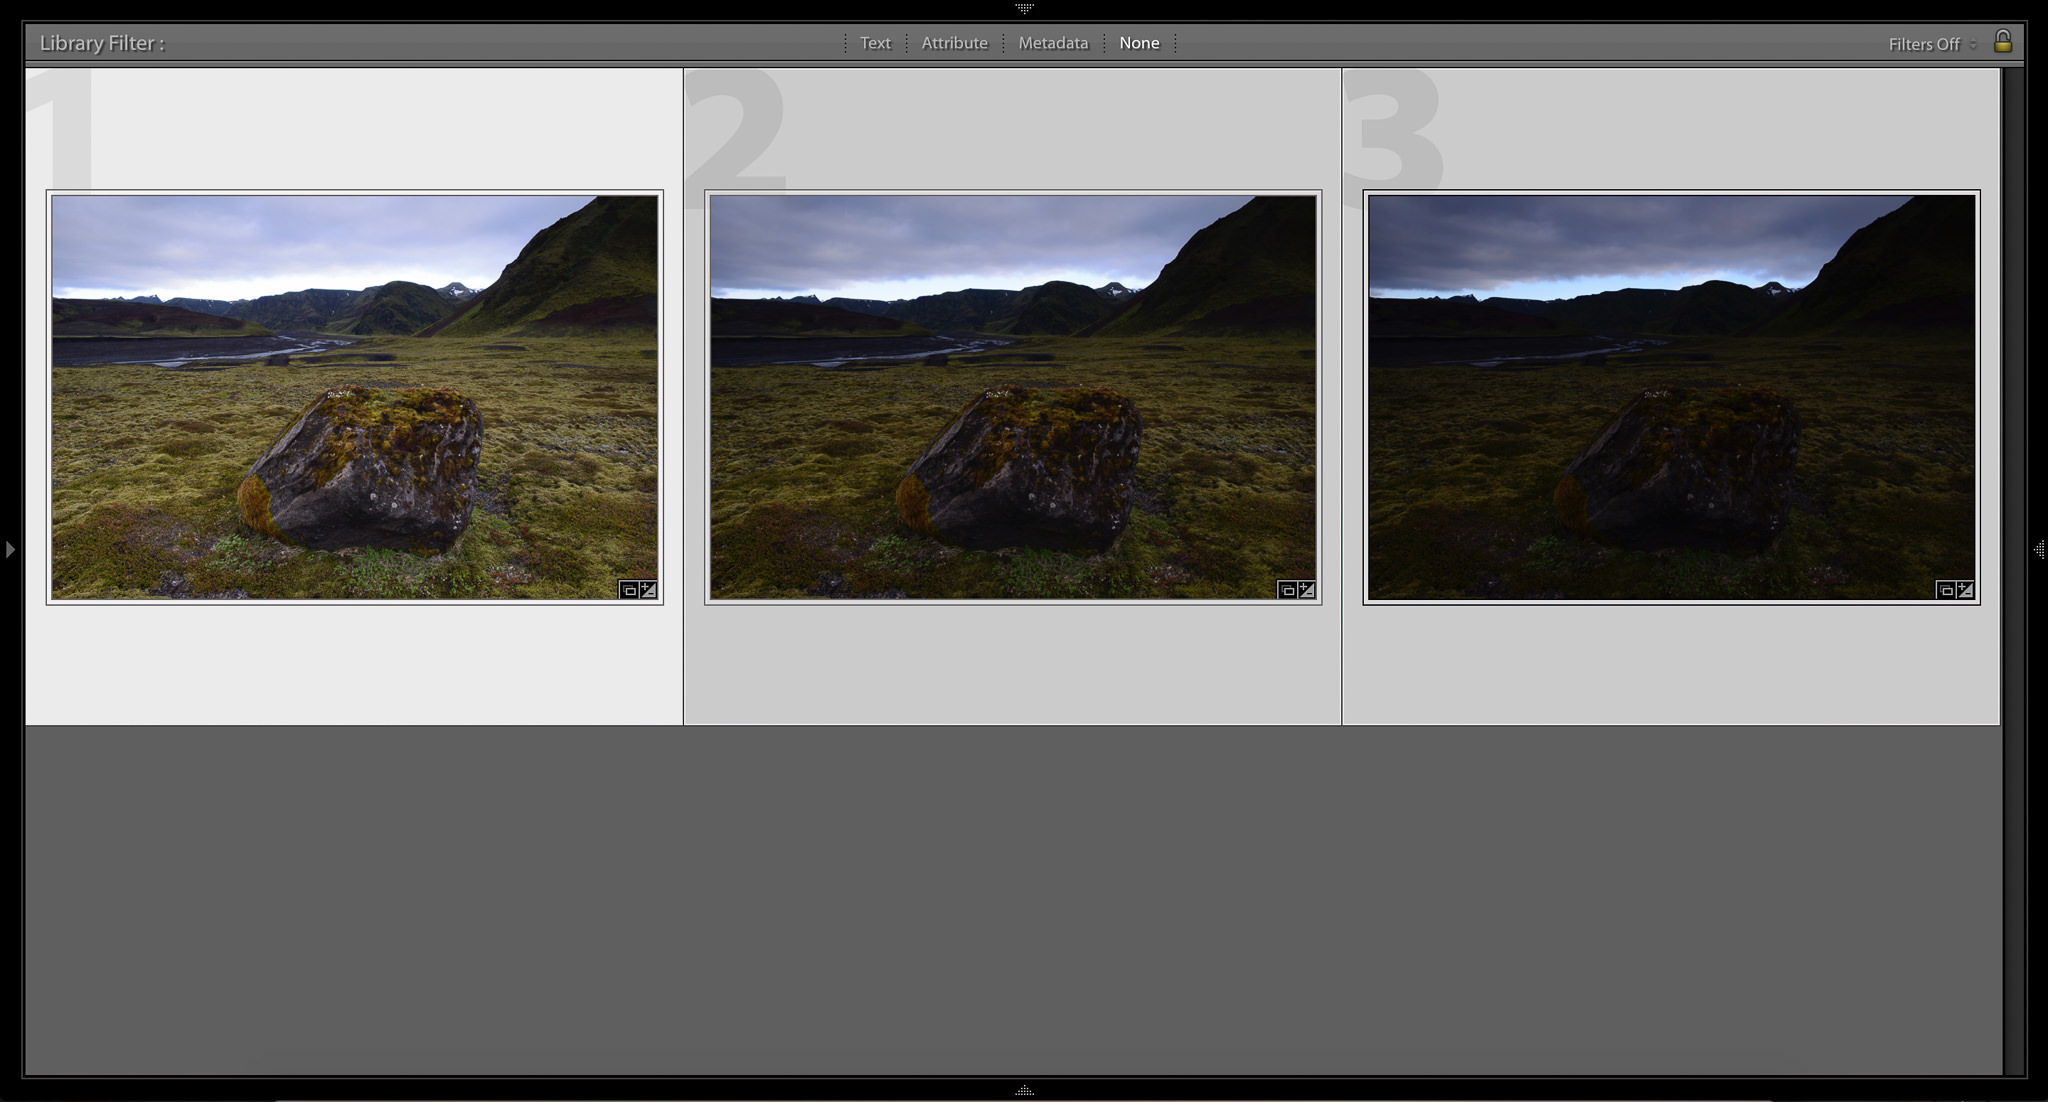
Another useful feature of Lightroom is the Match Total Exposure setting. Essentially, this option lets you take a series of photographs – all with different exposures – and then adjust them to match the same level of brightness.
The process is quite simple. First, hold down the Control key (Command on Mac) and click on each photo that you want to be the same brightness. Then, click again on the photograph that you want them all to match. (Every photo should be highlighted now, but the “target” image should be highlighted most prominently.) See below:
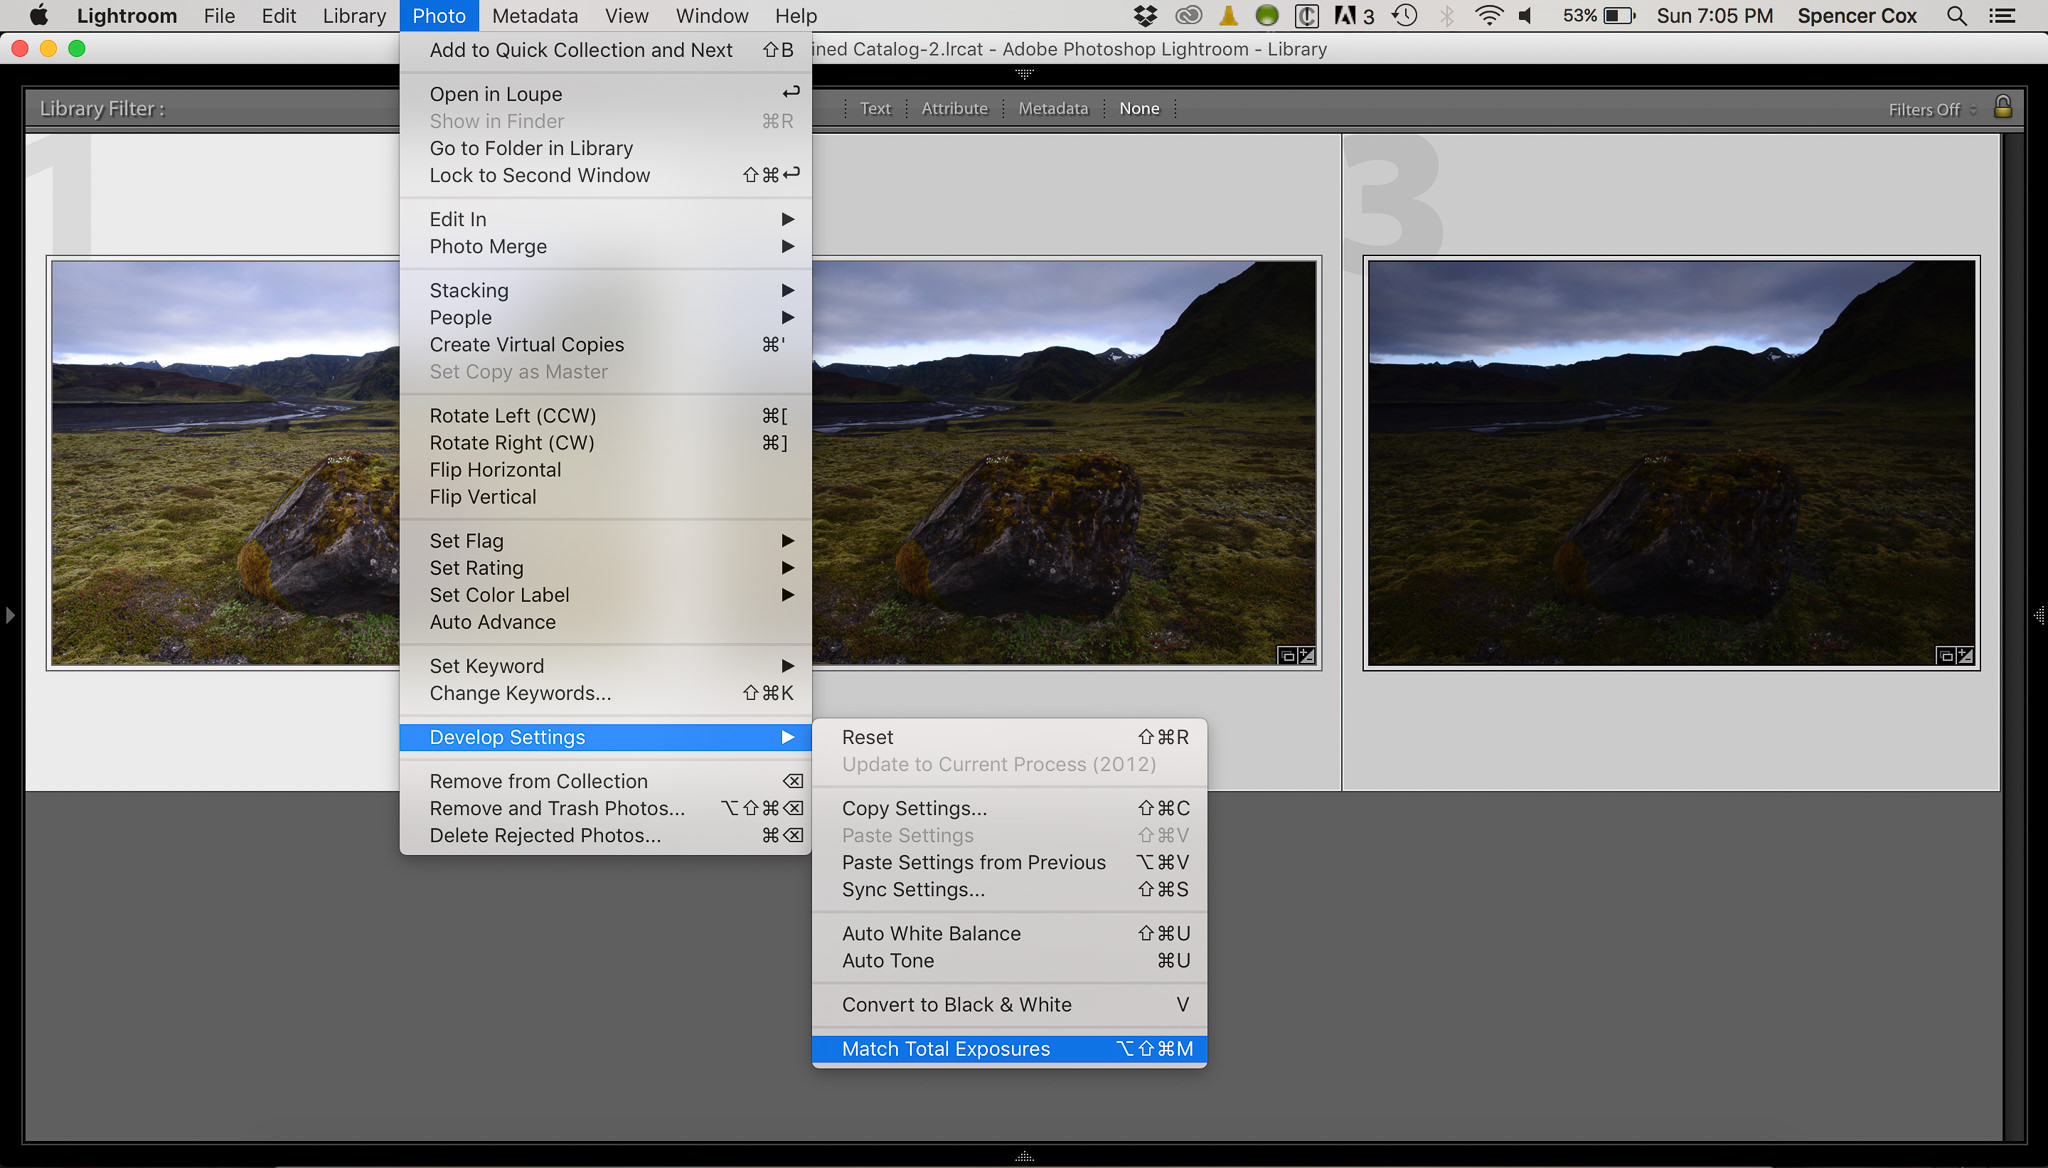
The next step is to click “Photo” at the top of the page, then “Develop Settings” and “Match Total Exposure.” See the photo below:
Ultimately, Match Total Exposure gives you a result like this:
I use this setting quite a bit when I expose to the right. I may take a single photograph at the “proper” exposure, then a series of increasingly bright photographs. I can use the Match Total Exposure setting to make all of the photographs look like the first, “correct” image – then compare each subsequent photo to see which ones retain detail in the highlights.
There are other uses, as well. If you want to blend several photos into a panorama, they should be the same brightness; if that is not the case, for whatever reason, you need to equalize their exposures. Doing this manually is a painful task, but the Match Total Exposure option is incredibly easy.
Note that Match Total Exposure works based on your camera settings. If you took a photograph indoors, for example, and then turned on an extra light (without changing your settings), the Equalize Exposure option wouldn’t have any effect – even though your second photo would be brighter.
4) Local Color Adjustments
One adjustment that I just recently found – and, honestly, have only used for experimentation at this point – is an interesting local color adjustment tool.
This option is hiding in plain sight under any local adjustment tab. Click on the gradient tool, for example; the lowest slider in the gradient menu is the “Defringe” tool. Below that, though, is another option: Color. By clicking on the gray box to the right of the word color, you open up the local color adjustment tool. See the screenshot below:

Once you pick a color, you can draw on the photograph like any other local adjustment tool. Do you want to change the color of a photo’s sky? This option was made for you.
Although I haven’t yet used the local color tool extensively, I can see its value. Portrait photographers, for example, might want to enhance the color of their subject’s face – making someone’s eyes look more natural, for instance.
Even a landscape photographer may find this tool useful. I, for one, think that the photo above is too gloomy; the local color adjustment fixes the problem! The improved version is below:
As you can see, the local color adjustment has helped me turn a sad photo into something happy. For me, that’s the real value of post-processing.
5) Conclusions
Lightroom is not an easy program to use, and some of its useful tools are hidden in unexpected places. None of the four features in this article are essential Lightroom adjustments, but each has its uses. Whether you need a more precise crop or a preview of your adjustments, Lightroom’s built-in options have what you need; it just takes some work to find. Hopefully, this article showed you some of those halfway-hidden features, making it easier to process your photographs exactly the way you want.
The post Four Hidden Lightroom Features appeared first on Photography Life.
from Photography Life https://photographylife.com/four-hidden-lightroom-features
Privilege in the Gardens

It’s a sunny February afternoon in Yountville, California, in the heart of Napa Valley. My fellow bloggers and I just finished a sumptuous lunch at Michael Chiarello’s Bottega, easily a new contender for one of the best meals of my life, and have consumed just enough wine to give the landscape a softened haze.
Yountville is also home to The French Laundry, one of the best restaurants (if not the best) in America. Chef Thomas Keller’s gardens that supply the restaurant are open to the public, and we stop briefly to wander the rows of produce.
My feet squelch through the damp grass. A gardener tills the soil in rows of cabbage. Bees hum at a nearby hive. The gardens are so straight and immaculate, I wonder if Keller has a secret garden that grows wild and straggly, where he hides the really good vegetables.
We’re happy. It’s the perfect time to take a group photo.
“Ooh, let’s get the farmhand in the background!” squeals one blogger.
And I freeze.

I’ve worked in the restaurant industry and I consider it among the most formative experiences of my life. Anyone who has worked in the restaurant industry in the United States knows that restaurants are built on undocumented immigrants. (Not every immigrant who works in a restaurant is undocumented, but a great many of them are.) And these people are often the hardest working employees with the worst jobs in the kitchen — and, paradoxically, the best attitude.
That goes for the fields, too, especially in an agriculture-driven state like California. I don’t know this man’s story; I wish I did. But he is not an Instagram prop.
We live in a time when Donald Trump is on his way to the Republican nomination after claiming that he wants to round up and deport all 11 million undocumented immigrants. A time when the alternative Republican candidates argue about who speaks Spanish better and who would treat immigrants worse.
Anthony Bourdain was succinct: “If Mr. Trump deports 11 million people or whatever he’s talking about right now, every restaurant would shut down.”

Like most of my blog trips, our group consists of entirely white middle-to-upper-class bloggers. And that is a problem. It’s not enough that one of the bloggers says hello to the gardener and chats with him in Spanish. It’s not enough that I write and publish this post. What we need is people of diverse backgrounds going on these trips and sharing their viewpoints.
(The travel blogging world can be surprisingly segregated by race. Did you know that? How many bloggers of color do you actually read? Think about it.)
The overwhelming whiteness of our group stands out even more as we explore Oakland, a phenomenally diverse city with a history of social justice. Here, I’m struck by how this city isn’t defined by a white narrative with people of color relegated to side players, a place where hip-hop isn’t “too scary” or “too inappropriate” for families to dance to on a Friday night at the excellent Oakland Museum of California.
But this isn’t a story about Oakland — that will come in due time. This is about a moment while standing in the French Laundry gardens, sunshine on our faces.
My stomach turns at the thought of smiling white people who make their living traveling to exotic places and posting pretty photos on Instagram making sure they get the brown-skinned gardener, a man who likely went through hell to get here today, in the background of their selfie, because — why, exactly? To prove how much better we have it than him?
“No,” I say. “No farmhand. Just us.”
I take a selfie of our group, but the moment’s gone. It sits on my phone, never to see the light of day.
I was hosted in Yountville as part of a campaign with Visit California. All opinions, as always, are my own.
from Adventurous Kate http://www.adventurouskate.com/privilege-in-the-gardens/
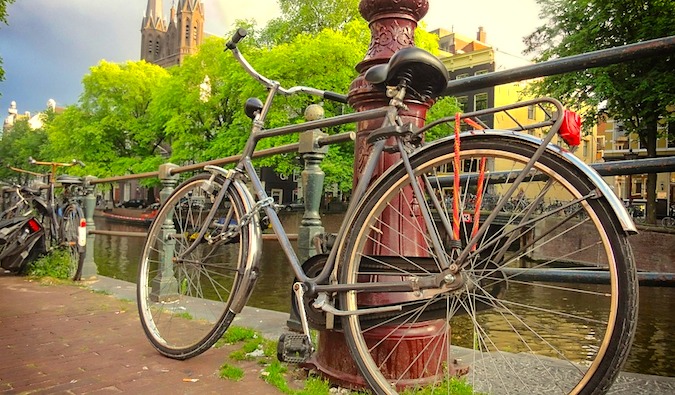
How to Spend 4 Days in Amsterdam

Amsterdam is one of my favorite cities in the world. I love its brick buildings, open skyline, rich history, and relaxed, easy going attitude towards life. Over the years, I’ve visited Amsterdam more times than I can count (I’m bad at math) and have spent countless hours walking the city, making friends with locals, and getting under its skin.
Amsterdam has so much to do that, even after so many visits, I still find new things to do and see. The city deserves more than just the few (and often smoke filled) days travelers give it, but if a few days is all you have and you want to make the most of it, this is the itinerary I would give to someone looking to get a good overview and feel for what makes Amsterdam so special:
Day 1
Free walking tour
A great way to orient yourself to the city is with a walking tour. You’ll learn some history, find out where the major sites are, and explore all those winding canals. Free walking tours are a wonderful first activity in any city. I recommend the free New Europe walking tour. It covers a lot of ground and gives you a general overview of the city and landmarks. The tour meets in the main square and lasts about 2-3 hours. (Be sure to tip your guide though!)
Canal tour
Amsterdam is a city tied to the water – it grew around its canals and the taming of the Amstel River. The canals of Amsterdam are incredibly beautiful, and there’s nothing like seeing the city from a boat. Skip the big canal boat tours you see around the city — they’re overpriced. You can often hire a private boat tour for about 20 Euros an hour (look for guides around the Red Light District). Moreover, you can also take the open-air Canal Hopper Small Boat. This is the company I use when I run group tours to the city — the boats are small, the tours more intimate, and your driver will give you a good personalized tour. The tours last about an hour.
Van Gogh Museum

This may be one of the most popular tourist attractions in the city, but don’t let the crowds deter you. The museum features many of Van Gogh’s best works of art alongside an excellent biography of his life and is laid out in chronological order, starting with his earliest works. Though not a huge museum, I can spend hours just staring at the paintings as Van Gogh is one of my favorite painters. The museums also has paintings by other famous artists of the period, like Monet, Manet, and Matisse. Try to come late in the late afternoon when the crowds subside.
Rijksmuseum

The Rijksmuseum is located right next to the Van Gogh Museum, and after years of renovation, it’s now beautifully remodeled. The museum still features an extensive Rembrandt collection, and you’ll be able to see the famous painting “The Night Watch.” Besides Rembrandt, there’s also an incredible and robust collection of other classic Dutch painters, like Frans Hals and Johannes Vermeer. Over one million works of art, craftworks, and historical objects are kept in the collection, and around 8,000 objects are on display in the museum so be sure to budget a few hours!
Day 2
Anne Frank House

In all honesty, I don’t like this place. I found it to be anticlimactic. You basically do a slow walk through the house as the crowds pack the place. You don’t get to let everything soak in as you’re being pushed from behind by the endless crowds. It’s maddening! But, if you don’t mind waiting in line and you’re curious about Anne (I think the Jewish History Museum does a more thorough job of relating the events in Anne Frank’s life to the Holocaust), it might be worth the visit for you. You can book tickets online up to two months in advance, which lets you skip the line. If you don’t do this, get there very early in the morning to avoid the long queue that develops over the course of the day!
The Jordaan area

This heavily residential area (an old working-class neighborhood turned hip) is probably the most missed part of Amsterdam. Although it’s right near the city center, hardly any tourists enter this maze of restaurants, cafes, and shops. It’s peaceful and a great place to wander while avoiding the mass of tourists crowding the main streets just a few blocks away. While in the area, be sure to eat at Moeders (traditional Dutch food) and Winkel 43 (apple pie).
The Tulip Museum

Located in a room inside a tulip shop, this little basement museum does a wonderful job of telling the history of tulips in Holland and the infamous tulip craze. It’s one of the best off-the-beaten-path attractions in Amsterdam. You’ll never find a crowd, and it’s only 5 euros (3 euros for students)!
Amsterdam History Museum

This museum features a very thorough history of Amsterdam. It’s big, and you’ll need 3–4 hours to really go through it in detail. There are a lot of relics, maps, paintings, and audiovisual displays throughout the museum. My favorite is the computer graphic at the entrance showing the growth and construction of the city over time. I can’t recommend this museum enough. It’s one of the best history museums I’ve ever visited.
Red Light District

Though much tamer than in previous years, the Red Light District manages to balance sex and seediness with being a major tourist attraction. During the day, it’s a quiet place. If it wasn’t for the red lights and sex signs everywhere, it would look like any other part of the city. But, at night, the area becomes awash with drunk, gawking tourists moving slowly down the street as they stare at the girls in the window while going from bar to bar and coffeeshop to coffeeshop. It’s a place to see and experience for a very brief time.
Day 3
Do a bike tour
Bikes are to Amsterdam like wine is to Bordeaux. The city loves bikes, and there are supposedly more bikes than people in Amsterdam. In fact, forget about keeping a lookout for cars — it’s the bikes that will run you over. Seeing Amsterdam and its surroundings from a bike is something I definitely encourage you to do. Mike’s Bike Tours is the best company to use, whether for a tour or to rent a bike on your own.
FOAM
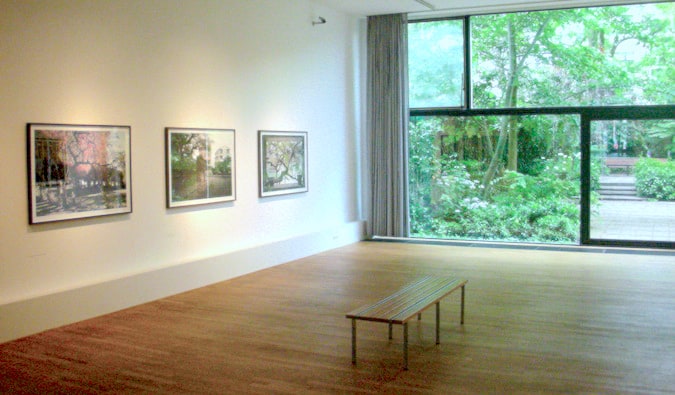
This photography museum houses wonderful pictures and sees few crowds despite being in the main part of the city. It’s a must for any photography lover. The exhibitions are constantly changing so you never know what you might see! They have a beautiful outdoor garden too. It’s a small museum and doesn’t take long to see.
Jewish Historical Museum

Often overlooked in favor of The Anne Frank House, the Jewish Historical Museum tells the history of the Jews’ prominent and influential position in Amsterdam. The exhibit on World War II does a great job of highlighting Dutch complacency, resistance, and guilt over the Holocaust.
Oosterpark

Everyone goes to Vondelpark to sit around, bike, or get high, but east of the main city center is a beautiful park with fewer people and green space that is just as relaxing. It’s about a 30-minute walk from the city center, but the walk takes you through residential areas of the city not often seen and way off the tourist map. I enjoy coming here because it’s far quieter and more peaceful than Vondelpark. If you wanted a quiet park experience, this is it!
Day 4
Museum Amstelkring

Ons’ Lieve Heer op Solder (“Our Lord in the Attic”) is one of the most interesting churches in the city. Hidden inside a 17th-century canal house, the clandestine Catholic church was built during Protestant rule. It was never really a secret but it was out of sight and out of mind for the authorities. The drawing room here is quite beautiful and the furnishings make it one of the most best 17th-century rooms left.
The Rembrandt House Museum

Rembrandt lived and worked in this house between 1639 and 1658. Daily demonstrations show modern visitors how he worked and you can also explore the house and see a recreation of how it was decorated during Rembrandt’s time. I wasn’t too impressed, but Rembrandt enthusiasts shouldn’t overlook it.
Museum Van Loon

The Museum Van Loon is a double-sized canal house (built in 1672) located on the Keizersgracht canal in Amsterdam. The house was owned by the wealthy Van Loon merchant family who set up a beautiful art collection. Now it’s a museum with period furniture, art, and family portraits. There’s a beautiful garden here too. This is definitely a place not to miss.
Vondelpark

Amsterdam’s largest and most popular park is a great place to walk, bike, people-watch, or relax, especially after a visit to a local coffee shop. There’s a playground as well as places to play sports, and numerous areas for kicking back. During the summer, Vondelpark is filled with people, especially locals who hang out at the café ‘t Blauwe Theehuis for drinks in the center.
The Heineken Experience

This museum used to be a lot better when it was cheaper and they offered more beer. It’s not a working brewery, and in comparison to the Guinness Museum in Dublin, it’s lame. But the price of admission buys you three beers and you’ll learn a bit of the history of Heineken (which I enjoyed since I drink a lot of their beer). It’s not a must-see, but it’s not a must-avoid either.
Some other sites worth visiting
Below are some of my other favorite activities to do in the city if you have more time or don’t like the options above!
- House of Bols – This is a Dutch gin museum. The self-guided tour takes about an hour and includes a cocktail and an interesting smell test. It’s tons of fun and one of the better liquor museums in the city.
- Waterlooplein Flea Market – This open-air market is like a giant flea market — everything and everyone can be found here. People sell secondhand clothes, hats, antiques, gadgets, and much more. You can also find new and unused items. If there’s something you want, you’ll probably find it here. Open Monday to Saturday.
- Day trip to Harleem – Just a quick train (or bike) ride from Amsterdam, Harleem is a quiet Dutch town that has a beautiful central church, great outdoor market, and all the beauty of historic Amsterdam with fewer crowds.
- Visit Noord – Leave the city center, take the ferry across the IJ, and visit the up and coming area of Noord Amsterdam. In the last few years, a lot of people have moved here (it’s cheap), cool markets and restaurants have opened, and a lot of old industrial land has been reclaimed for public use. It’s the new hip place to be! Be sure to visit the famous EYE, Amsterdam’s film institute.
- The Amsterdam library – The city’s library is a beautiful modern building built in 2007. It’s gigantic, overlooks the IJ, and has a wonderful top floor cafe for impressive views of the city. It’s one of my favorite to relax in the city. It’s quiet, peaceful, and there’s nothing like reading a good book with a great view!
- NEMO – Amsterdam’s science center is a great place to take kids!
- Stedelijk Museum Amsterdam – Like modern art? Well, I don’t but if you do, this is the place in the city to see it!
- Foodhallen – Located in Amsterdam west, this place is what the name implies – a food hall! This indoor food market has various vendors serving a variety of delicious food. It’s like food trucks in one location. Personal favorites include Viet View, Le Big Fish, and Friska.
- Houseboat Museum – This museum will show what it’s like to live in a houseboat!
This list only touches the surface of things to do in Amsterdam. There are a lot of off-the-beaten-path activities you could include, as well as many more markets, shops, and museums. Four days in any city is never enough time to really see it, but given Amsterdam’s compact nature, it’s definitely enough time to hit all the “major” attractions here.
Photo Credits: 1, 4, 5, 6, 7, 8, 9, 10, 12, 13, 14, 15, 16, 17, 18, 19
Get the In-Depth Budget Guide to Amsterdam!
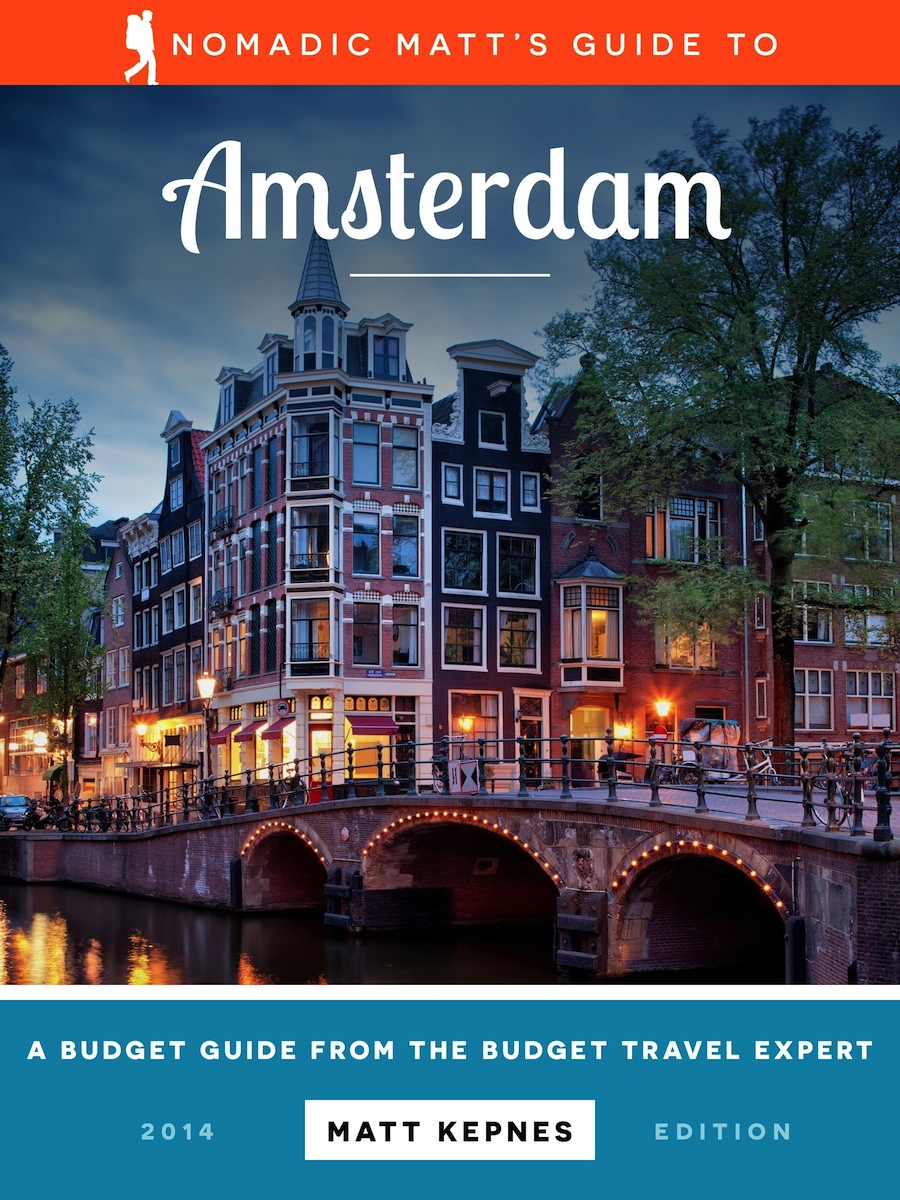 For more in-depth information and tips, check out my guidebook to Amsterdam (a city I used to call home). This book is written for budget travelers like yourself, cuts out the fluff found in other guides, and gets straight to the practical information you need to travel and save money. You’ll find suggested itineraries, budgets, ways to save money, on- and off-the-beaten-path things to see and do, nontouristy restaurants, markets, and bars, and much more! Click here to learn more and purchase the book.
The post How to Spend 4 Days in Amsterdam appeared first on Nomadic Matt's Travel Site.
from Nomadic Matt's Travel Site http://www.nomadicmatt.com/travel-blogs/three-days-in-amsterdam/
Inside North Korea: fascinating images of the world's most secretive state
A US photographer selects his favourite images from 10 trips to North Korea


from Travel news http://telegraph.feedsportal.com/c/32726/f/568425/s/4deb7f26/sc/38/l/0L0Stelegraph0O0Ctravel0Cdestinations0Casia0Cnorthkorea0C114235290CInside0ENorth0EKorea0Efascinating0Eimages0Eof0Ethe0Eworlds0Emost0Esecretive0Estate0Bhtml/story01.htm
from Travel news http://telegraph.feedsportal.com/c/32726/f/568425/s/4deb7f26/sc/38/l/0L0Stelegraph0O0Ctravel0Cdestinations0Casia0Cnorthkorea0C114235290CInside0ENorth0EKorea0Efascinating0Eimages0Eof0Ethe0Eworlds0Emost0Esecretive0Estate0Bhtml/story01.htm
Friday 26 February 2016
Updates on the Lens Database
This week I have been heavily working on keeping our lens database up to date. With so many lens announcements coming out from different manufacturers, keeping the database current has been a challenge, since it takes quite a bit of time to add all the relevant information. Big thanks to everyone who has been sending feedback, requests and recommendations to improve our lens database. We want to make it the best and the most complete database in the world and everything we build today will be hugely beneficial for current and future readers of the site. This is why we need your help today! By letting us know about the missing lenses, errors and inconsistencies, you will be joining our efforts in compiling a great source of public information. But before that, let me first shed some light on some of the changes that we have made to the database.

First, we have changed the order of the way the lenses are displayed on the main page. Instead of defaulting to focal length (which basically always showed teleconverters on the first page), we are now sorting lenses by their release date. This is a much better approach, because it allows viewing lenses by their release timeline (although release dates for most lenses should be fairly accurate, finding release dates for older lenses is certainly a challenge).
Second, a lot of lens technology descriptions have been updated to brand-specific verbiage. Unfortunately, this is the area that can be a bit confusing to interpret and intimidating to understand for many of us, since the same things are called differently depending on what brand you are looking at. For example, Nikon calls its image stabilization technology in lenses “Vibration Reduction”, Canon calls the same thing “Image Stabilizer”, while Tamron calls it “Vibration Compensation”. We can see the same pattern of such proprietary terms in many areas, including autofocus motors, lens coatings, lens elements, etc. To make it easier to understand such terms, we have provided extra descriptions in some areas (for example, Nikon’s “Vibration Compensation” is described as “Vibration Compensation (Image Stabilization)”), while generalizing terminologies in others.
Lastly, we have added quite a few of new and missing lenses to the database. At this time we have a total of 935 published lenses in the database and with a bit more effort, we will be adding many more lenses soon. Our goal is to get the last 15 years of lens making accurate first. Once that’s done, we will start adding more legacy lenses into the database.
How You Can Help
Now let’s talk about how you can help. If you could just go over the lenses you own, find them in the database and verify the accuracy of the information, it would help us immensely! If there is an error, please leave a comment below, indicating which lens has issues, or better yet, navigate to the lens page itself and leave a comment there. And if you have lenses that are currently not in the database, it would be very helpful if you could send us the missing information (you can go over a sample lens to see what kind of information we are generally looking for). If it is a lens released in the last 15 years, please just let us know what’s missing and we will take care of it. If it is a very old lens and there is not much information about it from the manufacturer, then we would appreciate it if you could send us detailed information about that lens. You can send all this information via our Contact Us form.
Thank you in advance for your help!
P.S. During the next two weeks I will be heavily working on reviewing some of the latest lenses from Nikon, Sigma, Zeiss and other manufacturers. My current priorities are: Nikon 24mm f/1.8, Nikon 24-70mm f/2.8E VR and Nikon 200-500mm VR. In between I will try to squeeze in reviews of some other camera and non-camera gear.
The post Updates on the Lens Database appeared first on Photography Life.
from Photography Life https://photographylife.com/updates-on-the-lens-database
The best hotels in films
To celebrate the 88th Academy Awards, we round up the best hotels featured in films, from Carol to The Shining


from Travel news http://telegraph.feedsportal.com/c/32726/f/568425/s/4de15384/sc/14/l/0L0Stelegraph0O0Ctravel0Cpicturegalleries0C114172240CThe0Ebest0Efilms0Eset0Einside0Ehotels0Bhtml/story01.htm
from Travel news http://telegraph.feedsportal.com/c/32726/f/568425/s/4de15384/sc/14/l/0L0Stelegraph0O0Ctravel0Cpicturegalleries0C114172240CThe0Ebest0Efilms0Eset0Einside0Ehotels0Bhtml/story01.htm
Subscribe to:
Posts (Atom)