Thursday, 30 March 2017

How to Spend a Layover in Paris

Is it worth going into Paris for an eight-hour layover at Charles de Gaulle Airport? A friend of mine recently asked me this question, so I thought I’d turn it into a post for all of you!

The short answer? Hell yes! Eight hours is enough time to get a brief taste of Paris before you catch your flight to your next destination. But you need to plan it carefully — this is not a time to just wing it.

Do You Have Enough Time?

I wouldn’t attempt going into Paris unless you had a minimum of a five-hour layover, and even then your time in Paris would be very brief. Don’t attempt a trip into Paris if you have less than that.

So, Kate, my layover is four and a half hours — would that be okay?

No! I meant what I said! I wouldn’t attempt it on less than five hours.

A five-hour layover doesn’t mean that you’ll have five hours to explore Paris — it means you have five hours minus the time it takes to go through immigration, possibly check your luggage into storage, wait for a train, take the train into Paris, take the train back to the airport, and go through security again for your next flight. And even then, it could mean you’d be spending less time in Paris than at the airport.

Things to Consider

1) What’s your luggage situation? If you booked a single flight that routed you through Paris (say, if you booked an Air France flight from Boston to Rome via Paris), you don’t have to retrieve your checked luggage. It will be checked all the way through to your final destination.

If you booked two flights separately, though — say, an Air Canada flight from Toronto to Paris and an EasyJet flight from Paris to Prague, and you booked them in two separate transactions, you will have to retrieve your luggage in between and check it in once again

Whatever luggage you are taking as carry-on, whether it’s just a small bag or all of your luggage, will stay with you for the duration of your layover in Paris.

However, there is luggage storage at Charles de Gaulle Airport. It’s located in Terminal 2, across from the RER station. It’s open from 6:00 AM until 9:30 PM. Each piece of luggage is six euros ($6.50) for up to six hours and 10 euros ($11) for up to 12 hours.

2) Where are you flying to and from? If you’re flying from outside Europe, it’s obviously an international flight, and if you’re flying on to Nice, it’s obviously a domestic flight — but some flights within Europe are treated like domestic flights due to the Schengen Area.

Most countries in Western Europe (Ireland and the UK excluded) are part of the Schengen Area, which has open borders. This means that flights from Paris to cities like Stockholm, Warsaw, Florence, Barcelona, and Munich are treated like domestic flights, not international flights. You will go through security, of course, but there is no immigration between Schengen countries.

The blue countries are part of the Schengen area:

Why do I mention this? Because it can save you a bit of time. You don’t need to allow time to get through immigration if you are flying from Paris to somewhere in Italy, for example. Security, yes, but not immigration. This could save you around 30 minutes or so.

3) Which terminals do your flights arrive to and leave from? There are three terminals at Charles de Gaulle Airport. Terminals 1 and 3 are close together and share an RER train station; Terminal 2 is further away and has its own RER train station.

Write down the terminals from which your first flight arrives and your second flight leaves — this will make your life so much easier.

4) Are you arriving on a red eye? If you don’t sleep well on planes, you may be exhausted when you arrive. My advice? Have some coffee and get out there! You’re in Paris, darling! (Ask for un café for an espresso, un café crème for a latte, or un café americain for a regular coffee.

5) Do you have euros? If not, no problem — just go to one of the many ATMs at the airport and make a withdrawal. Don’t exchange money at the airport, you’ll pay terrible rates compared to what the ATM will give you.

Just be sure that you call your bank before your trip and let them know where you’ll be traveling so they don’t flag your card for fraud. Also, double-check how much you’re charged for ATM transactions and whether you’re charged a foreign transaction fee for credit card purchases.

(If you’re American and travel often, I highly recommend banking with Charles Schwab. They refund all of your ATM fees at the end of the month, even foreign ATM fees (!), and they don’t charge foreign transaction fees.)

6) Finally, how much time do you really have? Add in the time expected to go through immigration (30 minutes is a good estimate but it could be longer or shorter), walk to the train, take the train, take the train back, and go through security and/or immigration again. This will help you plan your day.

How to Get Into Paris

The easiest way to get into Paris from Charles de Gaulle Airport is to take the RER B train, which goes straight into the heart of Paris.

There are both express and local trains on the RER B. I recommend taking the express; it doesn’t cost extra. It’s about 35 minutes to the Châtelet stop, which is close to the geographical center of Paris. One-way tickets cost 10 euros ($11) per adult and 7 euros ($7.50) per child.

Alternatively, you could take a taxi from the airport, which costs 50-60 euros ($54-65) and takes 35 minutes to an hour depending on traffic.

Personally, I recommend the RER B train. It takes roughly the same amount of time, it’s cheaper, and it’s more reliable.

(It’s very unusual to have a layover at Orly Airport, as most long-haul flights are via Charles de Gaulle, so I won’t be covering it here — but there are RER trains from Orly that will take you into the heart of Paris as well.)

What To Do on a Paris Layover

With only a few hours in Paris, you can’t do a lot — but if you concentrate on one small area with several attractions, you can feel like you’ve seen a lot of Paris.

My recommendation: take the RER B to the “St. Michel/Notre Dame” stop, which is right by Notre Dame and some of the prettiest neighborhoods in Paris. This journey will take roughly 40 minutes on the express train. Once you arrive in the station, follow the signs for Notre-Dame.

Visit the cathedral of Notre-Dame. This gothic cathedral is one of the most recognizable symbols of Paris — and it’s a solemn, overwhelming place, even without the presence of Quasimodo.

The views from the towers are spectacular, with the gargoyles looking over the city and the Eiffel Tower, but the lines can be very long. Find out how long the line is before you commit to waiting. Notre-Dame is free to visit but going into the towers costs 10 euros ($11).

Check out the kiosks on the left bank of the Seine. These iconic green kiosks sell books, art, and souvenirs. It feels so Parisian to peruse them!

Walk over to Ile St-Louis and have ice cream at Berthillon. There are two small islands in the Seine: Ile de la Cité and Ile St-Louis. Notre-Dame is on Ile de la Cité and Ile St-Louis is directly to the east. I love Ile St-Louis because there are far fewer tourists and it feels like a village in the heart of the city. Rue St-Louis, the main street, is filled with lots of cool shops.

Berthillon is famous for having some of the best ice cream in Paris with many unusual flavors that you won’t find at home.

Browse books at Shakespeare and Company. It may seem strange to browse an English-language bookstore in Paris, but trust me — Shakespeare and Company is a legendary business and one of my favorite bookstores in the world. It has a rich history, writers still live in the shop, and there are some cute cats. Have them stamp your book at checkout.

Walk over to Rue de Buci in St. Germain-des-Pres. This is one of my favorite areas in Paris, with lots of cool shops and cafes. From here on, just wander the streets at your leisure. One of the true pleasures of Paris is strolling aimlessly and seeing what you find.

Spend time in at least one cafe. It’s the most Parisian thing to do at all. Cafes are perfect for whatever you’re in the mood for. A coffee? A glass of wine or champagne? Some French onion soup dripping with cheese? A crepe? A salad with roasted duck? (One very notable exception: working on a laptop. Not like I found out about that the hard way or anything.)

Sit outside if the weather is nice. Even in the winter, most cafes have heating lamps.

If You Have More Time…

I didn’t want to plan an overly ambitious itinerary because it’s easy to end up miserable if you rush your trip too much. But if you have some extra time, you could add a few of these (not all of these!) if they catch your interest.

Visit Sainte-Chappelle. This cathedral is home to some of the most intricate stained glass designs in Europe. It’s located close to Notre-Dame on Ile de la Cité.

Visit the Pont des Arts. This is the bridge that began the love locks trend around the world. These days the locks are removed regularly, but there are nice views from the bridge.

Visit St. Etienne du Mont. This is better known as the Midnight in Paris church! If you love the movie, it’s great for photos.

Have a coffee or meal at Les Deux Magots or Cafe de Flore. These two cafes, close to each other on Boulevard St. Germain, were the hangouts of Hemingway, Sartre, Fitzgerald, Picasso, and all those

Visit the Luxembourg Gardens. Head further south into St. Germain-des-Pres and you’ll end up in these are some of the most beautiful and famous gardens in Paris. Stroll around, watch the kids with boats in the fountains, and pretend you’re in a movie.

Note: if you finish your visit here, you’ll be closer to the Luxembourg stop, which is also on the RER B line back to the airport.

What Not to Do

Please, please, please don’t try to pack too much in. I know how tempting it is to see everything — but you can’t see the best of Paris in just a few hours. Hell, you can’t see the best of Paris in two weeks.

I’m fairly certain that one of the secrets to travel happiness is making peace with the fact that you won’t see everything you want to see.

Don’t go to Disneyland Paris or Versailles. Both are outside the city — I’m sorry, but there’s just no time to visit on a brief layover.

Tips for a Paris Layover

Bring an umbrella. Paris doesn’t have great weather; it often rains. Or choose to risk it — you can always buy one in a shop.

Don’t dress like a slob. You may have flown overnight, but don’t schlep around Paris in yoga pants and a hoodie — you will stick out like a sore thumb in a city where locals look neat and put together. Trade your leggings for slim jeans, your sweatshirt for a nice sweater, jacket and scarf.

Wear comfortable flats. Sneakers immediately label you as a tourist. Literally all the shoes I own come from The Walking Company — their Abeo flats have FANTASTIC arch support, which I need for my bad feet, and they’re chic enough for Paris.

Download a Paris map app to your phone. It’s the easiest way to keep track of where you are, rather than using a paper map. If you plan on taking the metro, there are lots of free metro apps as well.

Be conscious of pickpockets. Pickpockets target tourists in Paris. To minimize your risk, I recommend using a crossbody purse that zips shut and you hold in front of you, or a backpack that locks like my Pacsafe backpack. Consider getting a Speakeasy Travel Scarf — they have a secret zippered pocket no pickpocket can get into.

Make sure you have travel insurance for your whole trip. If the worst happens — if you’re pickpocketed, or if you trip and break your ankle and need to visit a hospital, travel insurance will protect your finances and reimburse you. I never travel without it. I use and recommend World Nomads.

GET BACK IN TIME FOR YOUR FLIGHT!!!!

The most important tip of all. Everything here is meaningless if you end up missing your flight to your next destination!

I like to give myself a nice, comfy cushion of time so I won’t be stressed. (Ask anyone who has ever traveled with me and has seen me freak out when we’ve cut a deadline too close.)

Get back to Charles de Gaulle at least two hours before your onward flight departs. I like to give myself two and a half. It may seem a bit excessive, but when you consider the alternative — missing your flight, being stranded, possibly fucking up your return flight as well — this is one place where caution reigns supreme.

Save This Map For Your Trip

Here are all the locations mentioned. As you can see, they’re all close together!

Have a fabulous trip!


READ NEXT: 100 Travel Tips for Paris


Have you been to Paris? What would you recommend doing on a short layover?


from Adventurous Kate http://www.adventurouskate.com/how-to-spend-a-layover-in-paris/

Tuesday, 28 March 2017

How to Optimize Lightroom Speed and Performance

Love it or hate it, Adobe Lightroom has become one of the most popular post-processing and image management tools on the market. With its simple and intuitive interface, it is easy to learn and our team at Photography Life has provided many in-depth articles on using specific Lightroom features over the years. However, one of the biggest frustrations with Lightroom can be its poor performance, which can be especially disappointing when using the software on an older computer. In this article, we will go over a number of different techniques and settings in order to optimize Lightroom’s overall performance.

1) Upgrading Lightroom Might Not Be The Answer

When one experiences serious issues with any software, sometimes the answer is to upgrade to the latest and greatest release, hoping that the new version will address the problems. Unfortunately, that’s not the case with Lightroom. As we have previously demonstrated in our Lightroom Performance Comparison article, Lightroom is only getting slower with each new release, so the typical recommendation to upgrade to the latest version is not going to take care of its poor speed – it might actually make it worse. So if you are running an older release of Lightroom and you are wondering if upgrading the software is going to alleviate all the performance issues, it probably won’t. With the exception of some specific releases, it might get worse before it gets any better. For this reason, I recommend that you go through all the performance tips below and potentially even consider changing some parts of your post-processing workflow to get the best out of Lightroom.

That said, while jumping to the latest major release might not take care of the performance issues, you typically want to stay current either way. Adobe often delivers fixes and stability improvements to Lightroom and the most current minor releases will also provide support for the latest cameras and lenses available on the market. If you would like to find out more about this process, you can check out my article on how to upgrade Lightroom.

2) OS, Driver and Firmware Updates

While you might have your reasons for not wanting to upgrade Lightroom to the latest release, the same should not apply to your Operating System, Driver and Firmware updates – those you should update periodically, as they might contain important performance, stability and security patches. Personally, I avoid upgrading operating systems to the latest major release when it gets announced for at least three months (preferably six), so that all the potential bugs and incompatibility issues are addressed. There are plenty of beta testers out there willing to be on the cutting edge and if you want a stable workflow, you don’t have to be one of them. Just wait a few months and once all the major issues are addressed, you can safely upgrade. That’s not the case with driver and firmware updates though – I would recommend to update as soon as such updates are available. Pay close attention to graphics card driver updates, making sure that you have the most current driver.

3) Storage, CPU and GPU Performance

It goes without saying that Lightroom’s performance heavily depends on fast storage, CPU and GPU performance. For a start, have a look at the types of speeds you can expect to see when moving up from a spinning hard drive to an SSD or an NVMe drive in my HDD vs SSD vs NVMe Performance comparison. In short, it is a good idea to have at least one SSD or faster drive on your computer that you can utilize to store your Lightroom catalog and previews. I will provide more information on this type of setup further down in the article.

The same goes for your computer’s CPU – faster is generally better, although you don’t have to go with the latest architecture and an expensive Intel Core i7 CPU. I personally found Core i5 CPUs to be quite adequate for most Lightroom features. Since Lightroom is generally not well optimized for multi-threading, you don’t have to worry about getting a high-end Intel Xeon CPU either. Aside from the image export process and maybe 1:1 preview generation, Lightroom does not typically use more than a single CPU thread.

Having a fast and dedicated GPU card can provide some advantages to Lightroom’s performance. This is covered in more detail further down below.

4) Memory (RAM) Requirements

If you take a look at the system requirements page on Adobe.com, it states that 2 GB of RAM is required and 8 GB of RAM is recommended to use Lightroom. First of all, forget about the first number! I cannot even imagine trying to run Lightroom on a machine with anything less than 8 GB of RAM. In fact, even 8 GB of RAM can be insufficient for smoothly running Lightroom, especially if you open up Lightroom and other memory-hungry software at the same time. How smoothly Lightroom runs also very much depends on what you are planning to use it for. If you edit low-resolution images and don’t stitch panoramas or merge HDR images, 8 GB should be sufficient. However, if you are planning to perform such activities, I would strongly recommend to have at least 16 GB of RAM for Lightroom to use.

Unfortunately, Adobe’s Lightroom software development is rather poor, since the software has only become layered with more functionality over the years and some of the core issues and bugs have never been properly addressed. Lightroom is also known to be a memory hog and its memory leaks can occasionally result in enormous memory consumption. Because of this, I would recommend to occasionally close out of Lightroom and reopen it – this alone can take care of a number of performance-related issues. So if you see Lightroom slowing down, you would be surprised to see how much improvement you can get by just re-launching it.

5) Lightroom Catalog, Previews and Cache Folder Locations

Ideally, you should have your Lightroom catalog and the accompanying “Previews” folder (which contains all image previews and smart previews, Previews.lrdata file on Mac) sitting in the fastest storage you have available on your computer. For example, if you have an SSD drive and a large capacity hard drive on your computer, you should have your operating system, along with the Lightroom catalog + Previews folder on the SSD drive, whereas your photographs can reside on the slower hard drive. Lightroom’s cache should also reside on the fastest available storage. Below is an example of how I do this on my secondary computer:
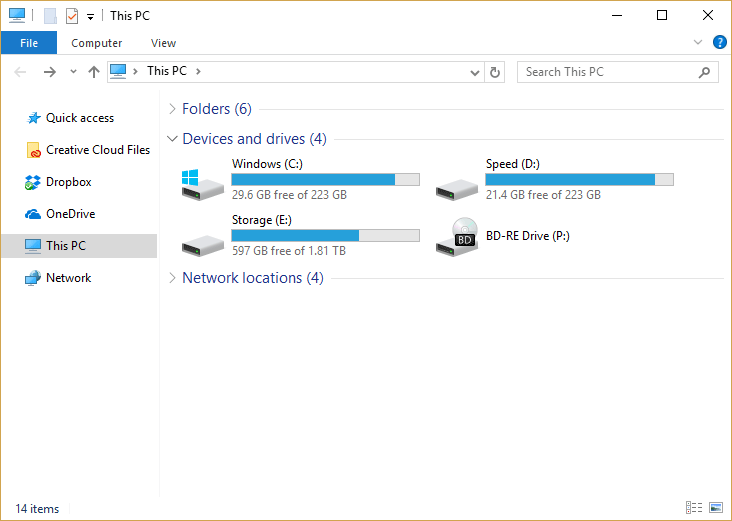
PC Drives

As you can see, I have three separate drivers on my computer. The first one C: (Windows, 256 GB SSD drive) is for the operating system and Lightroom Cache folder. The second D: drive (Speed, 256 GB SSD drive) is for storing Lightroom catalogs and Previews. The third E: drive (Storage, 2 TB Hard Drive) is for storing the actual RAW photographs. For Lightroom catalogs, I create a folder called “Lightroom” and I place all yearly catalogs there (more on file management below):
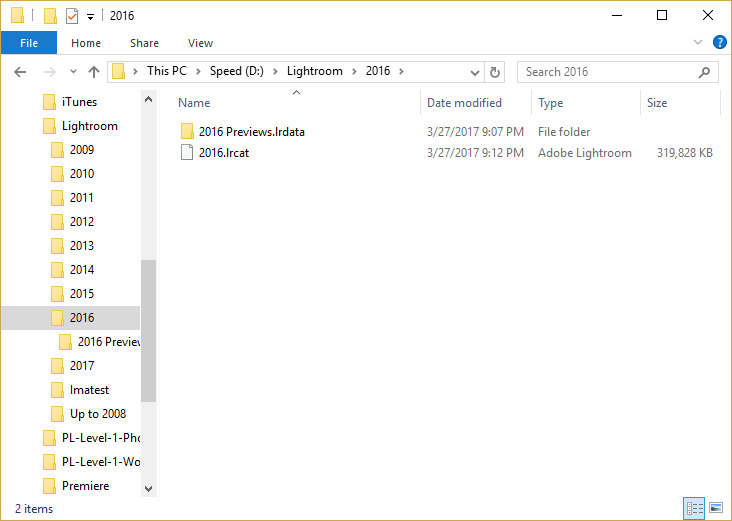
Lightroom Catalog Folders

And all photos are stored in a relatively simple structure – Photos -> Year -> Event, as shown below:
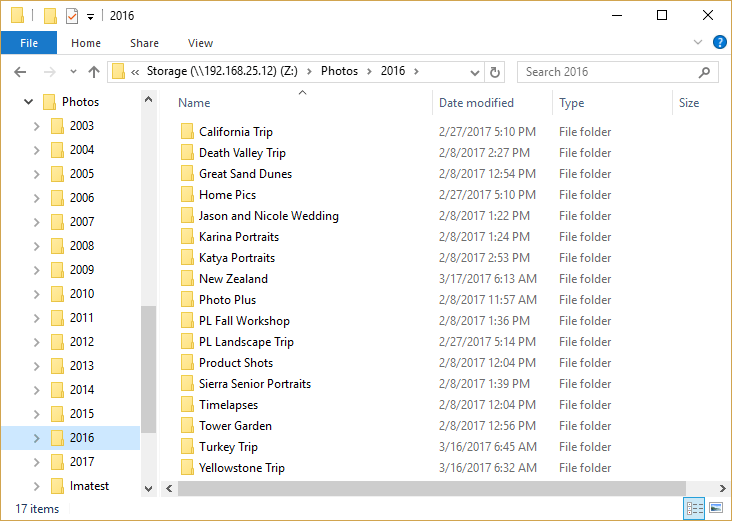
Photos Storage

Here is the basic folder structure:

  • “C:\Lightroom Cache” – only for Lightroom’s cache
  • “D:\Lightroom” – for storing Lightroom catalogs, organized by year
  • “E:\Photos” – for storing actual RAW images

You don’t have to have three drives as in the example above – on my primary machine, I only have a single large M.2 NVMe drive that I use for the operating system, Lightroom catalogs and cache, so the second drive is only used for storing RAW images. If you only have a single drive available to use (which is often the case when using a laptop), you can use that drive to store your Lightroom catalog and cache, whereas your photos can reside on external storage. My personal choice for external storage is the compact Samsung T3 SSD drive. It is an insanely fast drive that is both compact and lightweight, which makes it an ideal device to use when traveling (see my Samsung T1 review for more details).

Lastly, if you have a lot of photos like I do, you might want to consider putting all your photos on a large network storage device like the Synology DS1815+. In such configurations, your best bet is to still keep the Lightroom catalog and cache on a fast SSD drive, while the actual photos are fetched from a network resource. Make sure to use a gigabit switch and CAT-5e or faster network cables, or you might experience very painful speeds. You definitely do not want to be loading your images off a network storage device using wireless network, as it won’t give you the speed or the reliability of a direct cable connection.

6) Lightroom Cache and its Impact on Performance

When moving between RAW images in Lightroom, many of us are pretty familiar with the dreadful “Loading…” notification, which can show up for a few seconds when looking at a high-resolution RAW image. In order for Lightroom to properly read the information from a RAW image, it must access the file and extract all the relevant information. This information is temporarily stored in something called “Camera RAW Cache”. By default, Lightroom allocates 1 GB of your computer’s primary storage for this cache, which is capable of handling roughly 2,000-2,500 images. Once the folder goes over 1 GB, Lightroom’s cache management automatically purges older cache contents. While maintaining a cache of two thousand images might be sufficient for most people, if you are planning to work on more than a few thousand images (say after coming back from a full day wedding, or a long trip), you are better off increasing the size of this cache in order to accommodate more images and avoid constantly seeing the “Loading…” notification.

To make this change go to Lightroom’s Preferences (“Edit” -> “Preferences…”), then click on the “File Handling” tab and pay attention to the “Camera Raw Cache Settings” part of the window:
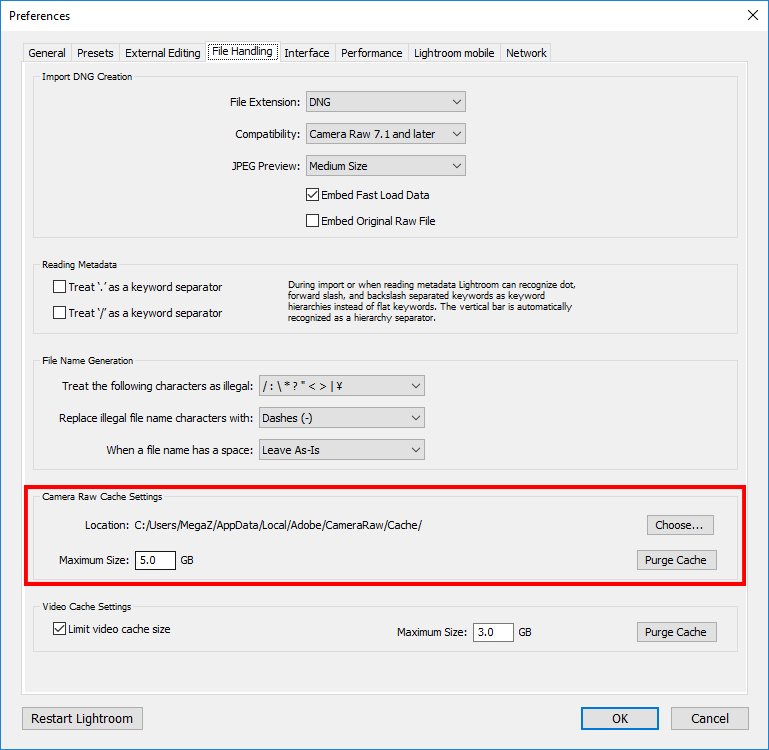
Lightroom Camera RAW Cache Settings

Simply bump up that number from 1 GB to something like 5 GB, which should be plenty for most situations. With 5 GB of storage space, Lightroom will be able to accommodate between 10,000 to 12,500 files in the cache, which is more than adequate for most photographers. If you know that you will be working with more than 10,000 images at a time (perhaps for timelapses or sequences of panoramas), then you can bump it up to 10 GB. There is no need to increase the cache to ridiculous numbers. Not only will you end up wasting space, but you will also significantly increase the number of files in a single folder, which might actually end up hurting the performance of Lightroom rather than improve it.

There is no need to move the cache location if it is already on a fast drive, but if you see that the cache folder is sitting on a slower hard drive, you might want to consider moving it to something faster. Keep in mind that the Lightroom cache is not something that is going to make Lightroom drastically faster. Having a cache that contains information about RAW files is going to make Lightroom marginally faster – perhaps 10-15% faster at most. Still, you do not want to lose this advantage when post-processing images, which is why it is a good idea to allocate enough space for the cache.

7) Allocate Enough Storage Space for Lightroom

Always make sure to allocate enough storage space for Lightroom to use. This one is very important, especially for the volume that keeps your Lightroom catalog and the accompanying Previews folder. If you run out of space while performing tasks in Lightroom (which can happen rather quickly when generating 1:1 previews), you might even end up corrupting the catalog. Adobe recommends at least 20% free space on your storage, but it all depends on what type of storage you are using and how big it is. To avoid potential corruption and performance issues with Lightroom, make sure to have plenty of storage available.

8) Organize Lightroom Catalogs

Lightroom catalog is essentially a database that contains all imported image metadata, along with current adjustments and editing history. If you take a good care of catalogs and properly organize your images in Lightroom, that in itself should take care of a few performance issues. For example, instead of putting everything into a single catalog, my personal preference is to keep Lightroom catalogs and photographs organized by year, as I have shown above. This way, things can be kept clean and I don’t have to worry about storage space issues, or my Previews folder getting massive. I have written quite a bit on image management and there is no need to repeat everything again – please see my article on how to organize images in Lightroom, where you will find a video that details how I keep Lightroom catalogs and photo folders on my computers.

Although you might be better off having a single catalog when you are starting out and you don’t have many images, I think it is a good idea to get in the habit of properly organizing your file and folder structure from the get-go to avoid potential changes and problems in the future. Lightroom can surely accommodate millions of images in a single catalog, but that’s not something I would recommend for a number of reasons. First, larger catalogs are going to be slower compared to smaller ones. I know database folks might disagree with me on this one, but it is not just the database that slows things down – the previews folder that contains image previews for every image and its accompanying database also grow significantly larger, becoming potential performance bottlenecks. Second, larger catalogs are harder to backup and manage, whereas smaller ones are much easier to deal with. Third, you are not putting all your eggs in one basket with a single Lightroom catalog. And lastly, if you run into space issues, it is very easy to move your older data by moving older catalogs, along with their accompanying image files to external archive storage – you won’t have to deal with anything missing from your catalog.

9) Optimize Lightroom Catalogs

When you delete a bunch of images from Lightroom, the database does not get automatically checked and compacted for you. This means that occasionally, you should run catalog optimization in order to make sure that the database is well-maintained. Optimizing a Lightroom catalog is very easy – all you have to do is fire up Lightroom, then select “File” -> “Optimize Catalog…”, which will bring up the following window:
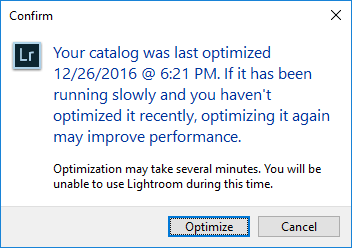
Lightroom Optimize Catalog

As you can see, it looks like I optimized by 2016 catalog at the end of the year, as part of my year-end workflow activities, but if I changed anything in my catalog, I would normally re-optimize it to make sure that it stays as compact as possible. Depending on how often you perform this task and the speed of your storage volume where the catalog resides, the process of optimizing a catalog can take as little as a few seconds and as long as a few minutes. Once you are done, you will receive a message that says “Your catalog has been optimized”.

Another reason for occasionally optimizing your catalogs is to make sure that they are error-free. If anything happens to the catalog that causes corruption, the process of catalog optimization might fail, which will be a good sign for reverting to an older backup.

10) Lightroom Previews (1:1, Standard and Thumbnails)

Lightroom can potentially store up to three types of previews for each image:

  • Thumbnail – for showing image thumbnails in Lightroom’s Library module. Thumbnails are generated pretty quickly by Lightroom, since it often uses the embedded JPEG previews in images that are generated by your camera. If Lightroom detects any changes, it will re-render the thumbnails and make them appear closer to what they should actually look like after changes in the Develop module are applied.
  • Standard – for looking at a larger version of an image in the Library module. Standard previews are nice to have built ahead of time, so that you don’t have to wait for the “Loading…” message each time you navigate between larger versions of images.
  • 1:1 Preview – for zooming in on an image and seeing it at 100% / 1:1 or higher view. The 1:1 previews can be very useful when looking at images at 100% view in the Library module. Please note that 1:1 previews are not used by the Develop module, so if you zoom in to images at 100% in the develop module and navigate between images, they will need to be re-rendered each time.

One of the suggestions that we often hear from photographers is to create 1:1 Previews, claiming that it will make the process of image culling and editing faster. While 1:1 Previews can certainly help a great deal for culling images, they are of no use when utilizing the Develop module! Don’t believe me? Try the following yourself:

  1. Select a group of images and generate 1:1 previews
  2. Once the previews are built, jump to the Develop module, zoom in to the first image at 1:1 / 100% view. Now press the right arrow of your keyboard to navigate to the next image
  3. You will see “Loading…” each time you move on to the next image

Now repeat the same process, except this time, zoom in 100% to the first image in the Library module, without going to the Develop module. Press the right arrow of your keyboard to move to the next image – the 1:1 preview will be shown without the “Loading…” message.

This basically proves that the 1:1 previews are of limited use and they can only be relied on when going through image culling. If you think they can help you when making changes to images in the Develop module, you would be wrong. As a result, if you are planning to cull through images in Lightroom, you should never do it from the Develop module – always look at images in the Library module instead.

11) Retaining Lightroom Previews

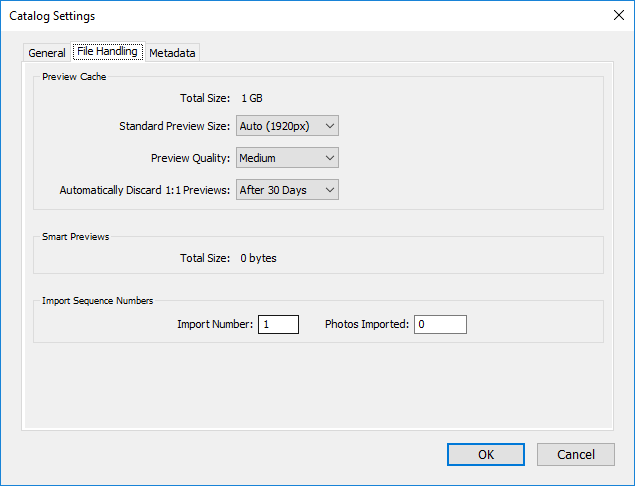
If you choose to generate Lightroom previews, don’t forget to check your Preview retention settings in Lightroom, to make sure that they are not eating up your precious space forever. Personally, I keep my 1:1 Preview retention / garbage collection to be 30 days, but if you edit images frequently and generate a lot of 1:1 previews, you should probably shorten that window to a week. Go to “Edit” -> “Catalog Settings” and click the “File Handling” tab to reveal the “Preview Cache” settings:
Lightroom Preview Cache

Take a look at the “Automatically Discard 1:1 Previews” setting and make sure you pick a time interval that works for you. Unless you really know what you are doing, you should not select “Never”. For most desktop computers, I would keep the default “Medium” setting for “Preview Quality”, but if you have a slow machine or a laptop, you are probably better of picking “Low” to make rendering a bit faster. Keep the “Standard Preview Size” at “Auto”, but if you have previously changed this setting and wondering which one to pick, choose resolution that closely matches your monitor resolution.

12) Automatically Writing Changes to XMP

In Lightroom’s Catalog Settings, you will find another tab called “Metadata”, which contains an important setting called “Automatically write changes to XMP”, as shown below:
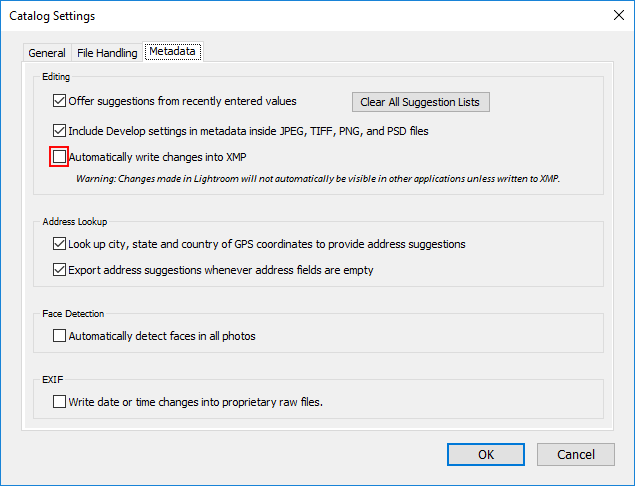
Lightroom Automatically Write Changes to XMP

What this setting does, is whenever you make changes to a RAW file in Lightroom, it either embeds your edits into the same image (if its is in DNG format), or creates a sidecar file that contains the changes. While I certainly recommend to preserve your edits within sidecar files, I would not recommend to keep this setting turned on, because it will impact Lightroom’s overall performance. And it makes sense, because Lightroom will be constantly writing changes to the XMP / sidecar file as you edit your photographs.

Instead of this, my recommendation is to make the process of creating sidecar files with all your changes either at the end of your editing process, or as part of your year-end workflow activities (see section #5 “Save All Edits”). The process of saving your edits is very simple – all you do is select all images (CTRL / CMD + A), then press CTRL / CMD + S to start the process (you can also go to “Metadata” -> “Save Metadata to File”). This way, if anything happens to your Lightroom catalog, you will be able to create a new catalog and import your images without losing your edits. Please note that saving your edits does not preserve your editing history.

13) Lightroom is Poor at Image Culling

Now let’s go over the painful process of image culling in Lightroom. Why painful? Because Lightroom sucks at image culling, period. In order to even make the process of image culling tolerable, you must render 1:1 previews ahead of time, or you will be wasting your time, waiting for Lightroom to render each image at 100% zoom. So if you are going through hundreds of images at a time, selecting which one you are going to pick or delete, you will need to sit and wait through the process of generating 1:1 previews. Unfortunately, this process can take forever, which for many of us means that we should allocate sufficient time for Lightroom to do this for us. Many wedding photographers typically import images into their Lightroom catalogs, then start the 1:1 preview rendering process before they go to bed, so that by the time they wake up in the morning, the renderings are done and they can sit and cull through the images. Sadly, many don’t understand how the 1:1 previews actually work, so they end up wasting a lot more time by firing up the Develop module, where the 1:1 previews are completely useless!

Now picture this process in your head. You have 1,000 images to import into Lightroom, out of which you are planning to only edit 100 images or so, which means that plenty of images will be deleted, while others will not be marked for editing later on. During the import process, Lightroom will be copying all 1,000 images into a designed folder on your computer and simultaneously creating tens of thousands of rows of data in the Lightroom catalog / database, containing image metadata, file location and other relevant information. When you start rendering the 1:1 previews, it will take even more time, since Lightroom needs to apply any of the import settings to each image, then render images one at a time. It then needs to keep all the rendered images in a separate database that resides inside the “Previews” folder, so that Lightroom knows which images have those 1:1 previews available to use. Next, you start going through images, marking which images you want to keep or delete, which again results in more database operations. After you are done, you delete all the images that you marked for deletion. During this process, Lightroom empties all the rows containing image metadata and other relevant information that no longer needs to be in the database. However, the database still stays at the same size, since nothing is re-organized or compressed after this – you will need to repeat the process of optimizing the Lightroom catalog in order to be able to reclaim the space and keep the catalog at its proper size. This, in turn, adds up to more wasting of precious time that one could spend editing images.

Lightroom might be pretty solid for editing images, but I personally stay away from Lightroom for culling through images for the reasons stated above. Instead of going through this nightmare, I would recommend to modify your workflow, so that you cull through the images ahead of time, only importing images you are intending to keep and edit in Lightroom. My personal choice of image culling software is FastRawViewer (see my detailed FastRawViewer review) and I use it heavily to cull through the images while they are still sitting on my memory card. Once I mark the images I want to edit and delete the ones I don’t care about, only then do I go through the import process in Lightroom. This speeds everything up and I know exactly what needs to be done in Lightroom. I don’t waste my time generating 1:1 Previews or optimizing my Lightroom catalog each time I delete images from it.

If you modify your workflow and avoid Lightroom for culling images, you will save yourself a lot of time and frustration!

14) Import Settings

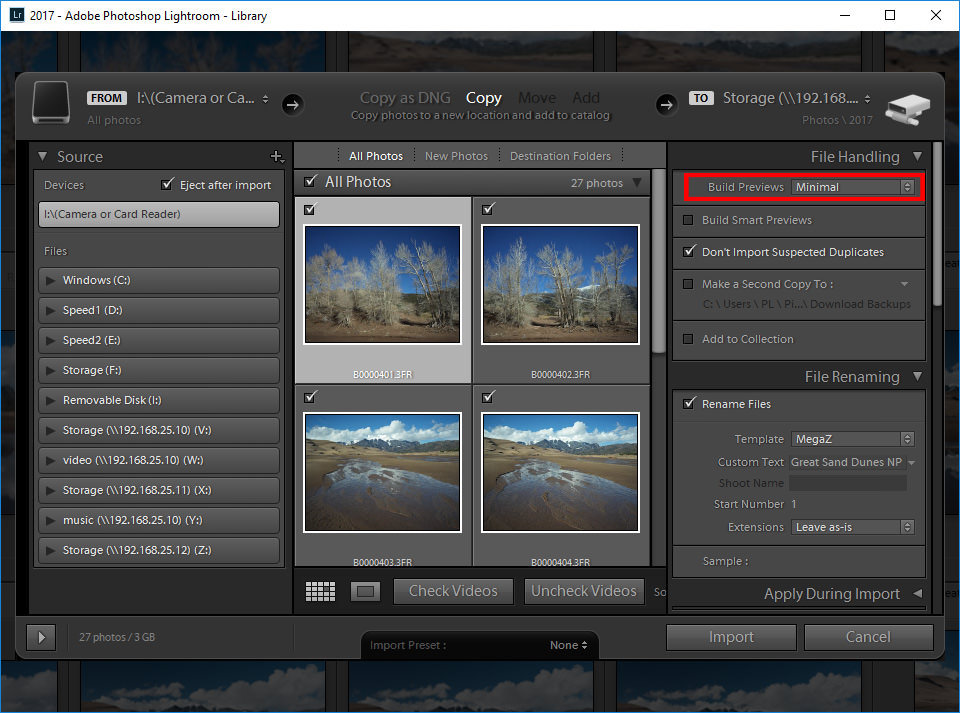
When importing images into Lightroom, you can save quite a bit of time by not rendering large previews upon import. You especially want to avoid rendering 1:1 previews on import, because those take forever to build and provide benefits only for image culling, as stated above. Personally, if I want to import images as quickly as possible, I choose “Minimal” for preview generation and if I want to be able to toggle through large images from a single card, I might sometimes choose “Standard” size previews (I typically do that after images are culled and imported though):
Lightroom Import Previews

For the best image import performance, I would recommend to render Minimal previews, especially when importing from more than one card. If you want to generate image previews, you can always do that after the import process is complete.

15) Using Smart Previews

Basically, Smart Previews are highly compressed, low resolution DNG files that are generated from the original RAW images. If your machine is slow and you are working with a lot of high-resolution images, sometimes limiting yourself to edit using Smart Previews is the best way to speed up Lightroom. For this, you will need to generate Smart Previews ahead of time, which can be done in a similar way as rendering 1:1 previews. Simply go to “Library” -> “Previews” -> “Build Smart Previews” and let Lightroom generate those smart previews for you. Once the process is done, you will end up with a bunch of small DNG files in a new folder called “Smart Previews.lrdata” (it is a file on Macs). These files will be used for editing, instead of the original RAW file.

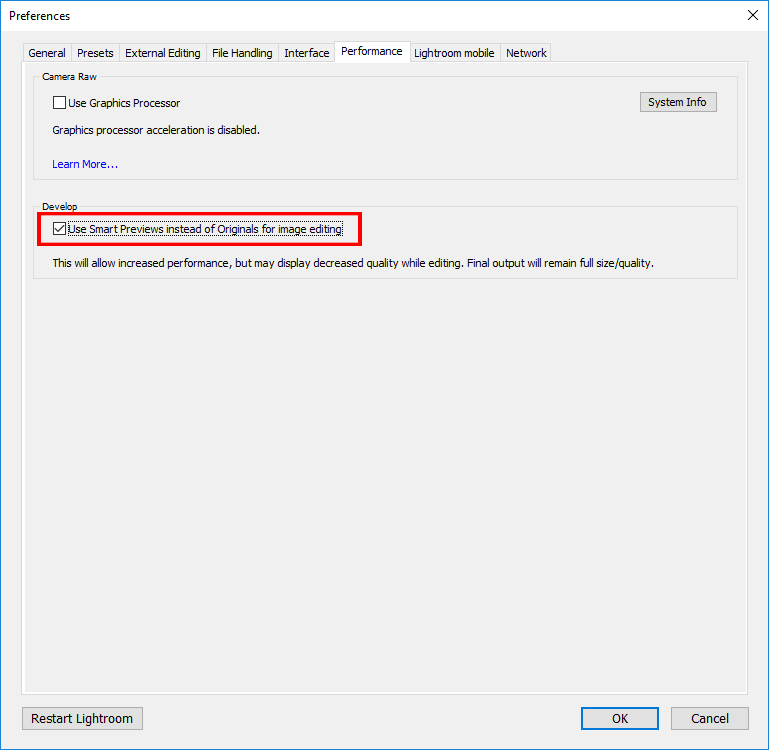
To make sure that your computer actually uses the Smart Previews instead of the original RAW files, you will need to change a setting within Lightroom. Fire up Lightroom Preferences by going to “Edit” -> “Preferences…”, then select the “Performance” tab. You will find a setting under “Develop” that says “Use Smart Previews instead of Originals for image editing”:
Lightroom Smart Previews Setting

Once you check that setting and click “OK”, go back to the develop module and select an image that you previously created a Smart Preview for. As long as you don’t zoom in to the images at 100% view, the RAW file that you will be working on will use the data from the DNG file instead of the original RAW image, which should noticeably speed things up, especially when toggling through many images and applying edits to them. The great thing about performing edits on Smart Previews, is that your changes will be automatically replicated on the original RAW images, so you don’t have to sync anything.

Don’t forget to turn this setting off after you get back to your fast desktop, as you are better off working on original RAW images instead.

16) GPU Acceleration

Some software is able to take advantage of a dedicated Graphics Processing Unit (GPU) in order to speed things up through “GPU acceleration” – a process that replaces CPU usage with GPU. In many cases, GPU acceleration can bring a lot of benefits, since the GPU is used for drawing and outputting information on the screen, whereas the CPU is freed up to perform other tasks. Although Lightroom can now take advantage of GPU acceleration, its support is unfortunately very poor at the moment. GPU acceleration is only limited to the Develop module, so it is completely useless for Library, Export and other modules / screens. It can bring some performance benefits when using the Develop module tools such as Spot Removal and Adjustment Brush. You can find this setting in the same Preferences window as above, under the “Performance” tab:
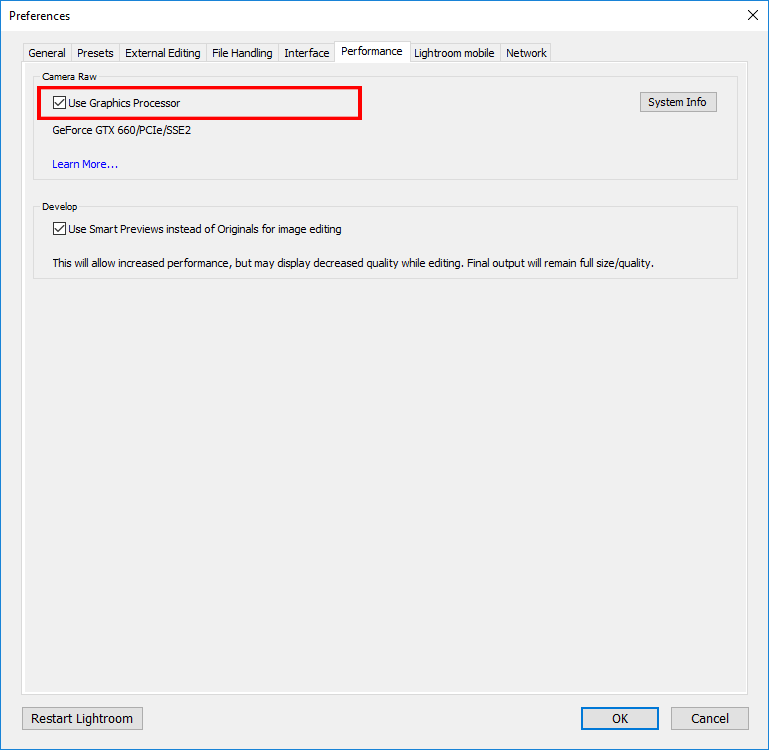
Lightroom Use Graphics Processor

If you have a fast dedicated graphics card from NVIDIA or AMD, you can take advantage of GPU acceleration and speed things up. However, the effectiveness of enabling GPU acceleration has to be tested on a case-by-case basis. If you have a fast video card, you will most likely benefit from enabling GPU acceleration. But if you have a built-in GPU or an older-generation GPU, you are probably better off keeping this setting turned off.

Therefore, my recommendation is to test whether this setting is going to be effective for your editing. In many cases, I found GPU acceleration to be buggy and slow, but in some cases, it can noticeably improve the performance of tools within the Develop module.

I hope you found this article on optimizing Lightroom performance useful. If you have any questions or comments, please use the comments section below.

The post How to Optimize Lightroom Speed and Performance appeared first on Photography Life.


from Photography Life https://photographylife.com/how-to-optimize-lightroom-speed-and-performance/

Stage Photography Tips

When People Downsize Their Camera Gear

Monday, 27 March 2017

Fuji X-T1 $500 Off, X100T & X-T10 $200 Off

Now that the Fuji X-T2 (see our detailed review) is out and other updates such as the Fuji X100F and X-T20 have also been already released, it is time to clear out the existing stock and make room for the latest and greatest. For this reason, until stock completely runs out, Fuji has decided to issue a $500 instant rebate towards the X-T1 and $200 rebates towards X100T and X-T10.

Fuji X-T1

If you are wondering about the capabilities of these cameras, check out our in-depth Fuji X-T1 review and Fuji X-T10 review. These are killer cameras and although their newer iterations are definitely superior in almost every way, the price difference between the newer models and these current offers is huge – the X-T2 retails for $1,599, so you could literally buy two X-T1 cameras for this price. The price difference between the X-T20 and X-T10 is smaller at $300, but that’s still quite a big chunk off from a $900 camera.

If you would like to take advantage of these offers, please see the links below:

The post Fuji X-T1 $500 Off, X100T & X-T10 $200 Off appeared first on Photography Life.


from Photography Life https://photographylife.com/fuji-x-t1-500-off-x100t-x-t10-200-off/

How You can Experience 1920s Paris Today

bars and cafes in Paris
If there is one era I’d want to visit more than any other, it’s Paris in the 1920s. I’m in love with that decade. The literature, jazz, optimism, style, and atmosphere — I love it all. Midnight in Paris is my favorite Paris movie, and I often wish I could make that real life.

However, unless you have a time machine, you can’t really visit 1920s Paris. What made les Années folles special can never be relived — the spirit, psyche, people, and music have long since faded away. But, as we have seen with the rise of Gatsby-themed parties and Prohibition-style bars, you can pretend! And that’s what I did on a recent visit to Paris, where there are still enough spots that recreate the era’s vibe to fill a visit.

Things to See and Do

The Gardens of Luxembourg in Paris

  • 20 rue Jacob – Back in the ’20s, a lot of American expats hosted salons that would bring together artists and writers to discuss and debate specific topics. One of the most famous was led by writer Natalie Clifford Barney. Although the building she lived in has been rebuilt since her time, during the day, you can often peer into the courtyard and garden where she held her salons.
  • The Luxembourg Garden (Jardin du Luxembourg; 6th arrondissement) – This is one of my all-time favorite places to visit when I’m in Paris. These beautiful and gigantic gardens, which surround the Luxembourg Palace (now home to the National Assembly), are also full of walking paths, chairs to relax in, ponds and fountains, statues, and finely manicured lawns that can’t help but inspire and soothe you. On a warm day, the gardens are bursting with people. In his day, Ernest Hemingway was also a fan, and it is said he wrote a lot during his strolls around the gardens.
  • Shakespeare & Co. (37 Rue de La Bûcherie, www.shakespeareandcompany.com) – Located across from Notre Dame, Shakespeare & Co. is one of the most iconic bookshops in the world. The original store opened in 1919 and served as a popular haunt for writers such as Ezra Pound, Ernest Hemingway, James Joyce, and others who fancied themselves writers (Hemingway’s A Moveable Feast has a chapter about his visit). The original location closed during WWII. The current store and location dates to 1951. It still captures the spirit of the writer class and does a lot to support writers (it has 13 beds writers can sleep in for free!), hosting readings and events throughout the year. I love wandering through its stacks and picking out unknown titles.
  • Montmartre – The Left Bank was the main hangout of artists and writers, but when they crossed the Seine, they went to Montmartre, where the cheap shops, cafés, and restaurants served as a backdrop to their discussions and work. They painted in the squares, debated in the streets, and wandered the tiny cobblestone streets in solitary thought. Today, thanks to the cheap housing, the area is still home to artists and painters (though it is far more touristy)!
  • 27 rue de Fleurus – Another salon was hosted by the famous Gertrude Stein, who lived at this address. Anyone who was anyone attended them, including Joyce, Hemingway, Pablo Picasso, Henri Matisse, F. Scott Fitzgerald, Guillaume Apollinaire, and Ezra Pound. Today, the rue de Fleurus is a quiet street and the house she lived in has been remodeled, but there’s a plaque above the address marking this famous spot, so you can sit for a moment and imagine what it would have been like to see all the greats walk in and out!

Where to Eat

Les Deux Magots in Paris

  • Les Deux Magots (6 Place Saint-Germain des Prés, www.lesdeuxmagots.fr) and Café de Flore (172 Boulevard Saint-Germain, www.cafedeflore.fr) – These two cafés are most synonymous with the Lost Generation (those who grew up during and just after World War I). Located right near each other in the now-trendy Saint-Germain-des-Prés quarter of Paris, these cafés are where all the artists and writers hung out in the 1920s. Picasso, Hemingway (again), Simone de Beauvoir, André Gide, Jean Giraudoux, Jean Paul Sartre — they were always here. Les Deux Magots sits on the corner of Boulevard Saint-Germain and Rue Bonaparte and fills the sidewalk with its chairs and tables, while the inside retains its old look: white walls, columns, and large mirrors. Café de Flore, with its large plants and flowers in the entranceway, is cozier but also retains its old-style marble floor and red leather seats.
  • La Closerie des Lilas (171 Boulevard du Montparnasse, www.closeriedeslilas.fr) – At the far end of the Luxembourg Gardens, you’ll find this tiny little café with a dimly lit interior and large outdoor patio hidden from the street by giant plants. It is said that Hemingway first read The Great Gatsby here. Like the other venues, the interior is still identical to how was it was 1920s.
  • Le Polidor (41 Rue Monsieur le Prince, www.polidor.com/en) – In Midnight in Paris, this is where Gil meets his idol, Ernest Hemingway. During the 1920s, this was actually a popular location for the likes of Joyce, Hemingway, André Gide, and Antonin Artaud. Thanks to the movie, restaurant is doing a booming business, but if you can find a seat, you’ll see that the hard-wood interior and décor has changed little since the ’20s. Imagine yourself sitting next to some famous artist of the day over delicious food and wine!

Where to Listen to Music

an empty Jazz bar
There aren’t many original music and jazz clubs left that have been around since the 1920s. Most have shifted focus, but if you want to listen to some good music, I recommend these three jazz bars:

  • Le Caveau de la Huchette  (5 Rue de la Huchette, www.caveaudelahuchette.fr) – This place has become increasingly popular since it was mentioned in the hit movie La La Land.
  • Le Caveau des Oubliettes (52 Rue Galande, www.caveau-des-oubliettes.com) – An awesome club in the Latin Quarter. This small venue is an ex wine cave dating back centuries. Small and intimate, it’s my favorite of the three.
  • Le Duc des Lombards (42 Rue des Lombards, www.ducdeslombards.com) – On the right bank, this jazz club is probably the most famous (and touristy) of the city but it gets incredible acts and pumps out some of the best jazz and blues in the area!

Where to Drink

  • Harry’s New York Bar (5 Rue Daunou, www.harrysbar.fr/en) – This is where they created the Bloody Mary and the Sidecar. This nondescript bar opened in 1911 and was a popular hangout for Fitzgerald and Hemingway. The tiny bar, with its deep wood finish, carved ceilings, and red leather seats, still remains intact.
  • Dingo Bar (10 Rue Delambre) – This is where Hemingway first met Fitzgerald. It was popular with the Lost Generation because it was one of the few places that were open all night (and they liked to party late into the morning). Today, it’s an Italian restaurant called L’Auberge de Venise, but the original bar remains and you can still come and pretend to have a drink with “Papa.”
  • The Prescription Cocktail Club (23 Rue Mazarine, www.prescriptioncocktailclub.com) – From the street, all you see is a curtained window, but when you get inside, you’re reminded of a 1920s NYC-style speakeasy. True, this place didn’t exist in the 1920s, but if you’re looking for incredible cocktails and an ambiance and class that says “welcome to history,” slide up to the marble bar and enjoy a drink in this darkly lit bar with exposed bricks and old-fashioned furniture.
  • The Little Red Door (60 Rue Charlot, www.lrdparis.com) – Located in the Marais, this is another bar looking to recreate that 1920s speakeasy vibe. It’s easy to pass the little red door of a nondescript building that hides this beautiful small bar with brick walls, eclectic furniture, and amazing (strong) cocktails. While it lacks the true ’20s feeling of the Prescription Cocktail Club, it’s still a fun place to visit!
***
As Hemingway once wrote, “If you are lucky enough to have lived in Paris as a young man, then wherever you go for the rest of your life, it stays with you, for Paris is a moveable feast.” Paris has changed a lot since les Années folles, and while it will never be the same, you can visit the old haunts and — just for a moment — transport yourself back in time and imagine what it was like.

Recommended Books and Movies

Photo credit: 4

The post How You can Experience 1920s Paris Today appeared first on Nomadic Matt's Travel Site.


from Nomadic Matt's Travel Site http://www.nomadicmatt.com/travel-blogs/experience-paris-1920s/

Thursday, 23 March 2017

What Camera Manufacturers Need to Learn from Fuji

The Best Way to Travel Southern Africa

camping in southern Africa

Ten months ago we started thinking about our trip around southern Africa. We knew that the region was vast and that travel there was a difficult mystery. We weren’t even sure if it was possible to cross the continent on our own. All we knew was that we wanted to see the great African plains, watch lions attack impalas, and have a drink while listening to the sound of fish eagles.

Fast forward nine months, and we now own a South African–registered Land Cruiser and have been touring the massive continent by ourselves. How did we get to this point? Was it the cheapest option? Or did we make a massive blunder by throwing a bunch of cash into a major liability, what with bad roads, border officials, bribes, and mechanical costs? Perhaps an overland tour would have been the best option? Or might backpacking across the continent have achieved our goal?

What is the best option for budget travelers in southern Africa: an overland tour, backpacking, or self-driving? It all comes down to what you want to see and how you want to experience Africa. Here are the pros and cons of each option:

Overland Tours

Overland tours are one of the most popular options with young people wanting to travel southern Africa these days. All transportation and accommodation, most food, and many activities are covered. They require little to no planning and no driving, are safe, and offer a sure way to meet other travelers.

Acacia Africa, Nomad, Oasis, and Absolute Africa are four of the most popular “budget” overland safari companies. These tours venture in and around South Africa, Namibia, Botswana, Zimbabwe, Zambia, and Malawi (as well as Rwanda, Uganda, Kenya, and Tanzania). Some tours cut out a few countries, while the “mega” tours include all of them. Some of the tours spend only two days in a certain country; others may spend a week there.

Acacia and Nomad include almost all activities, food, and park fees in the cost. They save the additional expenses for specialty experiences, like bungee jumping off the Victoria Falls Bridge or a hot-air balloon ride over the Serengeti.

Oasis and Absolute, on the other hand, opt for a pick-and-choose model and include only a limited number of activities. Instead they drive you from point A to point B and allow you to book experiences with local operators. Oasis and Absolute also include only 60% of your meals. (If you want all of the adventure activities included, the four providers are similar in price.)

Regardless of the overland company, expect to add roughly $5-10 a day for various expenses, like waters, beer, and tipping your guides.

Tour Company Average Daily Cost
Acacia $101.80
Nomad $100.00
Oasis $55.82
Absolute $64.46

Note: The prices differ according to where in Africa you are traveling, albeit not drastically. This is a crucial detail when determining to take an overland tour or go at it alone. Southern Africa is intrinsically cheaper and easier to do on your own than the rest of Africa. I like to call it “Africa Light.” Gas is cheaper, national parks are cheaper, food is cheaper, and the infrastructure is better suited for tourism. A tour in South Africa may average $86 a day with Acacia, while its East Africa tour will average $121 a day.

Pros of doing an overland tour in southern Africa:

  • Organized tour that requires little to no planning on a challenging continent
  • Great option for meeting people, especially as a solo traveler
  • Knowledgeable guides and safe drivers on harsh road conditions
  • Groups can be great fun

Cons of doing an overland tour in southern Africa:

  • Lack of “adventure” on an organized tour
  • No independence and hard to get away from the typical tourist activities
  • Lack of genuine local interaction
  • High cost
  • Enjoyment is subject to the atmosphere of the group

 Note: There are a few experiences offered by some overland tours that we do not agree with ethically. Any tour that puts you in contact with wild animals, such as lion walks, cheetah petting, and elephant riding, should raise immediate red flags. Ethics and tourism in Africa can be very murky; don’t always expect your tour operator to vet every activity and attraction.

Self-Driving

road trip in southern Africa
There are a plethora of variables that go into self-driving, but we’ll stick with the basics. Operating on the assumption that you will not choose to purchase a vehicle in Africa (you’d have to be crazy like us), your four main expenses will be transportation, food, accommodation, and activities.

Transportation
When we first arrived in South Africa, we got a small pickup rental truck for $650 a month ($21 a day), split between the two of us. We went with a 2×4 to travel through Mozambique, but if you route carefully and skip the dirt roads and sand, it’s very possible to get around most of southern Africa in a sedan (we’ve even met people doing it on motorcycles)!

Rental vehicles are the cheapest in South Africa and can be driven into neighboring countries with a letter from the rental company stating your intent to cross borders. A manual sedan in Johannesburg can be rented for as little as $120 a week.

You may want to drive to remote areas, which means a fully kitted 4×4 rental; those come in at $800 a week out of South Africa and Namibia on the low end for a round-trip car rental.

However, for that price, you can score a truck that can go anywhere and has comfortable roof tents that can accommodate four people — which is the best way to get one heck of a safari for an affordable price. (We self-drove into the Okavango Delta and got further than any backpacker or overland tour could ever go.)

It’s important to factor in road tolls and gas into your costs. Tolls in southern Africa are few and far between, but they do exist and you can expect to pay $10–20 a week in tolls if you’re driving around South Africa.

Keep in mind that distances are vast in Africa, so you’ll be covering some major ground getting from point to point. Southern Africa is bigger than all of Europe, so expect to budget about $100–200 a week for fuel, depending on how fast you move and the distances covered.

While these numbers may be difficult for a solo traveler, a group of friends together can make an African road trip very cheap. Obviously, the cost per person goes down with the more travel companions you add; $10 a day for gas and the rental is possible per person in southern Africa if split four ways. With two people in a smaller car, it’s entirely possible to drive around for $15 a day per person. If you don’t have travel partners, try joining groups on Facebook like “Backpacking Africa” or posting in Lonely Planet’s Thorn Tree forum.

Food
Food in Africa can be very affordable (of course there are some exceptions to this if you are eating out or have a special diet). You can find almost everything you want at large Western supermarkets in South Africa; however, as you work your way north, Western-style grocery stores become a rarity. Outside of big cities, most food will come from roadside stands or tiny convenience stores — all of which offer affordable local prices. If you’re cooking your own meals, you can get by on less than $70 a week for food. That includes eating three meals a day and items that may be considered luxuries to backpackers, such as steak, real coffee with milk, and a decent sandwich lunch.

Accommodation
Campsites can range from $5 to $15 per person a campsite; this does not include a tent or sleeping bag. Camping in southern African national parks is closer to $20–30 per person plus daily park fees. The campsites, except in Botswana, are usually fenced in to provide protection from wildlife and have facilities such as an ablution block. In major cities, you will be able to find hostels, budget hotels, and Airbnb rooms, and it’s very possible to get a bed for the same price as camping. Dorm beds run $10–20 a night and a double room $25–50 a night. But this isn’t Europe, so don’t be picky, and prepare for some less-than-desirable rooms. If you’re feeling truly adventurous, rooms in local roadside establishments cost around $3–8 a night but don’t plan on sleeping much because they’re often noisy and a little dirty.

Activities
You can’t get around Africa without some activity expenses. However, if you have plans on seeing any wildlife, you will have to pay—national parks, private game reserves, and safaris all cost money. The good news is that park costs in South Africa, Namibia, Botswana, and Zimbabwe are all reasonable, considering that these are some of the best game parks in all of Africa. Although you won’t have the comfort of being in a big game viewer and will have to spend money on fuel driving around the park all day, you will still able to see wildlife driving your own vehicle on your own time.These are some average national park fees in southern Africa:

Namibia $9
Botswana $12
South Africa $15
Zambia $25
Zimbabwe $30

 Note: These fees are based on international passports and do not include vehicle fees. Note that almost every park in Africa charges a vehicle fee for self-drivers. The fee can range anywhere between $5 and $50 a day, depending on the country and the car’s type and registrationIn summary, it is next to impossible to estimate a budget for driving yourself. Here are some average self-driving costs per day per person:

Rental car and fuel (two persons)* $15 (sedan) to $57 (4×4)
Accommodation $10 (camping) to $25 (dorm or shared private room)
Food $10–15
Activities $10
Total $45–105

* Prices are based on weekly car rentals starting in South Africa, where rentals are cheapest.

Pros of self-driving southern Africa:

  • Sense of adventure tackling southern Africa on your own
  • Freedom to drive wherever you want
  • National parks are cheaper than hopping on an organized safari
  • You can take as much or as little time in a place
  • You can delve deeper into local and rural African life with your own set of wheels

Cons of self-driving southern Africa:

  • The paperwork and bureaucratic headache of crossing borders with a car
  • Constant planning and routing and always being “on” can become exhausting
  • Maintaining and fixing the car if anything goes wrong
  • Little to no help if problems arise
  • Poor road maintenance can lead to potholes and road corrugation

Public Transport or “Backpacking”

safari in southern Africa
It is incredibly hard to estimate the cost of backpacking around southern Africa because it can vary so widely depending on one’s style. It’s also dependent on if you want to completely go off the grid or if you want to do touristy things. Some may be OK with walking into a village, paying a few dollars to the local chief, and pitching a tent in the dirt, while others wouldn’t dream of this and would rather take public transport from campsite to campsite. Living like a local in southern Africa is very hard if you’re traveling. Poverty is rampant in Africa, and many Africans can’t even afford to adequately feed themselves, let alone travel to the next town while living on a dollar a day. Due to the lack of demand and infrastructure for long-distance travel, the transport options are much more difficult compared to the West and Asia.

Transportation
Local buses around town can cost anywhere from $0.25 to a $1.50. They also only serve local towns and villages. For the larger intercity buses, you can expect to pay $8–25 for a 4–12-hour bus ride (sometimes longer). Tourist spots, parks, hostels, and campsites are often not near any major towns or villages, so you’ll need some budget for local taxis or plan on hitchhiking. The price of a taxi can range from $3 to $15, depending on distance and remoteness.

Food
There shouldn’t be any difference here compared to self-driving. The only exception is that self-drivers have the advantage of buying items in bulk and carrying cooking gear with them. If you are traveling by local transport and backpacking, your food options may be cheaper as you eat more and more of the local food and have less access to supermarkets. On the other hand, your costs could rise since you may not have the proper gear to cook all your own meals and may therefore frequent restaurants more.

Accommodation
Campsites, hostels, and guesthouses will not differ in pricing compared to those for self-drivers. However, as an overland traveler without a car and just a backpack, you can sometimes instead pay a small fee ($3–5) to a local village chief and pitch a tent in the community.

Activities
While you’ll be able to save on most things when backpacking southern Africa, you will lose out when it comes to seeing wildlife. Whereas overland tours and self-drivers have their own vehicle, backpackers will have to pay for each and every safari experience they want to have. Hopping on a day game drives into game parks costs $40 on the cheap end and $200 on the high end. The price difference is large, but most backpackers may visit fewer parks, so the cost difference isn’t out of this world.These are some average backpacking costs per day:

Transportation $9
Accommodation $10
Food $10
Activities $15
Total $44

It is possible to backpack Africa for cheaper; we’ve even met people walking, backpacking, or cycling around the continent. However, someone who travels slowly, camps in villages, and skips national parks will have a much different trip than overland tours and self-drivers in southern Africa.

Pros of backpacking southern Africa:

  • Complete integration into local life
  • Cheaper than a tour or self-driving
  • Breaks boundaries with locals as they do not view you as having many means
  • Operate on your own schedule

Cons of backpacking southern Africa:

  • Uncomfortable, exhausting, long, and even dangerous bus and train rides across the continent
  • Greater chance of getting in an accident or having items stolen
  • You should get used to being dirty
  • No one to help you should something go wrong
  • Constant routing and planning can get tiring

Final Verdict

exploring southern Africa
So what’s the best option for seeing southern Africa? In my opinion, southern Africa is best done on your own because of its infrastructure and lower cost. Travel through each country varies a lot: for example, it’s easy to backpack through South Africa; however, car rentals are also cheap. On the other hand, backpacking in a country like Namibia or Botswana, for example, can be difficult due to the best sights being in remote locations with no public transport around for hundreds of kilometers. So, it is generally better to take a road trip with your own vehicle to get to these sights, which can be great fun. Starting in Zimbabwe and heading up into East Africa, it can get very expensive to self-drive and the road conditions really deteriorate. It should also be noted that countries like Mozambique and Zimbabwe could be difficult to self-drive as police corruption is rampant (and for the uninitiated a terrifying endeavor). My tip for dealing with a corrupt cop is to remain patient, never argue, and calmly demand a receipt or real ticket. Backpacking is certainly the cheapest and more local option, but it can be difficult, uncomfortable, and slightly more dangerous. Hence I would generally say overland tours are best for those looking to see Africa but who don’t want to travel alone and not have to deal with planning.

Travel Style Suggestions
In the en,d it comes down to what you are looking for in terms of adventure, interactions, costs, comfort, and ease. It’s a difficult decision because overland tours are certainly the easiest, but also the most expensive and least adventurous. Backpacking can be difficult and uncomfortable and may hinder your experiences in Africa as most of the natural sights and national parks are far removed from populated cities where public transport operates. However, if you’re looking to meet some of the friendliest people on earth Africans are quick to befriend a backpacker. Self-driving falls somewhere in the middle, as it can be incredibly adventurous but will offer the most flexibility with a more mid-range price tag. It all depends on your travel style, but here is what I would recommend doing for each country in southern Arica. It all comes down to average cost, difficulty, and accessibility.

The post The Best Way to Travel Southern Africa appeared first on Nomadic Matt's Travel Site.


from Nomadic Matt's Travel Site http://www.nomadicmatt.com/travel-blogs/southern-africa-travel/

Wednesday, 22 March 2017

How to Update Firmware on Nikon DSLR

One of the areas within the camera that rarely ever gets touched, is the camera software, also known as “firmware”. Most modern electronic gadgets provide the ability to update their firmware by downloading fixes and updates through manufacturers’ websites and applying those updates on the devices. The firmware updates not only provide important fixes for identified bugs, but also provide brand new features that were absent when the device was shipped from the manufacturer. This ability to be able to update and run the latest version of firmware has become a standard among DLSR manufacturers, allowing end users to run the latest and greatest firmware on their cameras.

If you have never updated firmware on your Nikon DSLR or have not performed an update for a long time, you might want to check if new firmware is available for your camera. Some photographers argue that they do not feel the need to touch camera firmware, since they do not have any problems with their cameras and everything seems to be functioning properly. I personally feel otherwise – why not to run the latest and greatest camera software? And why would you resist adding more functions to your camera, especially if those functions are available to you at no charge? If you agree with me, then you should check what firmware you are running today and what firmware is currently available from Nikon.

In some cases, it is best to wait for at least 2-3 weeks after a brand new firmware update is released, to make sure that it does not come with unexpected bugs and problems. Although Nikon has a very good history and reputation when it comes to firmware releases, it does not necessarily mean that bad things won’t happen in the future.

1) Check current Firmware Version

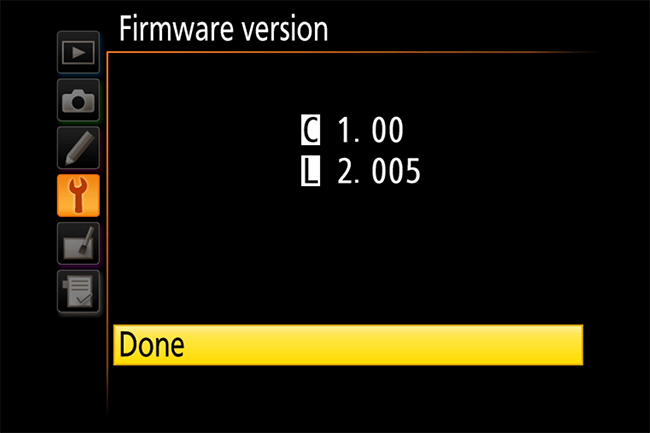
Checking the firmware version on Nikon DSLR is very easy – just press the “Menu” button, the go to “Firmware Version” under “Setup”. You should see something like this:

Nikon Firmware Version

Write down the C and L version numbers (on some cameras there will be A and B instead of C). The first number (C) represents camera firmware version, while the second number (L) represents lens firmware version (for various in-camera lens corrections). In the above example, the versions are 1.00 for the camera and 2.005 for the lens.

Next, go to Nikon Service and Support and click the “Firmware” link under “Download Center”. When the next page loads, search for your Nikon DSLR camera name or go through the categories to find your camera. Once the camera page loads, you will see a link to “Firmware” again. Click on that link and the latest firmware downloads should get revealed. For my Nikon D810, there were two downloads available – the latest Nikon D810 Firmware version 1.12 and the latest Distortion Control Data version 2.015, as seen in the below screenshot:

Nikon D810 Firmware Download

It is pretty clear that I am a bit behind in firmware, so it is a good time to upgrade. My camera firmware will go from version 1.00 to version 1.12, whereas the lens firmware will be upgraded from version 2.005 to 2.015. It is recommended to periodically update firmware, as it resolves a number of issues, so if the numbers you wrote down previously look different than the ones presented on Nikon’s website, it would be a good time to update.

If you want to see the list of fixes and new features the new firmware provides, simply click the “View download page” link and you will be taken to a download and instruction page. In my case, the list of changes are too many to list, but I recommend that you review those changes and see if they are worth moving up to. In most cases, it is a good idea to upgrade to the latest and greatest firmware, but in some cases, you might find that certain things might not function as they used to before. This is especially true for third party battery grips and batteries that might malfunction after a firmware update. Before you decide to update, I would make sure that the latest firmware release is at least 3 months old, just to be safe. If there is a major problem with firmware, other photographers will surely complain and some firmware releases might even get recalled. You do not want to risk potentially de-stabilizing your camera by installing the latest firmware. Keep in mind that any software release can be buggy, so being a bit patient does not hurt in this case.

2) Upgrade Camera Firmware

Before you start the upgrade process, make sure that your camera battery is fully charged. You do not want your camera to turn off during the process of flashing the new firmware, or it could make your camera inoperable!

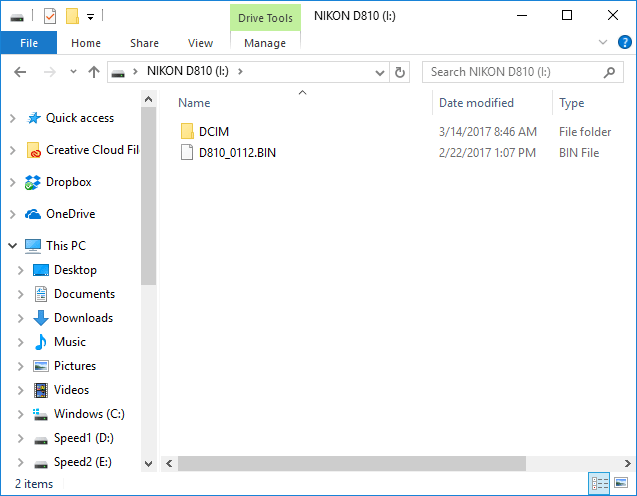
Once you download both camera and lens firmware files, it is time to put them on your memory card. But first, you have to double click on the files and have your system extract them. After the extraction was complete on my PC, I ended up with two folders: D810Update, which contained the camera firmware file called “D810_0112.BIN” and DCDATAUpdate, which contained the lens firmware file called “NKLD0215.BIN”.

What you need to do from here, is copy the camera firmware update to the memory card first, since you will need to apply these updates one at a time. Go into the newly created camera folder and copy the camera firmware directly into the root folder of your memory card. Don’t copy the folder – only the files! Here is what the memory card should look like after both files are copied:

Memory Card Camera Firmware

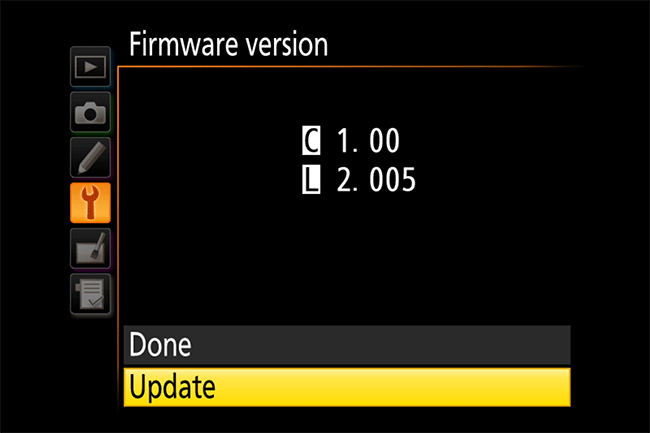
Now eject the memory card from your computer, insert it into your camera and go to Menu -> Setup Menu -> Firmware version (which is typically the very last menu option under “Setup Menu”). You should see something like this:

Nikon D810 Firmware Update Option

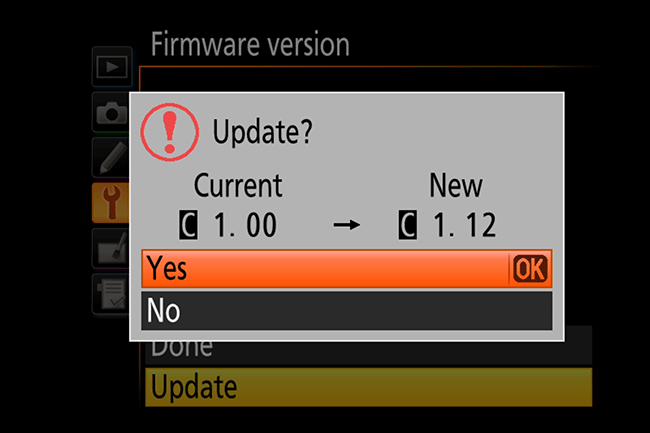
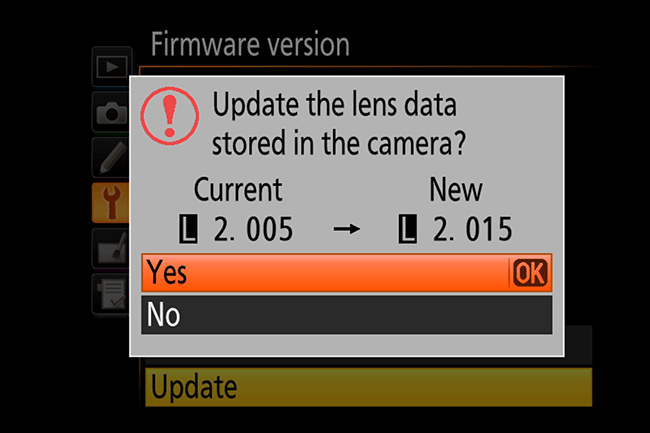
As you can see, there is now an option that says “Update”. Scroll down to it and press OK, after which you will see a warning:

Nikon D810 Update to New Firmware

Move up to select “Yes”, then press OK. The firmware update process will start. During the upgrade process, you will see something like this:

Warning!
Do not turn camera off during update. Update will take several minutes.

As it is asking you, do not turn the camera off during the update or remove its battery. In fact, best not to even touch it during this process.

Once the firmware update is finished, you will see the following message:

Update completed.
Turn camera off.

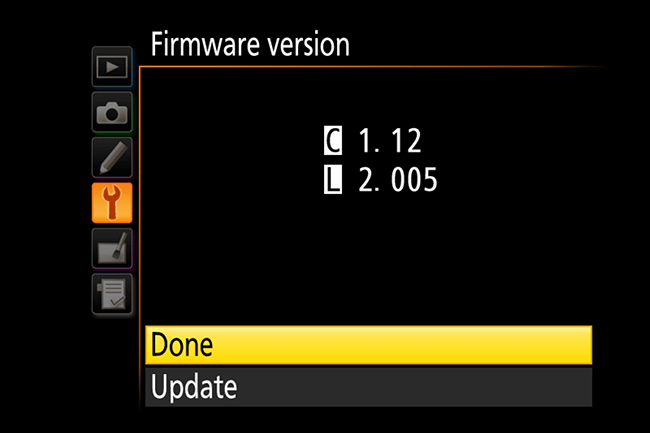
As instructed, turn the camera off. Turn it back on and now you should be on the latest firmware. Revisit the Firmware Version menu from the Setup Menu and you should see something like this:

Nikon Camera Firmware Updated

Success! The latest camera firmware has been updated. Now it is time to update the lens firmware.

3) Upgrade Lens Firmware

Now it is time to update the lens firmware. Take the memory card out of your camera, insert it back into your computer, then start out by deleting the camera firmware file, which in my case is the “D810_0112.BIN”. Now go to the second folder where the lens firmware resides and copy the file into the root folder, just like you did earlier. After the copy process is complete, eject the memory card and insert it into your camera. Go back exactly where you were under Menu -> Setup Menu -> Firmware version. You should again see exactly the same window as earlier:

Nikon Camera Firmware Updated

Select the “Update” button and press OK. You should see the following message:

Update Lens Firmware

Again, select “Yes” and press “OK”. The lens update process should complete much faster compared to the camera update process. Once it is done and the same “Update completed. Turn camera off.” message shows up, turn the camera off. Turn it back on and revisit the Firmware version menu again.

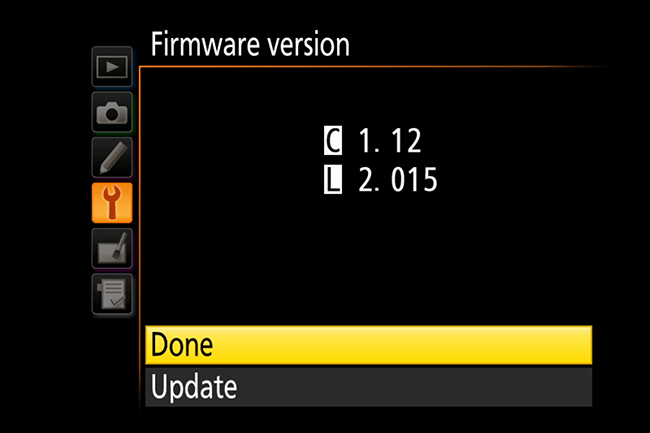
If everything went well, which it normally should, you should see something like this:

Nikon Firmware Fully Updated

As you can see, both camera firmware version 1.12 and lens version 2.015 are visible, which means that the process is completed.

4) Current Nikon DSLR Firmware Revisions

Here is a short list firmware updates for some of the recent generation Nikon DSLR cameras (as of 03/22/2017). Click links to open the support page from which you can get to firmware downloads:

  1. Nikon D5 – C:1.10 / L:2.015
  2. Nikon D4S – C:1.32 / L:2.015
  3. Nikon D4 – A/B:1.10 / L:2.015
  4. Nikon D810 – C:1.12 / L:2.015
  5. Nikon D800 – A/B:1.10 / L:2.015
  6. Nikon D800E – A/B:1.10 / L:2.015
  7. Nikon D750 – C:1.11 / L:2.015
  8. Nikon D600 – C:1.02 / L:2.015
  9. Nikon D610 – C:1.01 / L:2.015
  10. Nikon D500 – C:1.12 / L:2.015
  11. Nikon D7200 – C:1.02 / L:2.015
  12. Nikon D7100 – C:1.03 / L:2.015
  13. Nikon D5600 – C:1.01 / L:2.015
  14. Nikon D5500 – C:1.01 / L:2.015
  15. Nikon D5300 – C:1.01 / L:2.015
  16. Nikon D3400 – C:1.11 / L:2.015
  17. Nikon D3300 – C:1.01 / L:2.015
  18. Nikon D3200 – C:1.04 / L:2.015

The post How to Update Firmware on Nikon DSLR appeared first on Photography Life.


from Photography Life https://photographylife.com/nikon-firmware-update/