Monday, 5 December 2016

Win a Trip to Chile (including Easter Island)!

Win a Trip to Chile

The following branded content post is brought to you by Marmot and LATAM Airlines. With a contest this good, I’m always happy to promote it to my readers!

Now that I’m based in New York after years based in Europe, I’m making a priority to explore more of Latin America. Central America in 2015, Colombia in 2016. I’m starting to eye more of South America for 2017. And of all the destinations in South America, one of my top dreams is the remote environment of Easter Island in Chile.

But you may beat me there — because Marmot is now giving away a trip for two to Chile, including Santiago, Patagonia, and Easter Island!

Not only that, they’re giving away a $1000 Marmot gift card as well!

Win a Trip to Chile

The Contest

Winners of this contest will win an 11-day trip for two to Chile, including flights on LATAM Airlines (the consolidation of LAN, its affiliates, and TAM) from one of their departure cities (Miami, Dulles, LAX or JFK), plus flights from your departure city in the 48 contiguous states if you don’t live near a gateway. LATAM is actually the only airline that flies to Easter Island.

Winners also receive a $1000 Marmot gift card that can be redeemed on Marmot.com, by phone, or in the flagship stores in Aspen, Greenwich, and San Francisco. Marmot has an excellent selection of high-quality, durable outerwear that is perfect for a trip to a rugged destination like Chile.

Kate’s Thoughts

What I love about this trip is that it gives you experiences in three very different parts of Chile: the capital of Santiago, the mountains of Patagonia, and the isolated Polynesian environment of Easter Island.

Whenever I visit a new country, I try to visit three different places if possible. I’m not a fan of just flying into a capital, spending two days there, and saying, “Well, I’ve done [country].” I like to get a well-rounded experience when I have the time to do so.

This trip is by no means a complete guide to Chile — think about the Atacama Desert, the Lake District, Valparaíso, and all the great wine regions. Chile really has so much diversity as a destination! But it’s about as good of a first-timer trip as you can imagine.

Trip Itinerary

Day 1: Welcome to Santiago! Get settled in at your hotel before embarking on a half day tour where you’ll get to know this charming city, famous for its mix of beautiful colonial architecture, bohemian flare and modern skyscrapers. Enjoy an evening on your own exploring the hotspots in neighborhoods like Lastarria or Bellavista.

Day 2: Today you’ll find yourself arriving in Polynesia…yes, you heard right! Easter Island makes up the southernmost island of the Polynesian Triangle and you’ll have the chance to enjoy everything that this remote destination has to offer.

Day 3: Spend your day exploring the best of Rapa Nui’s archaeological sites like the famous standing heads of Ahu Tongariki.

Day 4: Hike your way up the Rano Kau volcano or spend a day basking in the sun at Anakena Beach.

Day 5: Pack your bags and head back to the mainland. Upon arrival in Santiago head to get a taste of one of the world’s most renowned wine regions.

Day 6: Enjoy wine touring and all of the stunning scenery that comes with it.

Day 7: Today you’ll head south to the heart of Chilean Patagonia. Torres del Paine National Park is home to some of the world’s greatest nature and will be your personal playground for four magical days.

Day 8: Go horseback riding around your lodge or head toward Gray Glacier; adventurous types can approach it via sea kayak!

Day 9: Save your energy for the grueling yet magnificent hike to the Las Torres basin. This full day trek will have you sweating but marveling all the while at one of South America’s most iconic peaks.

Day 10: Time to say adios to Chile and its natural splendor. Fly back to Santiago for your departing flight home. Hasta la proxima!

Win a Trip to Chile

How to Enter

Enter here. It’s easy! Just hit the enter button and sign up with your name, email address, and departure city.

This contest is open to legal U.S. residents age 18 and up. See the full terms and conditions here.

The contest ends on December 16, 2016, at 11:59 PM EST. The trip must be taken in 2017.

Win a Trip for Two to Chile!

Good luck!

Please let me know if you win — it makes me so happy when my readers win contests!

Does Chile sound like your kind of trip?


from Adventurous Kate http://www.adventurouskate.com/win-a-trip-to-chile-including-easter-island/

Why Being Broke is the Best Time to Travel

traveler looking down surrounded by a nice view
When you don’t have much money, travel seems only a nice fantasy. When you have debts, loans, or a crummy job; sleep on your friend’s couch; or can barely afford McDonalds, it seems that traveling is a pipe dream that will probably never come true, something you’re going to have to put off until you have money.

But I don’t think that’s the case! I think being broke is the best reason to start traveling.

When you have the fewest options is when you really you have the most options. When you’re at the bottom, you have little lose but everything to gain.

As Janis Joplin said, freedom is just another word for nothing left to lose.

When you don’t have any money or a great job, there’s little downside to picking up, saying goodbye, and going off to travel. You’ll ride out the storm, maybe find something you really love, and gain life experience and those soft interpersonal skills that employers today find valuable!

The world is full of opportunities (and jobs), so if you’ve exhausted those in your area, why not try a new one? If you’re willing to go out and grab life by the horns, you’ll find plenty of opportunities out there to earn money, travel, and find what you love.

Open yourself up to new possibilities and experiences. Don’t suffer in that crummy job that barely pays the bills. Move somewhere. Pick up and start over. It’s what our ancestors used to do. They moved to where the opportunity was and they thrived because of it. Where would we be if they didn’t constantly try to seek a better life but instead sat and watched Netflix?

I know picking up and leaving when you’re struggling can seem scary. We often leave a situation only when we are the most secure. When you’re struggling, your thoughts are more likely to be “if I can just get ahead a little, then I’ll be ready to go.”

However, there’s no perfect time to travel. There’s no right moment. If you’re in a bad situation, find opportunities and go try them. Which is scarier: failing and coming back to exactly where you started or continuing down a path that will probably drag you down for the rest of your life?

Unless you seize the moment, that temp job you’re in just until you find something new is more likely to be the job you still have years from now.

If you’re in a place you don’t like, are working a job you hate, or have debt, there’s no better time to say fuck it, move overseas, find work, and travel. Or volunteer with the Peace Corps, work on a farm, train dogs, or start a blog. My friend Mark Manson started his blog when he was sleeping on his friend’s couch counting pennies to afford McDonald’s because he figured what else did he have to lose?! (He’s now a New York Times best-selling author!)

One of my favorite scenes in one of my favorite movies, Up in the Air, is when George Clooney’s character fires J. K. Simmons’ character Bob. Bob is obviously upset — he has kids (one with asthma) and he feels like a failure. Instead of being sympathetic, George Clooney tells him he is a failure and reads Bob’s résumé: he went to the French culinary institute to study cooking and worked a fancy French restaurant. To quote:

“I see guys who work at the same company for their entire lives, guys exactly like you. They clock in, they clock out, and they never have a moment of happiness. You have an opportunity here, Bob. This is a rebirth. If not for you, do it for your children.”

What George is telling Bob is that now he has a chance to follow his dreams: to work with food instead of a job that saps his soul — because he has nothing left to lose.

If you were faced with such an opportunity to change — to use a setback or constrained circumstances to instead actually do something different — would you take it?

It’s super hard to go against the current. Life gets away from us as the days tick by. But eventually one must say, “not today, not anymore.”

Use the Internet (you can find a lot of work online via websites like Gumroad, UpWork, or Craigslist) and open yourself up to the world and all the jobs and opportunities in it.

There are ways to earn extra money via sharing-economy websites like Uber, Lyft, EatWith, TaskRabbit, and a plethora of other random side jobs from the sites listed in the previous paragraph to pad your wallet. (Bonus: you can do before and after you’re overseas!!!).

Once you find yourself overseas, you can get a working holiday visa, use job boards and local expat stomping grounds to find jobs, or take freelance work via a website like Upwork.

If I was broke, young, or in a job I didn’t like, I would first try to teach English overseas. You don’t need to be a teacher to do this — just a native English speaker (though having a degree will help if you want a better-paying job). There are a ton of schools out there that even pay for your flight to and from the country.

If I wasn’t a native English speaker, I would use websites like iTalki and teach people my language! You get paid to be someone’s language partner. There’s nothing like getting paid to have a conversation in the language you speak every day. These sites are hugely popular — and you don’t need to be a teacher.

Find something that moves you forward — even if it’s only a little bit. Then take the next step. Then the next. Then another.

Maybe along the way, you may find yourself with a new passion or in a new situation where you happen to feel at home.

But while you’re trying something new, you’ll at least be able to pay off some of your debt, have some cool adventures, and gain some life experience.

The world can be your oyster if you truly grab it! Whether you make minimum wage, are wheelchair bound, have to work on boats, or come from a developing country, you can make it happen. When you expand your worldview, you increase your possibilities.

Don’t make excuses as to why you can’t — find all the ways you can.

Stretch yourself. Piece a few things together. Use the web. Break out of your immediate circle.

The world can be your oyster if you let it.

What do you have to lose?

The post Why Being Broke is the Best Time to Travel appeared first on Nomadic Matt's Travel Site.


from Nomadic Matt's Travel Site http://www.nomadicmatt.com/travel-blogs/no-money-go-travel/

Saturday, 3 December 2016

Nikon 85mm f/1.4G Review

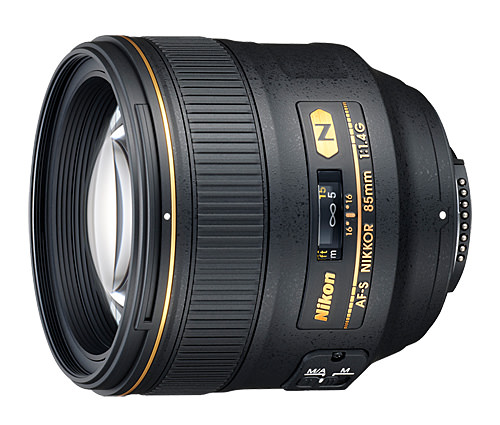
This is an in-depth review of the Nikon 85mm f/1.4G AF-S lens that was announced with three other lenses in August of 2010. Ever since the manual focus AI-s version of the Nikon 85mm f/1.4 lens was introduced back in 1981, the Nikon 85mm f/1.4 lenses have been used as references for superb sharpness, best-looking bokeh and beautiful color renditions. The last autofocus AF-D version of the lens produced in 1995, the Nikon 85mm f/1.4D, was often called the “king of bokeh”, yielding extremely pleasing out-of-focus areas, in addition to producing sharp, colorful images when shooting wide open. Its legendary performance made the Nikon 85mm f/1.4D lens a must-have for portrait photographers and many professionals heavily relied on this lens for many years for their commercial work (and some still do). The Nikkor 85mm f/1.4G lens is the latest update to the 85mm f/1.4 line, which replaced the outdated AF-D version with newer optical and technology innovations from Nikon. In this review, I will not only provide information on the Nikon 85mm f/1.4G lens, but will also compare it to both the older Nikon 85mm f/1.4D and the lighter and smaller Nikon 85mm f/1.8G.

Nikon 85mm f/1.4G

The Nikon 85mm f/1.4G AF-S is a professional-grade lens that is specifically designed for portrait, studio and wedding photographers that need an ultra-fast, high quality lens with a large aperture of f/1.4 for low-light situations and shallow depth of field to isolate subjects from the background, without compromising image quality and sharpness. The Nikon 85mm f/1.4G is built to work extremely well on both FX and DX sensors, yielding sharp results in the center frame, as shown in the following pages of this review. Compared to its predecessor, Nikon completely re-engineered the lens by optimizing its optical formula for better overall sharpness, replaced AF-D focus motor with much faster and more accurate silent-wave motor (SWM) and also added more advanced Nano crystal coating technology. Just like most Nikon professional lenses, the Nikon 85mm f/1.4G has a 77mm filter thread and is also sealed against dust and tough weather conditions for outdoors field use.

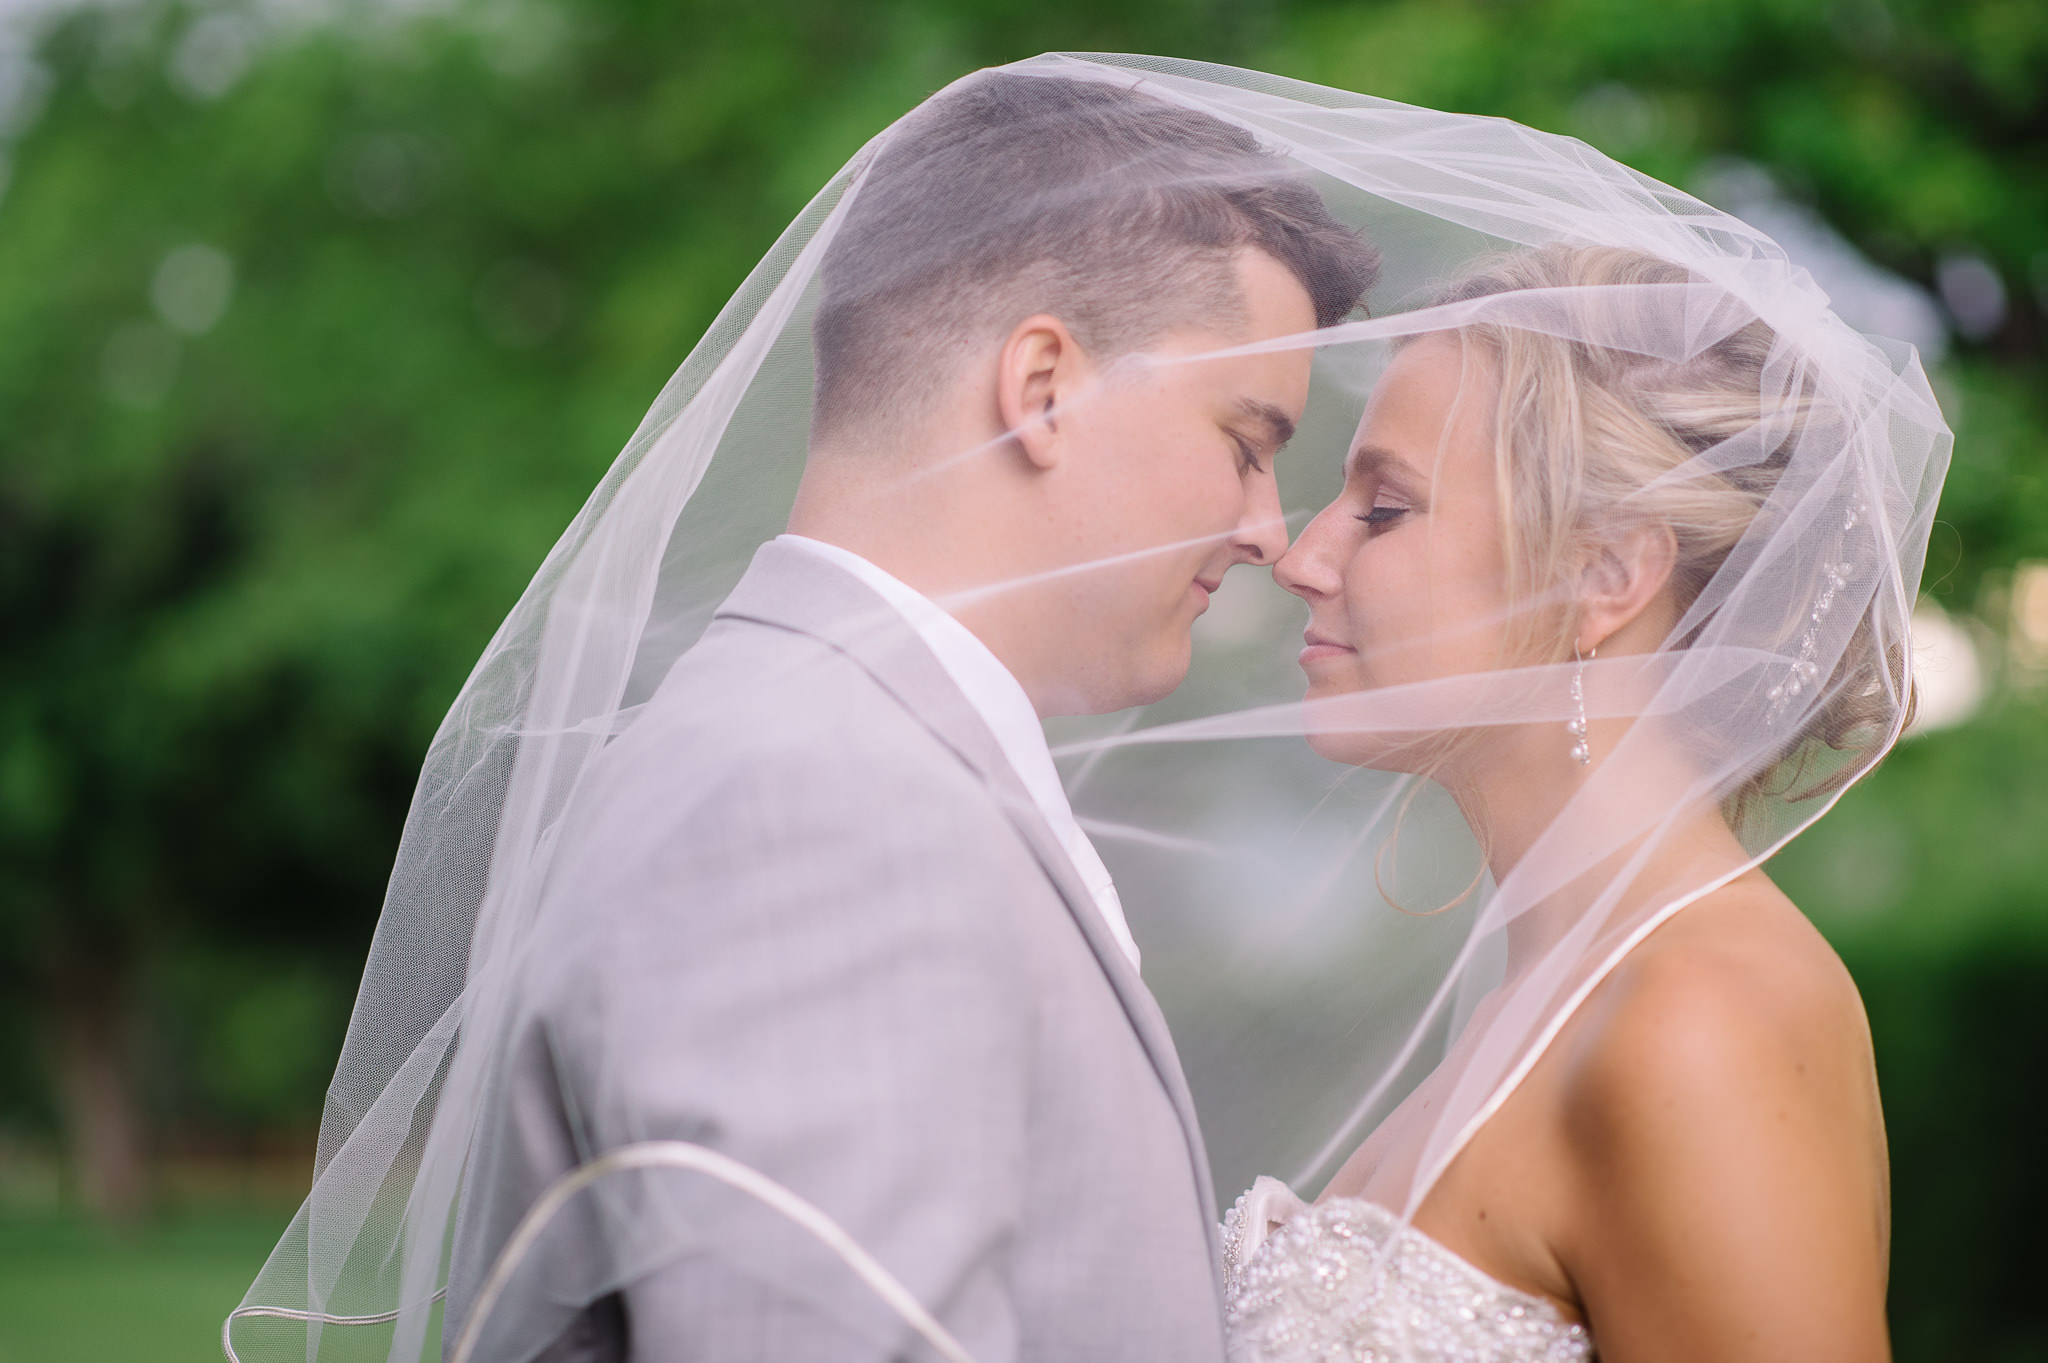
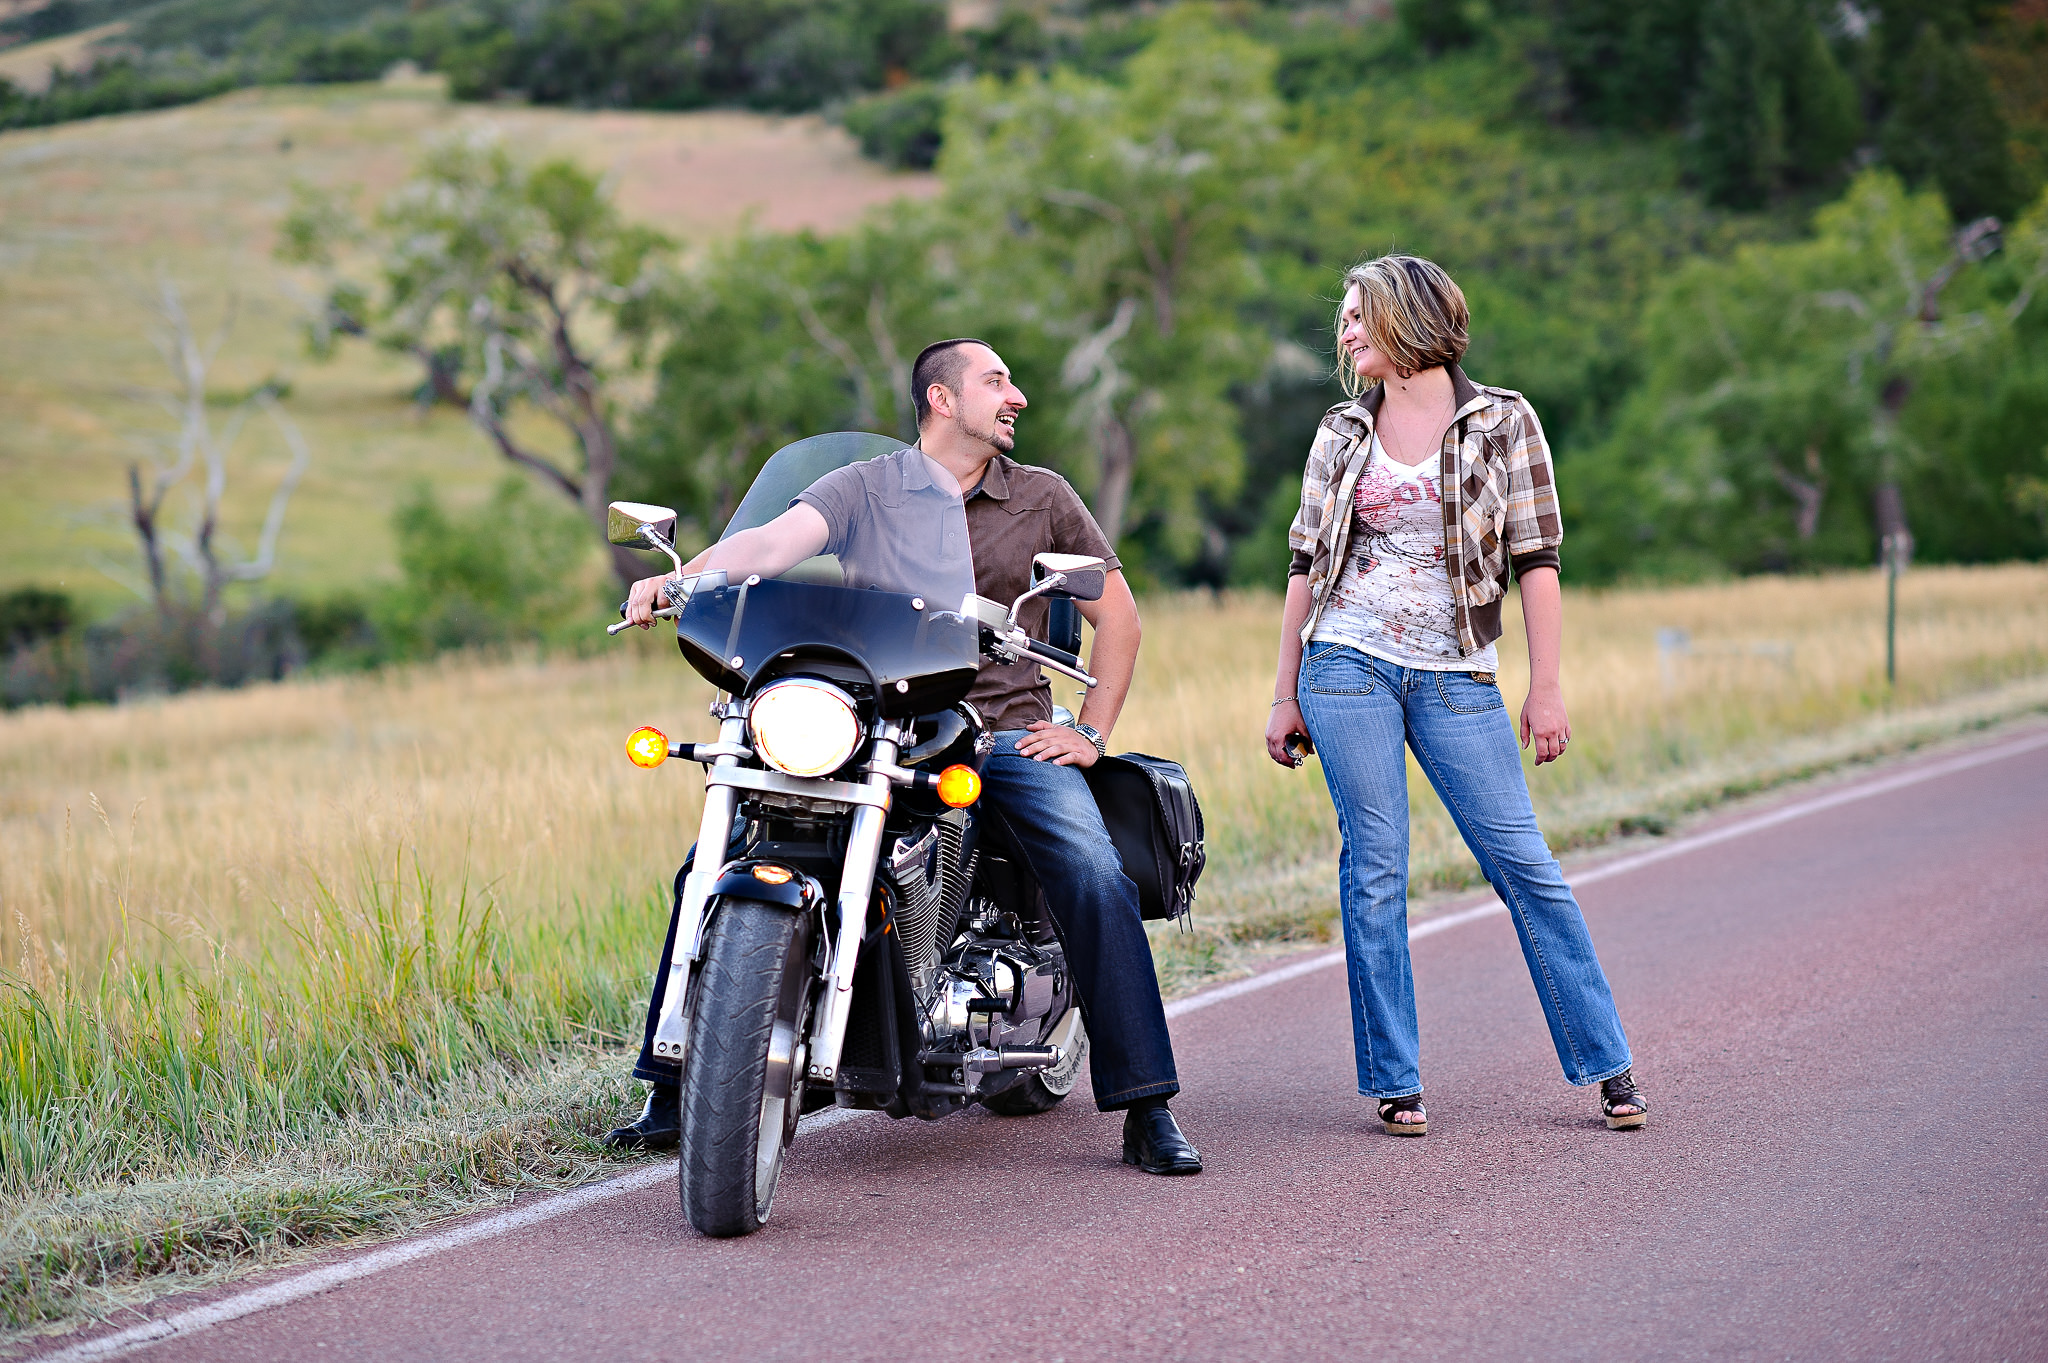
Nikon 85mm f1.4G Image Sample (11)

NIKON D700 + 85mm f/1.4 @ 85mm, ISO 800, 1/1000, f/2.0

1) Lens Specifications

Main Features:

  1. High performance FX-format f/1.4 medium-telephoto lens is perfect for portraits, low-light applications offering beautiful Bokeh (background blur) and outstanding picture quality.
  2. Use of Nano Crystal Coat further reduces ghosting and interior flare across a wide range of wavelengths for even greater image clarity.
  3. Internal Focus (IF) provides fast and quiet autofocus without changing the length of the lens, retaining working distance throughout the focus range.
  4. Nikon Super Integrated Coating (SIC) enhances light transmission efficiency and offers superior color consistency and reduced flare.
  5. Optimized for edge to edge sharpness on both FX and DX-format.
  6. M/A Focus Mode Switch Enables quick changes between manual and autofocus operation.
  7. Exclusive Nikon Silent Wave Motor (SWM) enables fast, accurate and quiet autofocus.
  8. Rounded 9-Blade Diaphragm renders more natural Bokeh (background blur)
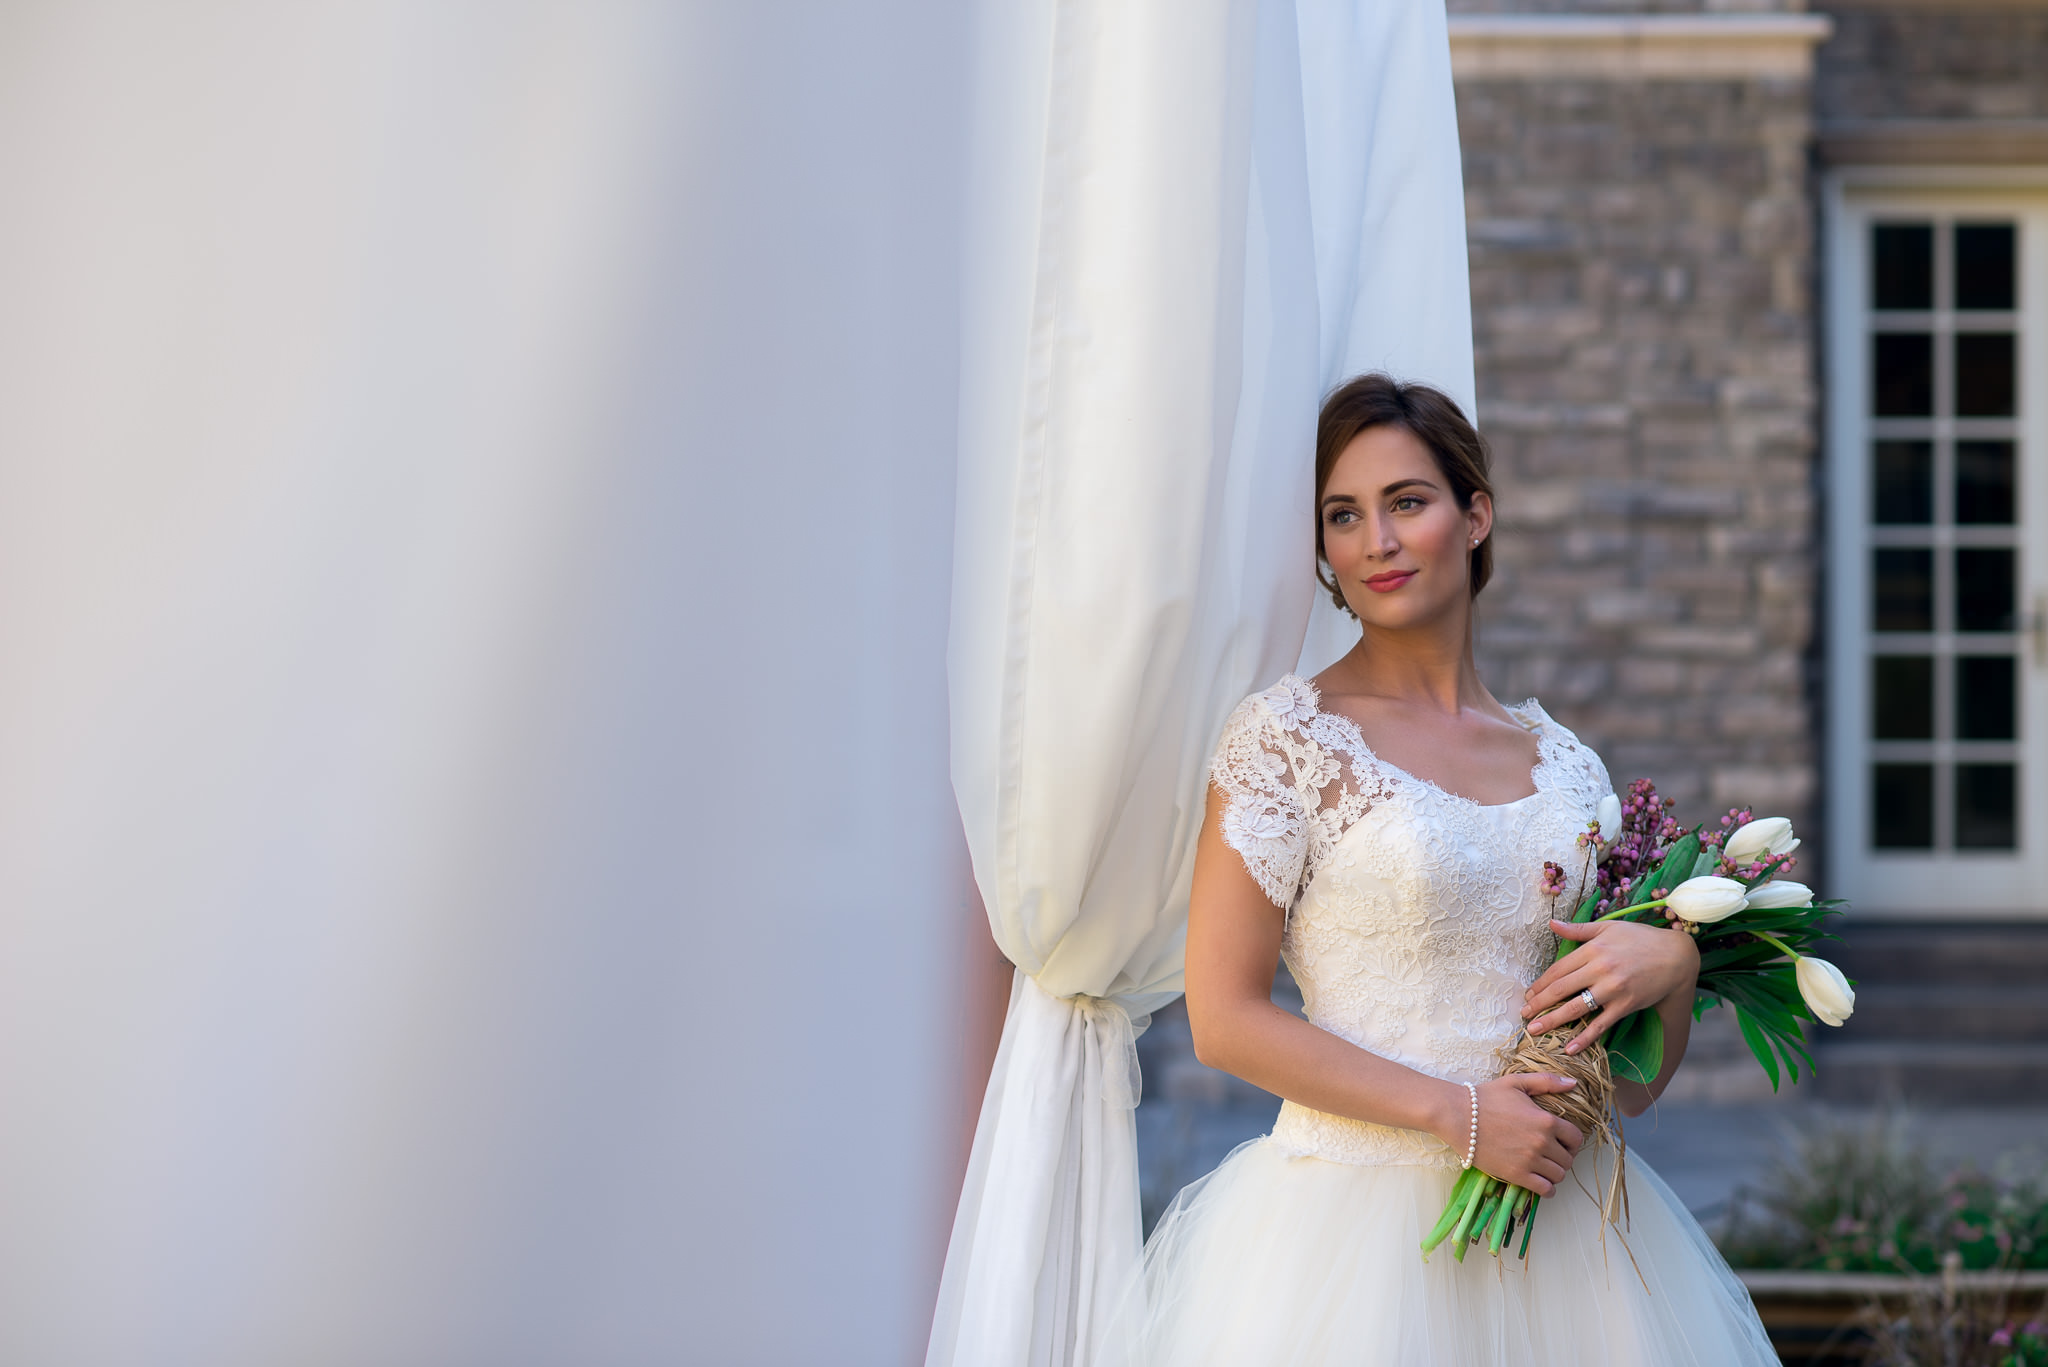
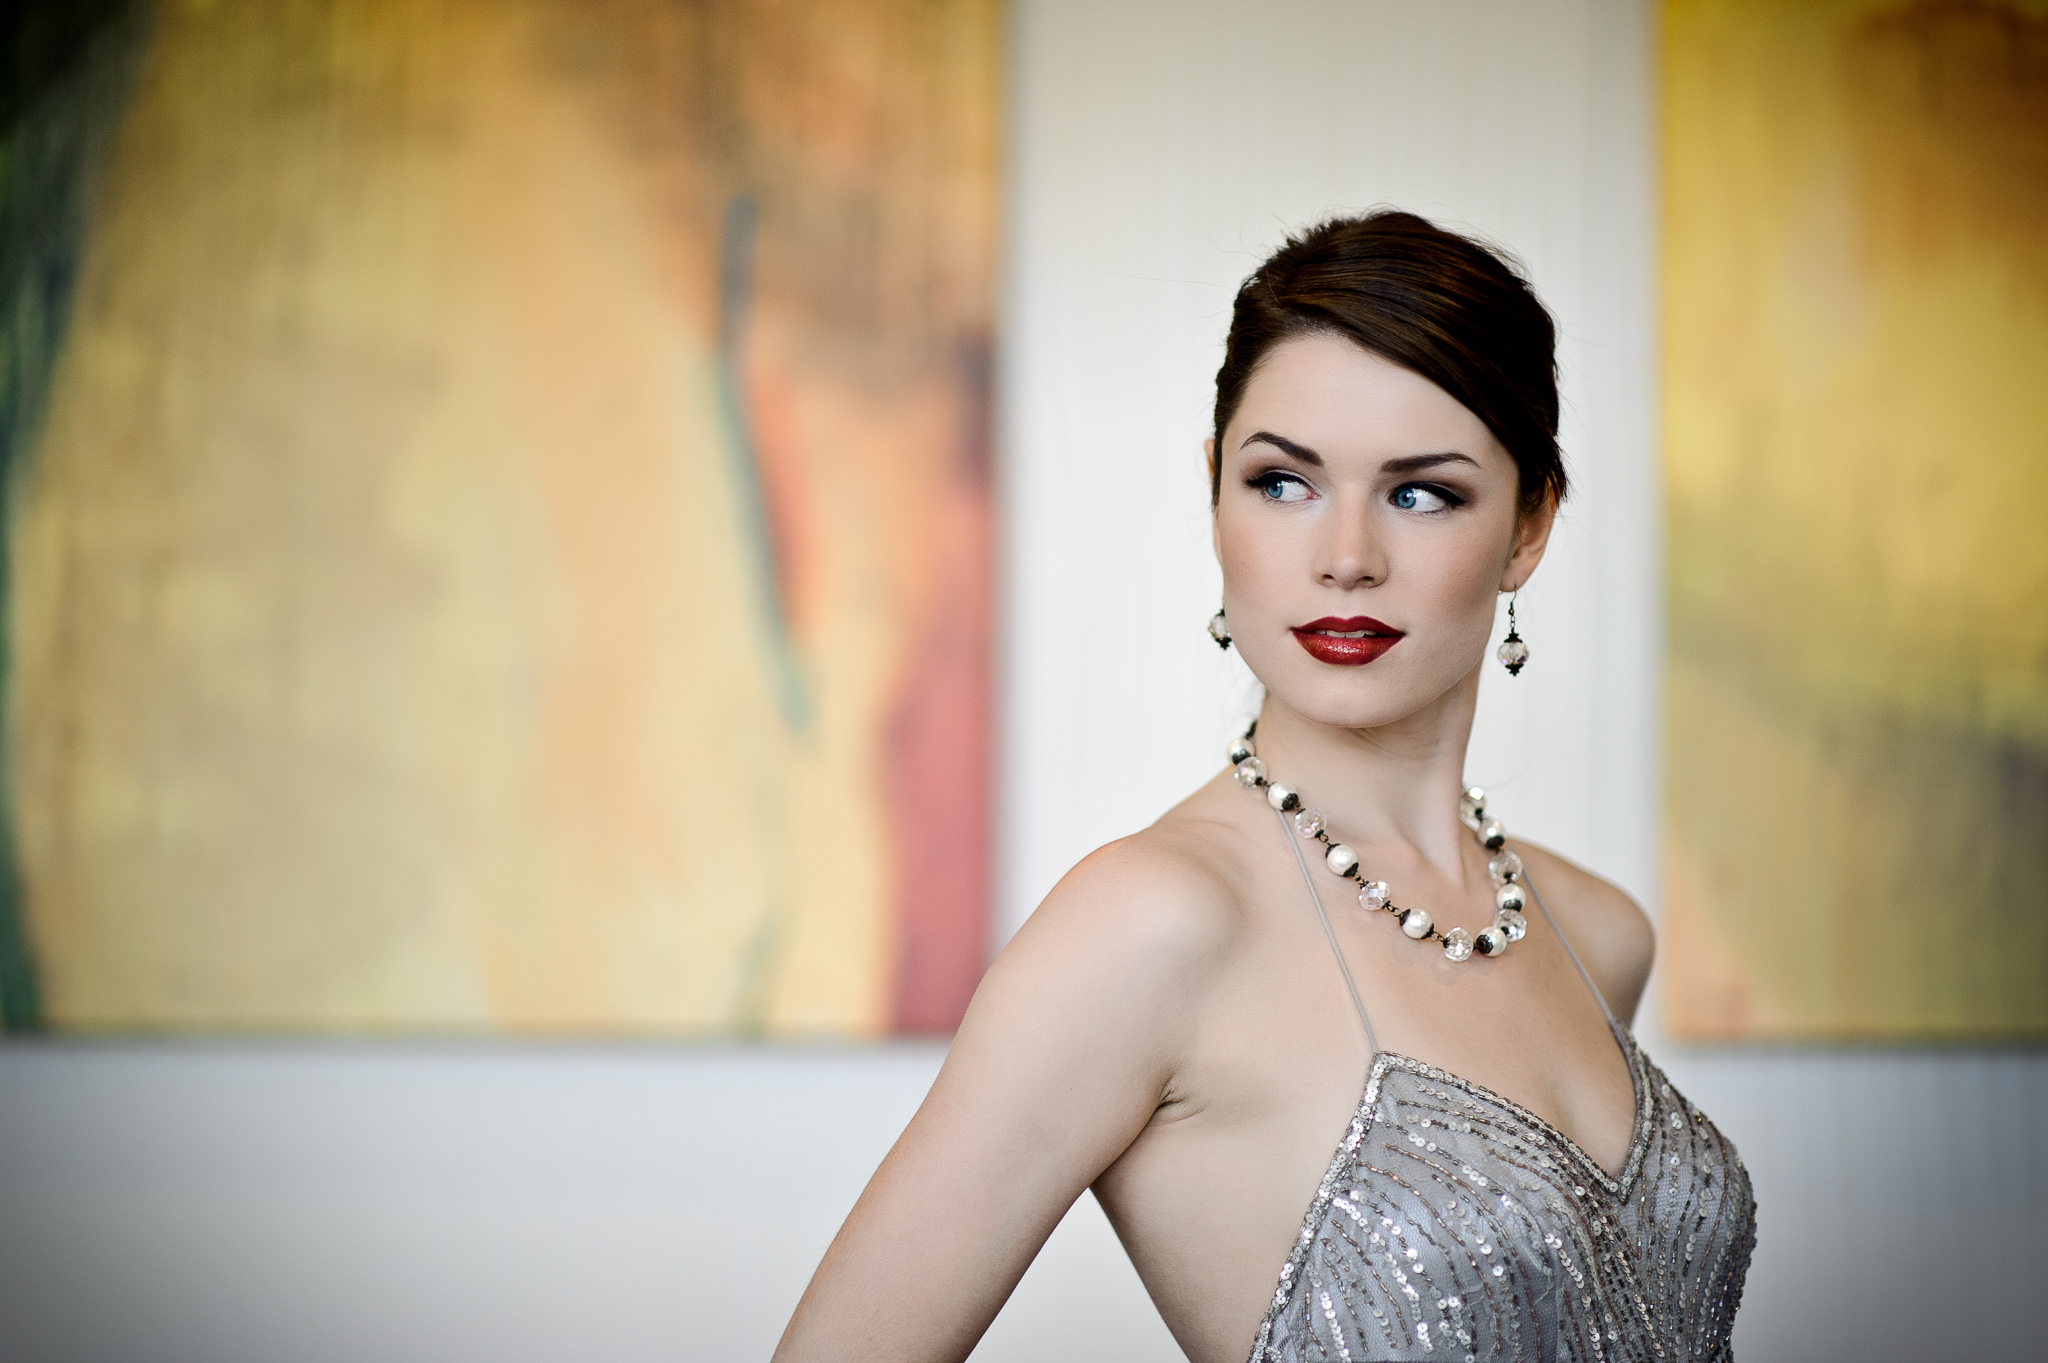
Nikon 85mm f1.4G Image Sample (44)

NIKON D750 + 85mm f/1.4 @ 85mm, ISO 280, 1/200, f/2.0

Technical Specifications:

  1. Focal length: 85mm
  2. Maximum aperture: f/1.4
  3. Minimum aperture: f/16
  4. Lens construction: 10 elements in 9 groups (with Nano Crystal Coat)
  5. Angle of view: 28°30’ (18°50’ with Nikon DX format)
  6. Minimum focus distance: 0.85 m/2.79 ft.
  7. Maximum reproduction ratio: 0.12x
  8. No. of diaphragm blades: 9 (rounded)
  9. Filter-attachment size: 77mm
  10. Diameter x length (extension from lens mount): Approximately 86.5 x 84 mm/3.4 x 3.3 in.
  11. Weight: Approximately 595 g/21.0 oz.
  12. Supplied accessories: 7mm Snap-on Front Lens Cap LC-77, Rear Lens Cap LF-1, Bayonet Hood HB-55, Flexible Lens Pouch CL-1118

Detailed specifications for the lens, along with MTF charts and other useful data for the Nikon NIKKOR 85mm f/1.4G lens can be found in our lens database.

Nikon 85mm f1.4G Image Sample (37)

NIKON D750 + 85mm f/1.4 @ 85mm, ISO 110, 1/200, f/2.8

2) Lens Handling

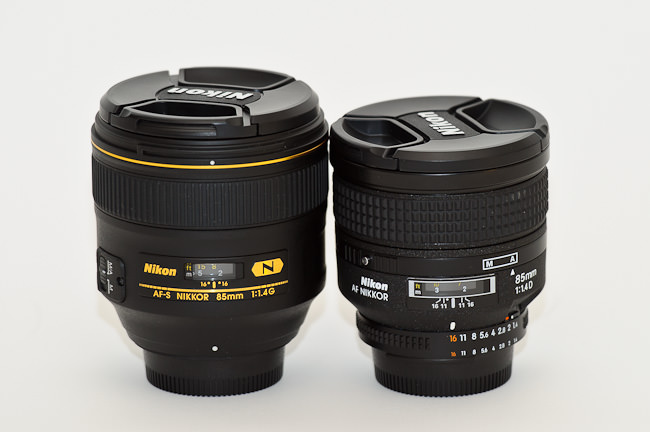
Just like all Nikon professional lenses, the new Nikon 85mm f/1.4 lens is built to last a lifetime with its rugged exterior and metal internals. It is designed to withstand tough weather and is well-protected on the outside against dust and moisture. The lens has been performing flawlessly under various weather conditions and I have used it under rain, snow and even sandy environments without any issues. It has a total of 10 optical elements in 9 groups and weighs a total of 595 grams, making it relatively easy to carry and handle. As can be seen below, the lens is both wider and taller than the old Nikon 85mm f/1.4D:

Nikon 85mm f/1.4G vs Nikon 85mm f/1.4D

Nikon 85mm f/1.4G vs Nikon 85mm f/1.4D

The Nikon 85mm f/1.4G feels very solid in hands and the focus ring is conveniently located in the front of the barrel, making it easy to manually focus with a thumb and index finger while shooting images or video. Another huge step over the AF-D version is the fact that you can simply rotate the focus ring while the lens is set in M/A focus mode to manually override autofocus, whereas you had to move the ring to “M” position before you could touch the focus ring on the 85mm f/1.4D. Thanks to Rear Focus design, the lens barrel does not rotate or extend, making it an ideal candidate to be used with various filters. The lens comes with the “HB-55” lens hood, which was specifically engineered for the Nikon 85mm f/1.4G.

Nikon 85mm f1.4G Image Sample (1-2)

NIKON D700 + 85mm f/1.4 @ 85mm, ISO 200, 1/125, f/2.2

Check out the Lens Comparison page to see more information about other differences between the two lenses.

3) Focus Speed and Accuracy

The autofocus performance of the Nikon 85mm f/1.4G is quite good, definitely better than on most other older-generation portrait lenses. When the lens focuses, it virtually produces no noise, due to the Silent Wave Motor (SWM) technology in the lens. One of the challenges when working with large aperture lenses like 85mm, is being able to correctly acquire focus on the subject when shooting at maximum aperture of f/1.4. The depth of field at f/1.4 is so shallow, that any movement by you or your subject will certainly affect the focus area and cause the image to have a shifted focus. You have to be extremely careful when shooting at large apertures between f/1.4 and f/2.8 and you need to pay close attention to such things as camera to subject distance, subject movement, close focus distance, etc. The biggest pain of the previous AF-D version of this lens was its autofocus system and its sporadic behavior in low-light situations.

Nikon 85mm f1.4G Image Sample (7)

NIKON D700 + 85mm f/1.4 @ 85mm, ISO 500, 1/800, f/1.8

The older Nikon 85mm f/1.4D certainly focused well when shooting in daylight, but as soon as the amount of light decreased (indoors or after sunset), autofocus would get extremely unreliable, forcing one to focus several times in order to get a reasonably sharp photo. The Nikon 85mm f/1.4G is much better in this regard, especially when coupled with the latest-generation Nikon DSLRs such as the Nikon D750 that have excellent low-light focusing capabilities. This difference alone made the 85mm f/1.4G worth upgrading to for many working professionals, including myself. It is very unfortunate when you take a fast lens with you to a concert or some other indoors event and you cannot get sharp images because the lens cannot properly acquire focus. I found myself defocusing and refocusing with the AF-D version a lot and it was certainly getting annoying, so I am glad that I no longer had to worry about that after I started shooting with the 85mm f/1.4G.

Nikon 85mm f1.4G Image Sample (10)

NIKON D700 + 85mm f/1.4 @ 85mm, ISO 320, 1/640, f/1.4

When it comes to autofocus speed, the Nikon 85mm f/1.4G is certainly slower than its predecessor though, as can be seen later on. The full rotation from close focus to infinity and vice versa takes a little longer when compared to 85mm f/1.4D (very similar behavior to Nikon 50mm f/1.4G vs Nikon 50mm f/1.4D), but the difference is not huge. What is more important – the speed of how quickly the camera snaps into focus, or how reliably it snaps into focus? I believe the latter is much more important, so I certainly do not mind the slower speed.

The post Nikon 85mm f/1.4G Review appeared first on Photography Life.


from Photography Life https://photographylife.com/reviews/nikon-85mm-f1-4g

Thursday, 1 December 2016

When in Doubt, Bracket!

On any photographic forum, it doesn’t take much effort to find old or new discussions on how to set the “proper” exposure while shooting, and even what exactly “proper exposure” is. The question of setting exposure was and is one of the most commonly-discussed topics on forums and blogs. Newbies (and not) bring it up again and again and receive all sorts of explanations – long and short, deeply “scientific” and completely “practical”, starting with advice to use the in-camera histogram, “zebras”, manual exposure mode, corrections and compensation, special camera modes to increase the dynamic range and increase the reliability of the histogram and other overexposure indicators, a separate exposure meter, Adams’s exposure formula, metering the incident light, spot measurement, a grey card, the back of one’s hand, green grass, an ExpoDisk, the sunny 16 rule, Magic Cube, etc., etc.
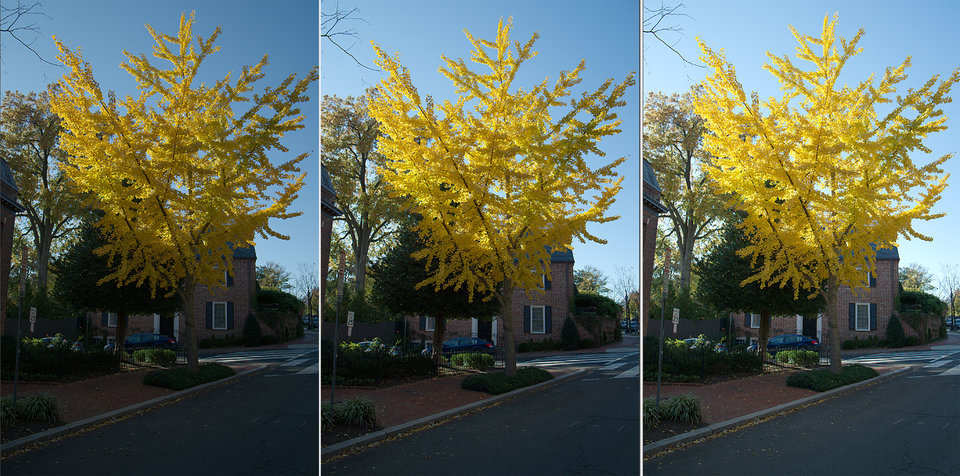
Fig1_GoldenTree

Figure 1

The number, volume, and force of the emotions present in discussions about correctly setting exposure for each shot, the number of gadgets and tricks to achieve the result, as well as the number of articles written on this topic create the impression that the one and only purpose of a photographer is to shoot based on the principle of “one shot, one kill”. The ability to immediately nail the exposure for each shot is viewed by some almost as an indicator of a photographer’s skill.

But if one thinks through the Internet fury, the sheer amount of contradicting advice and the number of gadgets indicate that there is no sure way to set the exposure “correctly” for a general case, especially when the light is not particularly good, and the contrast in the scene is high (often referred to as “high dynamic range”). The logical choice seems to use exposure bracketing, however the use of exposure bracketing by a photographer is often viewed as a “dirty trick”, bordering on bad taste – mauvais ton, the last resort, where it should be the exact first one.

Often, an experienced professional photographer will, upon hearing the question of how one should choose exposure while shooting, respond that you should “Bracket your shots when the lighting conditions are complex. Or, even better, bracket all of your shots. I do it all the time“. That’s because problems with exposure are not something that only a novice can encounter; of course if one is not a full-time pro, he has more of those.

One of the reasons why is that the camera won’t show you what a raw converter can do in terms of highlights recovery or noise reduction. Worse, even if you are shooting raw, camera will still display a JPEG, and on a rather tiny screen. Essentially, for the aforementioned reason and for others (choices of cropping and the final size being some of those), we know for sure that exposure is good or bad only while processing the raw on a computer.

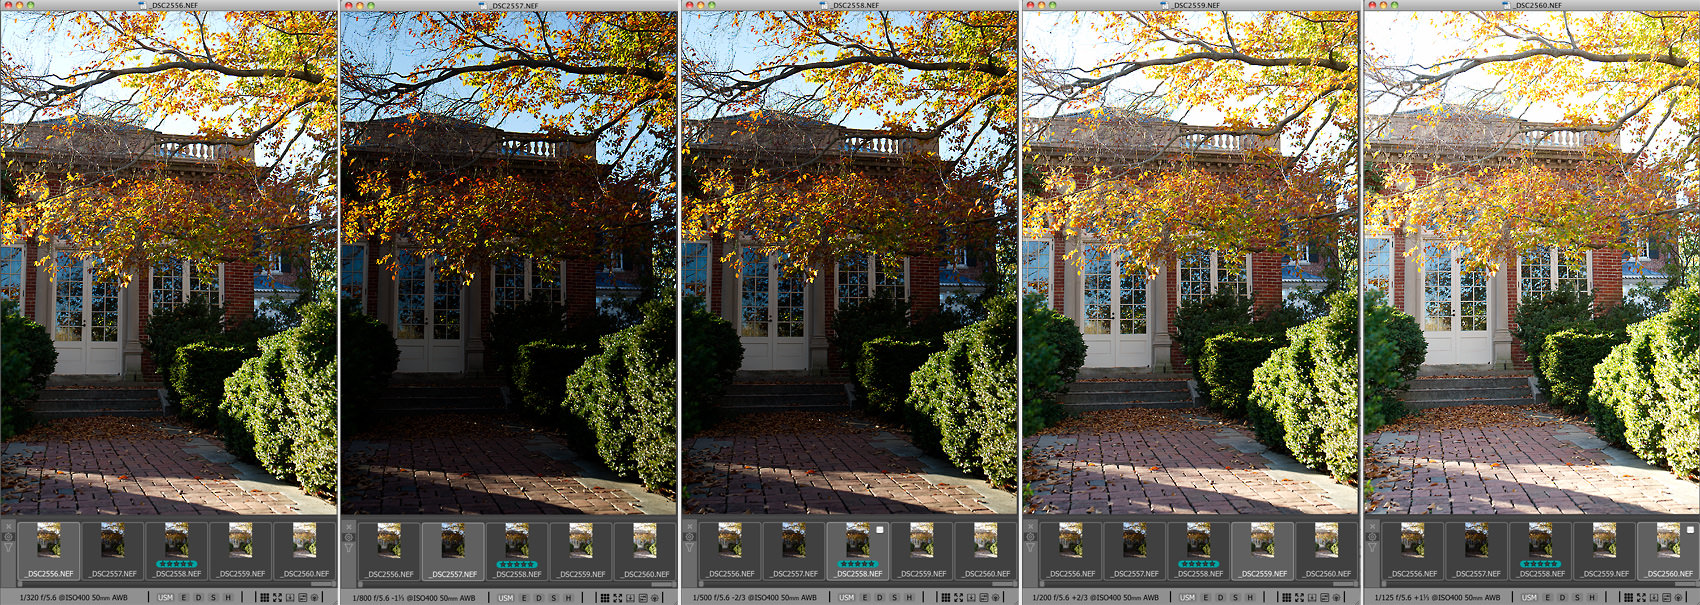
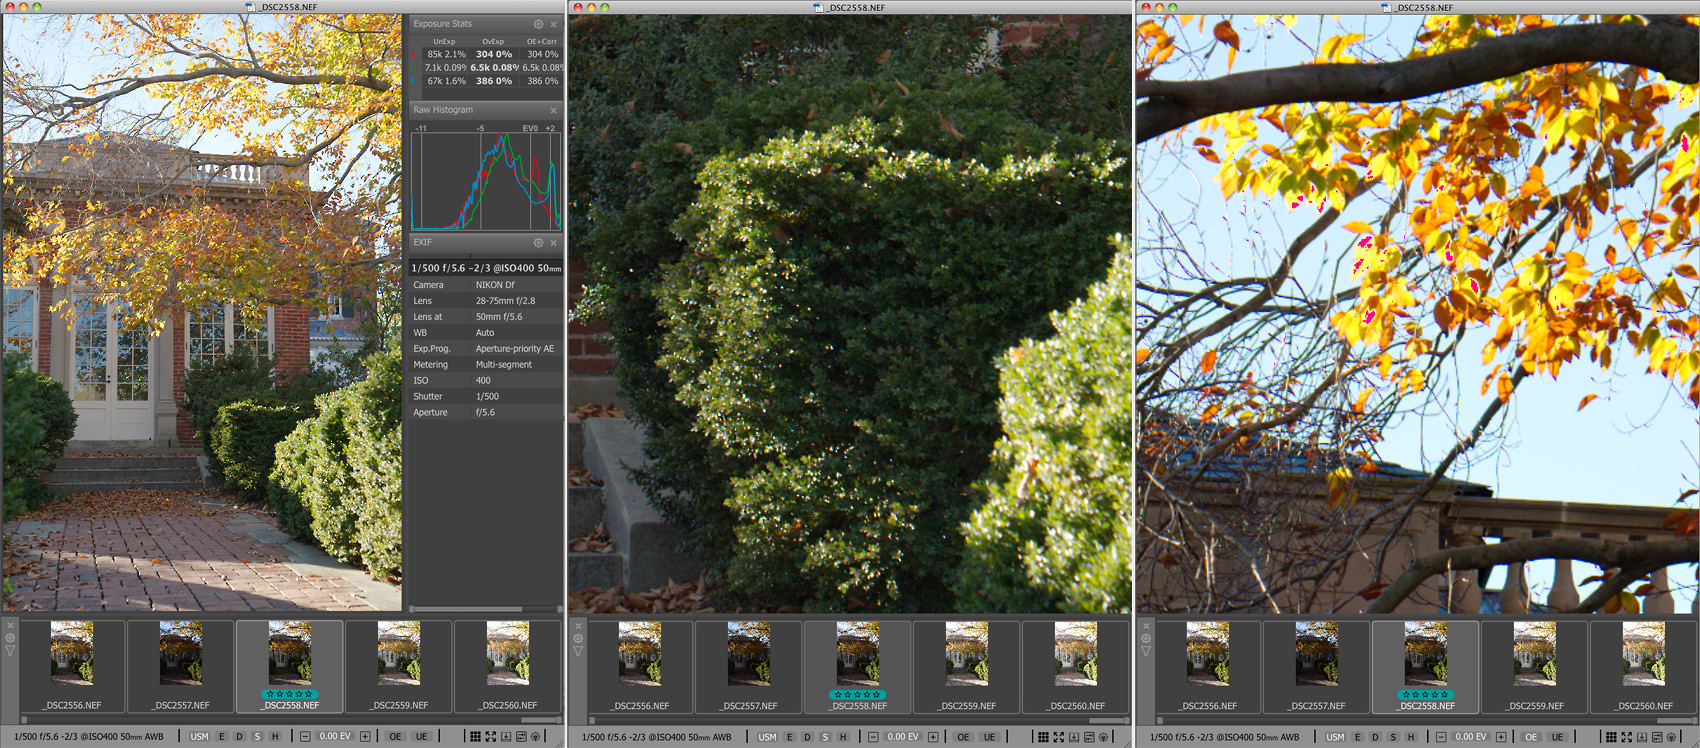
To illustrate this article, we decided to preform an experiment. It was a sunny day, we set the camera to aperture priority, matrix metering, and the bracketing was set to 5 frames, in a progression 0 EV, -1 1/3 EV, -2/3 EV, +2/3 EV, +1 1/3 EV. To keep the experiment “clean”, the camera was given to a complete novice, the shooting time was limited, and we intervened only once (we will explain why and how a little later). To evaluate the results, we used our FastRawViewer with its raw histogram, exposure statistics, overexposure overlay, shadow boost, highlight inspection, exposure compensation, focus peaking tools.
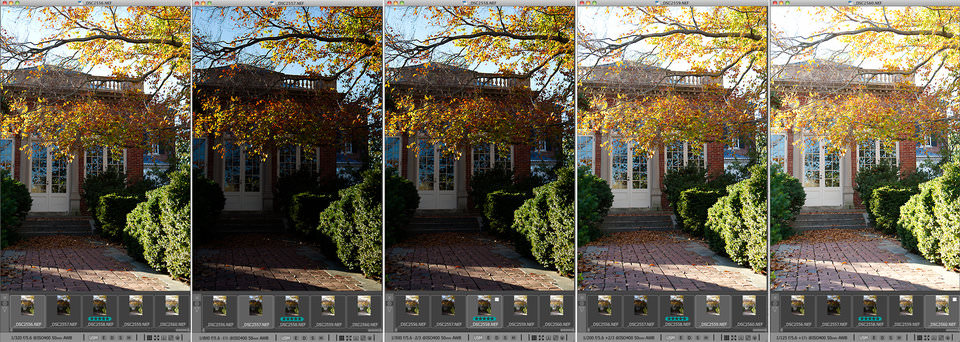
Fig2_2556_2560_full

Figure 2. series 2556-2560.

On scene 2556 (to the left, auto-exposed with zero exposure correction), the sky is already blown out and has no color; for shots 2559 (+2/3 EV) and 2560 (+1 1/3 EV) the clipping in the sky is obviously worse.
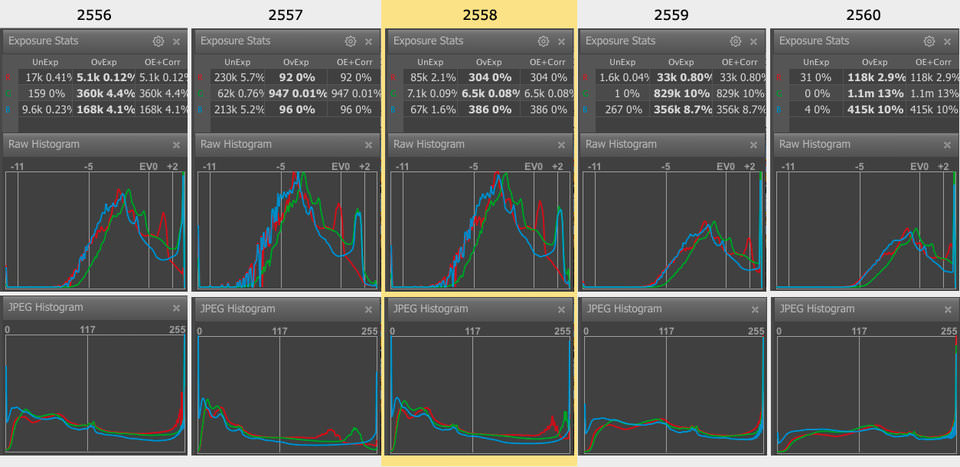
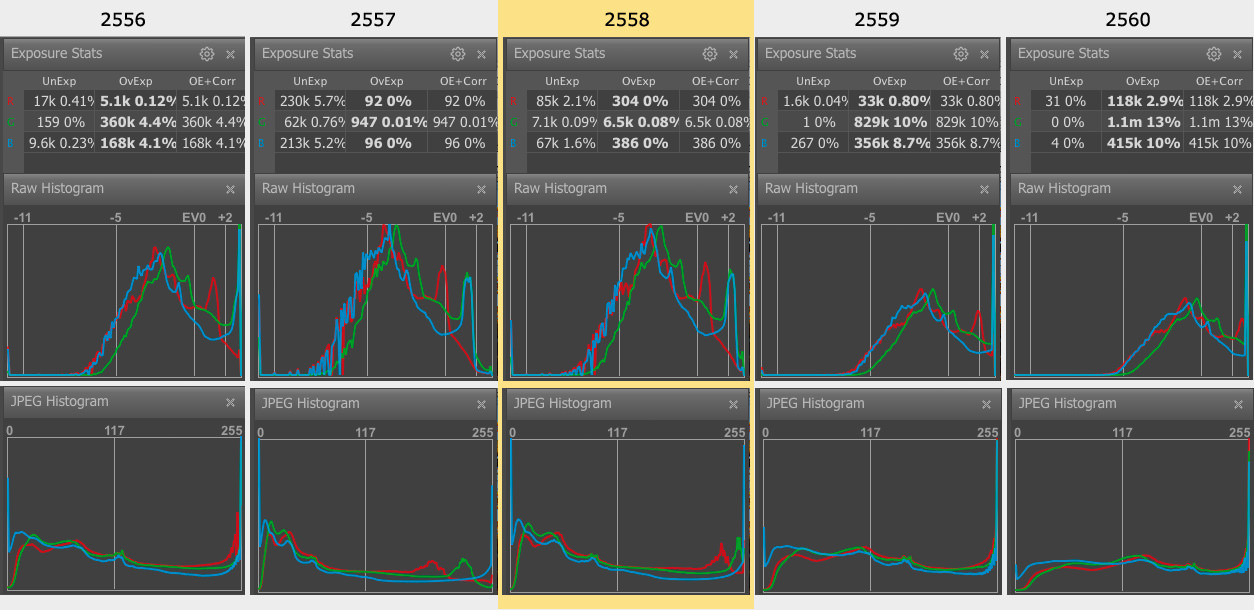
Fig3_2556_2560_Histograms_Exposure-Statistics_

Figure 3

Shot 2557 (-1 1/3 EV): there’s a bit more underexposure in the blue and red channels, as Exposure Stats shows, than would be desired. Notice that the histograms of the embedded JPEGs (bottom row) don’t point to a single useful shot – they’re all underexposed and overexposed at once, according to those JPEG histograms…
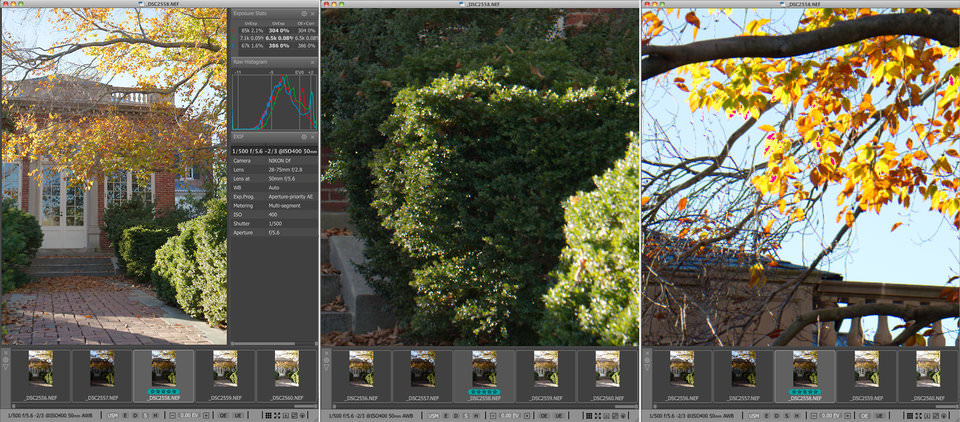
Fig4_2558_Shadow-Boost_OE-Indication

Figure 3

The best-exposed shot of the scene is 2558 (-2/3 EV): using Shadow Boost in FastRawViewer, we can immediately see that the details in the shadows are well-preserved (the image on the left) and that the shadows don’t have much objectionable noise (middle image); furthermore, the sky and highlights are intact, with only a few overexposed pixels on some of the leaves (the image on the right)

In reality, the idea of “one shot, one kill” is, in photography, quite often an artificial constraint, especially considering that, on the one hand, “once in a lifetime” shots generally don’t need excessively precise exposure, and on the other hand the frame rate of cameras is constantly being improved. At a speed of 5 frames per second and more, with ever-expanding flash card volumes, the possibility of missing a moment because of bracketing falls (and is certainly less then the possibility of missing it due to the waste of time while chimping). And when shooting landscapes and landmarks, this probability to miss The Shot because of bracketing falls practically to 0.

Furthermore, exposure bracketing and the review of the results thereof allows one to gain experience over time and learn how to set more accurate exposure immediately when the situation necessitates it. However, despite this hard-won ability to set accurate exposure off the bat, professional photographers continue to use exposure bracketing when the shooting situation permits – if for nothing less than the peace of mind.

During the time of film photography, a professional “wage laborer” photographer knew that he had to turn in useable shots from every shoot. Different organizations had different standards, demanding somewhere between 10 to 30% of useable shots. As a result, as soon as bracketing became possible with cameras, photographers began wasting less time trying to guess or calculate optimal exposure (despite the fact that film and development cost money, with good film and good development costing a pretty penny), and professionals used the results of the exposure meter but often used bracketing as well (especially if the shot had particularly complex light) – that is to say, he’d take several shots above the recommended exposure value and several shots below. After development, he’d pick the best shot. Yes, the number of shots for development and the culling grew, sometimes the price for film (and processing) bracketing demanded came out of the photographer’s pocket, but this way of doing things guaranteed a higher amount of useable shots, better pay, and better career prospects.
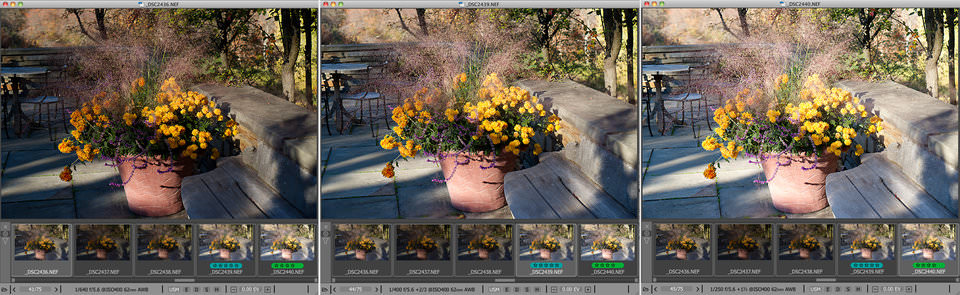
Fig5_2436-2440

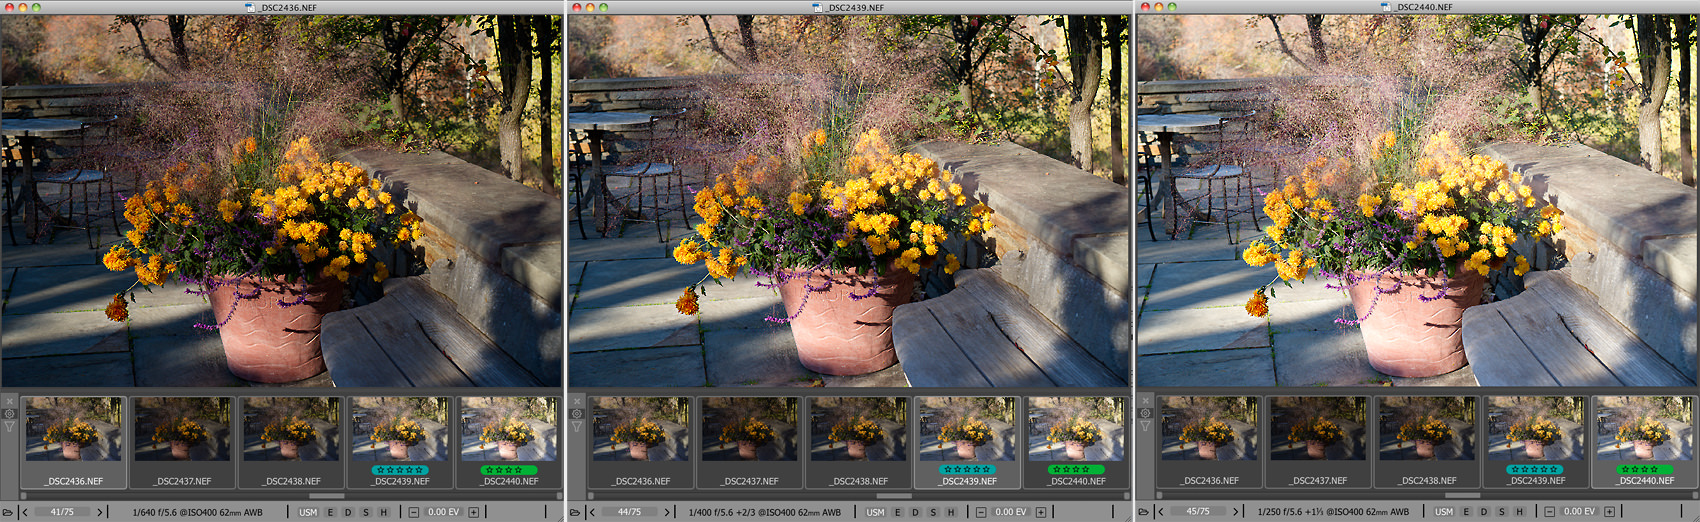
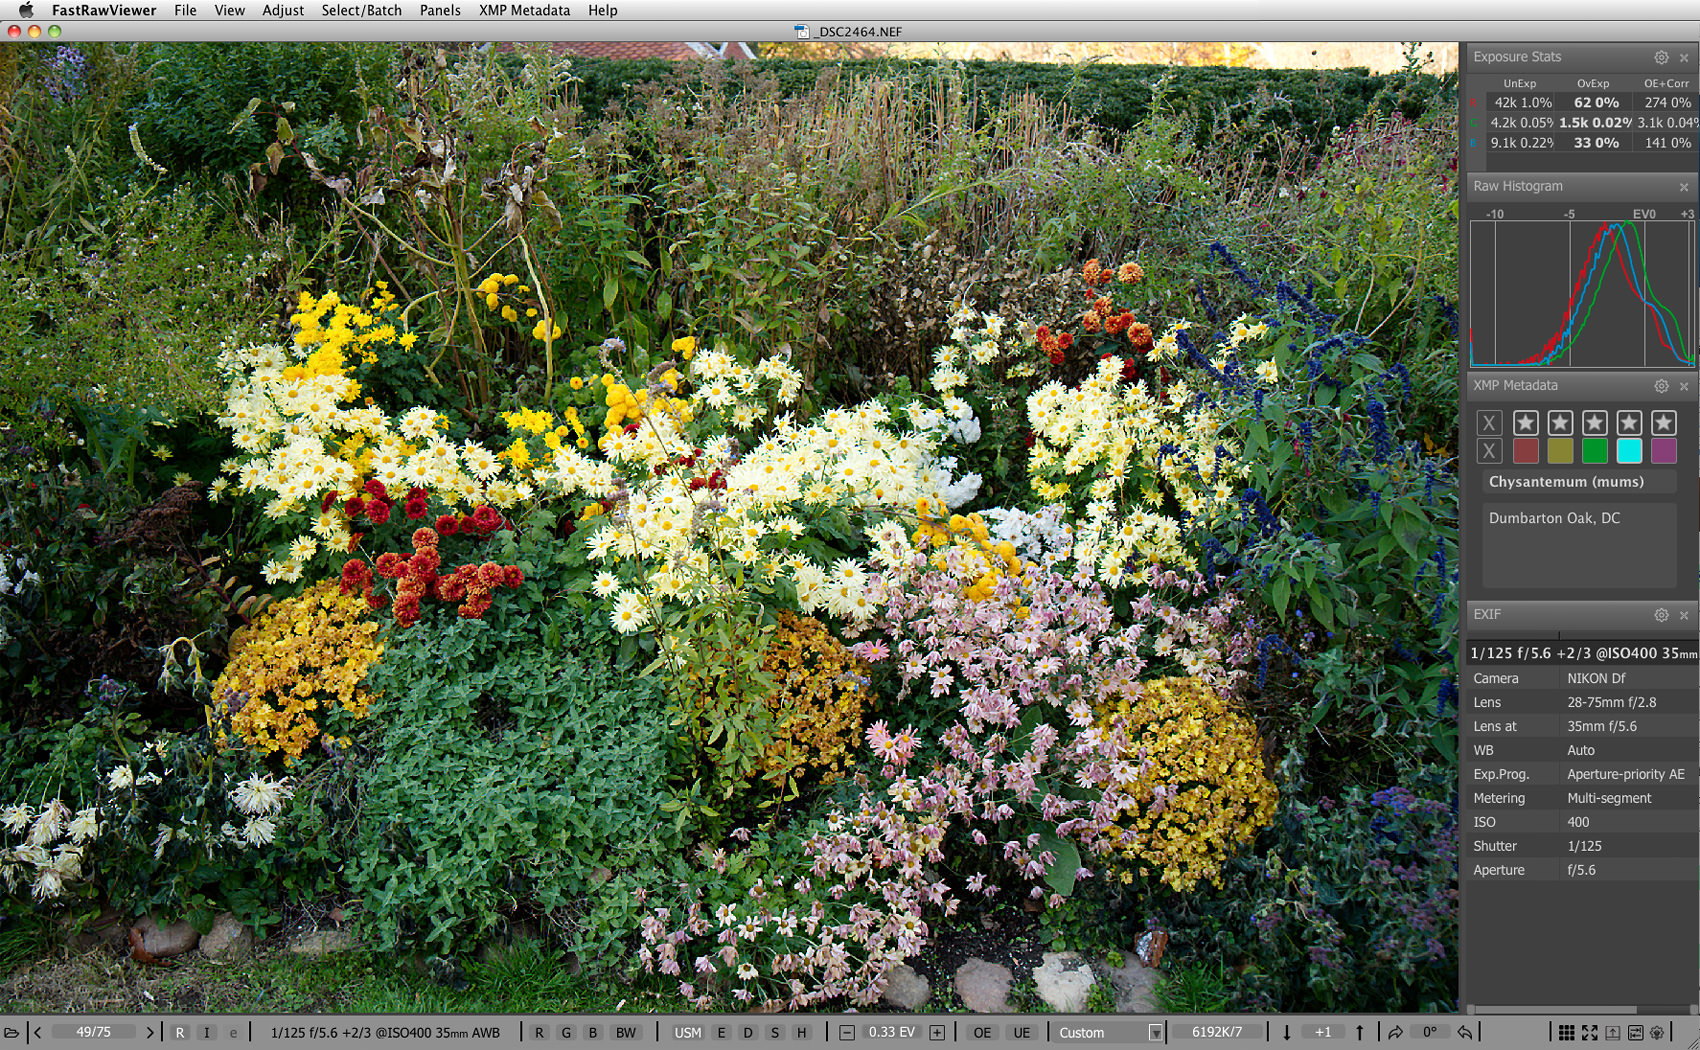
Figure 5. Series 2436-2440: the images shown are 2436 (autoexposure) – left, 2439 (+2/3 EV) – center, and 2440 (+1 1.3 EV) – right
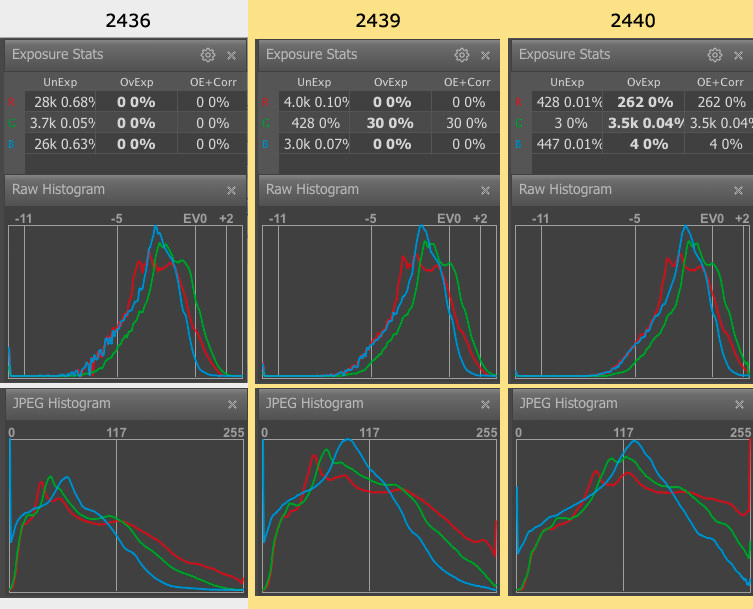
Fig6_2436-2439-2440_RAW-and-JPEG-Histograms_Exposure-Statistics

Figure 6

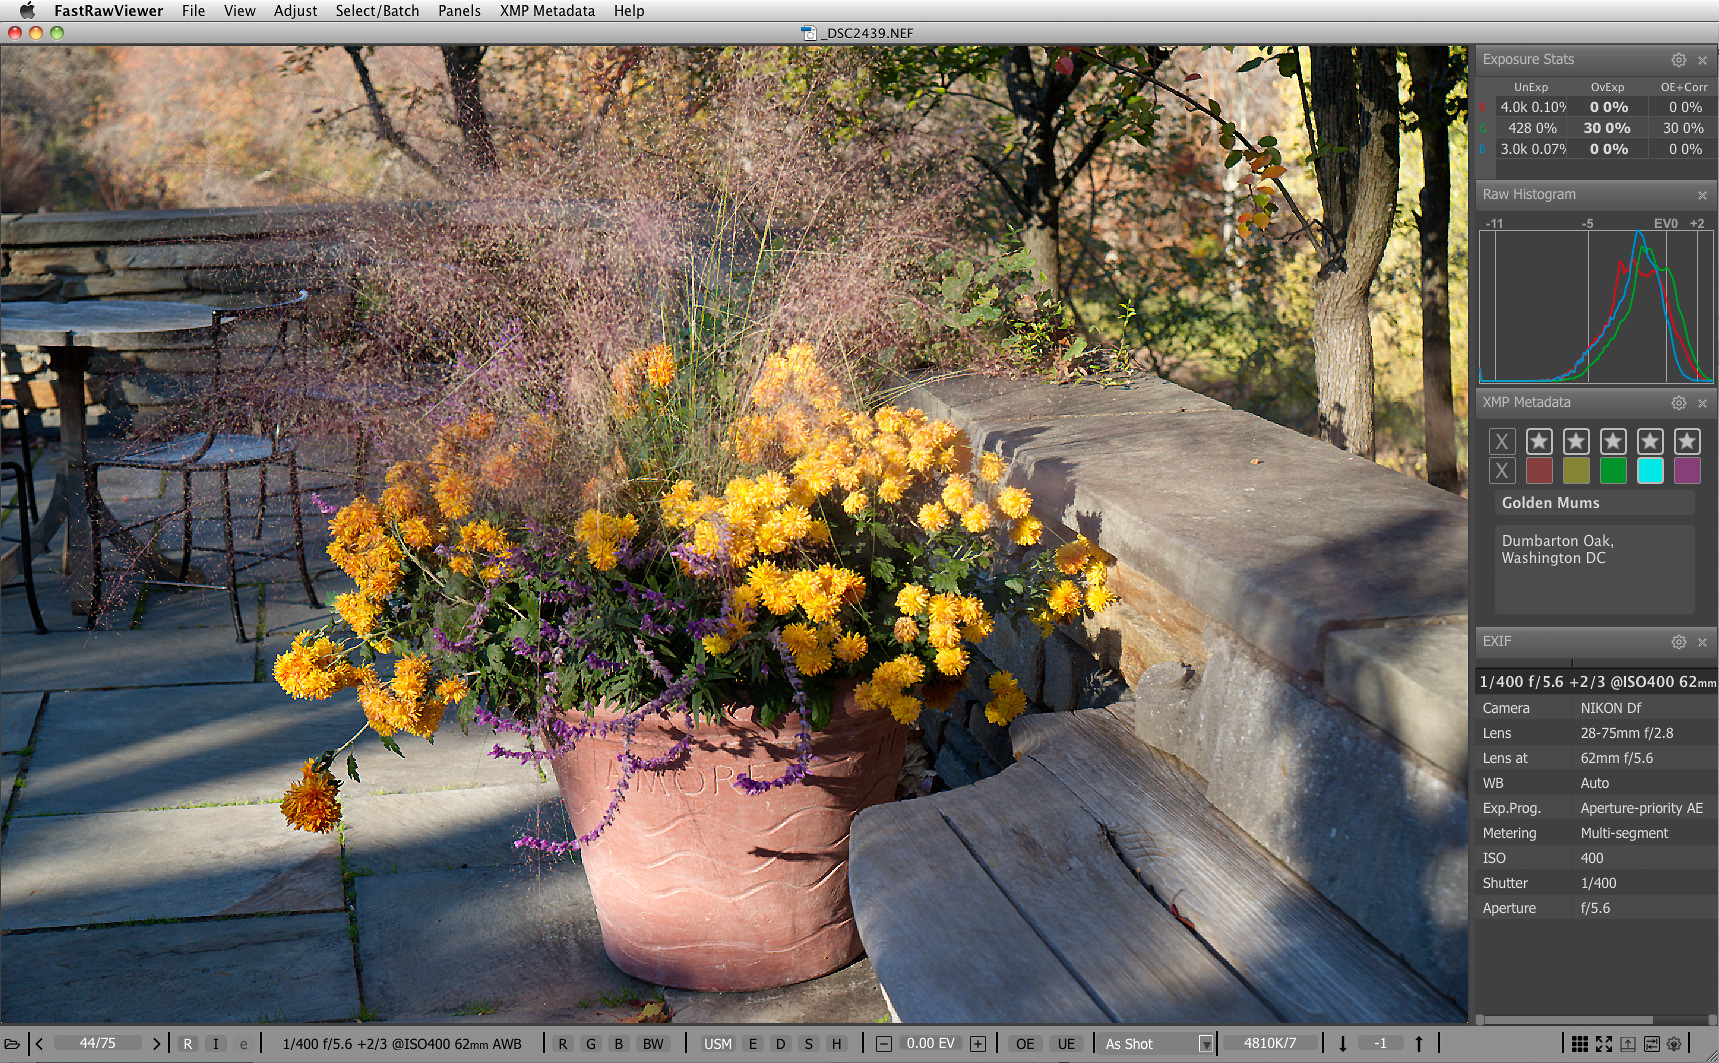
The histogram and RAW statistics show that shot 2440 is exposed almost perfectly, however the histogram for the embedded JPEG insists that it’s underexposed in all channels and is VERY underexposed in the blue channel. The same situation is visible with shot 2439. So much for trustworthiness of JPEG histogram! Depending on the how the image is going to be displayed (in terms of size, media, etc.), and the quirks of the converter being used, one could choose either of the two shots.
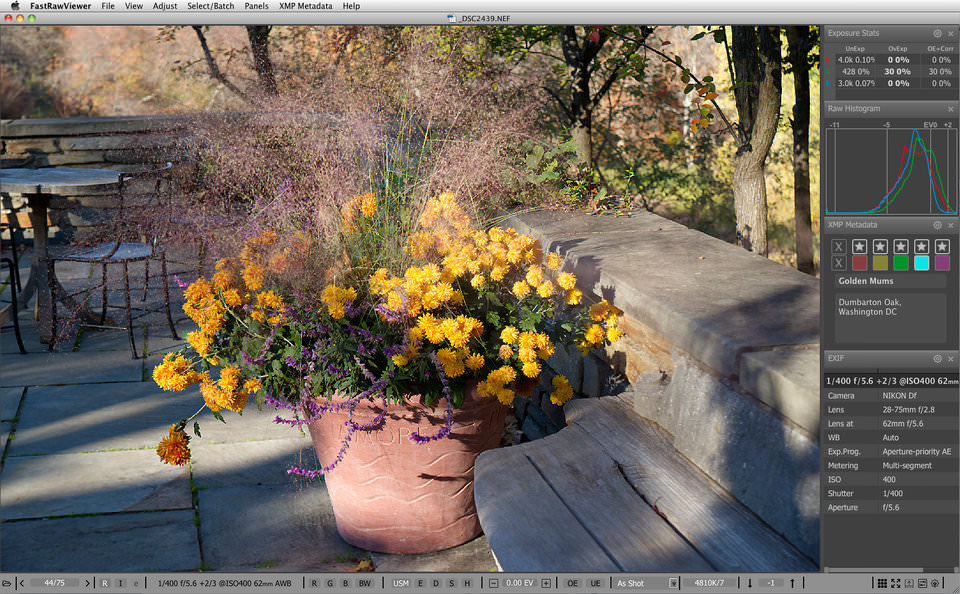
Fig7_2439-OnScreen-Sharpening_Contrast-Curve

Figure 7

We chose 2439, because we wanted to preserve as much details on the illuminated chrysanthemum petals as possible (those areas that were blown out in shot 2440) and didn’t want to risk those details being poorly reconstructed in a converter. However, as we noted above, depending on the circumstances of conversion and display, shot 2439 could also be chosen.

Furthermore, sometimes the shot picked out of a bracketed series wasn’t the one the exposure of which was the best technically speaking, but rather one that was a bit “over” or “under” exposed, because it better reflected the moment or the photographer’s analysis of the scene. In many places that trained pro photographers, the iron-clad lesson used to be that one always bracketed, even with wide format and expensive film.

With the development of digital cameras having the screen on the back of the camera, photographers got the idea that the problems that came into being on film cameras were a thing of the past: one no longer needed to take film to be developed to see just one photograph – now, one could look at the camera screen, instantly see the image, and understand whether the exposure was correct or not. This led to the idea that bracketing was unnecessary.

However, let’s consider a situation where you’re not shooting in a studio, but rather in a crowded or uncomfortable place, with changing light, changing scenery, etc. Instead of shooting, shooting, shooting, and then later looking at the images, you’re taking one shot, looking at the screen (damn, the sun has completely covered everything up and you can’t see anything, have to turn or move, which means the composition is now lost and needs to be found again), you’re being pushed around by people walking past you, you’re trying to understand what part of the exposure isn’t what you want, you’re frantically moving the various settings, and finally having set everything “just right” you realize that the scene is gone – the crowd left, or the opposite happened and a crowd blocked your view of something, or the light is different, or that pretty bird flew away… While you were looking at intermediate shots and changing settings, nothing was left to be photographed. When shooting, it’s better to not take away your eye from the viewfinder and have it ready to shoot, not to be in playback mode.

And now let’s remember the sad fact that photographers (and even then, not nearly all) only recently began to realize, that the camera screen shows an already-processed in-camera JPEG and its histogram and not raw, and that the difference between a raw histogram and a JPEG histogram is quite dramatic. Judging one by another is close to impossible, and “optimal” exposure for raw and “optimal” exposure for JPEG almost never coincide and can differ by a stop or more.

Even if by some miracle you manage to quickly judge the quality of the in-camera JPEG by the screen of the camera, and very quickly correct the exposure according to what you saw, the correctness of the exposure of the raw image is still going to be suspect.
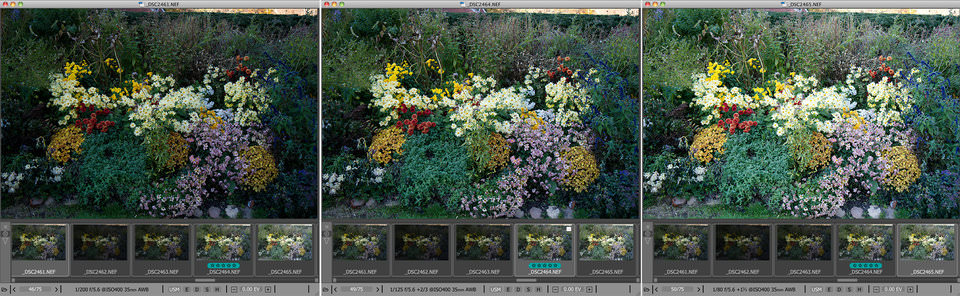
Fig8_2461-2465

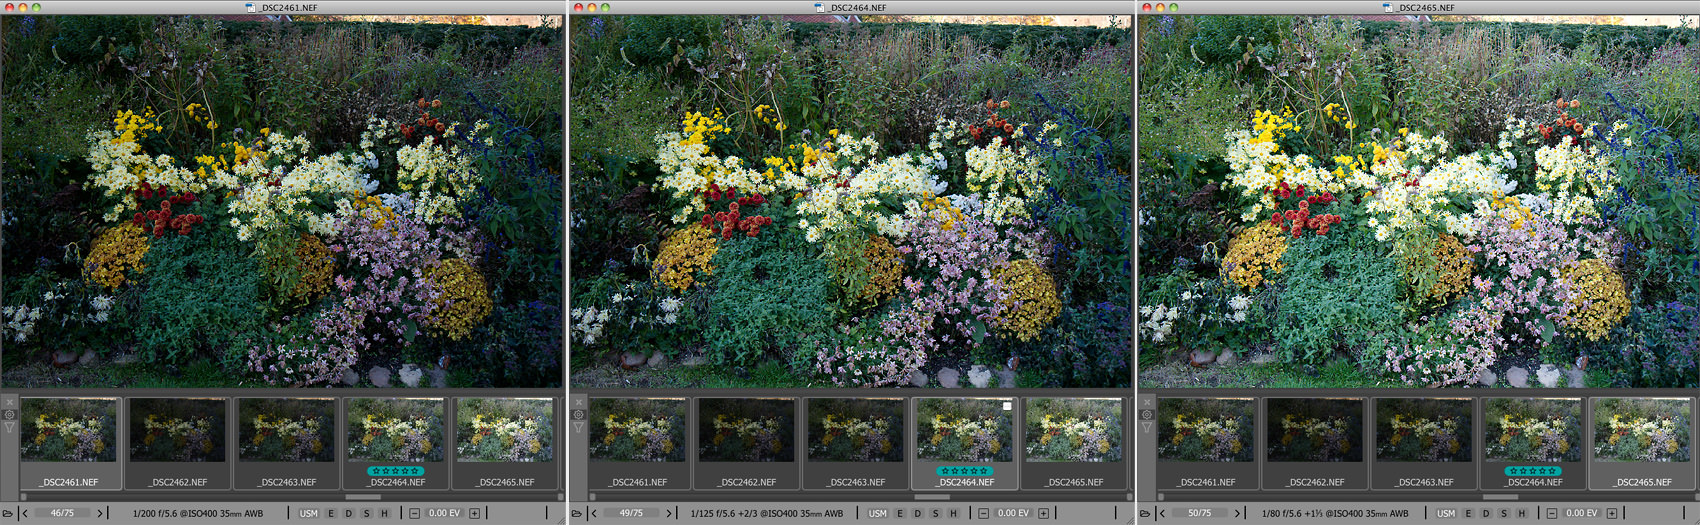
Figure 8. Series 2461-2465. The images shown are 2461 (autoexposure) – left, 2464 (+2/3 EV) – middle, 2465 (+1 1/3 EV) – right

For this scene, we’re going to choose the shot with completely preserved highlights on the elements of the scene that we deem to be the most important – the bright chrysanthemums. It’s easier for a converter to deal with restoring highlights in the sky, than trying to restore small illuminated details that got overexposed.

Fig9_2461-2464-2465_RAW-and-JPEG-Histograms_Exposure-Statistics

Figure 9

The details on the chrysanthemums in shot 2464 are completely preserved (though the JPEG histogram shows an impressive amount of overexposure in the highlights).
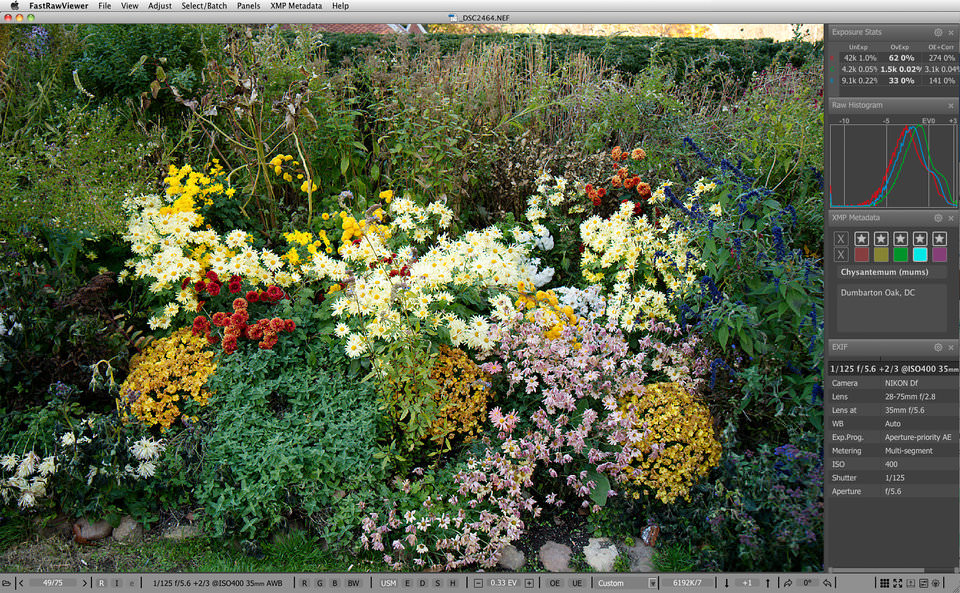
Fig10_2464_Exposure-Correction_Contrast-Curve

Figure 10

While converting shot 2464, we can apply an exposure compensation of 1/3 EV and not worry about any blowouts at the top-right corner of the image – we were going to crop it off anyway.

Some photographers say that, for their camera, they’ve already calculated the delta between optimal exposures for raw and JPEG, and therefore by looking at the JPEG, they can, considering this delta, set optimal exposure for raw. Unfortunately, this delta can change depending on the ISO setting, the distribution of brightnesses in the scene, white balance, and the colors present in the scene. And this also means that instead of taking pictures, the photographer is spending his time doing math problems in his head and playing with settings.

We sometimes tend to forget that the correctness of the exposure, in the overwhelming majority of cases, can only be judged afterwards, in the comfort of your digital darkroom – for example, all of the highlights are alright, but the shadows are so dark that any attempt to raise them reveals noise, color blotches, stripes. This will only be seen in a converter. Furthermore, different converters deal differently with raising shadows and recovering highlights, and different cameras are differently noisy, and even differently depending on the ISO speed set for them. Another consideration is that those shots that converters can’t deal with today because of their exposure “issues” might become quite doable in a few years – converters with their recovery algorithms and noise reduction methods most certainly progress.

Finally, different noise-suppressing programs have different results, and with different sizes on the display or during printing, the noise can look different. The visibility of the noise is also affected by the texture of the paper. We’ll repeat: exposure can be evaluated when preparing a shot for demonstration, and a shot can’t always be re-taken.
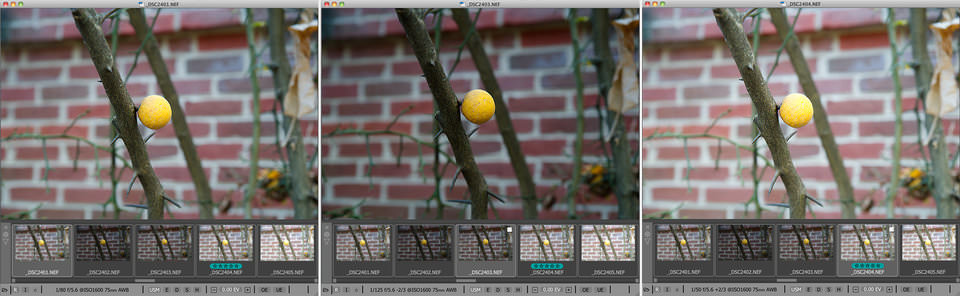
Fig11_2401-2405

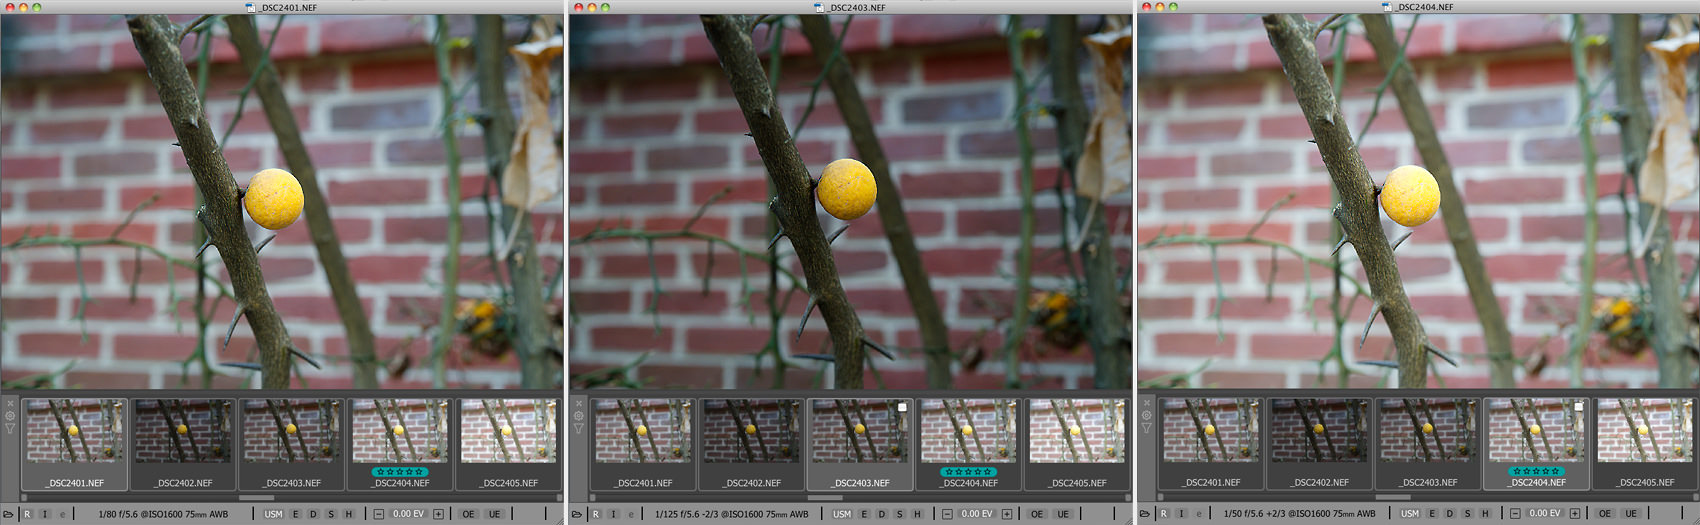
Figure 11. Series 2401-2405: the images shown are 2401 (autoexposure) – left, 2403 (-2/3 EV) – middle, 2404 (+2/3 EV) – right
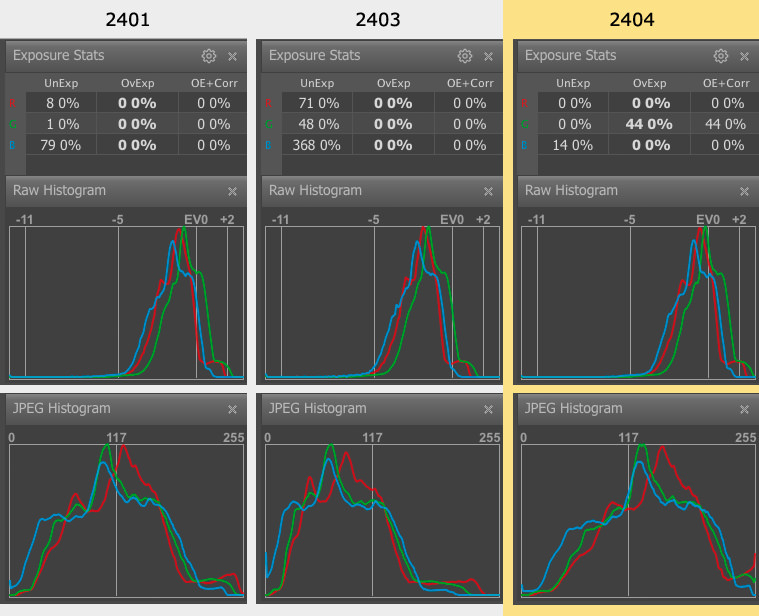
Fig12_2401-2403-2404_RAW-and-JPEG-Histograms_Exposure-Statistics

Figure 12

Based on the RAW histogram and statistics, the shot that we like the most is 2404, which is exposed almost ideally to the right (the JPEG histogram, as usual, shows overexposure and slight underexposure).
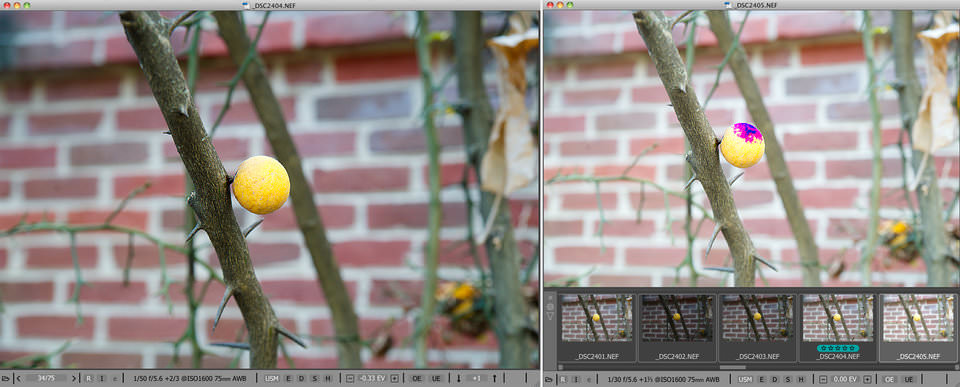
Fig13_2404-2405_Exposure-Correction_OE-indication

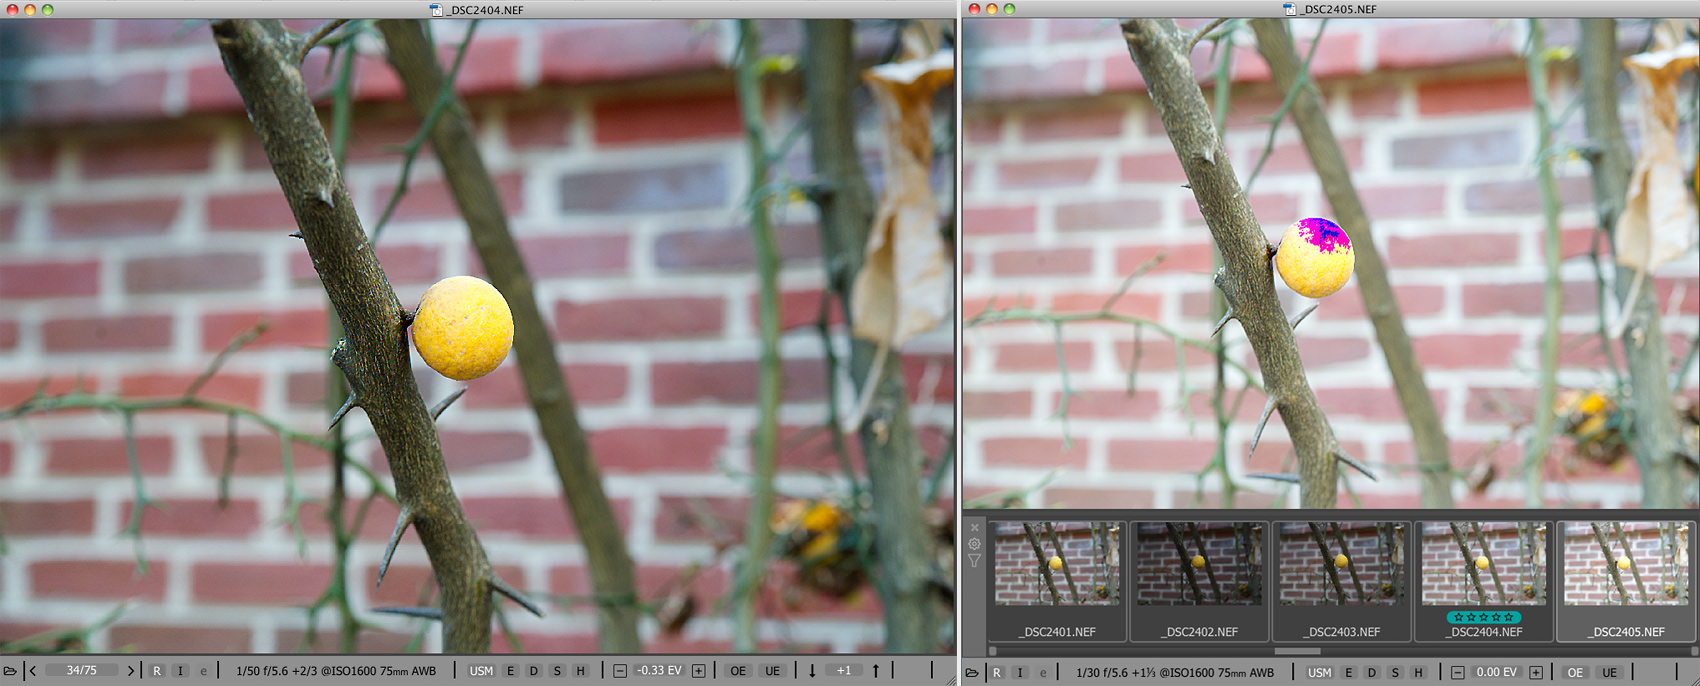
Figure 13

Although the last shot in the series (2405, the shot on the right) is exposed much more to the right, we won’t use it because it already has some pretty serious overexposure on the orange, the texture of which it may be impossible to restore in a converter. Shot 2404 can, if we want, have an exposure correction of -1/3 EV applied to it in the converter (shot on the left).

Knowing the light sensitivity of a material isn’t enough to set optimal exposure, because exposure changes for different parts of the scene depending on how they’re illuminated in the scene and the reflectivity of the objects in the scene. The camera’s AI is powerful, but it can’t read minds. It doesn’t know what the photographer’s intention is, and what shadows / highlights in the scene the photographer is willing sacrifice.
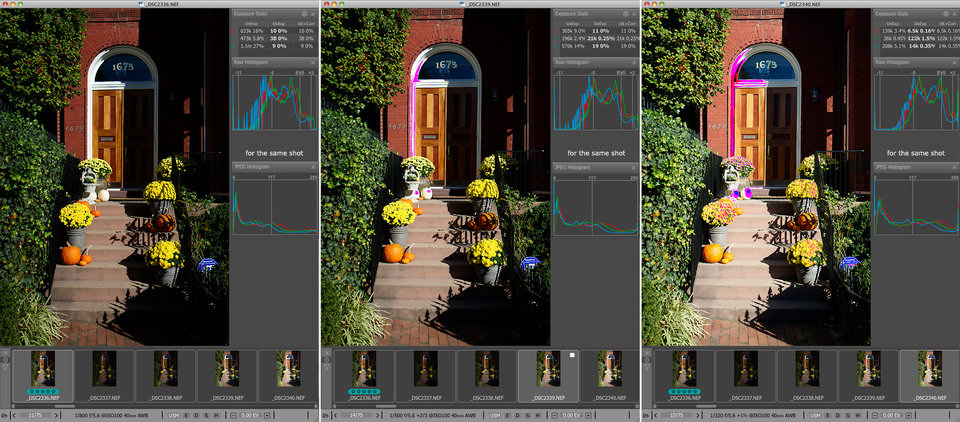
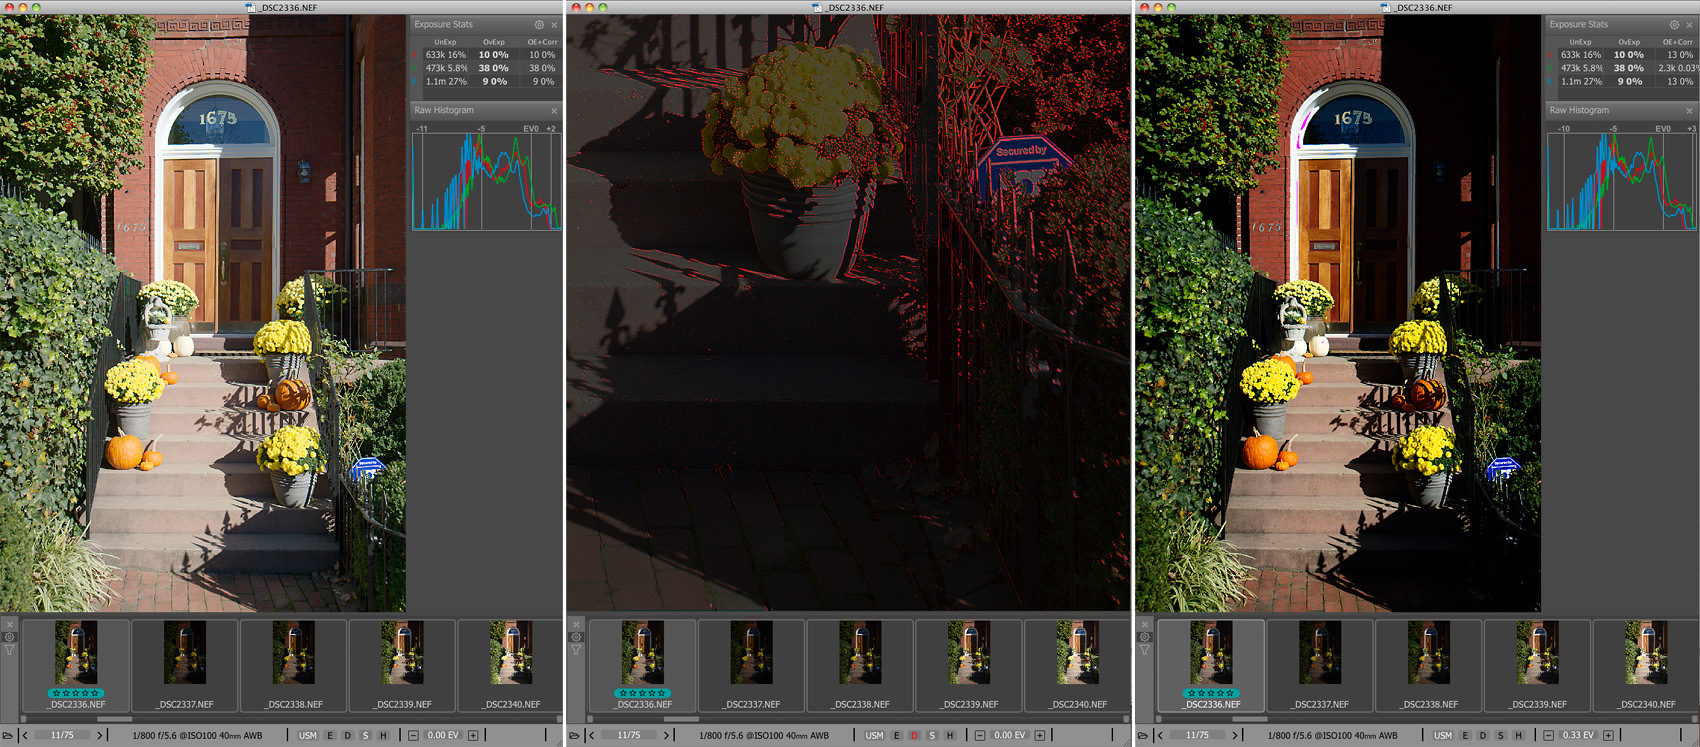
Fig14_2336-2340_OE-Indication

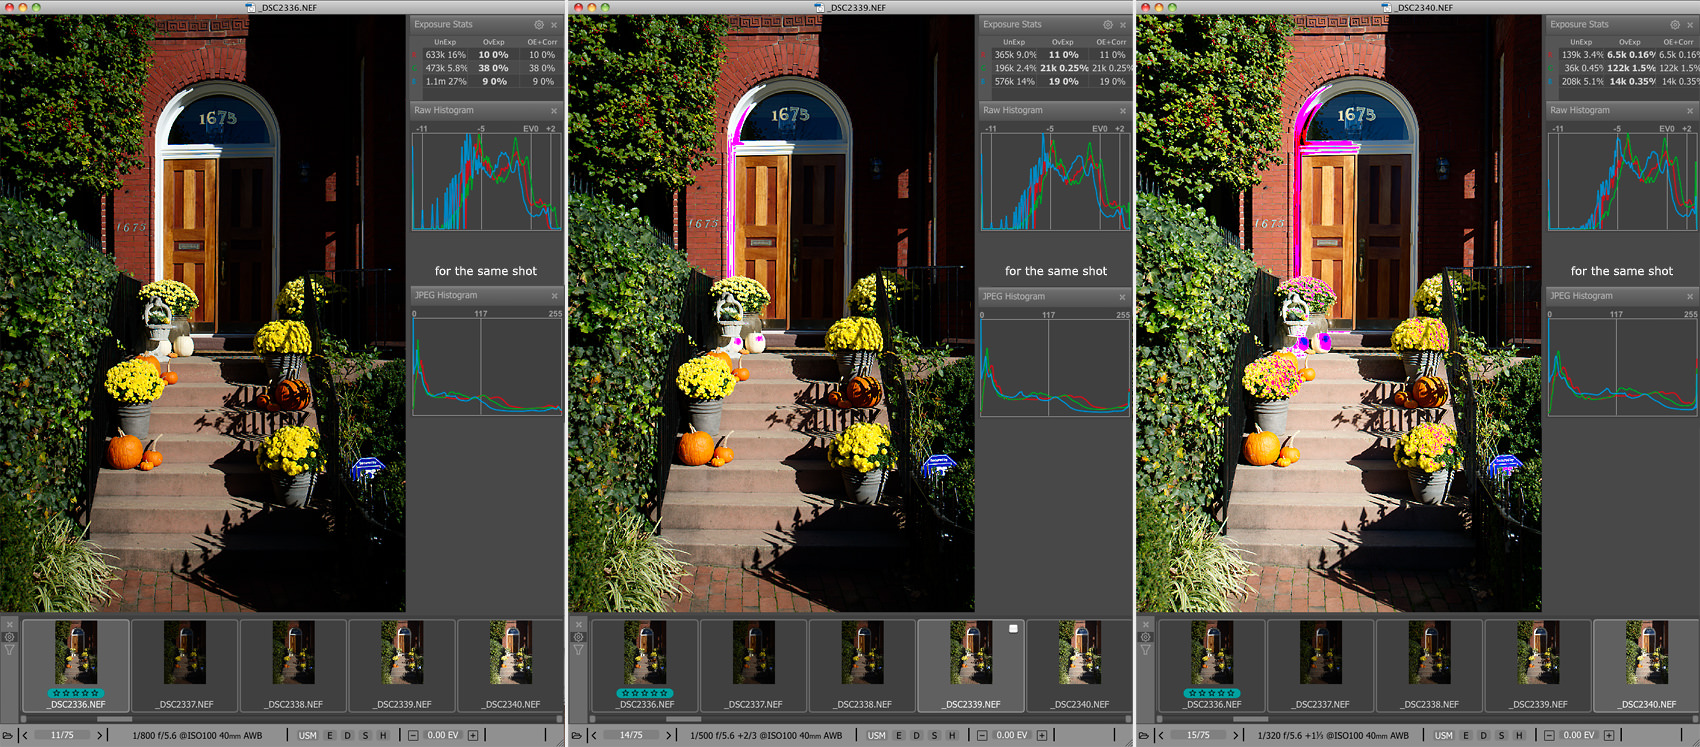
Figure 14. Series 2336-2340: the images shown are 2336 (autoexposure) – left, 2339 (+2/3 EV) – middle, 2340 (+ 1 1/3 EV) – right

Shot 2336 is the best, since the blowout in the highlights in the other two shots turns to the doorframe into a white stain; camera LCD may show the shadows as being completely plugged, however it is not the case. 
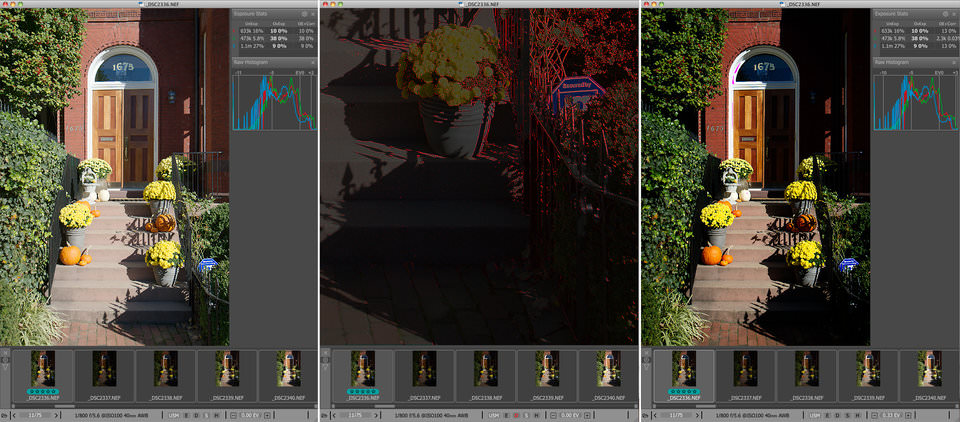
Fig15_2336_Shadow-Boost_Focus-Peaking_Exposure-Correction

Figure 15

Shot 2336 – Shadow Boost lets us see that the details in the shadows are well preserved (shot on the left), Focus Peaking shows us that the shadows in the foreground have no noise (shot in the middle), and an Exposure Correction of 1/3, preformed during conversion, will not cause blown out highlights (shot on the right).

In general, for scenes like this, it makes sense to put a bracketing step that’s a little smaller – around 1/3 EV. However, again, during a shoot, you don’t know how the converter that you’re using today is going to recover highlights and decrease the noise in the shadows, much less the one that you’re going to use in the near future. Therefore it’s a good idea to not throw out slightly overexposed images. Furthermore, while converting and editing with the use of the “crop” tool, often one manages to remove problematic parts of the shot.
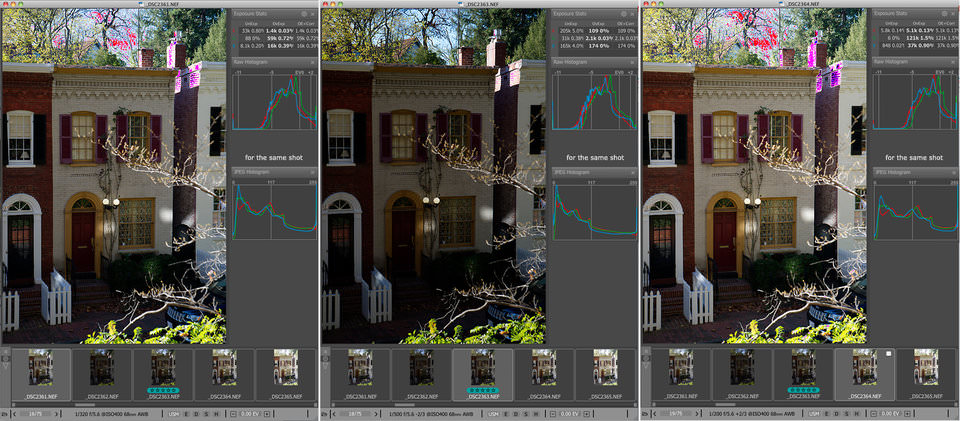
Fig16_2361-2365_OE-Indication-Histograms-OE-Stat

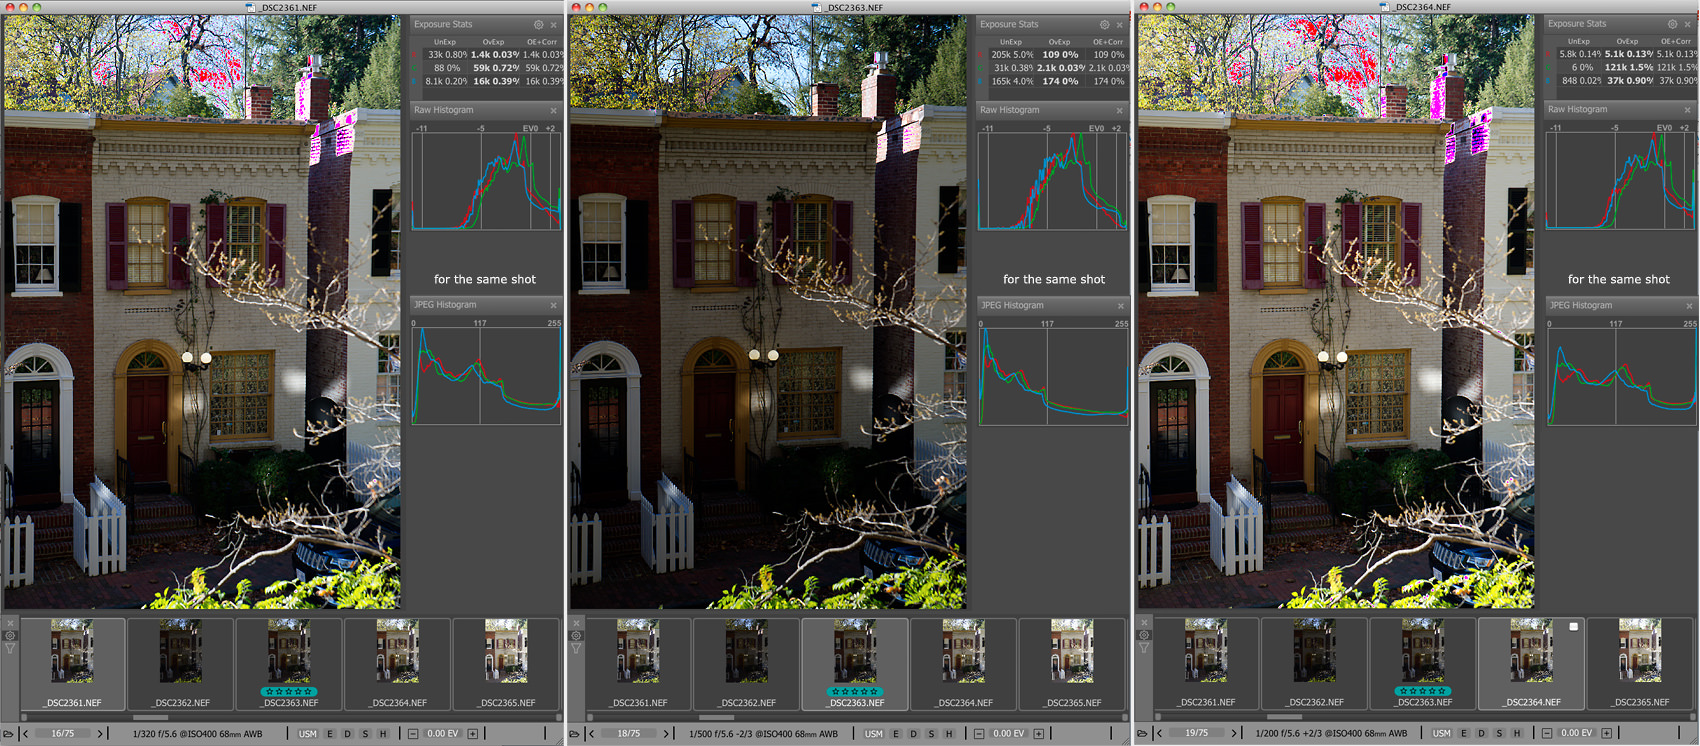
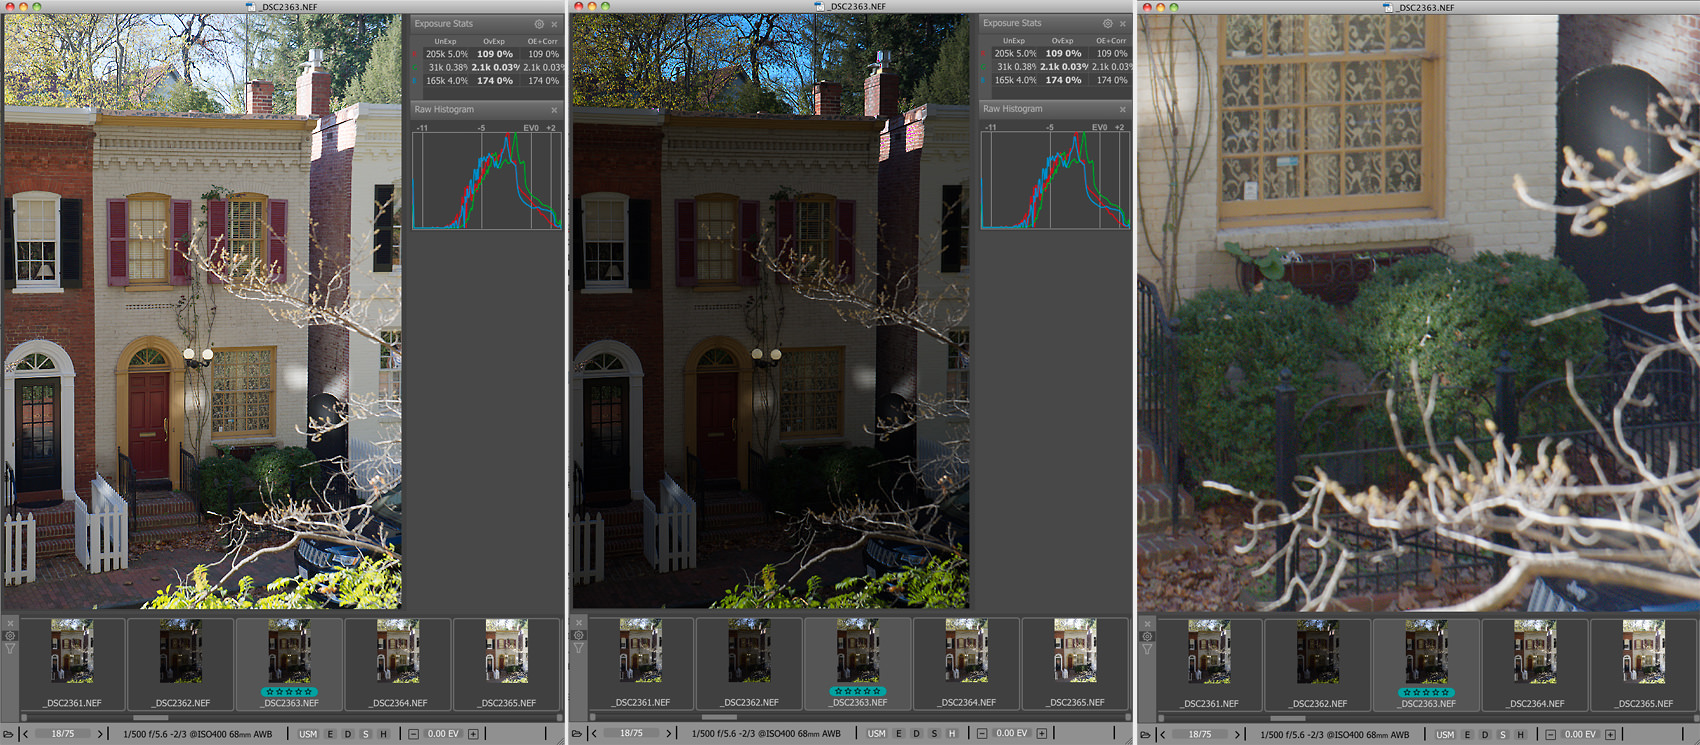
Figure 16. Series 2361 – 2365: shots shown are 2361 (autoexposure)- left, 2363 ( -2/3 EV) – center and 2364 ( +2/3 EV) – right

In this series, we’re still looking for the shot with the most preserved highlights in the sky.
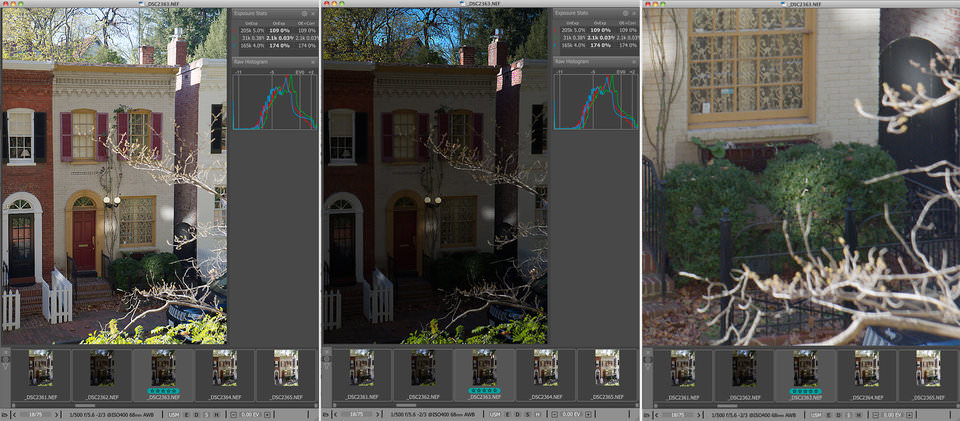
Fig17_2363_Shadow-Boost_Highlight-Inspection

Figure 17

2363 is the best, Shadow Boost allows us to see that the shadows have enough details (shot on the left) and that even in some of the deepest shadows there is very little noise (shot on the right). Highlight Inspection confirms that all of the details and highlights in the sky have been preserved.

The problem of exposure becomes especially unpleasant when the dynamic range of the scene doesn’t fit in the useful dynamic range of the camera. How do we find this out? Some would say that it’s obvious! All we need to do is measure the entire scene with the spot-meter (preferably the one in the camera) and calculate the difference between the minimum and maximum values. If it’s less than the useful dynamic range, you can confidently set the exposure about 3 stops above the spot-meter’s maximum value. Indeed, that works. But what if the range of the scene is more? Furthermore, try preforming this exercise and realize how much time it takes (camera manufacturers, we’re looking at you – you could give us the results instantly, it’s known inside the camera, but why exert yourselves eh?).
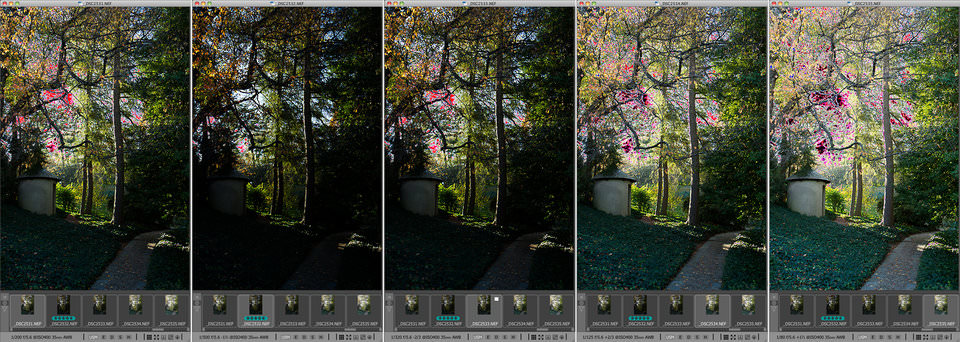
Fig18_2531-2535_OE-Indication

Figure 18. Series 2531-2535. OE Indication shows the change in the overexposure in the highlights

As a rule, scenes with a dynamic range that exceeds the dynamic range of the camera and are similar in composition to the photographs below require careful treatment of the highlights. Blown out highlights ruin the atmosphere of such a scene. If there are thin, dark details in the foreground of such highlights, they lose their shape and turn into a mess. As regards to shadows, when making shots such as this one must know their camera and their converter very well, to understand what level of “underexposure” in the shadows will allow one, after conversion, to get shadows with a minimal amount of noise. And of course, it all depends on the size of the shot and the medium on which you’re going to demonstrate it.
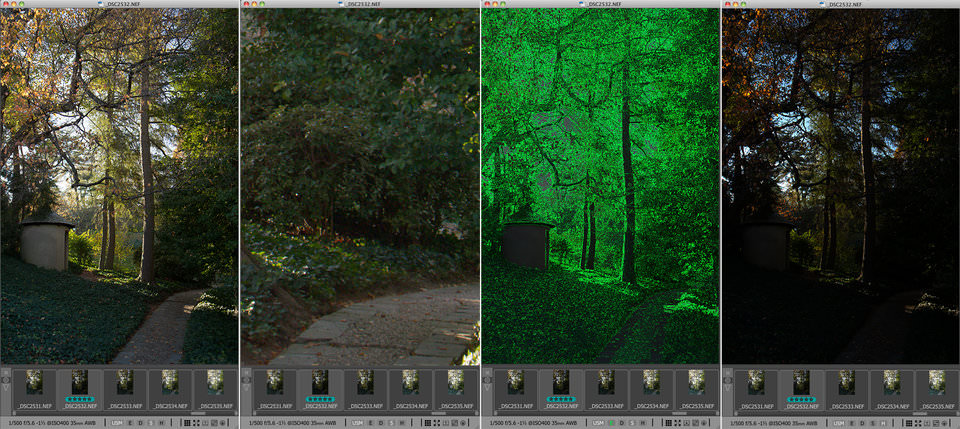
Fig19_2532_Shadow-Boost_Focus-Peaking_Highlight-Inspection

Figure 19

Choose 2532 (-1 1/3 EV) with the least overexposure in the sky. Shadow Boost – there are details even in the deepest shadows, and not much noise is visible (two shots on the left); Focus Peaking – all of the shadows have well-developed details (shot that is third from the left, green overlay represent in-focus detailed areas of the shot)); Highlight Inspection – the sky is completely preserved (shot on the right).

In reality, optimal exposure is the exposure that allows you to preform the conversion of the shot with sufficiently high quality.
The job of a photographer doing exposure bracketing is to decide whether or not they should correct the auto exposure, and if so, by how much, and what bracketing step and spread they should use. Furthermore, it sometimes makes sense to increase the ISO.

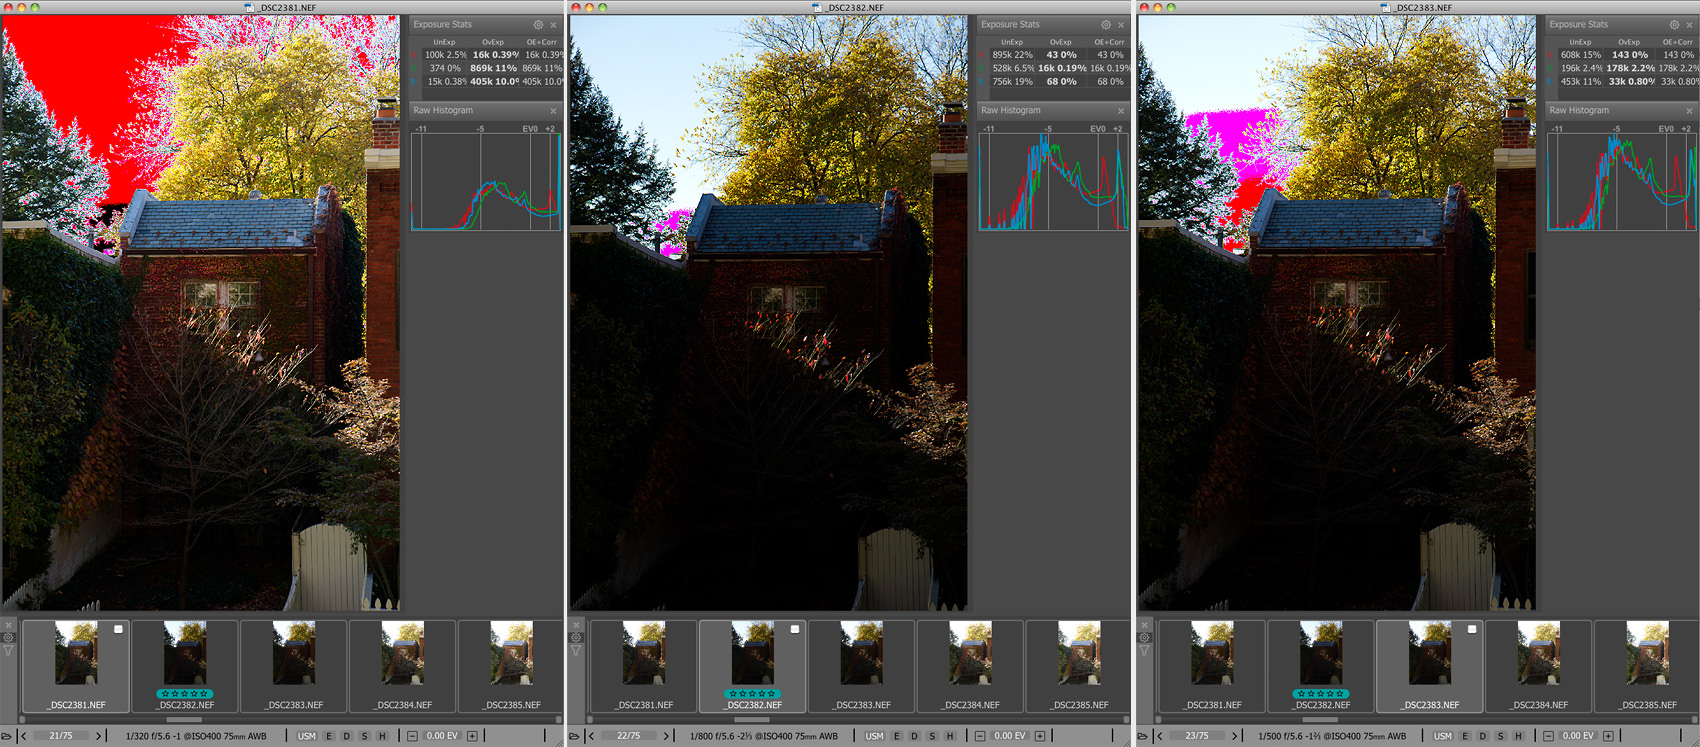
The following series is the one where we got involved in the shoot. It was quite obvious that this scene has a very high contrast, so we were sure that autoexposure won’t be a good start at all. That is why we advised to use negative exposure compensation on the camera, -1EV, and it started the bracketing series from that point, resulting in a series -1EV, -2 1/3EV, -1 2/3EV, -1/3EV, +1/3EV. Note, that for some scenes exposure compensation on the camera might go down to -2EV.
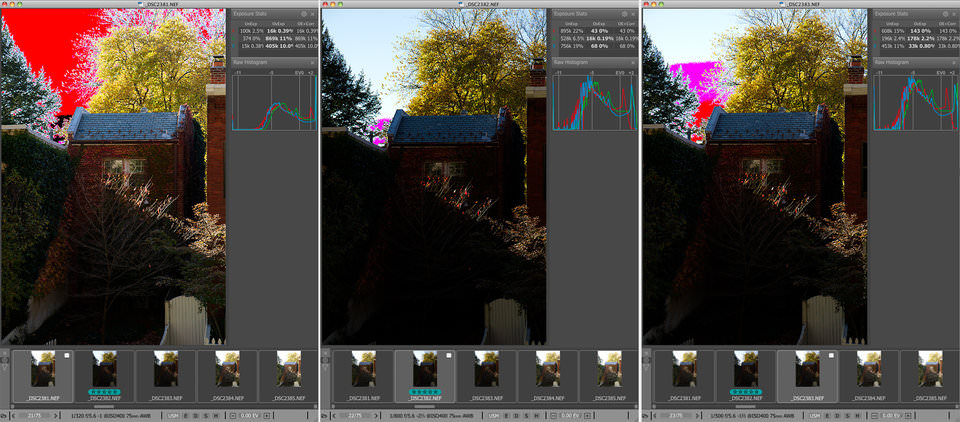
Fig20_2381-2385_Histograms_Exposure-Statistics_OE-Indication

Figure 20. Series 2381 – 2385. Shots shown are 2381 (autoexposure – 1 EV) – left, 2382 (autoexposure – 1 EV – 1 1/3 EV) – center and 2383 (autoexposure – 1 EV – 2/3 EV) – right

We are looking for a shot with the most preserved highlights in the sky. 2382 is the best in this series, but the exposure value is equal to autoexposure – 2 1/3 EV.
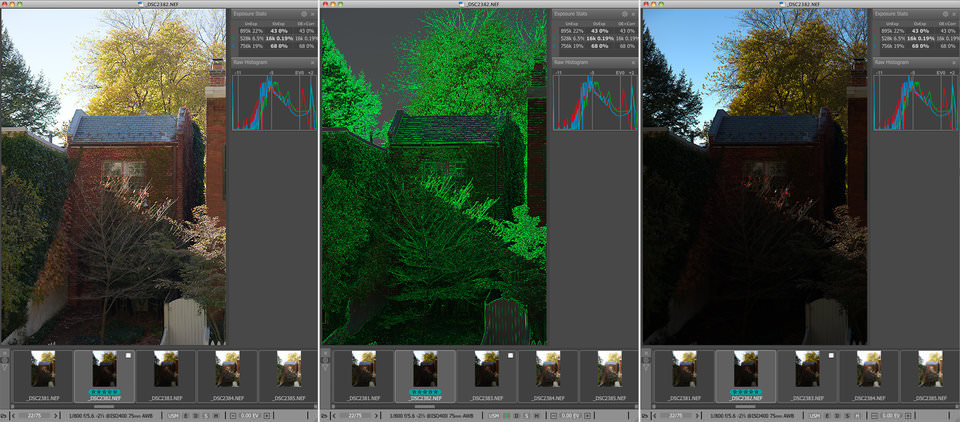
Fig21_2382_Shadow-Boost_Focus-Peaking_Highlight-Inspection

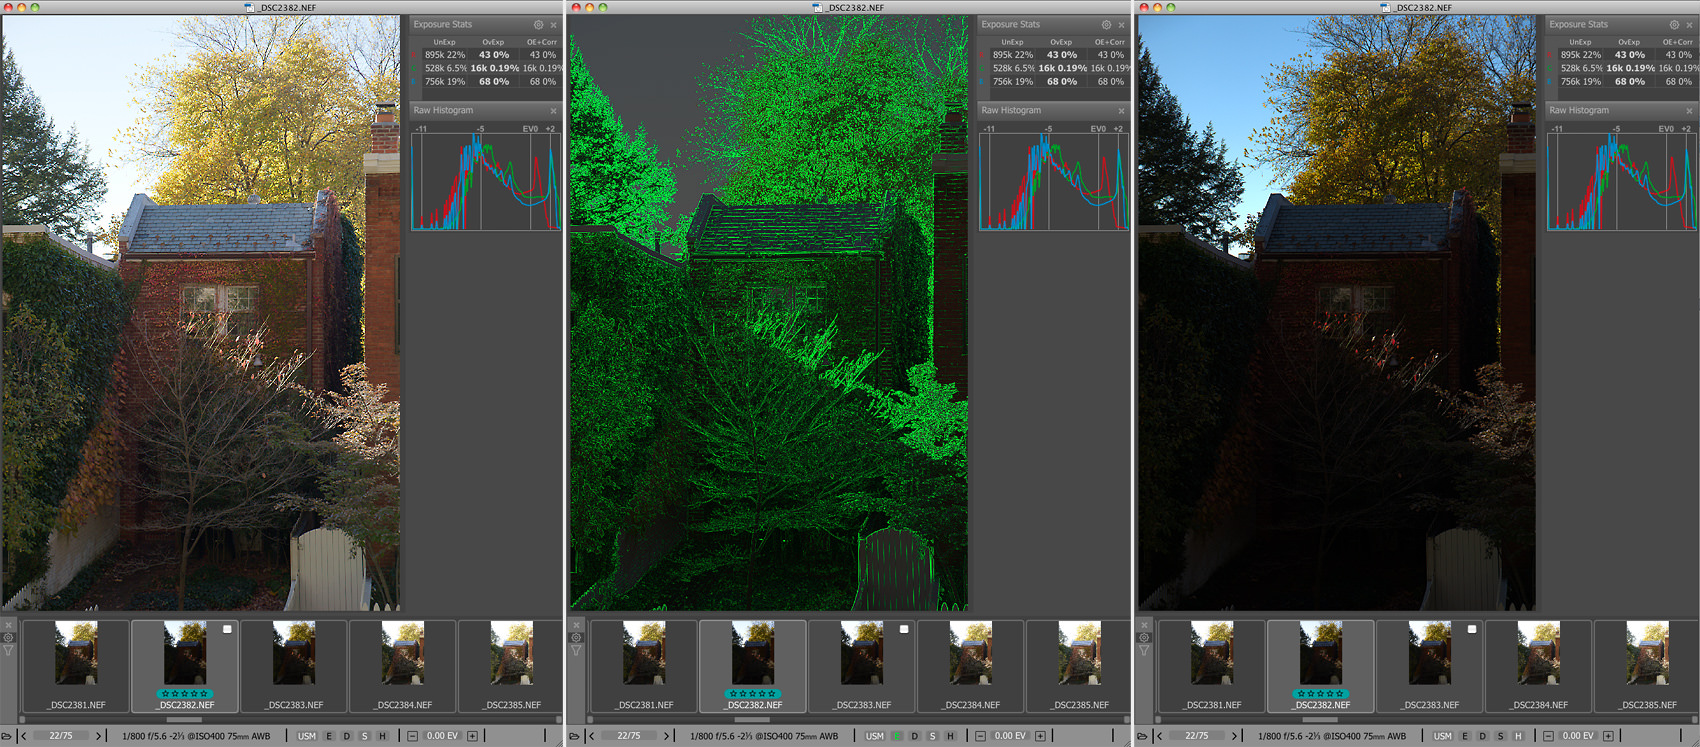
Figure 21

Once again Shadow Boost (we have increased its amount in Preferences) shows that even deep shadows are not so noisy (right); Focus Peaking confirms that we have a lot of details in shadows (center), and Highlight Inspection demonstrates that our highlights are quite safe.

We would like to bring up one last argument in favor of exposure bracketing.

Almost all modern cameras have some bracketing mode. We find it doubtful that camera manufacturers have great nostalgia and include (and even improve) this mode just to follow the tradition and for the sake of their deep respect for their old film cameras. Furthermore, many manufacturers ardently suggest using bracketing on their websites, both as a technical and as an artistic move. This is one more piece of evidence that there is no magical recipe for setting “correct” exposure for any scene while shooting. And no matter how much you may want to turn to yet another “expert” that suggests that his particular batch of serpent-derived animal byproduct will guarantee that long-expected miracle to happen and you will reach those perfectly set “correct” exposures for every shot, remember that maybe it’s not worth it to forget and replace the tried-and-tested proven method of guaranteeing good results, namely exposure bracketing, with some weight-loss-supplement science-seeming-but-actually-wrong methods and suggestions.

And don’t depend too much on the image on the camera back. Culling based on embedded JPEG (whether during the shoot or after it), as we have shown many times both in this article and prior, can be and usually is very, very unreliable. And the saddest thing is that, as Murphy’s Law dictates, it will definitely fail you right when the shoot was the most important for you and can’t be re-taken.

The post When in Doubt, Bracket! appeared first on Photography Life.


from Photography Life https://photographylife.com/when-in-doubt-bracket

Searching for the Perfect Dram on Islay


Whisky and I got off to a rocky start. The first time I tried it was in college. It tasted like rocket fuel. I only drank it when I had no other options — and drowned what little I poured into my glass under a ton of Coke.
Then I met my friend Dan, whose home collection of various Scotches and whiskies rivaled any bar I knew. He and Choun, the manager of Rye House in NYC, slowly walked me through the world of whisky. From sweet to smoky to heavy to peaty, I got to taste everything.
I went from whisky hater to whisky lover, and soon I learned that there was nothing I liked more than the smoky, peaty whiskies that come from the Scottish island of Islay. I came to love their campfire smell and strong bite at the end.

Last month, I finally had the chance to visit Islay with Sean (the fourth whisky musketeer). Located off the west coast of Scotland, Islay is a large island battered by the sea, wind, and rain. (The weather is so bad and planes can’t land often enough that the island’s carrier FlyBe’s nickname is “FlyMaybe.”)

As my whisky-loving friend Sean and I flew onto the island, I gazed out my window in glee. I was finally in the whisky drinker’s promised land and it looked beautiful. Through the cloud cover, I could see a vast green island, with rocky shores, endless farms, grazing sheep, and rolling hills dotted with diminutive stone houses. The land looked pastoral and untamed. It’s hard to imagine that so much of the world’s whisky originates here.

Whisky has a long history on Islay. It’s been made there since the 16th century — first in backyards and then, starting in the 19th century, in big distilleries. Over the years, whisky from the island came to be considered a specialty and was used to flavor a lot of other blends on the mainland. It wasn’t until the early 2000s that Islay whisky became world famous. It produces mostly single malt Scotch, which means they only use one type of grain (barley).

Sean and I visited seven of the eight distilleries on the island (sorry, Coal Ila, see you next time!). We began our first day at Bowmore (Sean’s favorite), famous for its mildly peaty whiskies. Bowmore was founded in 1779 and is one of the oldest and largest distilleries on the island, producing 1.5 million liters per year. Located on the shores of Loch Indaal in the town that bears it, the white painted buildings behind the walls of Bowmore made it seem less a factory and more like a housing complex. (All but one of the distilleries are located near the water because it was easier to get supplies in and out of the bays rather than overland.)

During our tour, we focused a lot on the production of whisky, learning the ins and outs of how it is made. It’s a simple process: first, you take barley, soak it for 2-3 days in warm water, and then spread it on the floor of the malting house, turning it regularly to maintain a constant temperature. These days, only Bowmore and Laphroaig do their own maltings, though they produce only a fraction of what they need (used to make the tourists happy, I suspect); most of the malt and smoking process — for all the distilleries on the island — is done at a big plant in Port Ellen or on the mainland.

After the malting, the barley is then smoked in peat, an earthy fuel from the bogs that cover the island. It is this process that gives the whisky the flavor that has made Islay famous. After that it is fermented, distilled, and then put in casks, where it ages.

In Scotland, most distilleries reuse American bourbon or Spanish sherry casks (some use French oak, but that’s very rare). By law, Scotch whisky has to be made in non-virgin oak — they can’t make their own barrels. It’s not Scotch if it’s made any other way! It’s in these casks that the flavors of the whisky mix with the wood to become what they are. The longer the alcohol stays in, the smoother and mellower it becomes. (So if you like a real smoky, peaty whisky, get a young one!) Unlike wine, which continues to change with age, once the whisky is out of the barrel, it’s done maturing.

The highlight of our trip to Bowmore was when the attendant let us bottle our own whisky right from the cask! Let me introduce you to the Nomadic Rebel:

After Bowmore (and a quick walk around town), we went to Bunnahabhain. Located at the very far end of the island, its remote location provided the opportunity for the most scenic drive of the trip: across the island and then down a tiny road, with the sea and mountains of the nearby island of Jura to your right and farmland to your left.

Looking like an old industrial factory with long warehouses on a rocky shore, Bunnahabhain does most of its production off the island. After a short, very underwhelming tour, our guide took us for a tasting, where he leapt out of his shell and gave us an animated history of the whiskies we were trying. (Overall, this was my least favorite distillery I visited, although I loved their products.)

Our second day, we visited the three most famous distilleries on the island: Laphroaig, Ardbeg, and Lagavulin.

Laphroaig sits on a beautiful, wide, and rocky inlet that opens up to the sea. The smell of salt and sea fills the air, fighting for control over the peat smell of the distillery. Laphroaig’s distillery is considered one of the most beautiful, with its small historic buildings, its name in giant letters placed on the outside wall that faces the bay, and a number of viewing points of the bay, where you can sit out and enjoy a dram or three. The highlight here was seeing the malting process in progress, as well as the peat fire and smoke as it filled the kiln.

At Ardbeg, we had lunch before joining our tour guide, Paul. “You’ve probably seen a bunch of these now, huh? I’ll just show you what makes Ardbeg different and we’ll just drink,” he said as he grabbed two bottles for the tour. “In case you get thirsty!” he added slyly. (We got thirsty!)

Paul gave us a quick tour of the facilities, highlighting their old mash tanks and distilling process, which produces alcohol at 62-75% alcohol by volume (ABV). Afterward, we toured the grounds, marveling at the old casks and original buildings still in use, before setting back to the main house. Ardbeg is set back from the road and seems to take up a city block with its large white warehouses. Back at the tasting room, Paul let us sample many of Ardbeg’s famous brands, as well as some special distillery-only blends found nowhere else, never seeming to care that we kept slipping in requests for the harder-to-find good stuff.

We talked with Paul for a long time. Like most people we met, he had grown up on the island, moved away, and come back. “City life was too busy for me,” he said. Like most of his friends, he got a job at a distillery. Unlike most of his friends, though, he actually liked whisky. A surprisingly large number of the young people we talked to weren’t really keen on Scotch (“it’s what my grandfather drinks”), but Paul was a big fan and knew his way around the spirit.

After wishing Paul goodbye, we stumbled out of Ardbeg and strolled toward our final stop of the day, Lagavulin. With plenty of time before our tour, we walked slowly down the path between them, awed at all the cows and sheep on the rocky verdant hills that rolled across the island, then caught a few minutes’ snooze on one of the benches that line the way. Walking this path from distillery to distillery is something I can’t recommend enough.

On our final day, Sean and I visited Bruichladdich and Kilchoman. Starting early at Bruichladdich (which had been shut for decades before two private investors and reopened in 2000), our guide Jenn gave us the grand tour and history of the place. The grounds are mostly white industrial buildings in a small compound, though upon arriving we were struck by the cobblestone courtyard (parking lot). It was a beautiful entranceway that harked back to days of old. She set seven different types of whisky in front of us, though I had to drink most of Sean’s too because he was driving.

At Kilchoman, the visit becomes a blur, after having drunk so much at Bruichladdich. Our tour moved quickly through the distillery, then we tried a few of the brands. I don’t remember which ones, as I mostly turned them down since I didn’t want to be too drunk too early!

After a quick lunch and final dram before I hugged Sean goodbye, I boarded the ferry back to Glasgow and promptly fell asleep in a happy, whisky-induced haze with a giant smile on my face. I had been to my alcoholic promised land and it was everything I had imagined it to be. From the friendly people with their small-town charm to the beautiful landscape, distilleries, and sea air, Islay was an island of dreams, one I definitely want to return to.

(Though next time I’ll spend more time outdoors appreciating the scenery and hiking off all that whisky!)

Logistics

If you’re going to go to Islay, you can get there by a twice-daily plane from Glasgow with FlyBe or via the ferry/bus combo from Glasgow.

For meals, I liked Yan’s Kitchen, Lochindaal (best seafood on the island), the café at Ardbeg, Bridgend Hotel, and The Harbour Inn.

Accommodations consist mostly of cute little farmhouses turned B&Bs. There’s also an HI hostel on the island.

Recommended Whiskies

  • Bowmore 13 – Nice, smoky taste with a strong finish. One of my favorites.
  • Bowmore 18 (sherry cask) – Smooth, fruity flavor.
  • Bowmore 25 (wine cask) – Smooth, with a peaty finish.
  • Laphroaig 21 – Smooth, light on the palette.
  • Laphroaig Cask Strength 16 Year – Really strong, very flavorful. Packs a punch.
  • Ardbeg Supernova – Very strong with good, peaty finish.
  • Lagavulin Double Matured Distiller’s Edition – Delicious!
  • Lagavulin 8 – Very strong smoky and peaty flavor. Tastes like a campfire. One of my favorites.
  • Lagavulin 18 – Smooth, with a more subtle flavoring.
  • Bruichladdich 1989 – Smooth, with a subtle sweet flavor.
  • Bruichladdich 2003 – Really strong, powerful flavor.
  • Kilchoman Machir Bay – Great smooth Scotch, with a subtle peaty finish.

Note: Visit Islay provided the car and accommodation for Sean and I, and they also connected me to distilleries so I could get the behind-the-scenes tours for this article. Meals, flights, and transportation to and from the island — as well as all that whisky I bought — were at my own expense. 

The post Searching for the Perfect Dram on Islay appeared first on Nomadic Matt's Travel Site.


from Nomadic Matt's Travel Site http://www.nomadicmatt.com/travel-blogs/islay/