Wednesday, 28 December 2016

How to Watermark Images in Lightroom

While it seems that adding watermarks to images does little nowadays to deter image theft, watermarks can still be very useful for photographers and business owners for promoting their work and their brands across websites and social media. Unfortunately, for those who are just starting out, adding a simple watermark to images can be a rather painful experience, especially if they are not already familiar with the process using such software tools as Photoshop. Thankfully, Adobe has made it easy to add watermarks to images in Lightroom, allowing one to not only add a watermark to a single image, but also to apply it to all images during the export process, which can save a lot of time and frustration when dealing with batches of images. In this article, I will show how to use the built-in watermark tool that is readily available in Lightroom in order to quickly add watermarks to images.

Watermarking Photos in Lightroom

Tasman Glacier, New Zealand at Sunset. Image watermarked via Lightroom.
NIKON D810 + 24-120mm f/4 @ 32mm, ISO 64, 1/4, f/8.0

1) Why Watermark Images?

The first question you might ask yourself is – should you watermark your images? There are many opinions on this matter. Some argue that watermarks prevent theft (which I and many others disagree with), allow self-promotion and help build brand recognition, while others argue that adding watermarks spoils the viewing experience and does more harm than good. Let me quickly point out what I think about watermarks and when they should and should not be used.

  1. Unless your watermark visibly takes up the entire photo like in the image below, it can often be easily removed in Photoshop using standard tools. So if you are worried about theft and copyright infringement too much, either do not post your images online or post them in a small size with a gigantic watermark all over it. You will fend off all potential thieves for sure. I immediately close sites that show icon-sized images with huge watermarks. And I know that I am not the only one out there…
    Big and Ugly Watermark

    Big and Ugly Watermark

  2. On a more serious note, if your objective is self-promotion and building brand recognition (which should be your primary goal when adding your watermarks), then come up with a good strategy to add watermarks without spoiling the viewing experience (see tips below). This means making your watermarks small, but recognizable and placing them in a good, open corner spot in photographs close to image borders.
  3. Well-known photographers rarely put watermarks on their photographs, because they want to deliver the best (and unobtrusive) viewing experience. They also often post large images that occupy the whole screen. Why aren’t they worried about copyright? Because they are known and their images are recognized. If such photographs or “works of art” are stolen or reproduced elsewhere, the offenders would most likely be reported and caught quickly. Am I saying that unless you are a well-known photographer you should be adding watermarks to your photos? Of course not. I believe you should worry less about theft and focus more on making better photographs.
  4. If watermarks are used properly, they can help promote your work instead of doing harm. You are not a stock photo agency, so stay away from large watermarks that span across your photos.
  5. And for all those “right-click disable” folks out there that do it on their websites – you are only spoiling the browsing experience of your visitors. I hate not being able to right-click and open links/images in new pages on websites and blogs. It is about time for you to understand, that if someone really needs to steal your image, they can just press the “Print Screen” button on their keyboards, then paste the screenshot in Photoshop and crop it to their liking!

Before I move on to specific instructions, I would like to provide some watermarking tips and best practices:

  1. Try to use a graphic logo instead of plain text for watermarks. If you do not have a logo yet, use short text with your name and Copyright © symbol.
  2. When using text watermarks, try not to add the word “photography” at the end of your name. If your name is not unique (just search Google), then either come up with a nickname or use your URL (below).
  3. If you have a short URL, you can post your website address instead of your name.
  4. When using text watermarks, use a standard and recognizable font rather than some gothic/italic/handwriting font that is impossible to read.
  5. Try not to use multiple lines of text for watermarks.
  6. Semi-transparent watermarks always look better and more professional than bold copyright imprints. If you decide to use a watermark, make it 60% or less transparent.
  7. Another good watermarking method is to add some space underneath each photo and then put your copyright information there. But you would have to use Photoshop and record actions in order to do that (not covered in this article).
  8. Put your logo/text watermark in the corners of your photos. Top-left, top-right, bottom-left and bottom-right locations typically work the best.
  9. If you do not feel like sharing your camera settings, remove your EXIF data from images, but only keep your copyright and contact information. This would just be an additional copyright protection layer for you in case your image is posted elsewhere.

2) The Watermark Position Dilemma

Because of the nature of photographs and their colors and patterns, finding a good placement for your watermark can be a problem. Where should it be placed and how? As I have pointed out above, the best locations for standard watermarks are near the top and bottom corners of your photos (unless you chose to add extra space to the bottom or the side of your photographs in Photoshop or other third party software). Which corner should you use for watermarks? I would say all of them! Why? Because every photo will be different and while one corner might work for one photo, that same corner might not for another. A gray watermark will not be visible on a photo with a gray corner where the watermark is placed. So you have two options – either to use a different shade of color that is visible in the same corner, or move the watermark to a different location. I prefer the latter for consistency, but it is totally your choice.

Now moving your watermark in photos would be extremely inefficient if you had to change your watermark every time you need to move it. That’s why the best method is to create multiple watermarks in Lightroom and put them in multiple locations. For example, I have 4 different Lightroom watermarks that I called “Top-Left”, “Top-Right”, “Bottom-Left” and “Bottom-Right”. All watermarks are the same (PL logo in white) – they are just positioned differently.

3) Creating a Text Watermark in Lightroom

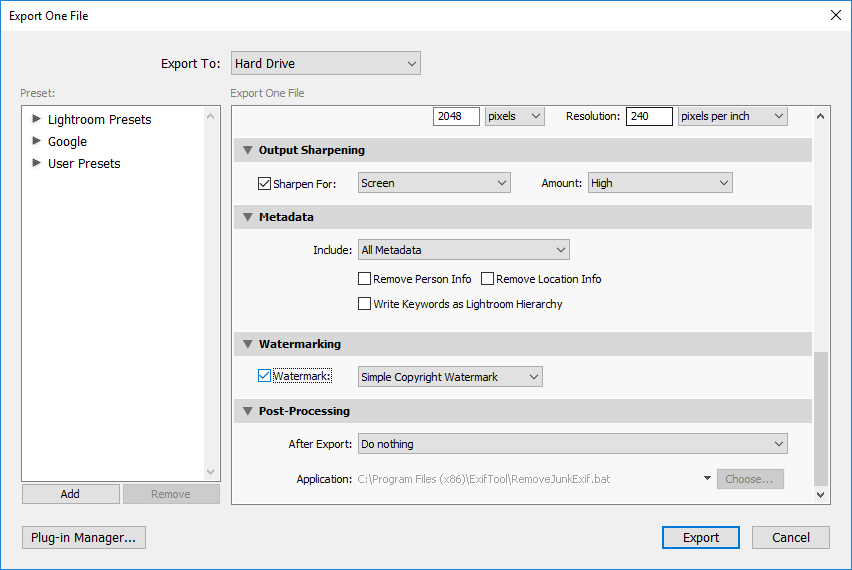
Let’s go through the process of creating a text watermark in Lightroom. To access the watermark function in Lightroom, you can go to “Edit->Edit Watermarks…” (Lightroom->Edit Watermarks on Mac) or you can also access it from Lightroom’s Export window. I normally access it via the export window, which can be found in File->Export or pressing CTRL+SHIFT+E:
Lightroom Export Watermark

Once it comes up, scroll down and find “Watermarking”. Next, check the box in front of “Watermark:” and then select “Edit Watermarks…” from the drop-down menu. The “Watermark Editor” will come up that looks like this:
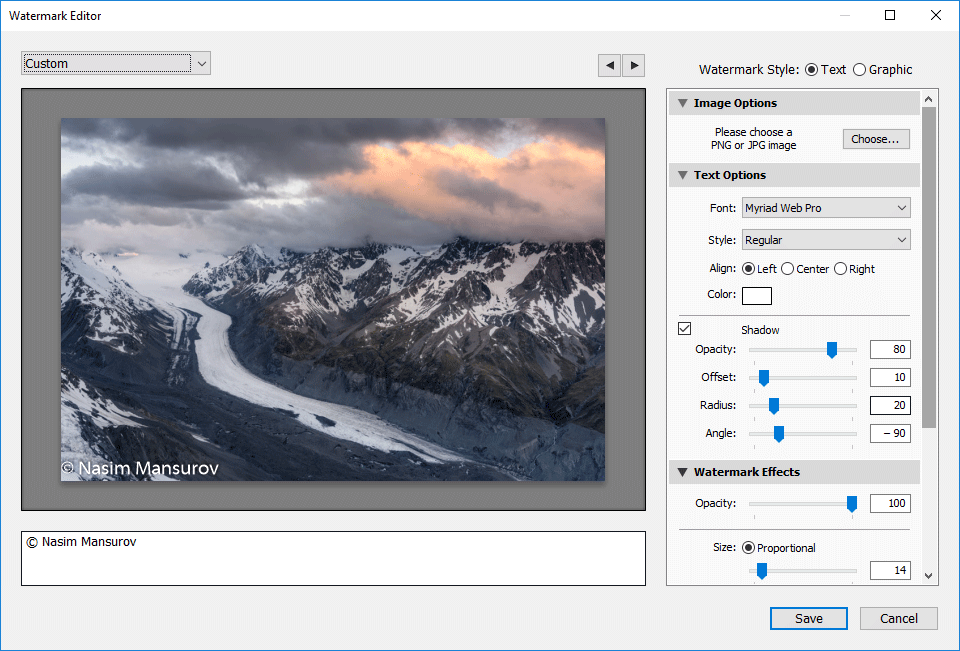
Lightroom Watermark Editor

The watermark editor is very easy and intuitive to use. The left bottom section is where you type the text and you can change the layout on the right side of the window. Let’s get started with typing the text. Put the copyright symbol (copy-paste it from here – © or press ALT + 0169 on PC / OPT + G on Mac) first, then put your name afterwards. On the right side of the screen, choose your desired font under “Text Options”. I personally like the “Myriad Web Pro” font, but you can use whichever font you want, as long as it is legible. Choose the style and alignment, then pick the color of the text. I would recommend to keep the color white, since colors rarely look good in text watermarks. The default Shadow settings should work fine, but if you want to make changes to the way the shadows appear, you can do that in this screen. Now scroll down till you see “Watermark Effects”:
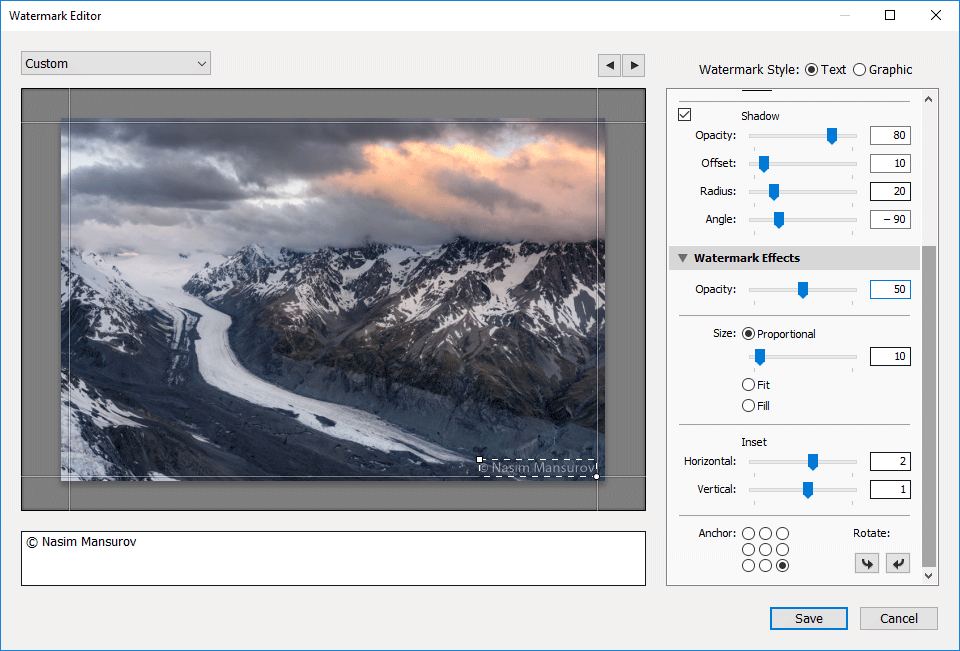
Lightroom Watermark Effects

As I have pointed out before, you do not want the copyright watermark to be 100% visible, so it is best to make it semi-transparent. I typically use 50% opacity, but you can play between 30-80% to see what works for you. Keep “Proportional” size instead of “Fit” or “Fill”, and 10% typically works great. If your copyright text looks too small, increase the value to a bigger number.

The next task is to pick an “Anchor” point, meaning where your copyright will be located. As I have pointed out above, it is best to keep it in the top left/right and bottom left/right corners. Start with the top-left corner. Remember, our objective is to create 4 watermarks with different locations. Next, click “Save” and the “New Preset” window will pop up:
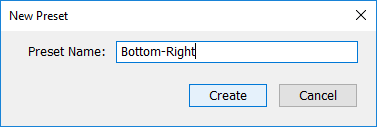
Save Preset - Bottom Right

Give it a meaningful name that will be make it easy to understand the location of the type of watermark. I called mine “Bottom-Right”, as shown above. Click “Create” and you will be returned to the Export screen.

Now repeat the task three more times and create 3 other watermarks for “Top-Left”, “Top-Right” and “Bottom-Left”. At the end, your “Watermarking” drop-down should look something like this:
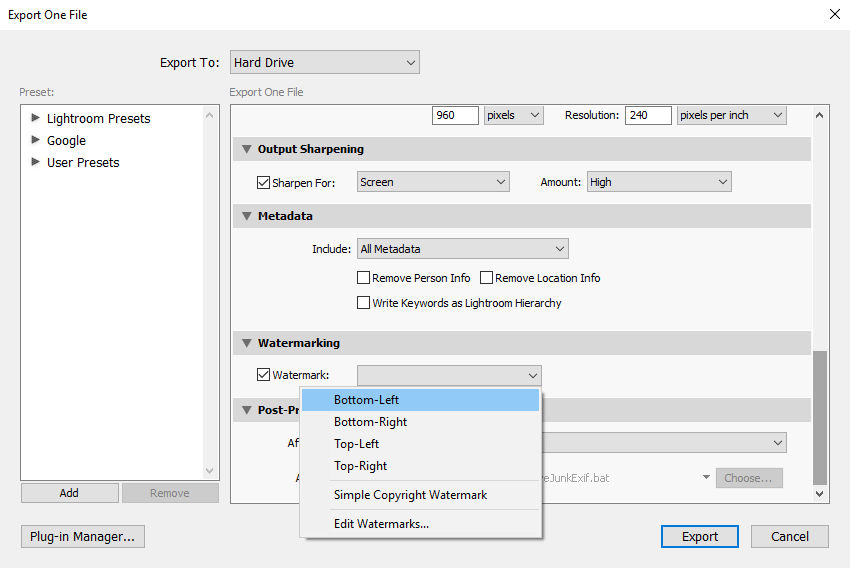
Lightroom Multiple Text Watermark Templates

Now that you have the text watermarks created, how do you use them? Just select a bunch of photos in Lightroom, bring up the export window, then select one of the watermarks and click “Export”. That’s all!

Here is how I normally do it:

  1. Select all photos to be extracted in Lightroom
  2. Bring up the Lightroom Export window (CTRL+SHIFT+E / CMD+SHIFT+E)
  3. Select the “Bottom-Right” watermark (works best for most images)
  4. Click “Export”
  5. Once images are extracted, go through each one and identify the ones where logo does not look good or is invisible
  6. Select the images that need to have a different watermark placement, then bring up the export window once again and pick a watermark for a different location
  7. Click “Export” again and then overwrite the existing photo

You might need to repeat the steps 5-7 multiple times until you get the watermarks placed well. That’s all there is to it. Now let’s talk about graphic watermarks with logos.

4) Creating a Graphic Watermark in Lightroom

Now let’s move on to the cool stuff, which is adding a graphic watermark with your logo to images in Lightroom. No matter how good you make the text watermark look, it will never match a good-looking graphic logo. But to accomplish this, you will need your brand / company logo in a transparent format like PNG or GIF. Your logo cannot be in JPEG format, since JPEG has no support for transparency. If you had your logo developed professionally, you should have the original logo in vector/EPS format. You might also find a transparent PNG/GIF file in the same folder. If you cannot locate one, it is very easy to export your logo to a PNG format, as long as you have the source file. A transparent logo should look like this when opened in Photoshop:

PL Transparent Logo

Since we will be making your watermark semi-transparent, it is best to have the image in white rather than black. For a quick conversion in Photoshop, simply press CTRL+I / CMD+I to invert the logo colors:

PL Transparent Logo White

Now export the image from Photoshop by going to “File->Save for Web & Devices” and then pick “PNG-8” on the top drop-down. Make sure that “Transparency” is checked, as seen below:

Photoshop Save for Web PNG Logo

Once you have the file ready, you are now ready to use it in Lightroom. Oh and by the way, make sure that you are using a large version of your logo (at least 250 pixels wide). If you make it too small, your watermark will not look good when exported out of Lightroom, since Lightroom will have to up-size it for large photographs. If you use a high-resolution PNG image, Lightroom will automatically down-size it during the export process.

Let’s now pick some photos and bring up the Export dialog box in Lightroom by pressing CTRL+SHIFT+E. Make sure to check the box in front of “Watermark:” under “Watermarking”, then select “Edit Watermarks…” in the drop-down menu. A new window called “Watermark Editor” will come up:

Lightroom Watermark Editor Graphic

In order to use a graphic logo, we need to make sure to select “Graphic” on the top right corner of the window. Under “Image Options”, click “Choose” and find the logo you exported earlier. Once the file is chosen, you will see the logo show up right away on your photo preview on the left. You will also notice that the “Text Options” are now grayed out. Scroll down till you get to “Watermark Effects”:
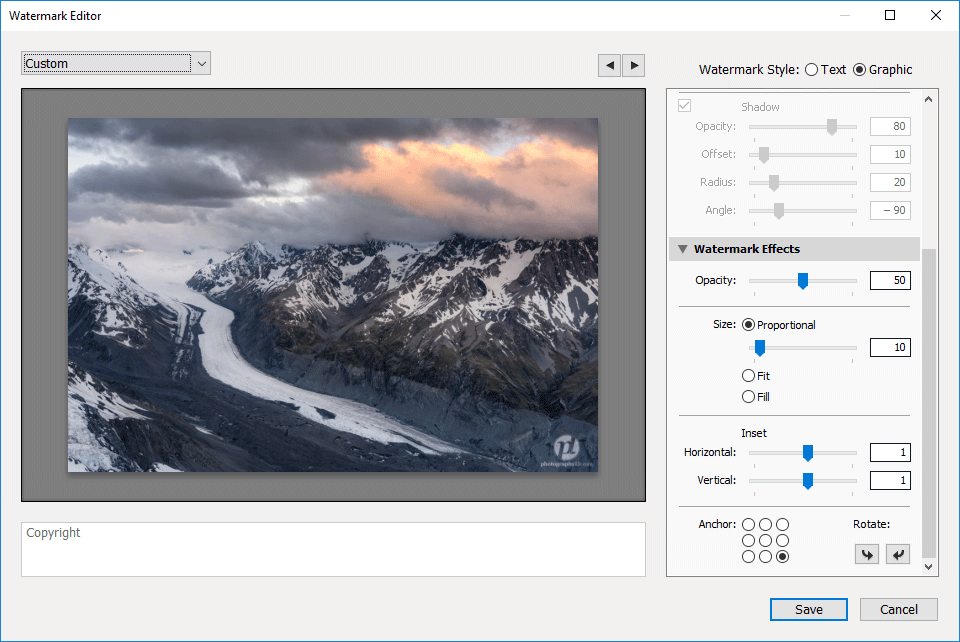
Lightroom Watermark Editor Watermark Effects Graphic

Just like with the text watermark, you have to pick the right opacity – I normally leave mine at 50-60%. The size should stay “Proportional” and 10-15% size works great for most situations. If your logo is too close to the border, you can move it up/down and left/right by changing the “Inset” values in “Horizontal” and “Vertical”. In the above case, I went ahead and set +1 for both horizontal and vertical inset values, so that the logo is slightly moved from the edge of the image. Pick one of the Anchor points again (start with Bottom-Right) and then save the Preset with a new name like “Bottom-Right Logo”.

Now open up the Watermark Editor again, change the Anchor to bottom-left, click Save again and give it a name like “Bottom-Left Logo”. Do the same for top-left and top-right. Once you are done, you should have four watermarks for different watermark locations.

Now try to export a couple of photos and see how you like the result:

  1. Select all photos to be extracted in Lightroom
  2. Bring up the Lightroom Export window (CTRL+SHIFT+E / CMD+SHIFT+E)
  3. Select the “Bottom-Right” graph watermark (works best for most images)
  4. Click “Export”
  5. Once images are extracted, go through each one and identify the ones where logo does not look good or is invisible
  6. Select the images that need to have a different watermark placement, then bring up the export window once again and pick a watermark for a different location
  7. Click “Export” again and then overwrite the existing photo

Here is how my image looks like with the “PL” logo watermark:

Watermarking Photos in Lightroom

Watermark Applied to Image via Lightroom

The good news, is that you can use the above method for both vertical and horizontal images, so you do not have to extract your verticals separately. If all four corners are very bright and the white logo does not work, make another transparent logo in black and create additional watermarks. When watermarking very bright photos, use the black logo with 50% transparency and it will look great.

That’s it! Let me know if you have any questions and I would love to see how your logo comes out!

The post How to Watermark Images in Lightroom appeared first on Photography Life.


from Photography Life https://photographylife.com/how-to-watermark-images-in-lightroom

My List of Must See Things Do When in Austin

View of downtown Austin, TX
Austin is known for its incredible music, delicious restaurants and food trucks, excellent university, and vibrant tech scene. It’s a city on the move, where people who love the outdoors, warm weather, and succulent BBQ flock to live. And with its never-ending conferences and music and sports events, it’s one that attracts people from around the world. Austin is a weird little big city that I have yet to see someone not love.

I’ve been living here since May, and in the last couple of months since taking a break from my travels, I’ve buried myself in two things: writing and keeping active (OK, copious amounts of eating and drinking too).

Since you’ve already seen the writing (it’s all the previous blog posts), I want to share some of the favorite things I’ve done in this amazing city (for when you visit — come stay at my hostel, HK Austin, when you do!). I hope they’ll help you fall in love with it just a little more quickly.

Barton Springs

People relaxing at Barton Springs in Austin
Barton Springs is a pool/creek that everyone flocks to in the warm summer months. Fed by a natural cold-water spring in Zilker Park (see below), the city-run Barton Springs Pool features manicured lawns that are great for lounging on and relaxing with your friends. The wide pool gives you plenty of room to float around and cool off, as the temperature can hit 100 degrees in the summer. The pool costs $3 to get into (for residents, but they never ask for proof), and while there’s lots of space around it, I often prefer to lounge on the creek itself. While the banks are rockier and there are fewer places to lounge, it’s free, it’s the same water, and you can drink and eat along it (something that is prohibited in the pool).

Zilker Park

Gardens in Zilker Park in Austin
Zilker Park is in the heart of South Austin and offers many different types of outdoor activities, such as hiking, biking, kayaking, jogging, and anything else you can do in a park. Barton Springs (see above) is here, and there’s a botanical garden and the ever-awesome outdoor Umlauf Sculpture Garden, centered on the artistic works of Charles Umlauf.

The Greenbelt

A trail on the Barton Creek Greenbelt in Austin
Located in south-central Austin, the Barton Creek Greenbelt contains 12 miles of gorgeous trails where you can bike, run, or walk. There are even beautiful limestone bluffs for rock climbing and,—when there’s enough water in the creek — several swimming holes to cool off in. If you are looking to get out and enjoy the nice weather, this is one of the best places to do it. It’s a favorite of everyone in the city and one of the best things about Austin!

Two-stepping

Performers playing at The White Horse in Austin
When in Rome…err, Austin, two-step! Country dancing is all over the city, with the White Horse being the most famous spot (if you go on Wednesday, they give free two-step lessons). The Broken Spoke is another popular place too.

Movie at the Alamo Drafthouse

The Alamo Drafthouse in Austin, TX
The Alamo Drafthouse is a local institution with multiple locations, where you can watch a movie, drink beer, and order food. Besides showing mainstream movies, they also screen quirky movies and weird previews, host the local Rocky Horror event, and play many classic and cult films throughout the month. This place is more than just a theater, it’s a place for those who love and appreciate film.

LBJ Library

Lyndon B. Johnson Library in Austin
Lyndon B. Johnson was one of the most powerful US presidents of the 20th century. A complex man, he helped push forward the Great Society, expanding civil rights and the social safety net, while at the same time expanding the war in Vietnam. His presidential library is in Austin, and while it’s not a “hot” thing to do, I highly recommend a visit to learn about one of the most colorful and controversial presidents the country has ever seen.

Rainey Street

Rainey Street in Austin, TX
This nightlife area is filled with old houses that have been converted into bars. Originally the “hipster” part of the city, it’s now mainstream and teems with people on the weekend. Personally, I hate coming here on the weekends: it’s too crowded and there are too many bachelor/ette parties. I find the scene a little too wild for me (though you may not). Instead, my favorite time to visit is for after-work drinks, when there is just the right amount of people to feel busy and exciting but not overwhelming. From Banger’s for Sunday brunch to Clive Bar, Half Step, and Bungalow for drinks, and Craft Bar for craft beer, Rainey is an eclectic and fun place to hang out — as long as you avoid the weekends.

First Thursday

People celebrating at an event in Austin, Texas
One the first Thursday of every month, the South Congress Hotel hosts a huge event with musicians and an all-night happy hour. It’s one of the biggest nights of the month for young professionals and a wonderful a place to have fun, meet new people (Austinites are very friendly), and drink cheap. You don’t want to miss this if you’re in town. It’s one of my favorite monthly social activities.

Drink a cocktail

Drink a cocktail in Austin, TX
While beer and cheap drinks are still king here, there is a growing cocktail bar scene in the city. I’d personally rather drink a cocktail than be at a noisy bar. If you’re looking for the perfect cocktail, try Firehouse Lounge, Floppy Disk Repair Shop, Midnight Cowboy, Garage, Whistler’s (see above), and Weather Up (but only for happy hour, as their drinks are slightly overpriced).

Whistler’s

Lots of whiskeys
This bar on the east side of the city is one of the coolest in town, and when I’m in Austin, you’ll probably find me here (it’s also pretty close to my hostel). You’ll also find a robust whiskey selection, knowledgeable bartenders, a cool crowd, and a giant outdoor patio space. On the weekends, an upstairs mescal bar opens. Whistler’s also hosts one of the most famous food trucks in Austin, Thai Khun, which serves some of the city’s best Thai food (the khao man gai (chicken with rice) is spot on). This is a must-visit bar!

Music

A crowd enjoying music at Stubb's in Austin, TX
Austin’s music scene is world-renowned, and there’s always some live music going on or a big musician in town. You’ll find a lot of music on Sixth Street and in the downtown area. Most of the bars host musicians. Stubb’s is a world-famous music venue downtown and hosts a lot of big-name musicians in its outdoor venue. Try to see a show there if you can!

Eating

Delicious Austin, TX BBQ
Austin’s food scene is damn good (though it needs a few more ethnic places). From BBQ to American to organic to Mexican, you can’t go wrong here. Here are my some of favorite spots (a href=”http://www.nomadicmatt.com/travel-blogs/guide-eating-austin/>longer list can be found here) that will help you put on 10 lbs. before you leave:

  • Bar Chi (206 Colorado St., (512) 382-5557, www.barchiaustin.com) – Decent sushi but an unbelievably affordable happy hour (5-7pm each day). My friends and I come here because it satisfies the sushi craving on the cheap!
  • Wu Cho (500 W. 5th St. #168, (512) 476-2469, wuchowaustin.com) – This is one of the best Chinese restaurants in Austin. It serves a very popular dim sum brunch on Sundays. Be sure to come early as it gets packed during dinnertime and Sunday brunch, and the wait for a table can be up to an hour.
  • Launderette (2115 Holly St., (512) 382-1599, launderetteaustin.com) – Located in an old laundromat, this restaurant is one of the hottest spots in town and serves an amazing menu of Americana and seafood, as well as a decent selection of wine. Some of my favorite dishes include crab toast, burrata, okra, Brussels sprouts, and grilled octopus. If you’re coming for dinner, come early, as it fills up fast.
  • Truluck’s (400 Colorado St., (512) 482-9000, trulucks.com) – This is my favorite steak restaurant because it’s one of the few places where you can also get fresh seafood (crab, oysters, lobster). It’s not cheap, but if you want an upscale steak house, try this.
  • Péché (208 W. 4th St., (512) 494-4011, www.pecheaustin.com) – A New Orleans–inspired restaurant serving Bayou food, with a very friendly staff, tasty cocktails, and an extensive whiskey list.
  • La Barbecue (1906 E. Cesar Chavez St., (512) 605-9696, www.labarbecue.com) – BBQ is a matter of perspective. A lot of people say Franklin’s is the best, but La Barbecue is #1 to me. It opens at 11am. Expect two-hour waits during lunchtime, so get here early.
  • Veracruz (1704 E. Cesar Chavez St., (512) 981-1760, veracruztacos.com) – The best food truck in town (conveniently located across the street from my hostel). It makes wonderful breakfast tacos, and the migas was voted #1 in the country. There is never really a line, but service is slow.
  • Torchy’s (multiple locations, torchystacos.com/in/austin) – World famous (and another spot where the president ate), this taco restaurant has multiple locations around town. It lives up to all the hype! The food here is pretty spicy. I’m a big fan of the fried avocado and “trailer park” tacos. Every location is always packed, so expect a wait, especially on the weekends.
  • P. Terry’s (multiple locations, pterrys.com) – This is the best burger bar in town. It’s delicious and cheap (you can get a burger, fries, and a drink for $6 USD), with filling portions. This is one of my all-time favorite spots in Austin, and since it’s close to my house, I tend to eat here too often!
  • Leaf (115 W. 6th St., (512) 474-5323, leafsalad.com) – This new lunchtime salad place is incredible (also the line is long). Its gigantic salad bar has anything and everything you could ever want to put in a salad. It’s one of my favorite places for a healthy meal in Austin.
  • True Kitchen (222 West Ave. #HR100, (512) 777-2430, truefoodkitchen.com) – This new restaurant is incredibly popular with people after work. All its food is natural and organic. You’ll find healthy wraps, salad bowls, sandwiches, and fresh and flavorful seafood, as well as an incredible selection of wine and cocktails.
  • Perla’s Seafood & Oyster Bar (1400 S. Congress Ave., (512) 291-7300, www.perlasaustin.com) Some of the best seafood and oysters in town!
  • Home Slice Pizza (1415 S Congress Ave., (512) 444-7437, www.homeslicepizza.com) Hands down the best pizza around!
  • Clark’s Oyster Bar (1200 W. 6th St., (512) 297-2525, www.clarksoysterbar.com) – Another awesome spot for seafood, with an incredible oyster happy hour from 3 to 7!

Whole Foods

Whole Foods Market in Austin, TX
Why visit Whole Foods? I mean, they have those everywhere, right? Well, this one is special. This is the original store — and it’s massive. Its salad bar goes on seemingly forever, there are very good restaurants in the store, the rooftop features patio seating, and musicians play on the weekends. It’s an amazing place that is also a popular spot for after-work drinks and Sunday brunches. Stop by at least once to get your fill (and enjoy the walk in beer fridge).

***

Austin is a perfect little city, offering visitors a plethora of activities to fill the 3-4 days most people spend here. It’s a city to live in. You don’t really sightsee here; you get active. You go out, hang out, and eat out. Skip most of the local museums, get outside, enjoy the food, the drinks, and the music, and get the most out of one of the best cities in the United States — and the place I call home!

Photo Credits: 1, 2, 3, 4, 5, 6, 7, 8, 9, 10, 11, 12, 13, 14

The post My List of Must See Things Do When in Austin appeared first on Nomadic Matt's Travel Site.


from Nomadic Matt's Travel Site http://www.nomadicmatt.com/travel-blogs/my-must-see-to-do-list-in-austin/

Tuesday, 27 December 2016

Integrating JPEGmini Pro to Lightroom Workflow
Although we have already published a detailed review of the JPEGmini Pro software a while ago, a number of readers have reached out to me, asking how to effectively use the software, specifically when extracting images for clients from Lightroom. I have now been using JPEGmini for over a year and both Lola and I have been extracting images from Lightroom in a specific way to get the highest quality JPEG images to our clients, while retaining the smallest file size possible. Previously, we would extract everything at particular resolutions (typically 2048 for smaller JPEGs and full size for print) using 100% JPEG compression for the full sized images for the best possible quality, but extracting hundreds and sometimes even thousands of images turned out to be a headache when it came to storage and file transmission. With JPEGmini, we were able to continue delivering the best images to our clients, with a much smaller footprint. This resulted in both time and cost savings in the long run for us, as we did not have to deal with time-consuming uploads and large USB drives. In this article, I will show how both Lola and I we have been utilizing JPEGmini as part of our Lightroom workflow.
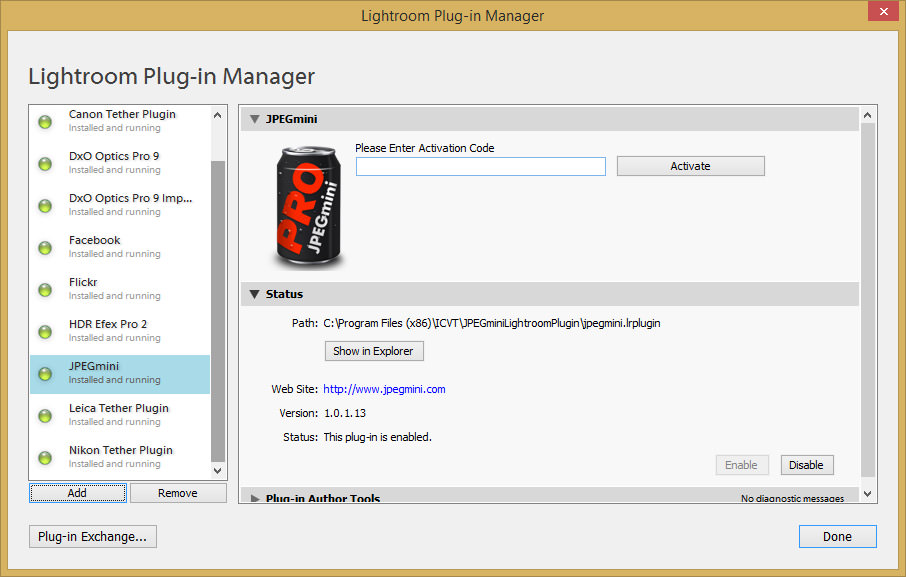
First of all, in order to integrate JPEGmini into your Lightroom workflow, you will need the Pro version of the software – the regular version does not come with a Lightroom plugin. Once you download and install JPEGmini, you will have to add JPEGmini into your Lightroom through the Plug-in Manager, as detailed below:
  1. After JPEGmini Pro installation is complete, fire up Lightroom
  2. Once Lightroom opens up, go to File->Plug-in Manager

  3. Click the “Add” button on the left bottom corner of the Plug-in Manager window
  4. On a 64-bit version of Windows operating system, browse to C:\Program Files (x86)\ICVT\JPEGminiLightroomPlugin
  5. Left-click on the “jpegmini.lrplugin” folder once, then click the “Select Folder” button
  6. You will be presented with the following window:
    JPEGmini Lightroom Plugin
  7. Type in your activation code and click “Activate”
  8. Wait until the software is activated. When the process is complete, the text will change to “Activated”
  9. Click “Done” to close the Plug-in Manager window

The plugin is now up and running, and ready to be used.

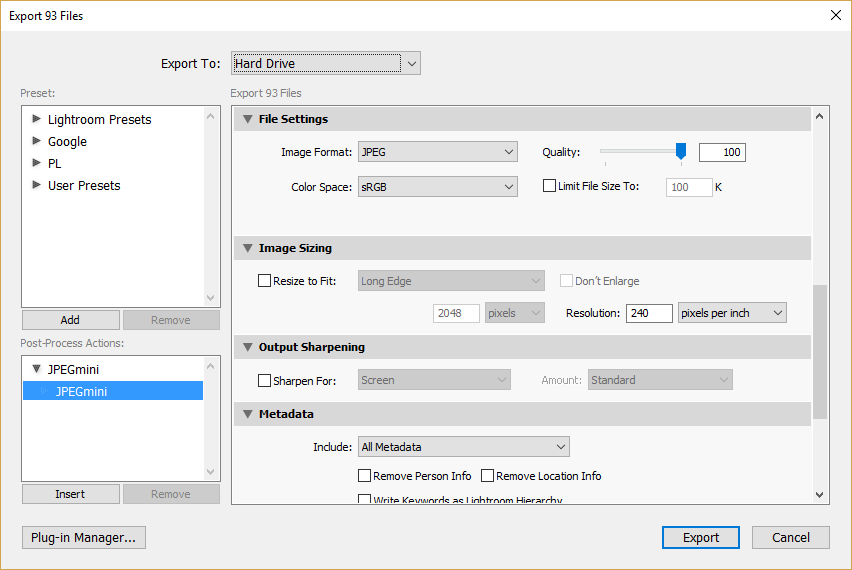
From here, you will no longer need to worry about doing any extra work, aside from inserting JPEGmini into your Post-Process Actions. Launch the export window of Lightroom by pressing Ctrl+Shift+E (Command+Shift+E on Mac), then expand “JPEGmini” under “Post-Process Actions” on the left bottom side of the window and select the JPEGmini link. From there, click on the “Insert” button:

JPEGmini Pro Post Process Actions

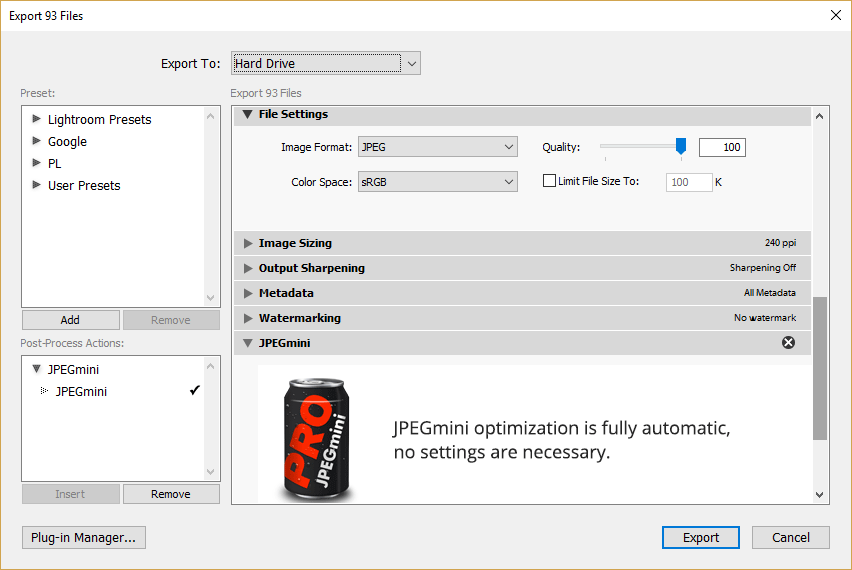
After you do that, you will see that now you have a new section in the main window called “JPEGmini”, which now shows the JPEGmini Pro soda can:

JPEGmini Inserted

This means that the software optimization is now running, so every time you export an image, it will automatically be optimized for you.

Now the big question is, what Quality should you pick during the export process? Remember, JPEGmini is designed to optimize ANY JPEG compression. If you choose a lower quality during export, you will already have a smaller file and JPEGmini will do its best to optimize the image even further to get to a smaller JPEG file size. So if your aim is to provide the best possible image quality, whether you are providing the JPEG to your client, or publishing your work online and you do not want anyone to see JPEG artifacts, my recommendation would be to keep the Quality set to 100 and let JPEGmini handle the rest. This method has been working great for me and I typically choose Quality 100 in Lightroom export window now, unless I am uploading images to this website and I want to have even smaller file sizes.

Most social media websites like Facebook will be re-optimizing your images upon upload anyway, so if you use a quality setting of 100 with JPEGmini compressing the image, you will most likely have the least amount of artifacts once the images are processed by those extra compression engines.

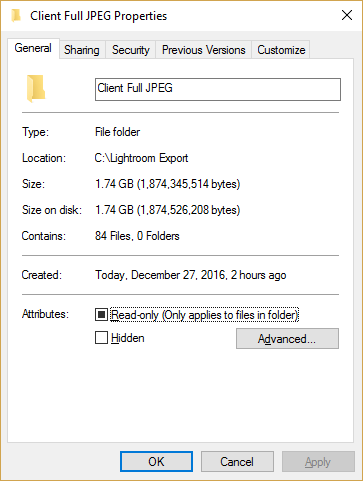
Let’s take a look at how JPEGmini can help you save time and space. Here is the export of a single client shoot with a total of 84 JPEG images extracted in full resolution:

Exported Full JPEG

As you can see, that’s a total of 1.8 GB of files, which is a lot for 84 images. That’s because some of the images were stitched from multiple RAW files and the images contained a lot of detail. Let’s now take a look at what JPEGmini was able to do after applying it on export, with the same Quality setting of 100:

Exported Compressed Full JPEG

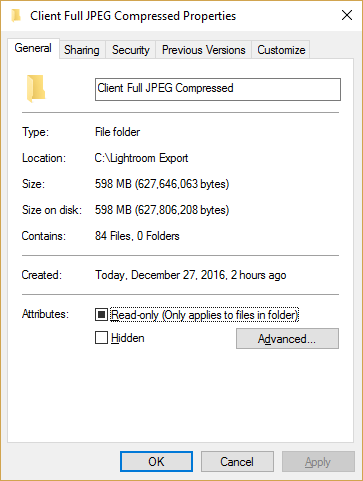
At around 600 MB, that’s a very significant reduction in total size from 1.8 GB – I now have 3x smaller images. Uploading this to my Dropbox is going to take a lot less time and I won’t have to worry about running out of space both locally and in the cloud when continuously dealing with delivering image content to my clients.

Hope this helps – if you have any questions, please let me know in the comments section below!

The post Integrating JPEGmini Pro to Lightroom Workflow appeared first on Photography Life.


from Photography Life https://photographylife.com/integrating-jpegmini-pro-to-lightroom-workflow

JPEGmini 60% Off Today and Tomorrow Only

As many of our readers know, there are only a few software packages out there that we always recommend at PL to our readers. One of such software packages is JPEGmini, which in my opinion, is worth every penny, even when paying for it in full. Well, today and tomorrow only, our friends at B&H Photo Video decided to host a really nice special for our readers, by bringing the price of the JPEGmini Pro photo optimization software down to $59.95, which is basically 60% off its original sticker price of $149.95. Considering how much you can do with JPEGmini, that’s one heck of a deal for it! If you do not know about JPEGmini, I would highly recommend to give my JPEGmini Pro review a read, as it details all the feature of the software and explains exactly what it does. In short, JPEGmini is capable of reducing the file size of your JPEG images by up to 80%, while keeping the quality indistinguishable for the viewer.

JPEGmini Pro Total Space Saved

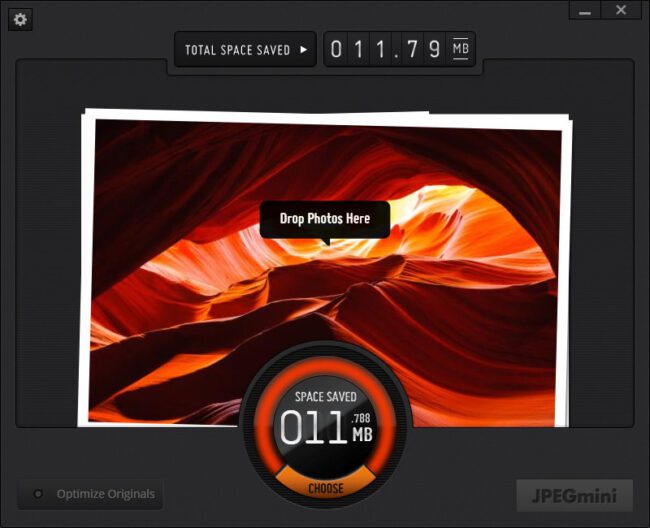
The great thing about JPEGmini Pro, is that it comes with a plugin for Lightroom, which allows you to run the software during the export process, integrating right into your photography workflow without any disruptions. So you can export your images always at the highest quality, without worrying about JPEG compression and artifact issues, delivering the best quality to your clients – all without compromising on space. In addition to the plugin, the main software package (as pictured above) is capable of running through your entire image library, finding JPEG images and batch-compressing them. I have done this a number of times on my entire photo library and I have spaced a few terabytes of space just like that.

Please note that Photography Life has no affiliation whatsoever with JPEGmini. We only promote this software to our readers, because we love it and use it on a daily basis. We have never been paid to promote any product and we will never accept any payments for promoting products and services at Photography Life. Along with FastRawViewer (also on sale until January 1st), JPEGmini is the software I personally use on a day-to-day basis and highly recommend.

You can already purchase your copy of JPEGmini through B&H Photo Video for $59.95. The sale has already started and will last until December 28, 2016 11:59 PM.

The post JPEGmini 60% Off Today and Tomorrow Only appeared first on Photography Life.


from Photography Life https://photographylife.com/jpegmini-60-off-today-and-tomorrow-only

Monday, 26 December 2016

Photography Workflow – Year-End Activities

As a photographer and a photography business owner, I go through a number of activities at the end of each year to close it out, just like many businesses do when performing year-end activities. These activities have become an essential part of my photography workflow, allowing me to continue using a very consistent and reliable method to not only store and archive my images, but also to be ready for future data growth and potential hardware changes. If you have not yet considered year-end activities for your photography, I would recommend to give the below article a read and see if it would suit your workflow. Basically, I have developed a set of procedures that I run on either December 31st, or the first few days of each new year to ensure that my data stays consistent, secure and fully backed up. Most of these procedures highlighted below are related to my current post-processing software of choice, Adobe Photoshop Lightroom, but if you run any other software, you should be able to run through similar steps to make sure that you are set for another year of successful shooting.

1) Lightroom: Catalog and File Synchronization

Throughout the year, I will be making plenty of edits and changes to my existing images when working in Lightroom. During this process, I might also go through some images and physically delete them (mistakes, blurry images, etc). Unfortunately, despite my efforts to keep a consistent Lightroom catalog, this process often leads to images going out of sync – that’s when images in the file system do not fully match the images that are present in the Lightroom catalog. As discussed in detail in our Level 1: Workflow and Post-Processing Course, when running a hybrid file management system, you do have to make sure that your files look good both at file system and Lightroom catalog levels. This way, if I ever want to switch to another post-processing tool to edit my images, I can do so with ease and my Lightroom catalog always looks consistent.

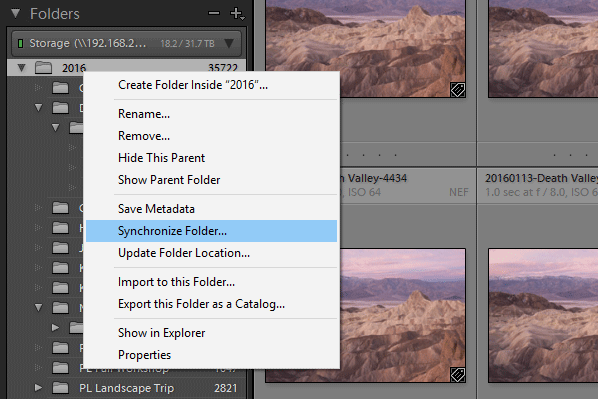
Gladly, Lightroom has built-in tools to make file and catalog synchronization easy. All you have to do, is click on your parent folder structure within Lightroom’s Library module, then click “Synchronize Folder…”:

Lightroom Synchronize Folder

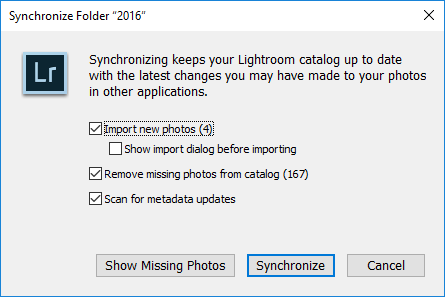
After that, you will see a window just like this one, which scans through your Lightroom catalog for potential inconsistencies:

Lightroom Synchronize Import

As you can see, it looks like I have 167 images that need to be removed from Lightroom (they are no longer in my file system) and four images need to be imported into Lightroom (they are missing in my Lightroom catalog). From here, you can click “Show Missing Photos” that will show you all the missing images (perhaps you want to find them instead of deleting them), or you can click the “Synchronize” button to start syncing your folder. If you want to see all the images that are missing in Lightroom, but present in your file system before synchronization, make sure to select “Show import dialog before importing”. Be warned that if you have a lot of images, selecting this checkbox might take a very long time, since Lightroom needs to rescan every single folder once again. I personally never check this box. Instead, once the import is complete, I simply click on the “Current Import” link under “Catalog” in the Library module, which shows me the images that were imported.

After running through this process, you should have your images fully synchronized between your file system and the Lightroom catalog.

If you run any other software that contains a separate database for your images, you might want to run through a similar tool to ensure that you are working with fully synchronized data.

2) Image Folder Reorganization

The second step of my year-end process is to go through each folder within my image catalog and make sure that images are where they should be. Whichever file management system you end up choosing, you still need to make sure that the files reside where they should be residing and not stored all over the place. Depending on the software you use, this process can be somewhat time consuming, as you need to click through each folder and make sure that you do not have any images that do not belong to that particular folder. If you are a Lightroom user, the process will be quite simple, but still might take some time, especially if you have a lot of images.

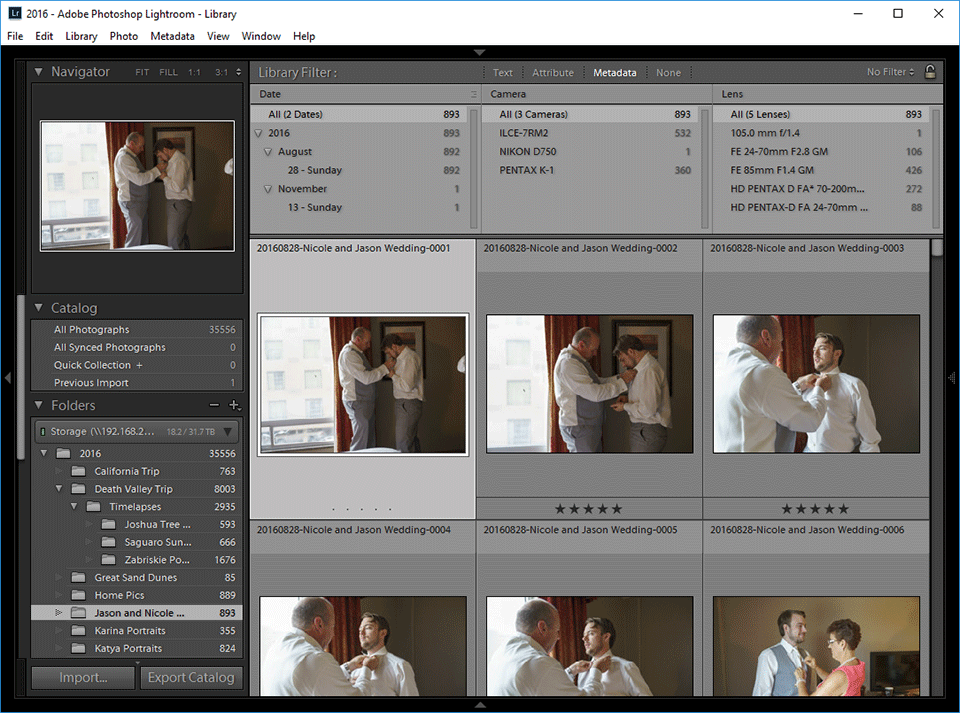
When looking through each folder, you can use the built-in filter tools to identify potential images that do not belong. For example, you can use the handy Library Filter to see the dates on which images were captured. In the below screenshot, you can see that I have 892 wedding images from August 28th. However, there is also one image from November 13th, which is most likely something that should not belong in that folder:

Lightroom Filters for Identifying Images

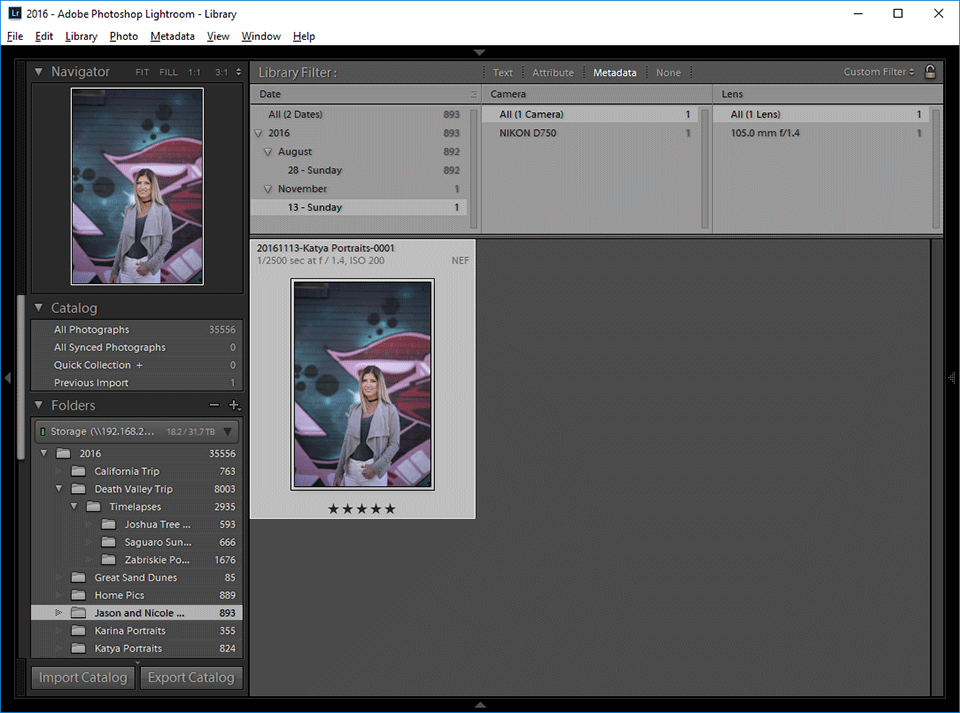
By clicking on November 13th, I can drill down to the image that was most likely moved into this folder by accident:

Lightroom Filters Identified Image

By dragging the image into its correct folder, I was able to quickly take care of this issue and only be left with the images from the wedding.

I would recommend to go through each folder in your image catalog and make sure that you only have the images that should be there. If you don’t use Lightroom, simply use your operating system file browser to preview images – you will need to switch to a thumbnail view to preview your JPEG / RAW files. Often, by just looking at the photos, you should be able to properly organize them.

3) Lightroom: Batch Renaming

Once all the images are in their right places, the next step is to batch rename them. Why is this necessary, you might ask? Well, for me, file names need to make sense when running a hybrid file management system. This way, if I ever need to find an image, I need to be able to quickly identify the following information by just looking at the file names:

  • Year, month and date the image was captured
  • The name of the event, irrespective of where the image is located
  • File sequence number to properly sort images in file system
  • File extension to understand if it is a JPEG, RAW or TIFF image

Since I always rename my images during the import process with appropriate file names (for details, see Level 1 Workflow and Processing course or How to Organize Photos in Lightroom article), I normally don’t need to worry about running this step. However, since both Lola and I work on the same Lightroom catalog, sometimes one of us can either forget to run through the proper import procedure, or perhaps rush and do things quickly for the client without properly running through the correct steps, which can result in incorrect file names. In addition, editing images in Photoshop from Lightroom can yield funky image titles with “Edit” or other words added to each image, potentially messing up the naming structure. So at the end of each year, I go through every single folder and batch rename all images, so that I have all images named consistently.

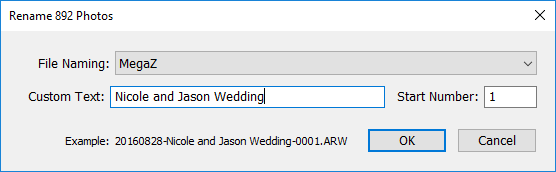
The easiest way to batch rename images in Lightroom, is to select all images in a folder by first clicking on the folder, then pressing CTRL+A (Command+A on Mac) on the keyboard, which will select all files in a given folder. But before you do that, make sure that you first sort your images by capture time, so that the images don’t get renamed based on whatever sorting method you are using. Go to “View->Sort->Capture Time” and make sure “Ascending” is chosen on the bottom to resort your images based on the date/time the image was captured. From there, all you have to do is press F2, or go to “Library->Rename Photos…” on the menu. You will see a “Rename # Photos” window pop up:

Lightroom Batch Rename

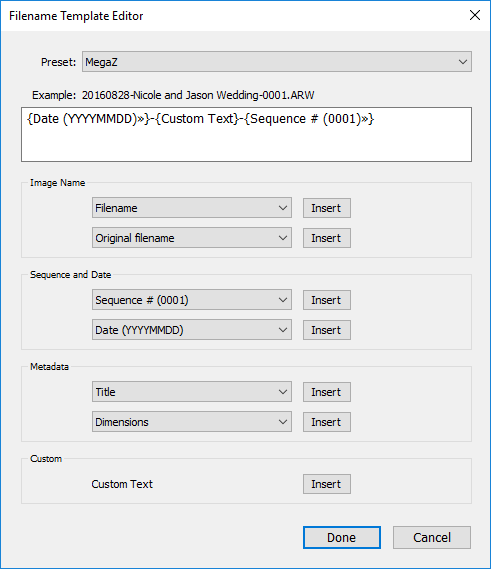
As you can see, I already have a template set up that allows me to mass rename images – all I have to do is type “Custom Text”, which in this case represents the event. To its right, I have a “Start Number”, which is a sequence number for the first image. Lightroom will start with this number and increment sequence numbers for the rest of the images accordingly. If you don’t already have a template set up, check out my template below:

Lightroom Filename Template Editor

Run through each folder and batch rename all the images. If you have previously already named the files properly and this is the second time you are doing it, Lightroom might run into file naming conflicts, resulting in weird sequence numbers. If this ever happens, all you have to do is give it a different name temporarily, and batch rename all the photos again with the correct name. Another method is to give a very high sequence number (like 10,000), then restart the batch rename process with the sequence number 1. Both methods will work well and you won’t lose any files.

4) Lightroom: Optimize Catalog

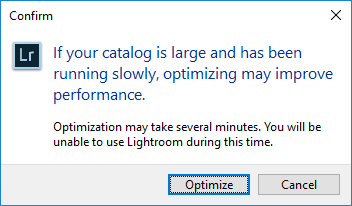
Now that you have all the images in full sync and the images are correctly named, the next step is to now optimize your Lightroom catalog. Whenever you deal with a lot of batch operations in Lightroom, it is always a good idea to optimize your Lightroom catalog, since things might have moved in the database quite a bit and running optimization will make the database work faster. The process of optimizing a catalog is very simple – just go to “File->Optimize Catalog…” and you will be presented with the following pop-up window:

Lightroom Catalog Optimization

Click “Optimize” and Lightroom will go through the process of optimizing your catalog. Depending on the size of your catalog, it might take some time. Once the catalog is optimized, you will get a message that says “Your catalog has been optimized”.

5) Lightroom: Save All Edits

Did you know that Lightroom has a way to store all your edits within your images or sidecar files, so that if you ever lose your catalog you could still start over and not lose any of the edits? That’s certainly a powerful feature and something you should definitely use. At the end of each year, I make sure to save all changes that I have made in Lightroom to my images for this reason and I recommend you do the same.

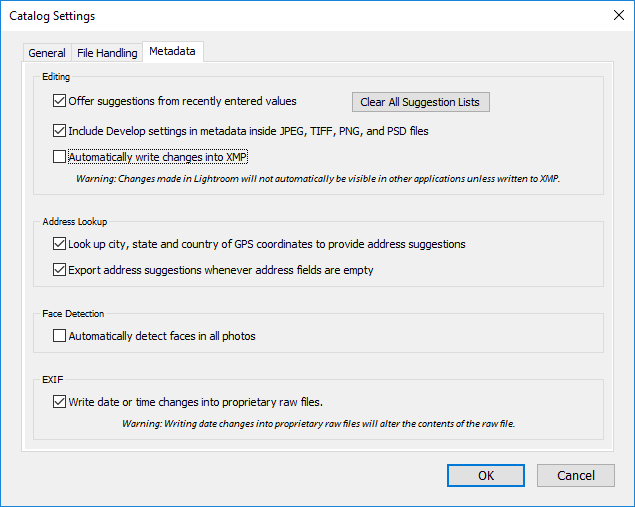
While there is a setting in Lightroom Catalog Settings where you can force Lightroom to automatically save all the changes to sidecar / XMP files, I do not recommend using this option, since it slows down Lightroom. You can find this option under “Edit->Catalog Settings…” menu option, within the “Metadata” tab:

Lightroom Automatically Write Changes to XMP

If you keep the “Automatically write changes to XMP” option turned off like I do, make sure to write all the edits into images as part of the year-end activities. To do that, all you have to do is go to the parent folder where your images reside in Lightroom (in my case it is 2016), then press CTRL+A (Command+A in Mac), then press CTRL+S (Command+S in Mac). Or you can go to “Metadata->Save Metadata to Files” in Lightroom:

Lightroom Save Metadata to Files

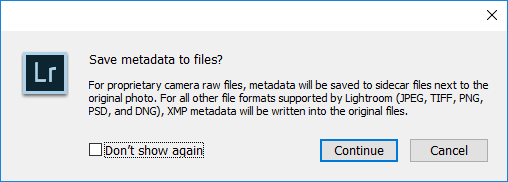
Lightroom will present the above window. Now keep in mind that this process will take a long time, so arm yourself with a cup of hot coffee or hot chocolate, grab a nice Book (our Landscape Photography eBook would be a good read :)) and get ready to wait…for a long time. Lightroom will go through each image and write changes to either the file directly (in case you use the DNG format) or XMP sidecar files.

After the process completes, all of your edits will be saved, so if you ever happen to lose your catalog, you won’t lose your edits. Now keep in mind that the above process does not save the history – only the latest edits will be preserved!

6) Back Up Lightroom Catalog and Images

The next step is to back up your Lightroom catalog and your images. This step, without a doubt, is the most important one in your list of year-end activities. Running a full backup is important, as it will ensure that your files for the year are in multiple locations and your data is safe. Keep in mind that you should always keep your data in at least 3 different locations per “3-2-1 Backup Rule“, which definitely applies to a photography workflow. If you don’t know where to begin, check out my Photography Backup Workflow article for more details. We have also covered backup in detail in our Workflow and Post-Processing course.

Note: Make sure to close out of Lightroom before backing up your Lightroom catalog!

Since your Lightroom catalog and your images are kept in two separate locations, make sure to back up both. Backing up one without the other is a huge mistake. Even if you choose not to backup your Lightroom catalog, you should always back up your images. While you can start over with a new Lightroom catalog by re-importing images (without losing your edits), there is absolutely no way to restore your RAW files from your Lightroom catalog alone.

7) Test Your Backups

It is absolutely essential to have backups, but backups are only good if they actually work. When was the last time you have actually looked into your backup routine and tried to recover a file? Has it been a while? Perhaps it is now time to test your backups and make sure they work as intended. Start by renaming a folder in your computer (do not delete in case your restore procedure fails), then try to restore backups from your main backup first, then your off-site location. If you store hard drives in a different location, plug each one of them into your computer and make sure that they all still function without any issues. If you have any doubts about off-site storage, it might be a good idea to redo it from scratch, even if it takes a very long time and lots of effort. While onsite backup is something many of us make sure takes place, many of us often neglect off-site backup, sometimes completely. I personally have too much storage to back up into the cloud, but buying a few large capacity drives and dropping them off at a safe deposit box or your friend’s house might be worth the effort, even if you only do it once or twice a year. If you do any commercial work, I would highly recommend to have a robust off-site backup solution!

8) Lightroom: Close the Catalog and Start a New One

Once you are done with all of the above tasks, if your Lightroom and folder structures are organized by year (which I highly recommend), you might consider starting a fresh catalog and closing your current year catalog, making it only available for future exports and edits. From here on, you should not use that catalog for importing images next year or any other year in the future! Unfortunately, there is no way to lock a catalog from further imports in Lightroom, so you will have to remember to only import images in the current year catalog.

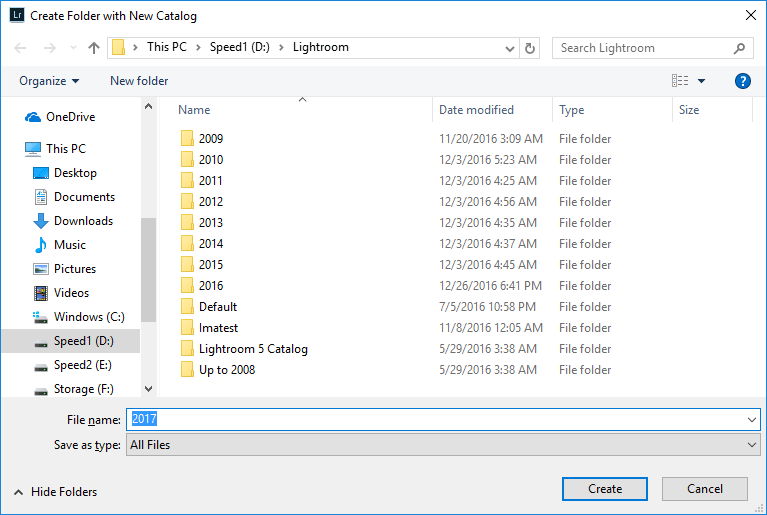
Go to “File->New Catalog…” to create a new catalog in Lightroom. Make sure to navigate to the same folder that hosts all your existing Lightroom catalog. I personally store my catalogs in a folder called “Lightroom” (My images are always stored in a folder called “Photos”, so I know right away where to put my Lightroom catalogs):

New Lightroom Catalog

Keep in mind that you do not have to create a folder for the year – Lightroom will do that automatically. All you have to do is type the new year in the “File name” field, just like above. After you click “Create”, Lightroom might ask if you need to back up your catalog. Since you have already done that in the previous step, you don’t need to worry about backing up your catalog again, so you can safely click “Skip this time”.

Your brand new Lightroom catalog for the next year should now be open and ready for import. From now on, you will only be importing images into this catalog!

9) Evaluate Your Current and Future Storage Needs

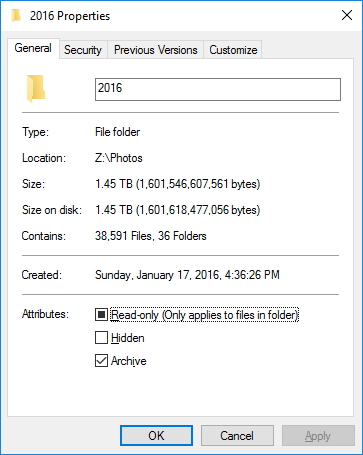
The next steps are to evaluate the total amount of storage you consumed this past year – this will help you understand your future storage needs and growth. For this task, your file system will be the best way to see how much data you have consumed. If you are a Windows user, all you have to do is click your parent folder and select “Properties”, which should bring up a window similar to this one:

Folder Properties for Storage Needs

As you can see, I consumed a total of 1.45 TB (Terabytes) of storage in 2016. Lightroom shows a total of 35556 images and I ran the above before saving all the changes to sidecar files in Lightroom, since the process took a long time. It has been a pretty busy year for me, but now that I know that I roughly shot close to 1.5 TB in 2016, I can project that I will need about 1.5-2 TB of space in 2017. This means that I need to re-evaluate my storage needs and make sure that I have enough storage for next year. Looking at my Synology DS1815+ (see my detailed review of the Synology DS1815+), I can see that I still have more than half of the 32 TB volume available and my secondary backup with ioSafe 214 (see my detailed ioSafe 214 review) that mirrors my photos is showing 2 TB of space available as well. I am good to go for another year, but after that, I will need to look into expanding my secondary backup the following year. And my offsite backup routine will need to change as well, as I will need to add another large drive to the mix.

Evaluating storage needs is important, because it will help you plan ahead. I have been a big fan of Synology storage arrays for a while now, but I have recently started to look into QNAP’s storage solutions as well, since they have slightly different technology and allow both NAS and DAS connections at the same time. I will soon be evaluating two QNAP storage arrays for my needs and will be writing reviews, which will hopefully help our readers in choosing the right storage solutions for photography needs.

Hope you found the above article useful. If you perform other useful year-end activities not mentioned above, please share in the comments section below!

The post Photography Workflow – Year-End Activities appeared first on Photography Life.


from Photography Life https://photographylife.com/photography-workflow-year-end-activities

Saturday, 24 December 2016

Nikon D750 with MB-D16 Battery Kit Deal Expiring Tonight

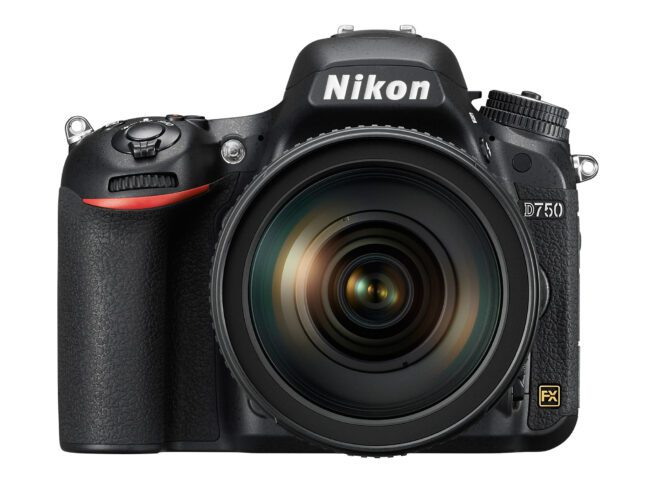
Happy holidays dear PL readers! While Spencer and I are still going through all the images we have taken in New Zealand and spending some time with our families, I wanted to mention a killer deal that will be expiring tonight. The full-frame Nikon D750 DSLR (see our detailed Nikon D750 review) camera kit with the 24-120mm f/4G VR lens (recently updated Nikon 24-120mm f/4G VR review) is currently being promoted by Nikon with the free MB-D16 grip / multi-battery pack. On top of this, B&H has pitched in with an additional product to promote this deal even further – they are bundling a few different accessory options, such as a 4 TB external hard drive by Western Digital + 64 GB SanDisk SDXC memory card (my preferred option) or a Rode microphone to give an instant savings of $820. This deal is a real steal, especially considering how superb the D750 camera is, especially when coupled with the 24-120mm f/4G VR. Today is the last day when you can take advantage of this deal, since it will expire at 11:59 PM EST (December 24, 2016).

Nikon D750

The Nikon D750 bundles come with a few different options. If you do not want to get the 24-120mm f/4G VR kit, you can get the body-only configuration and it will still come with the MB-D16 battery grip. Below are all the links that will take you to different configurations:

Keep in mind that all the other deal bundles with the Nikon D500 and the D810 will also be expiring. Our favorite deals are the Nikon D500 + MB-D17 + 200-500mm f/5.6E VR + 2x 32GB XQD cards for $3,246.95 ($550 off) and Nikon D810 + MB-D12 + 24-120mm f/4G VR + 32 GB SDHC Card + 4 TB WD External Drive for $3,196.95 ($920 off).

If you are wondering about the performance of the Nikon 24-120mm f/4G VR, definitely check out our detailed review of this superb lens. Here is a sample image that I lightly processed in Lightroom, captured in New Zealand’s north island with the Nikon D810:

New Zealand Beach Sunset

NIKON D810 + 24-120mm f/4 @ 24mm, ISO 64, 1/1, f/11.0

I did not have a lot of gear with me this time – just the D810 with a couple of lenses, along with the Fuji X-T2 (review coming soon!), so weight was not an issue. If I wanted to go lighter and wanted to do more travel photography than purely landscapes, I would have taken the D750 with me instead. The lens I used most of the time was the 24-120mm f/4G VR, although I did use the new 70-200mm f/2.8E VR quite a bit as well (review also coming soon).

Please note that B&H will reopen for web orders in a few hours (at 6 PM EST), so the order window is pretty short!

The post Nikon D750 with MB-D16 Battery Kit Deal Expiring Tonight appeared first on Photography Life.


from Photography Life https://photographylife.com/nikon-d750-with-mb-d16-battery-kit-deal-expiring-tonight