Friday, 3 February 2017

Cell Phone Photography – Part 2: Editing Images

In my last post I covered the basics of cell phone photography. In this post I want to go over how you can edit photos with different apps on your phone. Of course, you can always import photos from your phone onto your computer and edit them with your software of choice, but if you plan to share images on social media and want to upload them directly from your phone, you can save a few steps by doing everything on your phone.

For the purposes of this article, I’m going to assume that you have experience editing photos on a computer. I’m not going to cover the basics of photo editing and what all of the different controls do (if you need more information on editing basics, this is a great place to start). You also might consider our Level 1: Workflow and Post-Processing Basics video.

1) Why Edit Images?

If you’re used to using your DSLR or mirrorless camera for photography and typically shoot JPEG, the images probably come out of the camera looking pretty good. Of course, almost any image can benefit from a few adjustments in post processing, but this is especially true with phone photos. The lenses on cell phones don’t have the same quality glass and special coatings as the lenses for your camera, so you’ll often find the images you capture with your phone need edited before you’re happy with them.

If you followed my advice in the last article, your images should be properly exposed, but there’s more to a good image than proper exposure. At the very least, almost every phone image can benefit from a boost in contrast and saturation. You might also need to adjust the tint and white balance a bit. Finally, editing images is an opportunity to put your personal touch on an image and make it your own.

Throughout this post, I’m going to use the same image and edit it in different apps. Hopefully this will show that they’re all pretty similar in the results they can produce. Of course, the more editing options an app has, the more complicated your edit can be.

2) App Overload

Once you start looking for an app that you can use to edit photos, the first thing you’ll notice is that there are a lot of them out there. How do you decide which to use? I’m going to go over a few of the most popular options out there, as well as offer up my personal opinions about each one. Most are free, so there’s really no reason not to try out a few different ones and see which you like best.

One thing to keep in mind is that you are editing JPEG images. Images that you’ve captured with your cell phone camera are always going to be JPEGs (unless you specifically used a phone and app that can shoot in DNG), so expect some limitations on how far you can push things.

There are going to be some differences in which apps are available for iOS and which are available for Android. All of the apps that I discuss in this post are available for both (with the exception of Camera+). Almost every default camera app will have some basic editing capabilities built in. Since all different builds and brands of Android phones will have a different default camera app, I can’t promise that the one that you’re using will be able to edit photos. Also, they’re all going to have different options, so I suggest exploring the options within your phone’s camera app and deciding if it will work for you or if you need to download something that gives you more control over the final look of your image.

2.1) Default Camera App

Let’s start out by covering the default editing capabilities that come with your phone. I shoot with an iPhone 7+ (running iOS 10.2), so that’s what I’m going to cover first. The editing options aren’t actually found inside the camera app, but can be found when you’re reviewing images. View an image that you took (either in the camera app or inside Photos) and at the bottom you’ll see three lines that look like sliders. This gives you access to the editing options.
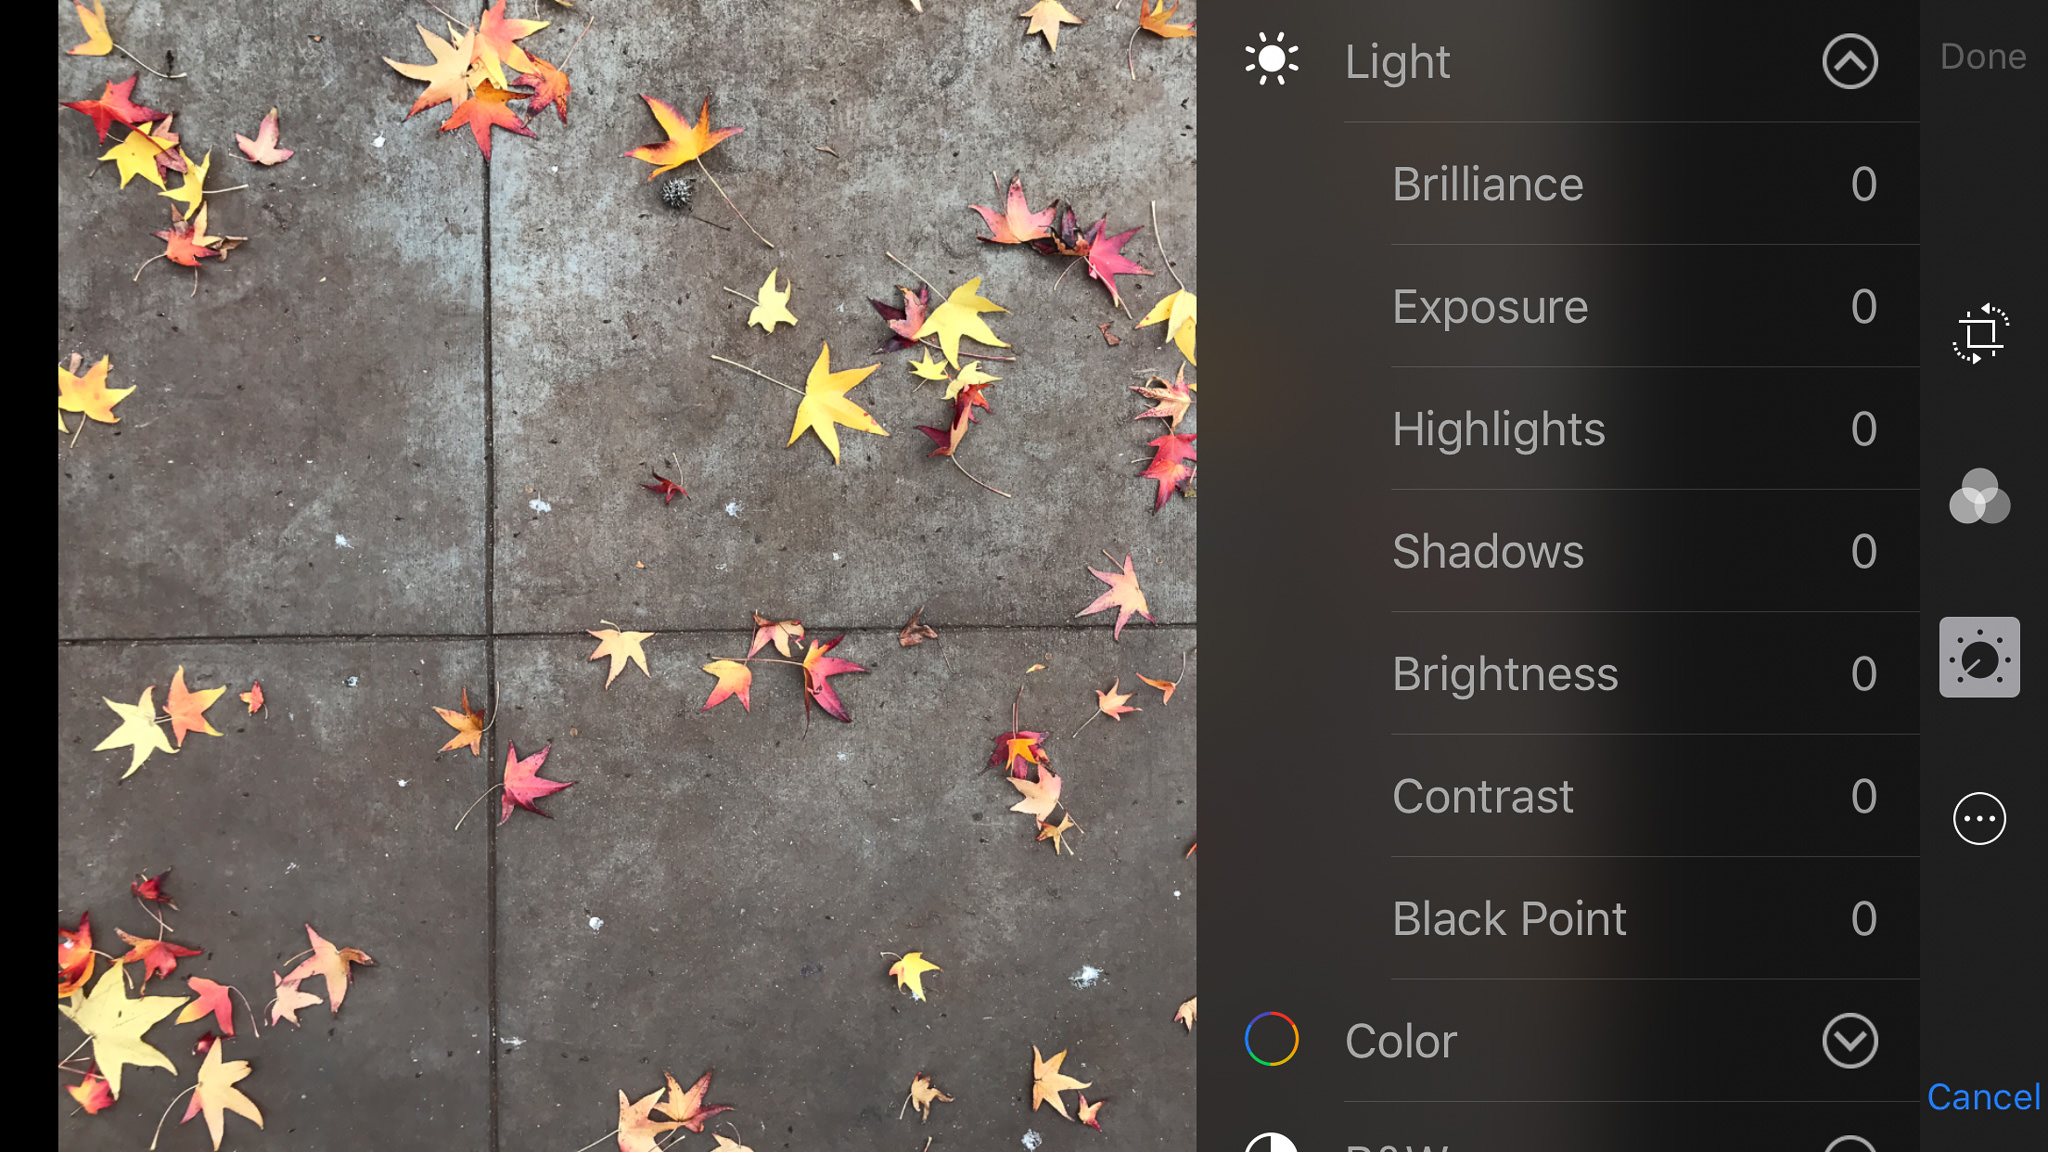
iPhone Editing Screen

iPhone Editing Screen

If you just want a quick fix, you can press the magic wand in the upper-right corner and some quick adjustments are made to the image. If you want more control, you’ll need to go through the icons on the edge of the screen. From here you can crop and straighten, add filters, adjust image properties like exposure, contrast, highlights/shadows, color and even have control over properties of B&W conversions like intensity and grain.
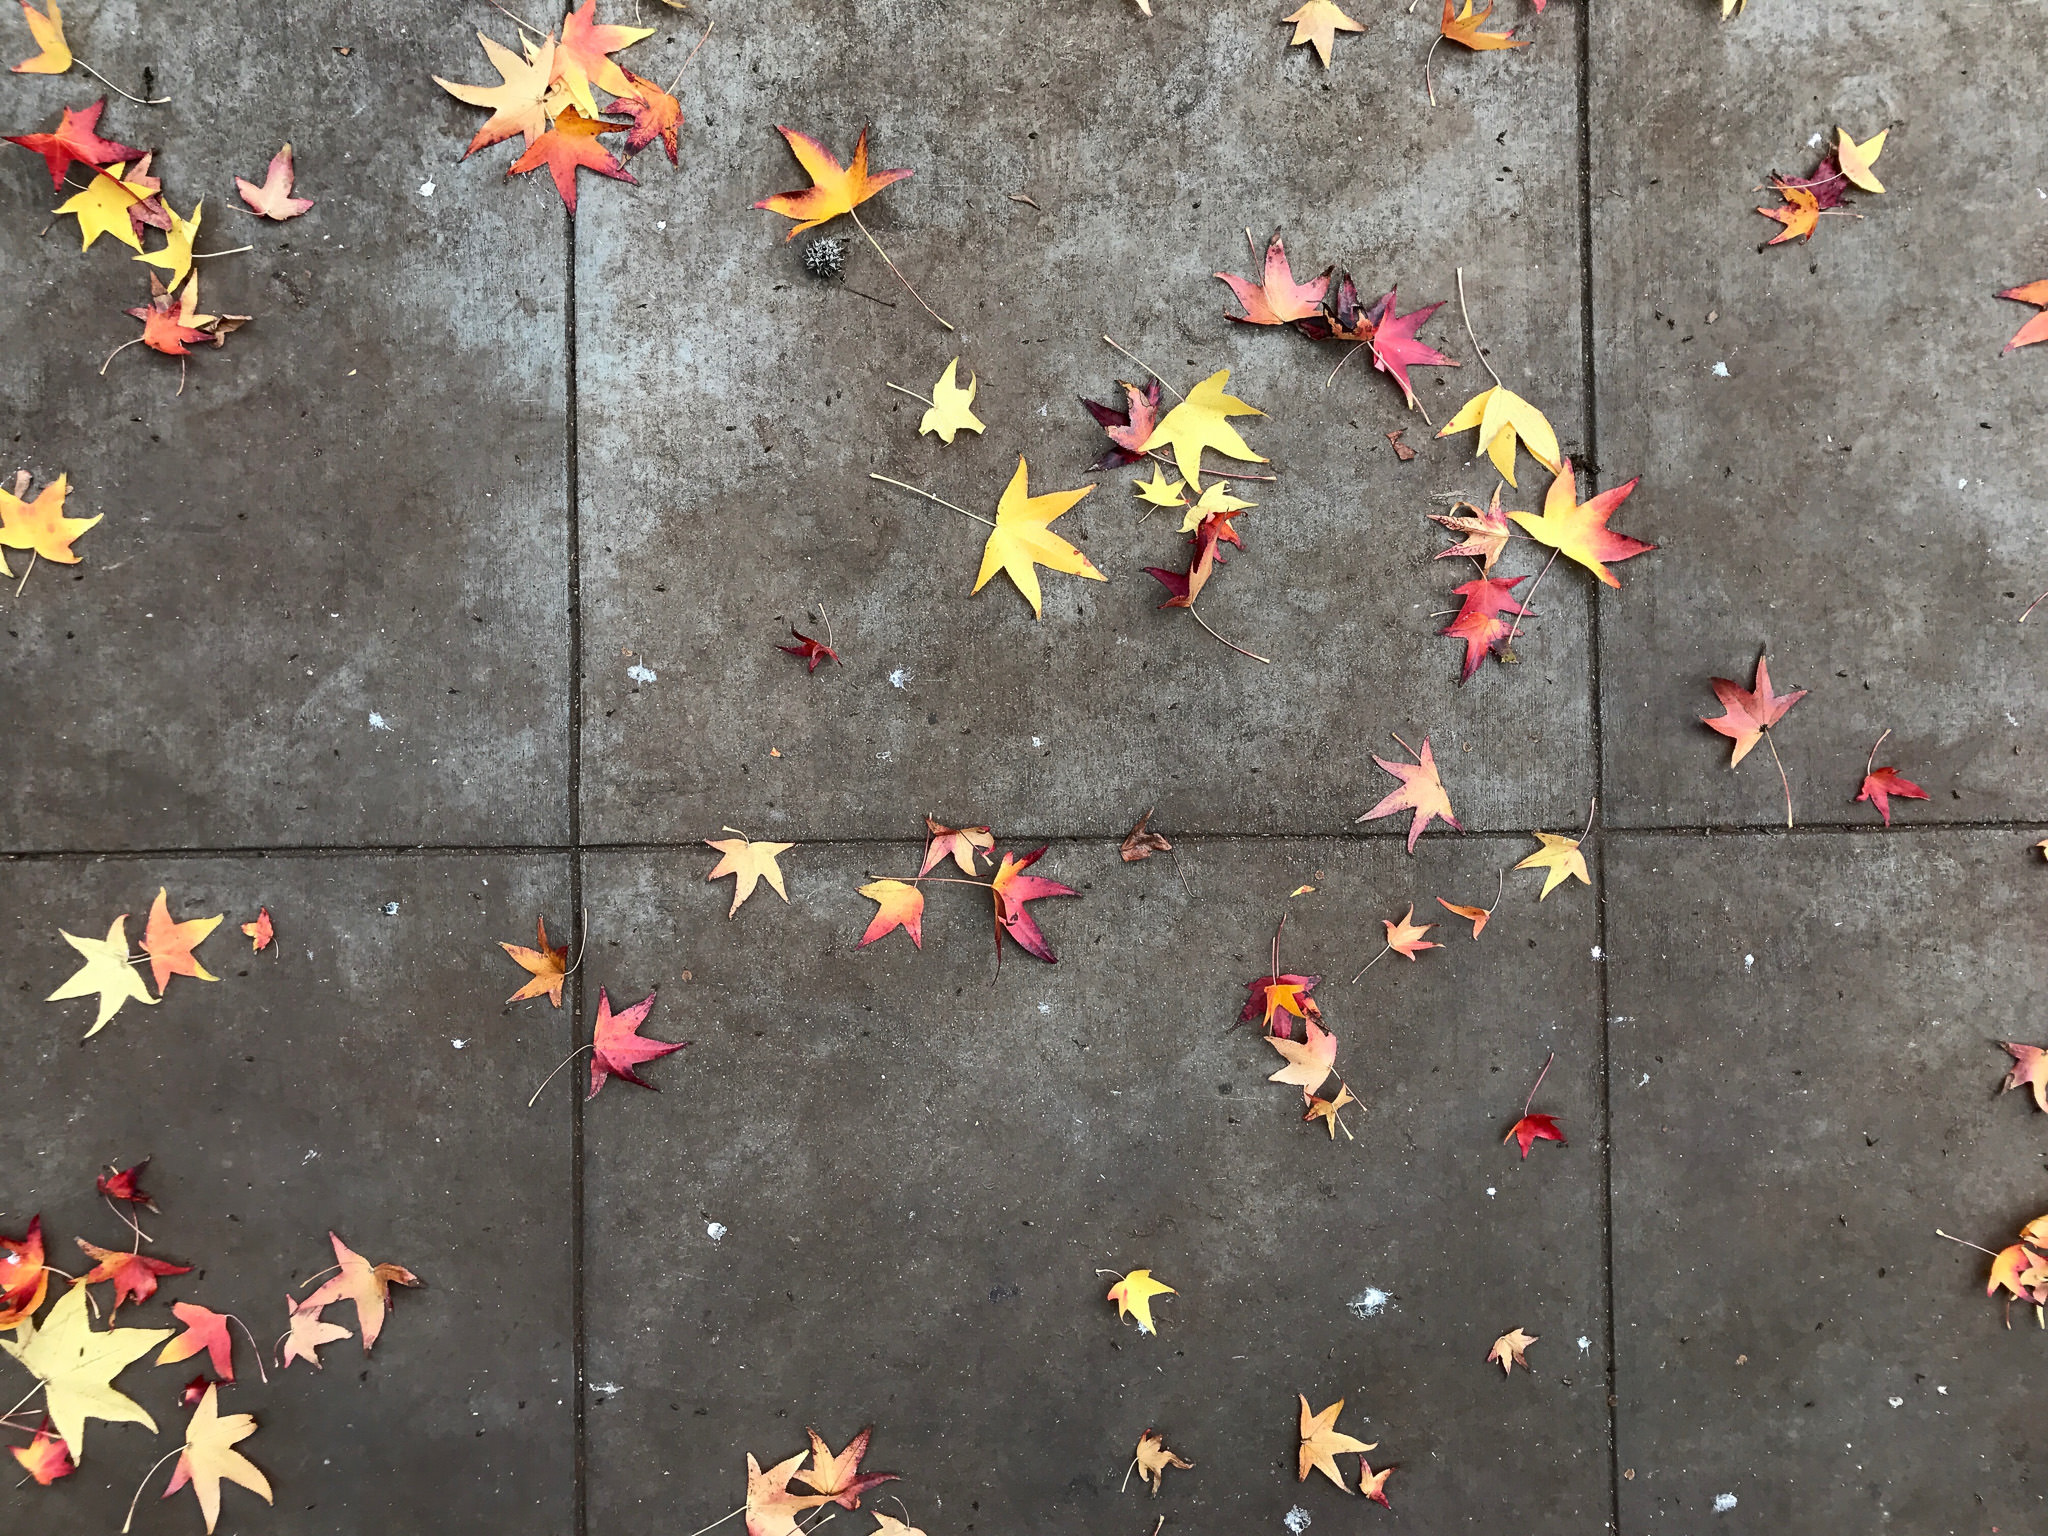
JPEG image edited with iPhone default app

iPhone 7 Plus @ 3.99mm, ISO 20, 1/180, f/1.8 – JPEG image edited with iPhone default app

As for Android, the only example I have is my wife’s Samsung Galaxy Note5. I was not at all impressed with the editing options on her phone. They were very basic and had strange names that don’t really relate to most editing software. If you have a different phone or even a different version of the operating system, you might have different options, but I personally would not use the default editing app on her phone.

Regardless of what phone you’re using, the editing options that are part of the default camera app are basic and capable of some quick image corrections. If you have a little image editing experience, you should be able to take a photo from boring to polished without much trouble.

2.2) VSCO

One of the most popular photo editing apps around is VSCO (pronounced “vis-co”, stands for Visual Supply Company). One of the reasons for it’s popularity is that it has presets that can quickly and dramatically change the look of your images. If you apply a preset but want to personalize it, you can tweak it until you’re happy with the look of your image. Unfortunately, when you apply a preset you can’t see what changes were actually made to the image, so it’s tough to adjust one specific aspect of a preset. Sometimes you’re stuck with the changes that were made. For example, if the preset you like adds too much fade, you can’t reduce the amount of fade, you can only increase it. On the other hand, if it cools off the image too much, you can always warm it up by adjusting the white balance.
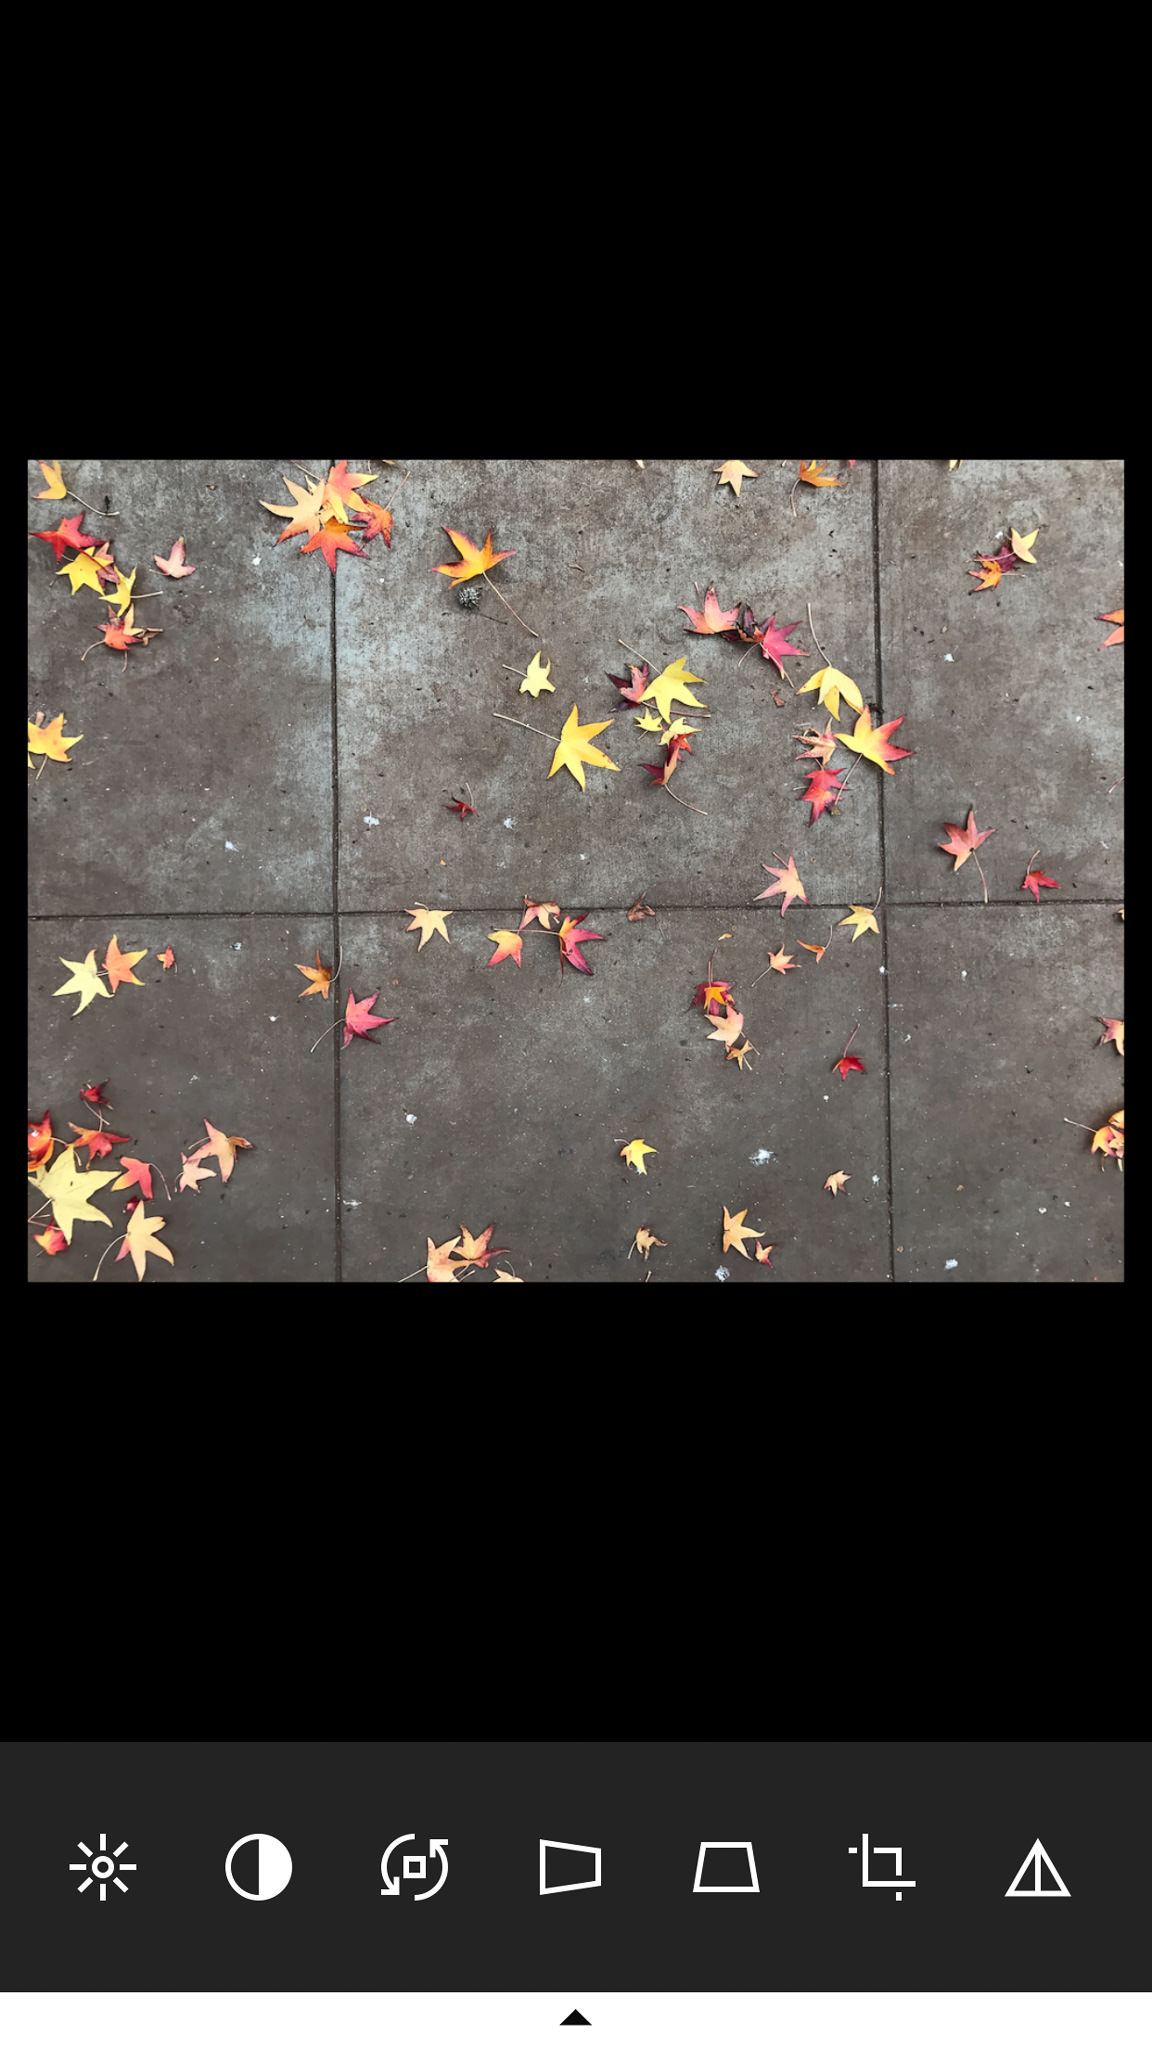
VSCO Editing Screen

VSCO Editing Screen

If you’re not a fan of presets, you can also edit your images with manual controls. You’ll notice the tools aren’t named, which means there is a bit of a learning curve as to what each one does. You’ll have to take my word for it that a lot of the adjustments in VSCO are the same ones that can be found in the default editing app. In addition to those, you also have options like perspective control, skin tone, vignetting, and even split toning. VSCO is my go-to app for photo editing. I’ve used it to create both clean, simply edited images and complex, moody images.

JPEG image edited with VSCO

iPhone 7 Plus @ 3.99mm, ISO 20, 1/180, f/1.8 – JPEG image edited with VSCO


VSCO is free to download and comes with some basic presets. Additional presets are available, both for free and for purchase.

2.3) Instagram

Many people who use their cell phones for photography also choose to share their images on Instagram. By default, Instagram comes with capable photo editing tools. If you want to share images on Instagram and don’t want the extra step of editing your photos in a different app, here’s what you can expect to find when you open it up.
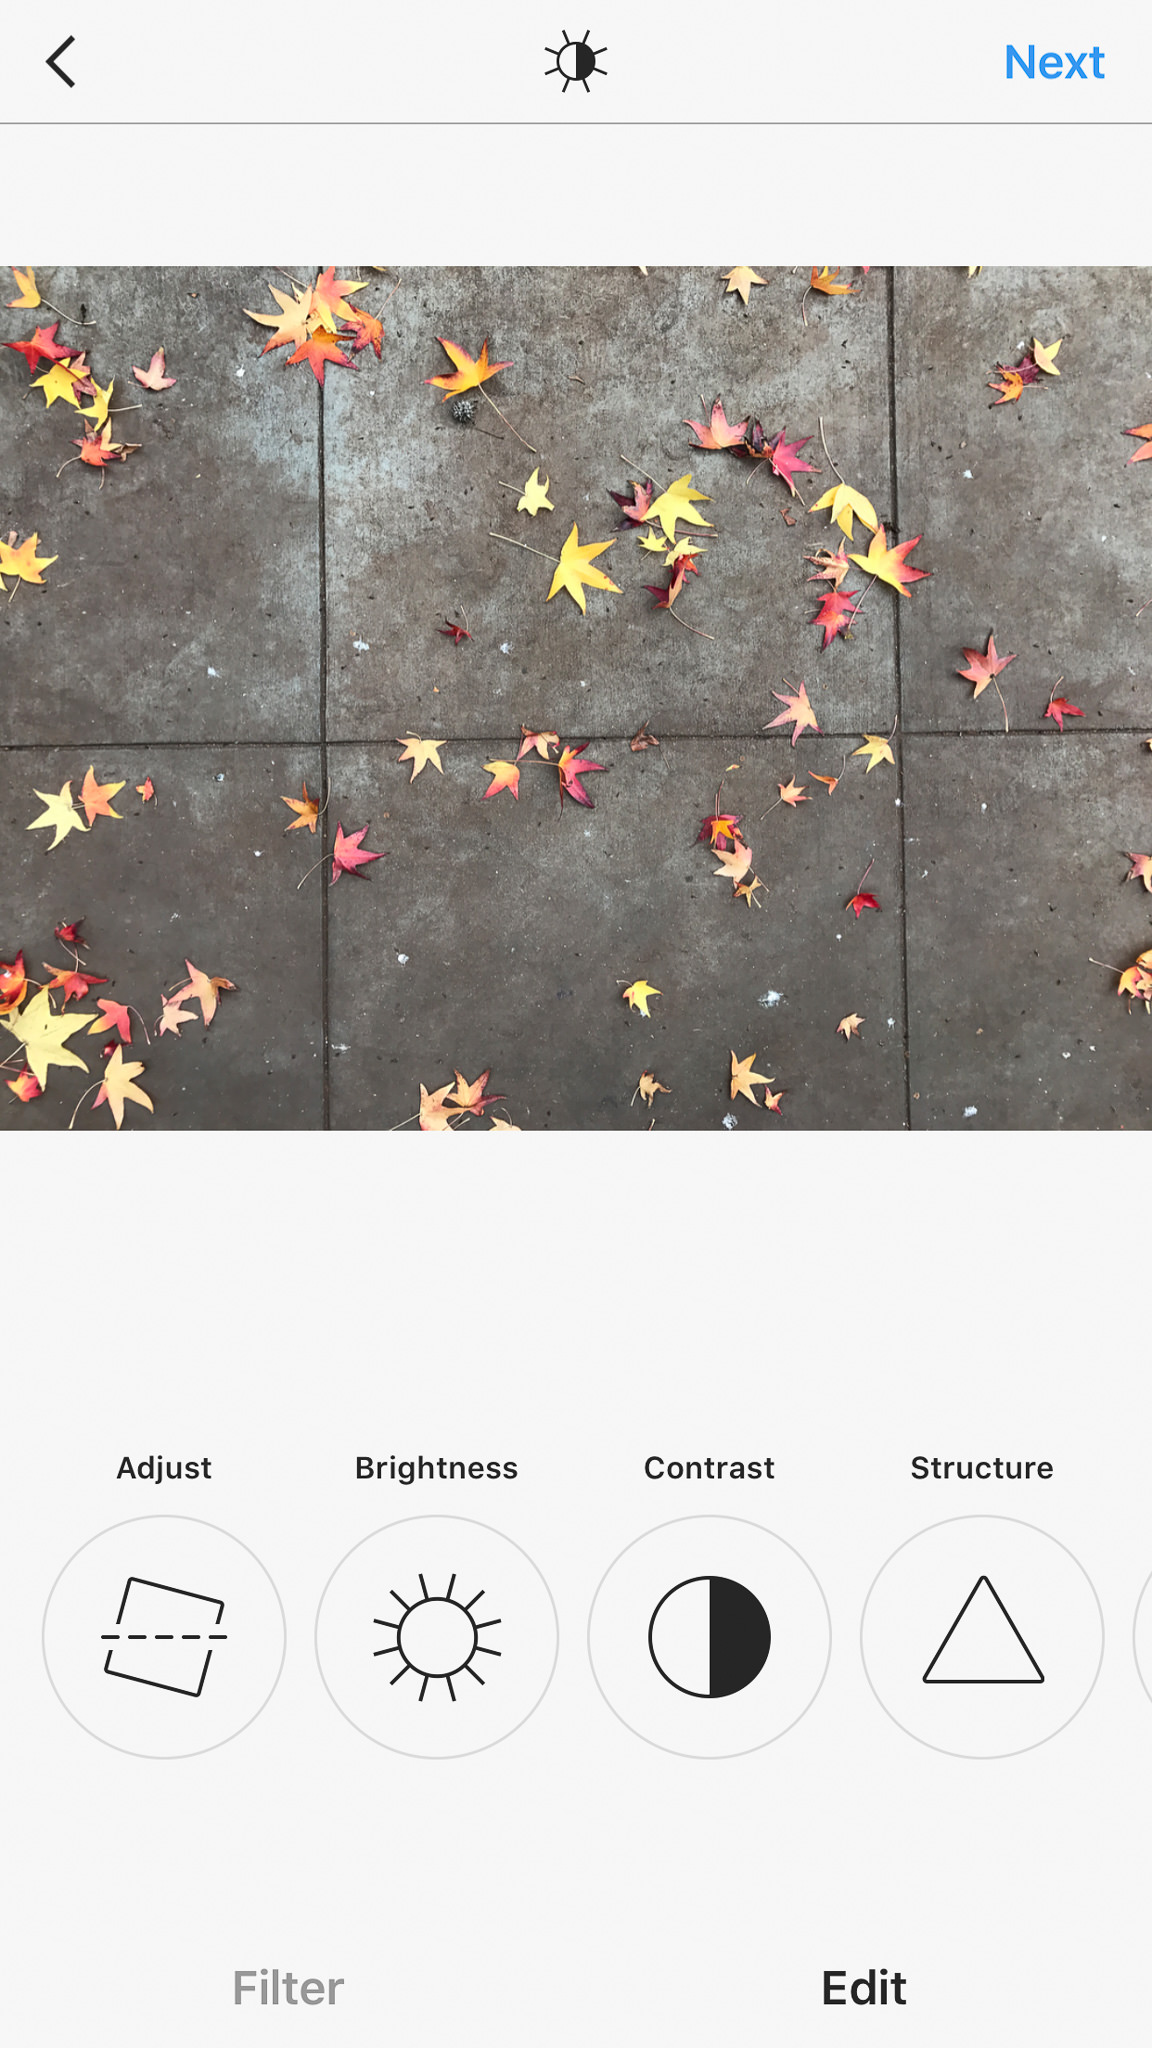
Instagram Editing Screen

Instagram Editing Screen


Instagram’s first claim to photo-editing fame was the ability to add filters to images. When it was first released, it didn’t even have the option to edit images. The only way you could change the way a photo looked was to add a filter. Over time, Instagram became more sophisticated and eventually offered basic editing capabilities. All of the usual suspects are here (brightness, contrast, color, etc…), including one of the original tools that made Instagram unique: a simulated tilt-shift effect.
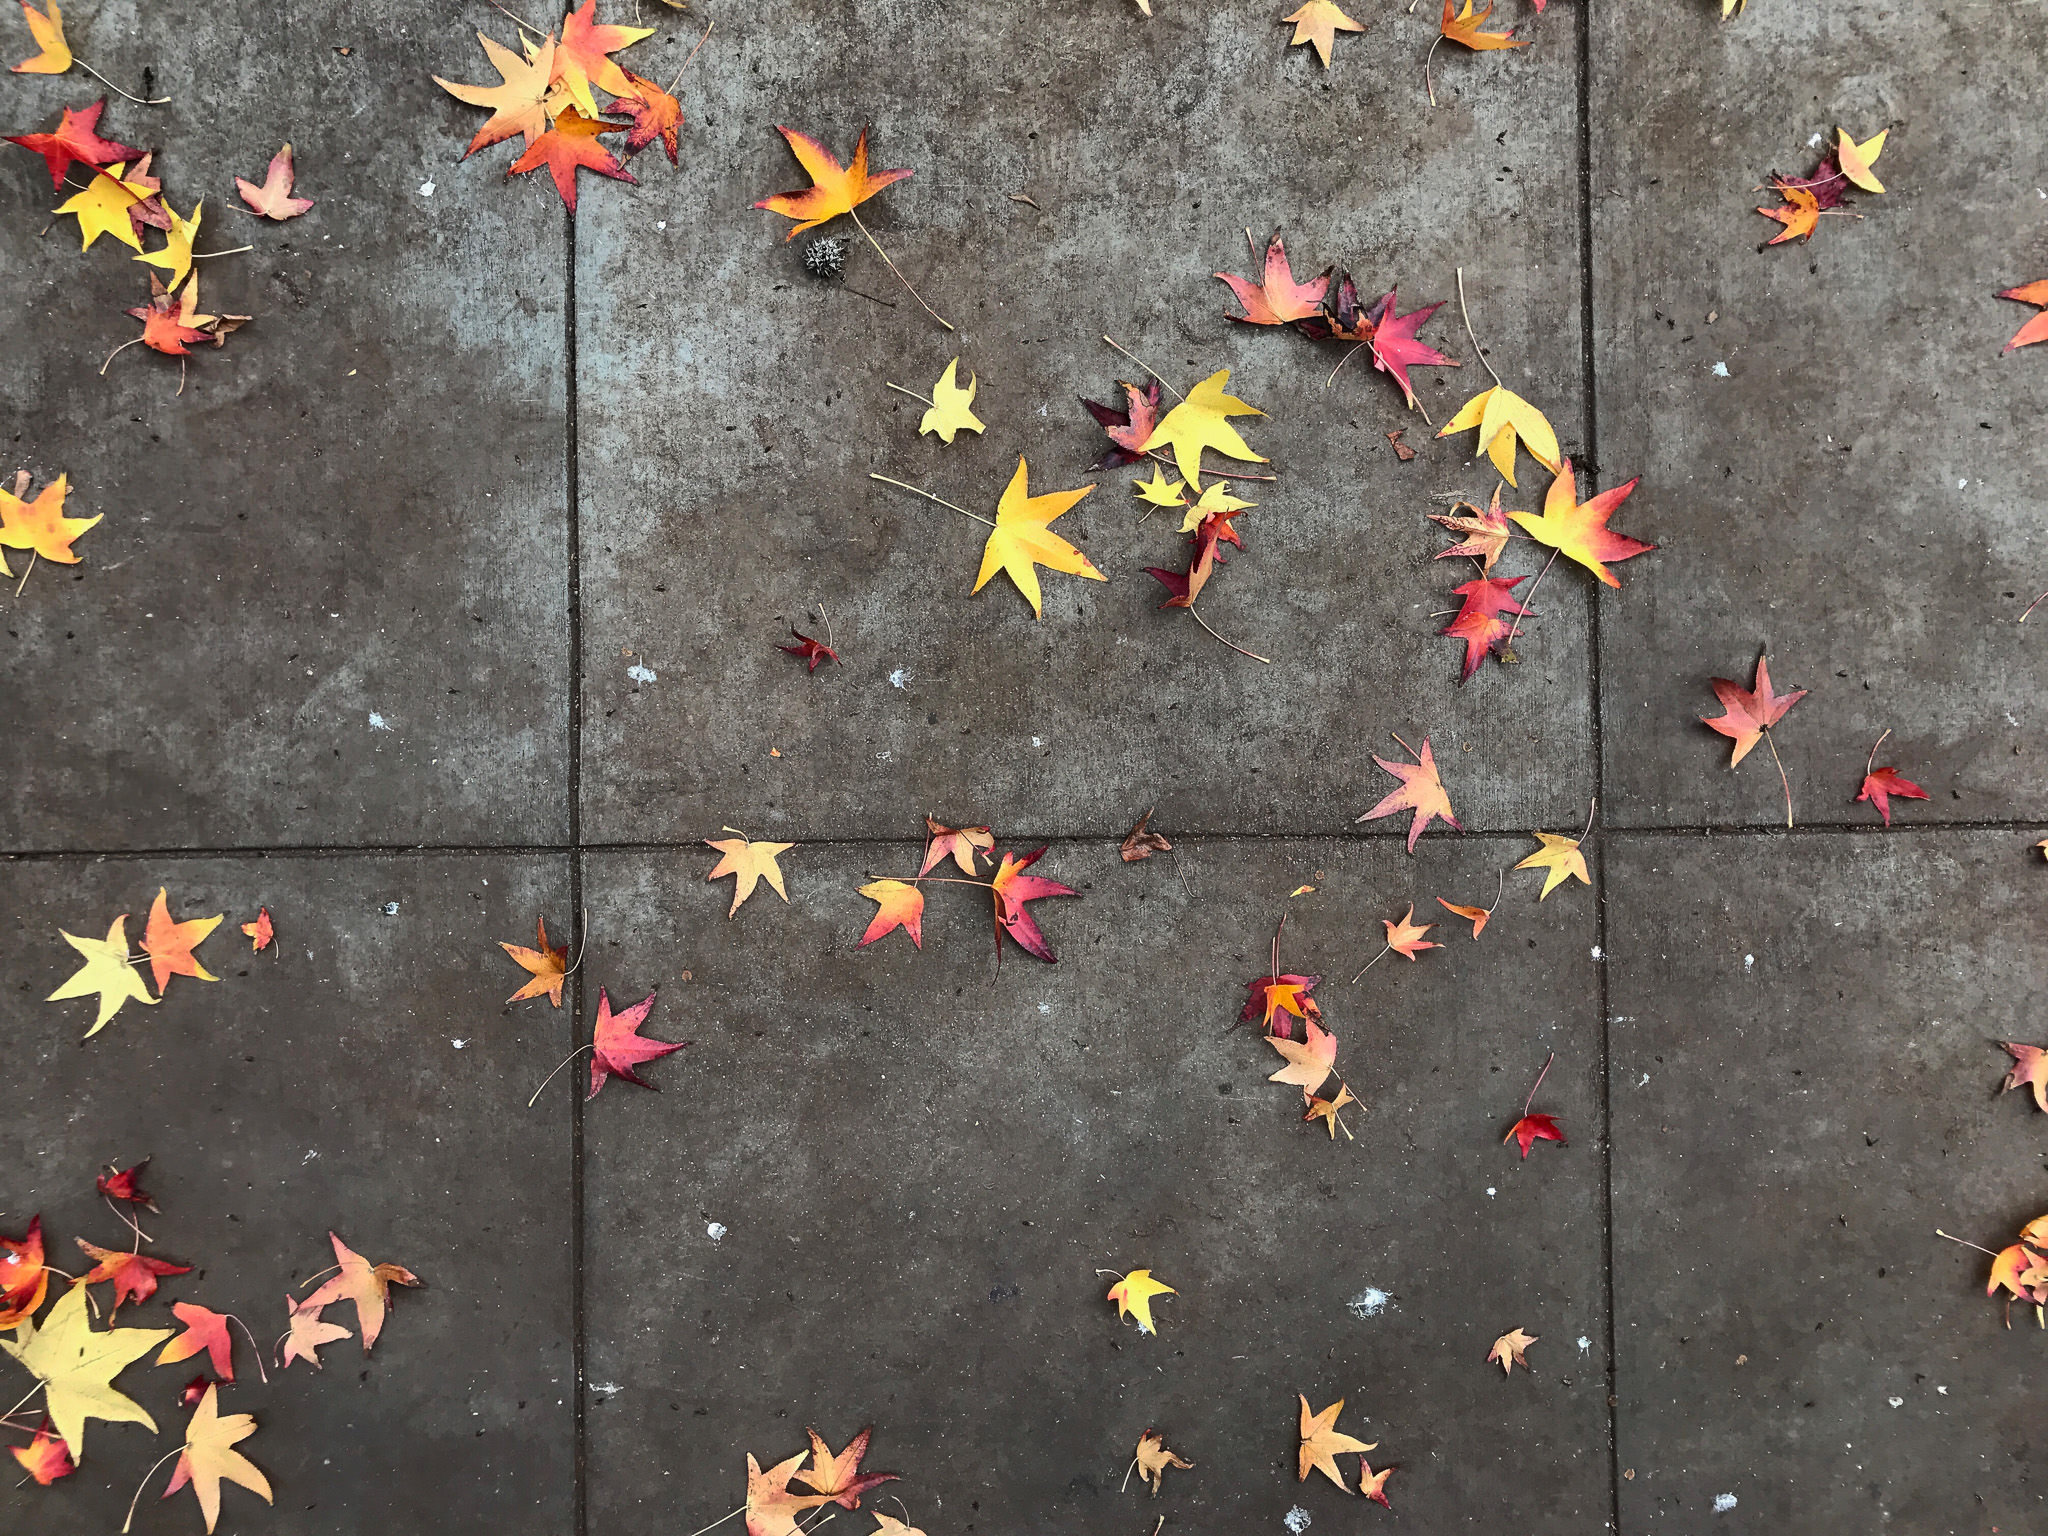
JPEG image edited with Instagram

iPhone 7 Plus @ 3.99mm, ISO 20, 1/180, f/1.8 – JPEG image edited with Instagram


One word of warning about using Instagram to edit your photos. Once you edit an image using the Instagram app, you have to somehow share it within the app to get the edited image to appear with the rest of the images on your phone. You can not directly export it for personal use. For this reason, I would suggest only using Instagram for photos you plan to share with the app.

You can download Instagram here. You can also take a look at my Instagram page, which is strictly cell phone photography (although I mainly use VSCO for editing my images).

2.4) Lightroom Mobile

If you’re used to using Lightroom on your computer, Lightroom Mobile will be very familiar. Of all the different apps I’ve tried, this one is definitely the most professional and photographer-friendly. In addition to the expected filters and basic adjustments, there are lens correction and even curves adjustments available! Of course, the more advanced controls that are available to you in the computer version of Lightroom aren’t available on the mobile version, but it’s still one of the most feature-rich apps around.
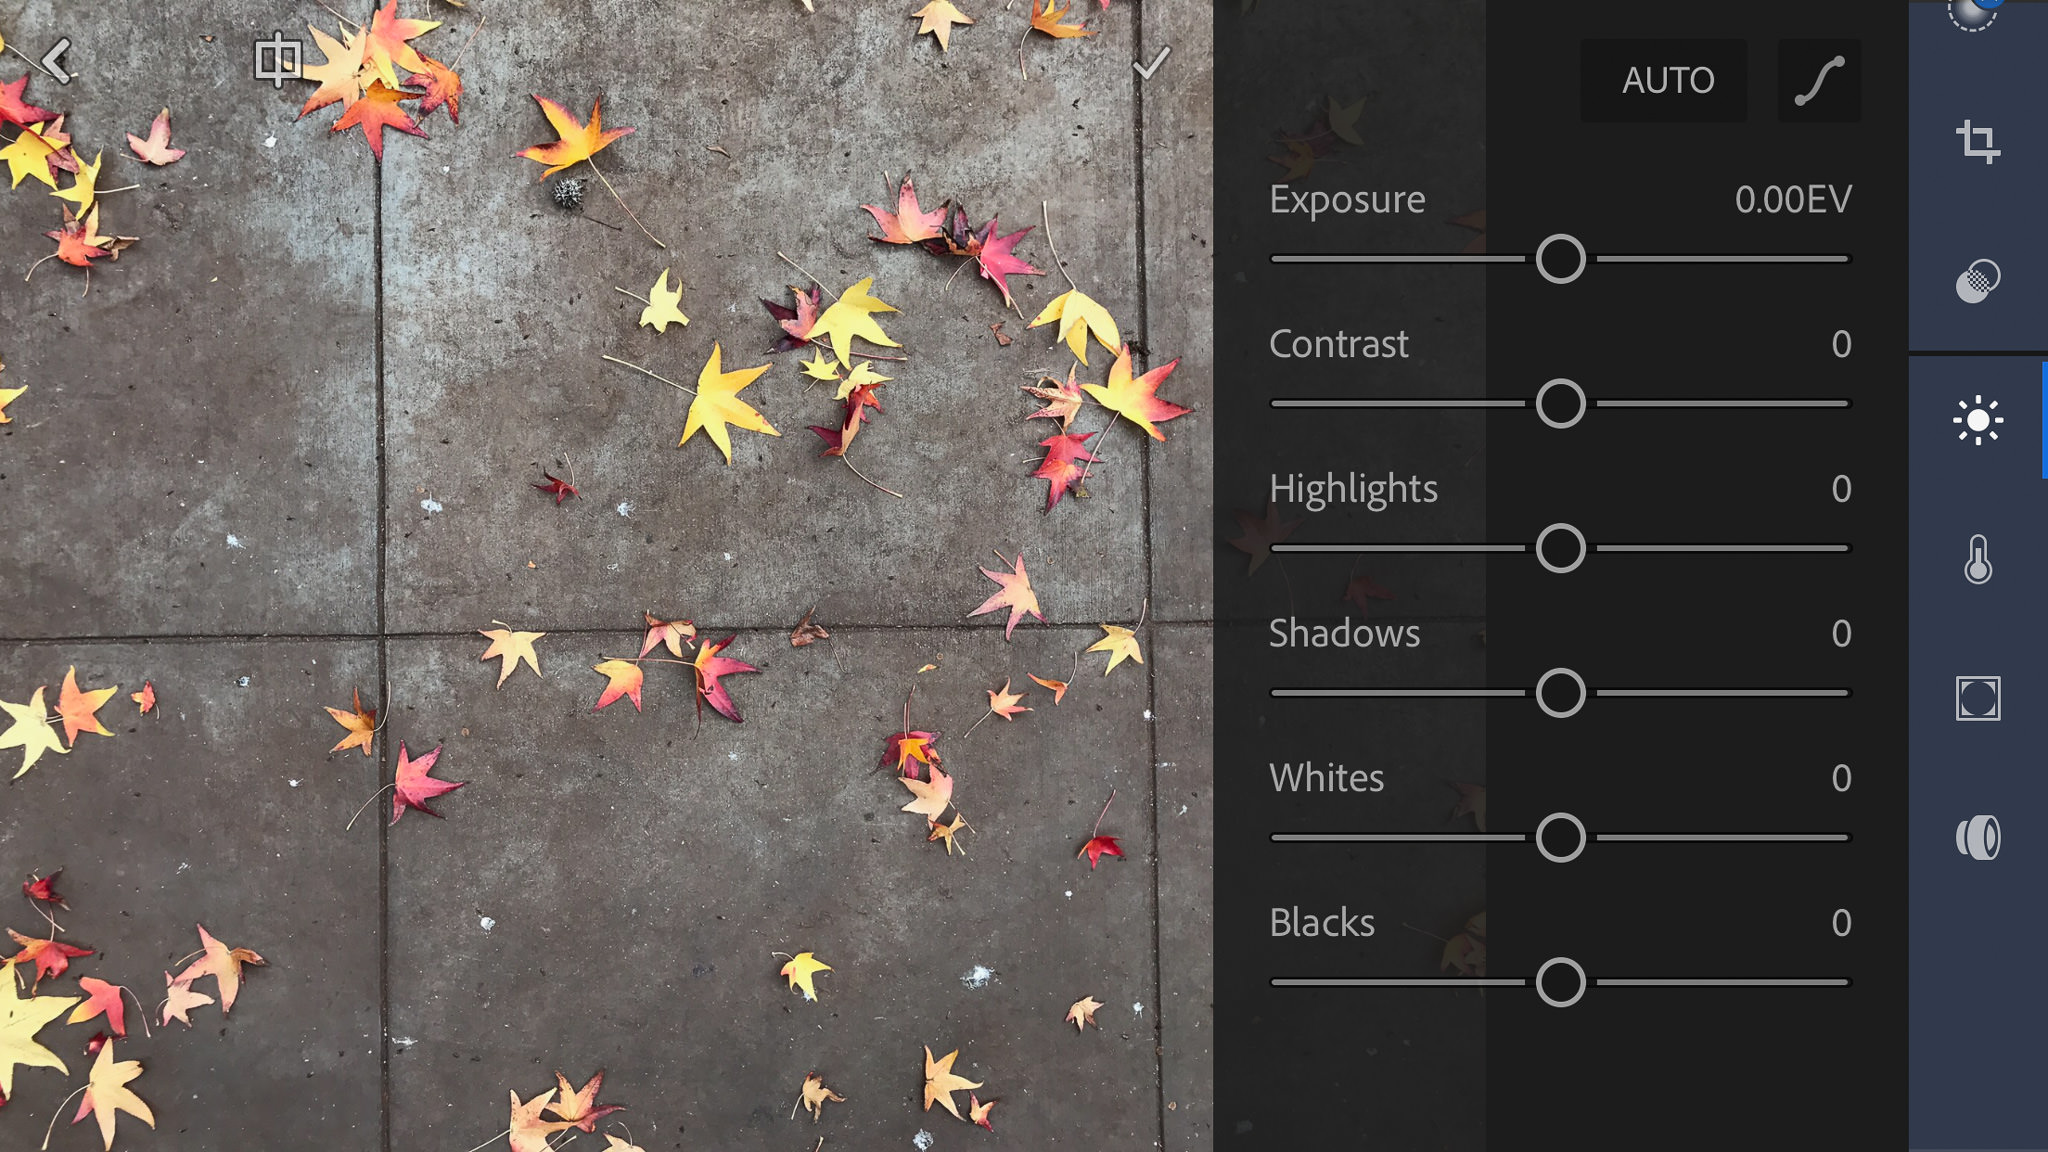
Lightroom Mobile Editing Screen

Lightroom Mobile Editing Screen


If you have a phone that can shoot in DNG, this is a great app to use both for capturing and editing images. Keeping everything within one app definitely helps with photo organization. If you decide not to use the camera function of Lightroom Mobile, you can still use it to edit JPEGs you take in other apps (although you can’t use it to edit DNGs taken in other apps unless you’re an Adobe CC subscriber).
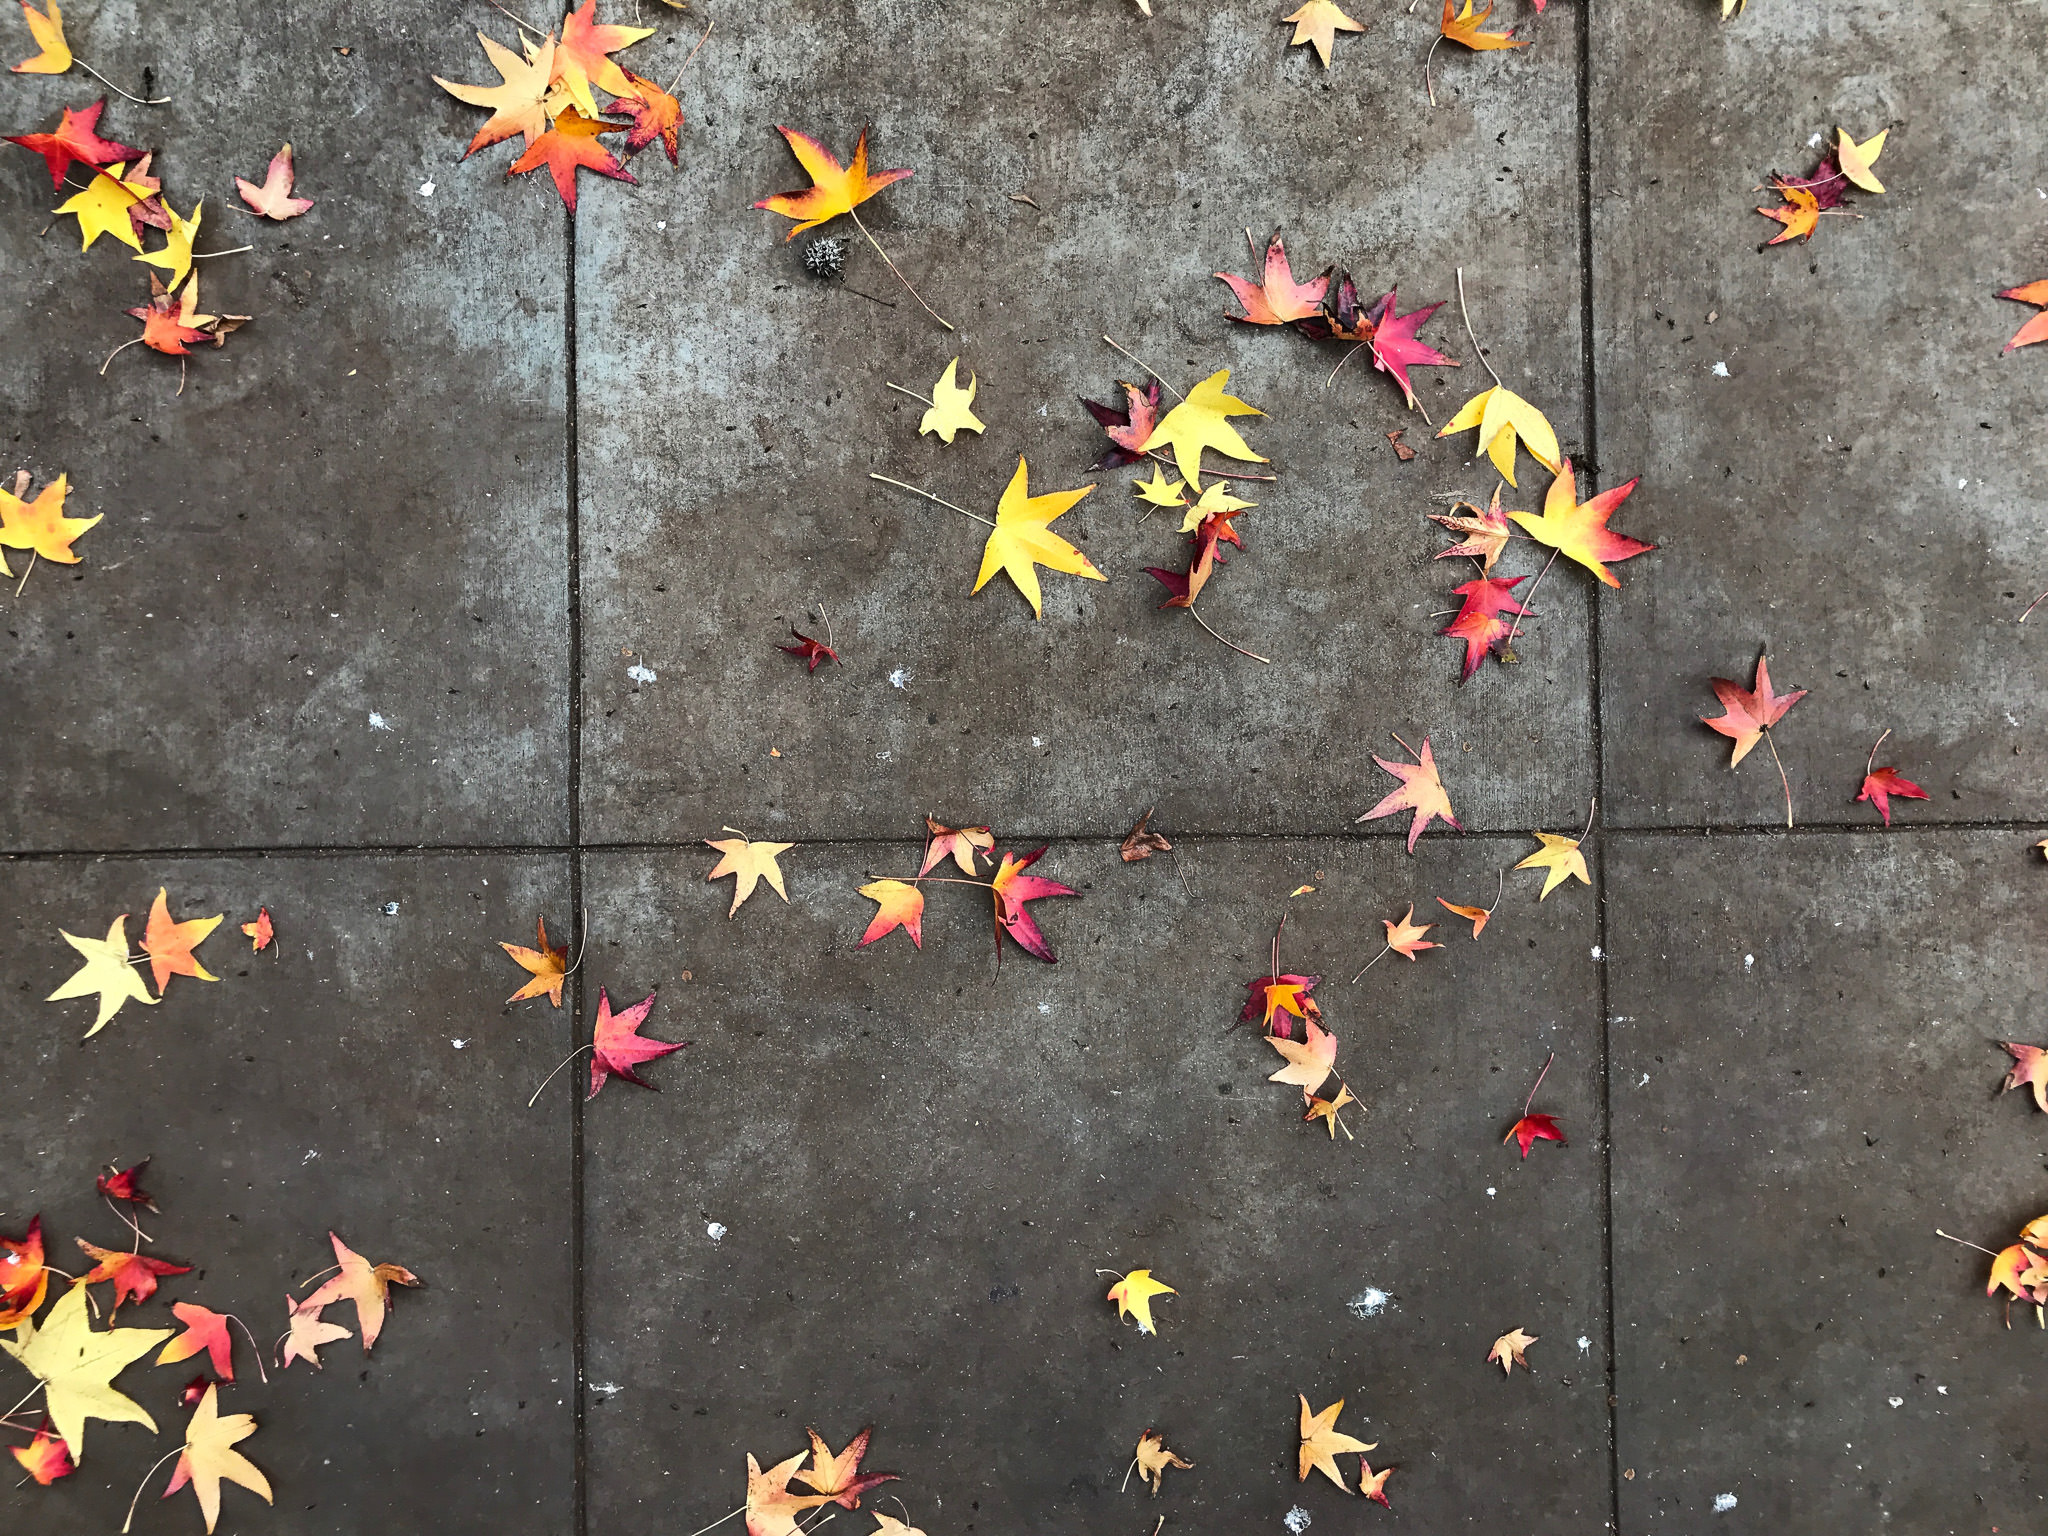
JPEG image edited with Lightroom Mobile

iPhone 7 Plus @ 3.99mm, ISO 20, 1/180, f/1.8 – JPEG image edited with Lightroom Mobile


You can download Lightroom Mobile here.

3) Editing DNG Cell Phone Images

Is it worth it to use an app that can shoot DNG images on your cell phone? How much more dynamic range is available to you? Do all of the traditional reasons for shooting DNG apply? Do the images look better without the default camera’s JPEG compression? Let’s take a look.

Here are two images that I took at roughly the same time. The first is a JPEG that was taken and edited with the default camera app on my iPhone 7+, while the second is a DNG that was taken and edited with the Lightroom Mobile app. Please ignore the differences in color temperature, as I edited them separately and didn’t match them perfectly.

JPEG image shot and edited with default camera app

iPhone 7 Plus @ 3.99mm, ISO 20, 1/1500, f/1.8 – JPEG image shot and edited with default camera app
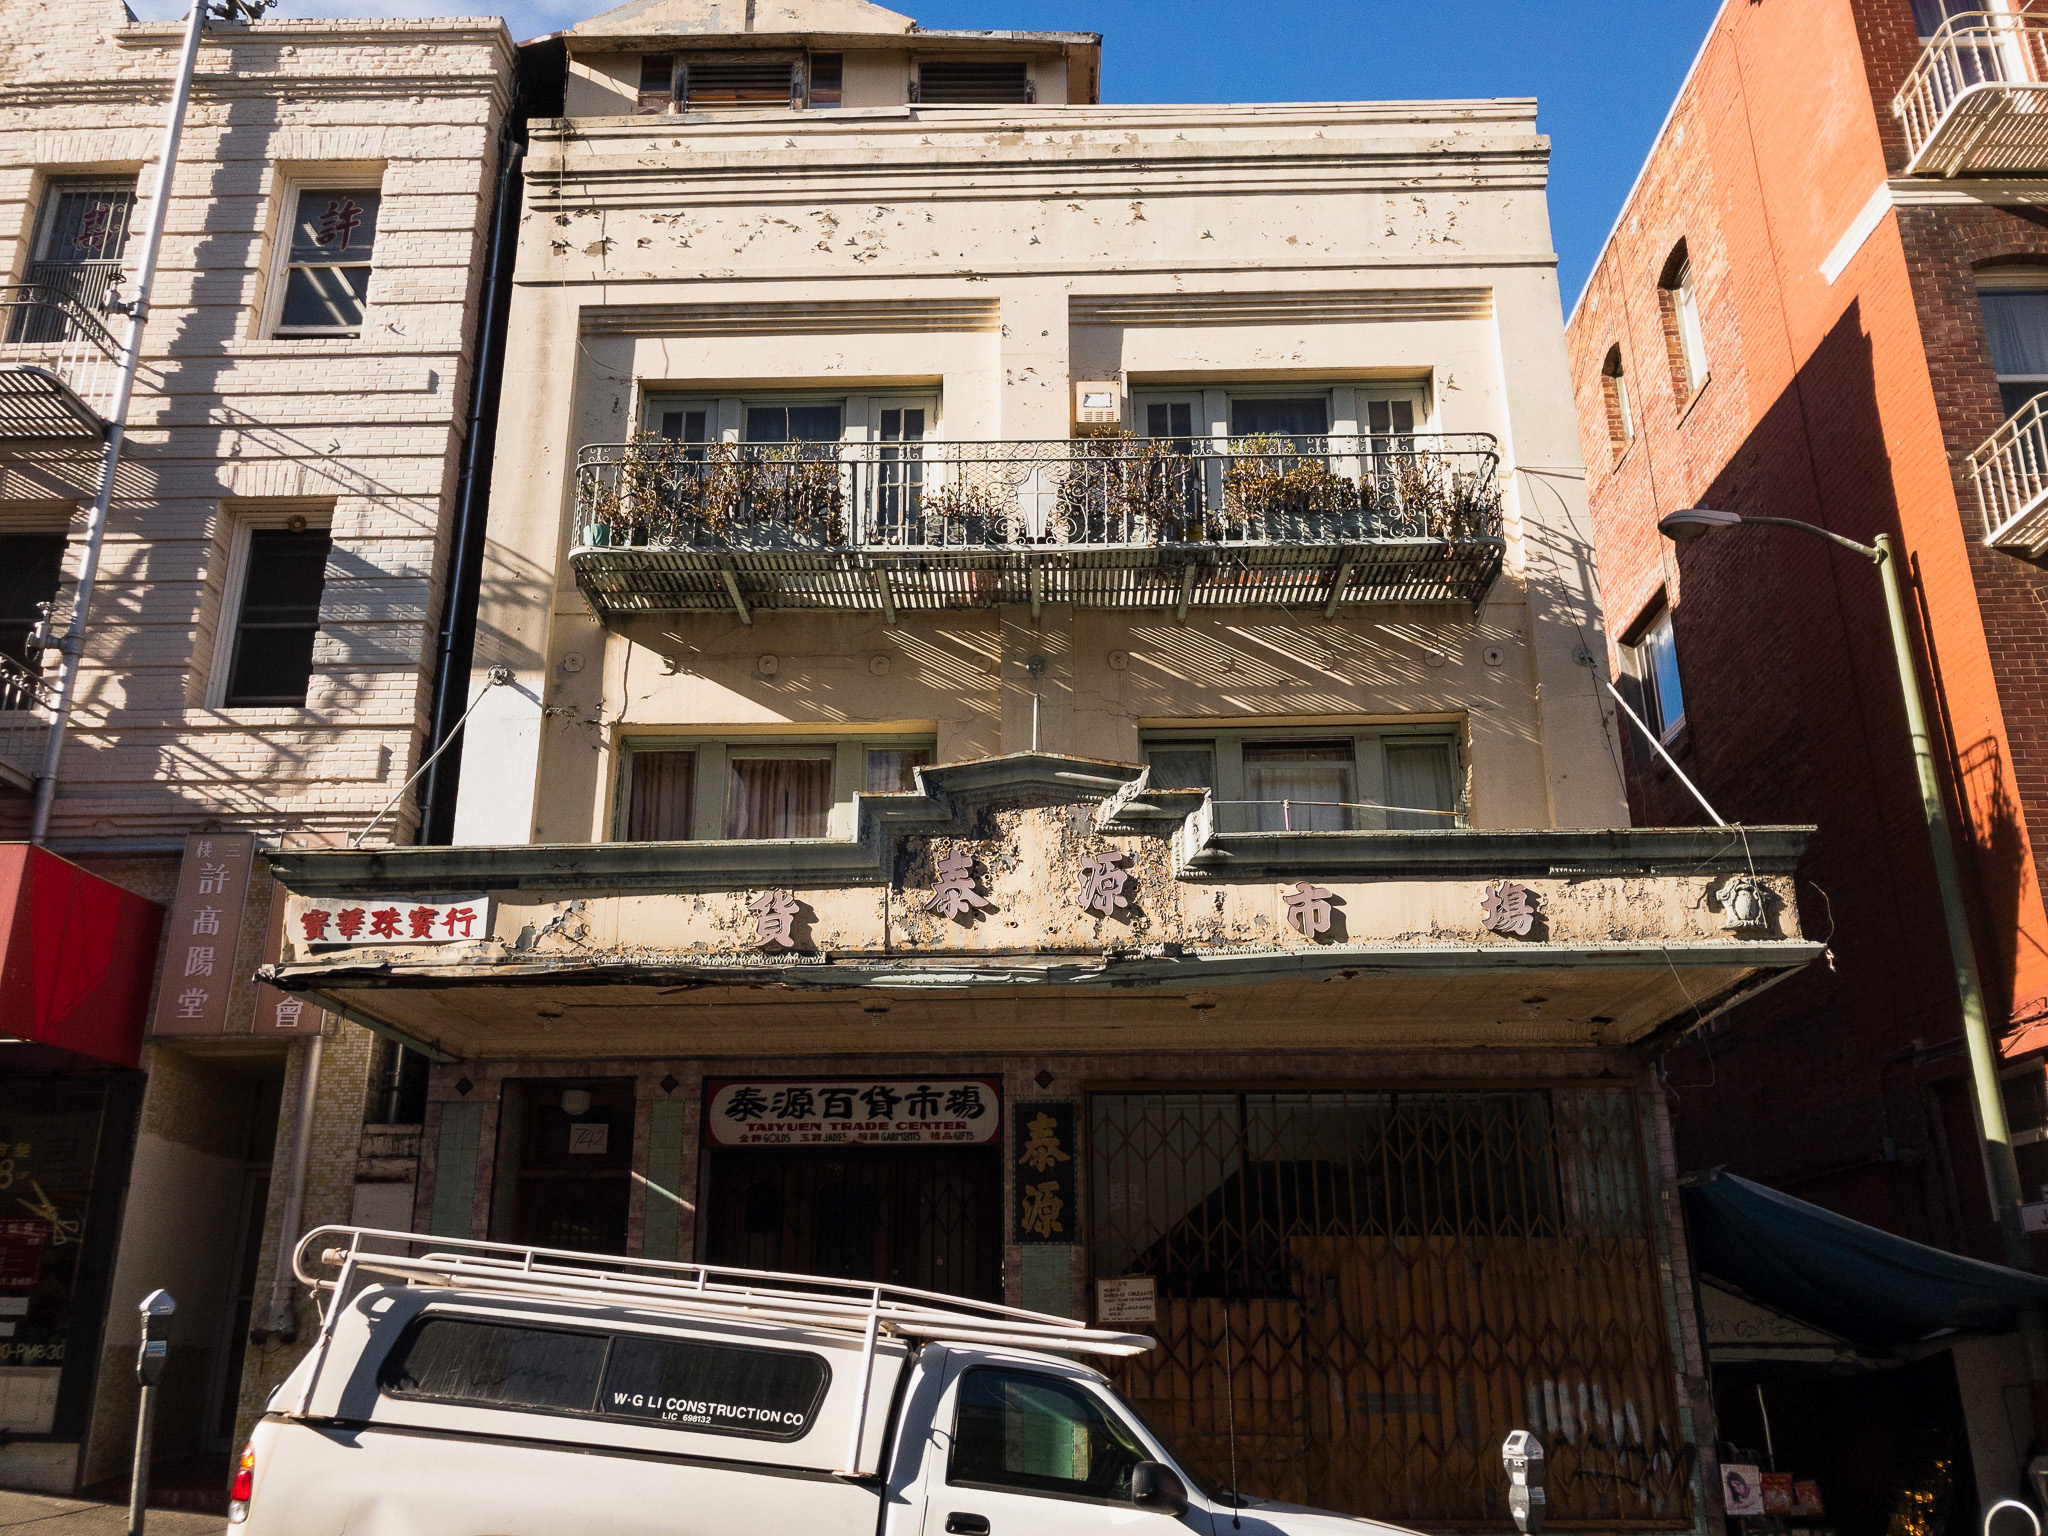
DNG image shot and edited with Lightroom Mobile

iPhone + iPhone 7 @ 3.99mm, ISO 20, 1/1250, f/1.8 – DNG image shot and edited with Lightroom Mobile


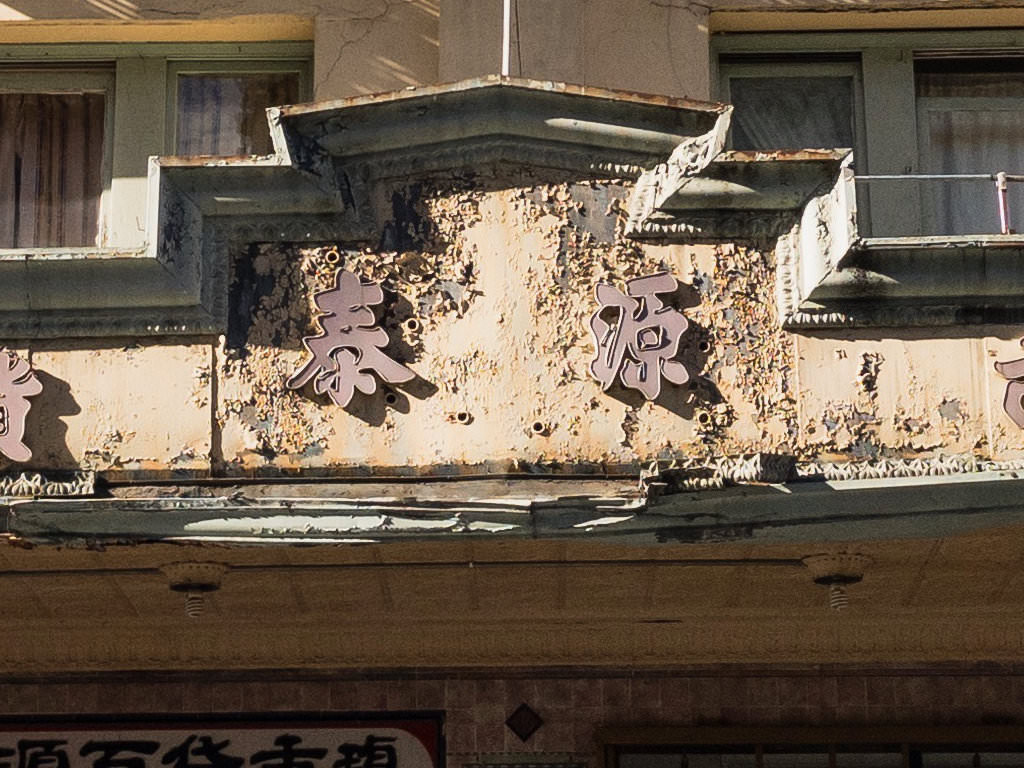
Is there a difference between the two images? Let’s zoom in to 100% in the same area and see how things look.
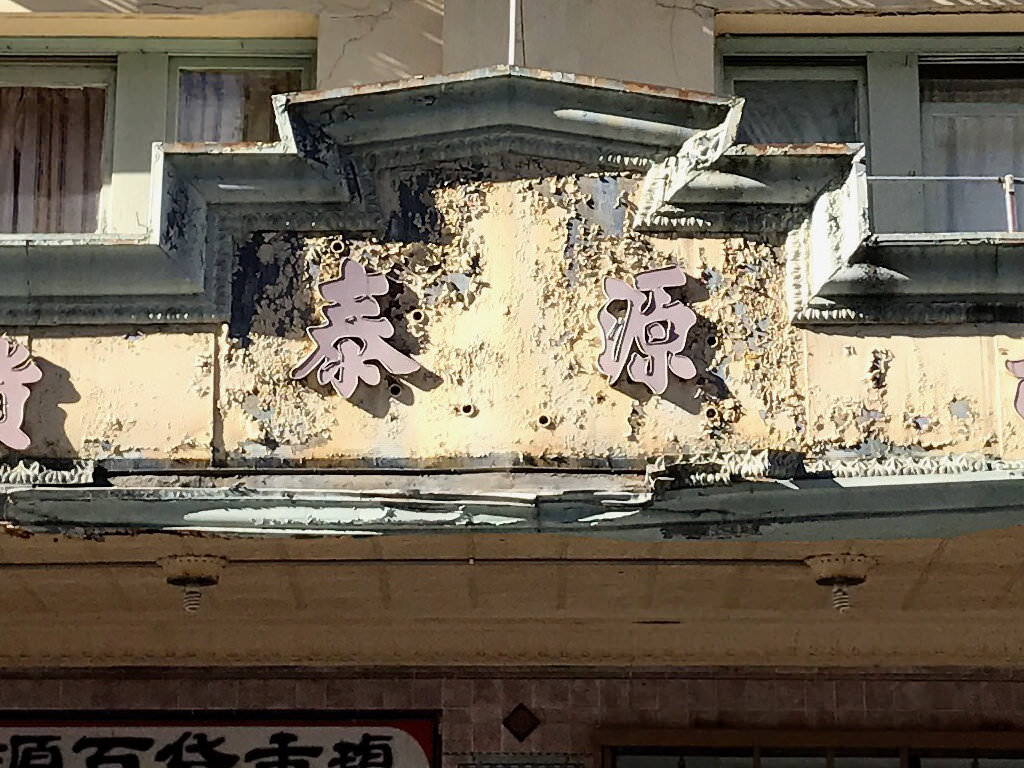
100-percent crop of iPhone JPEG
100-percent crop of iPhone JPEG

100-percent crop of iPhone DNG

100-percent crop of iPhone DNG

As you can see, there really isn’t much of a difference. You can’t see more detail in the DNG compared to the JPEG and it looks like there’s the same amount of shadow information.

I wanted to see if editing the DNG on a computer version of Lightroom made any difference. I figured the compression on export might be less noticeable and show a bit more detail. Unfortunately, before I ever got started I ran into a snag. Apparently, if you use Lightroom Mobile to shoot images in DNG, they are stuck within the Adobe ecosystem. It prevents you from exporting or downloading the DNG images from your phone (unless you sync Lightroom Mobile to Lightroom CC). Fortunately, you don’t have to use Lightroom Mobile to shoot in DNG.

To work around this restriction (since I’m not a Lightroom CC user), I had to go out and shoot some new images. This time I used Camera+, an app that’s only available for iPhone. With Camera+, I was able to shoot in DNG and then download the images to my computer to edit in Lightroom.
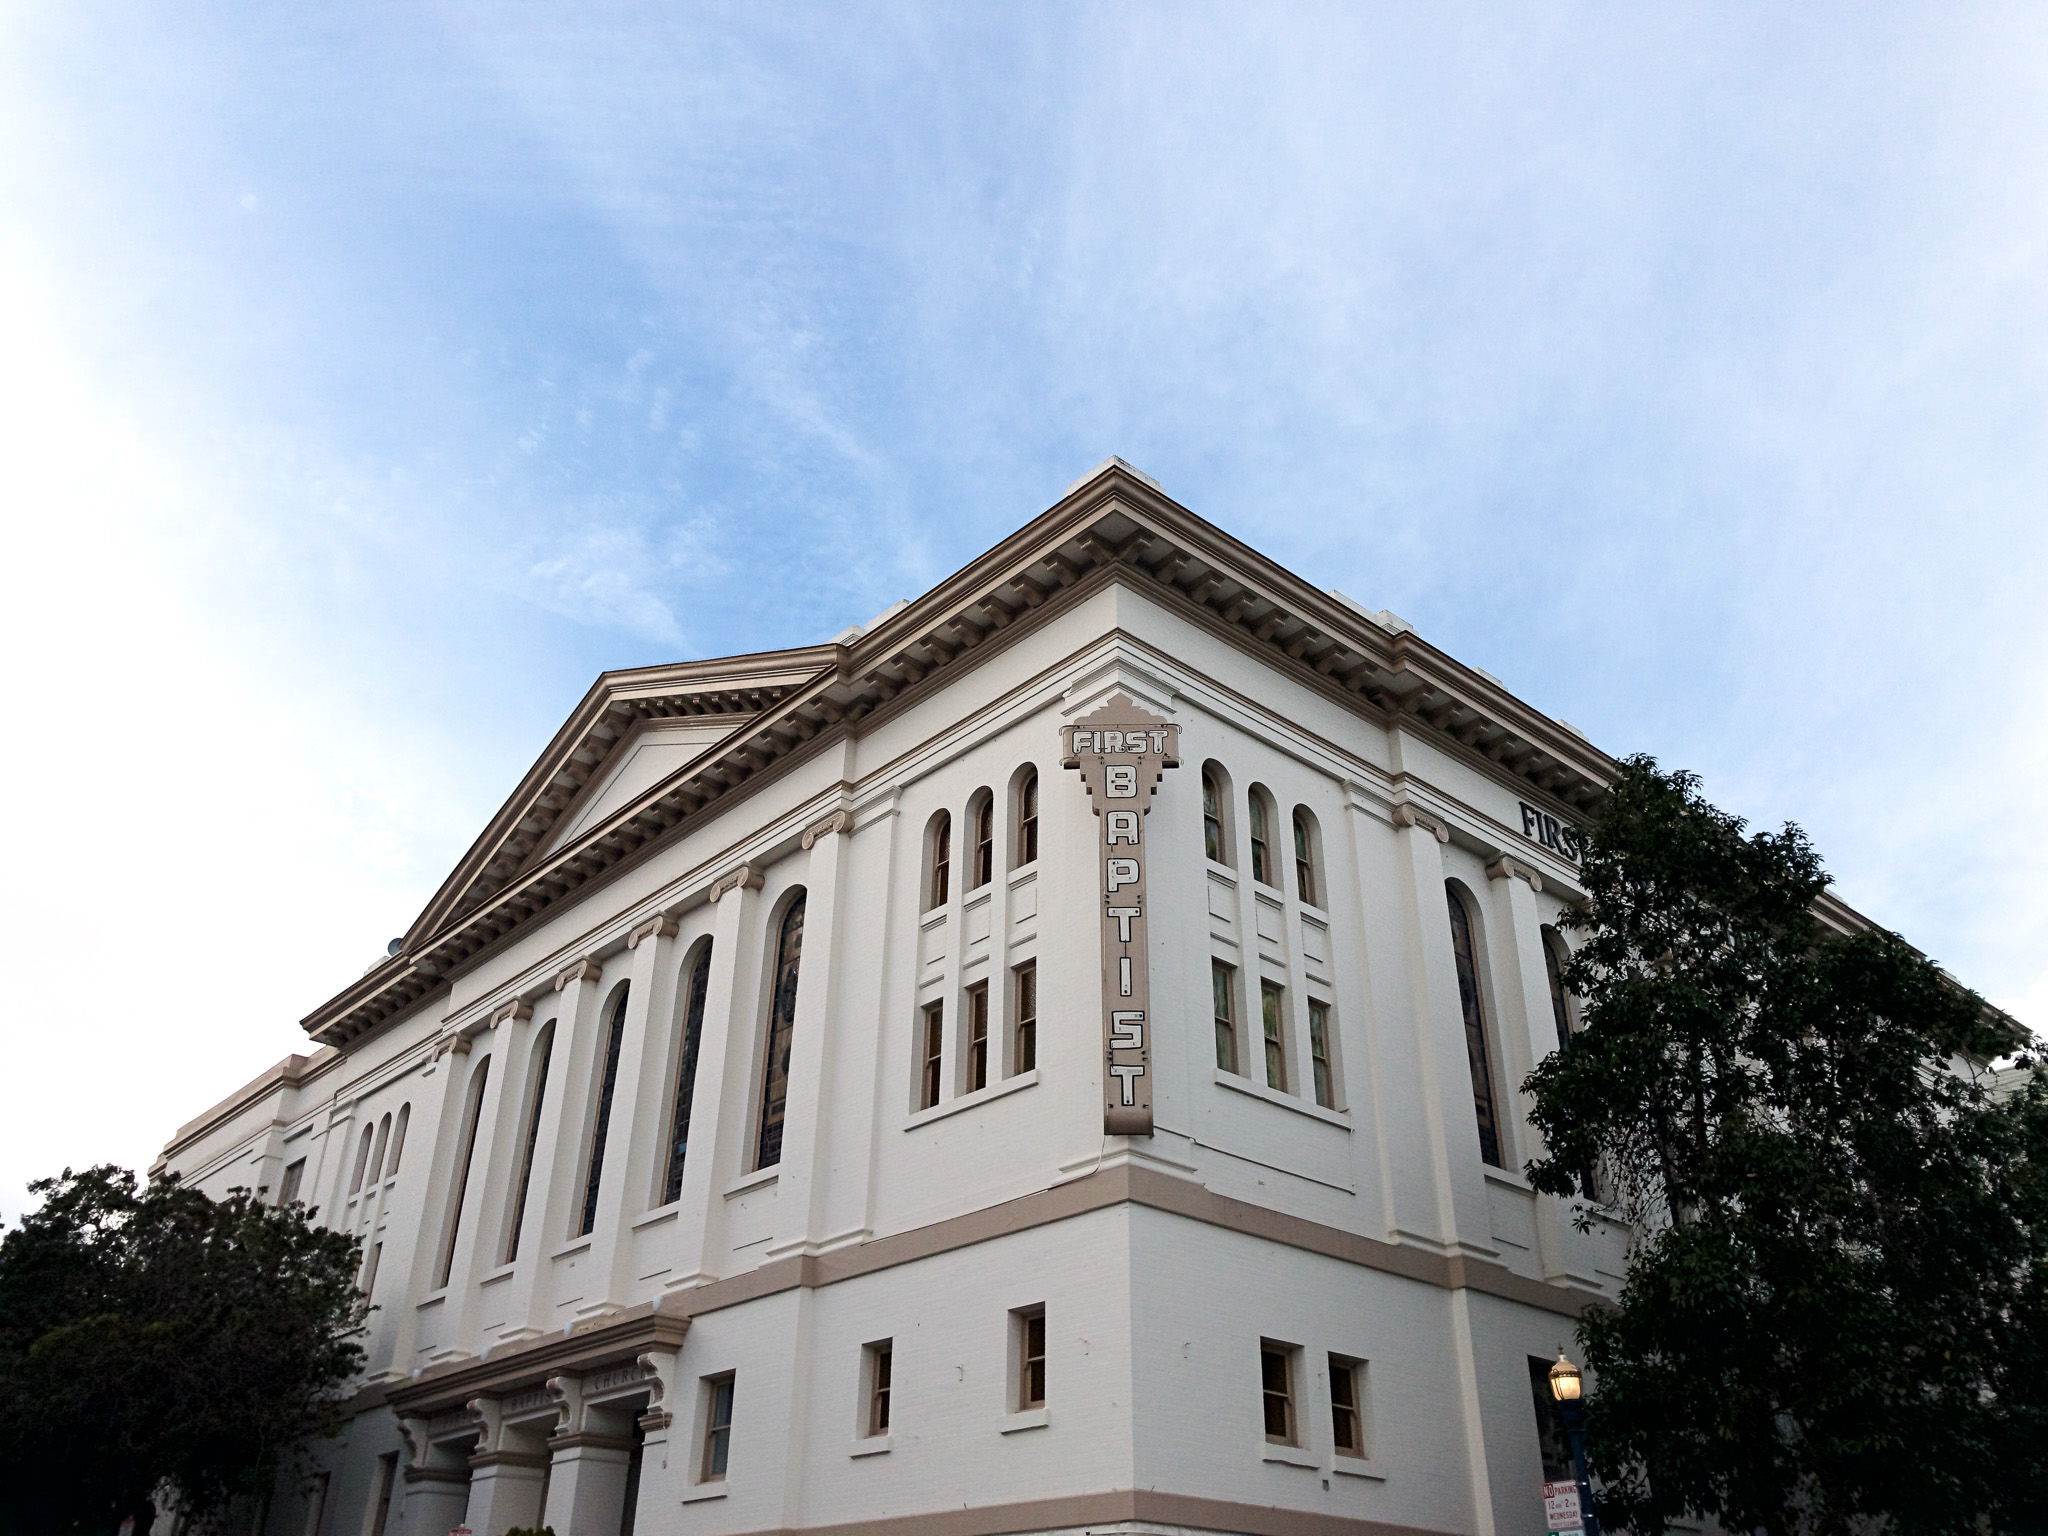
DNG Image Edited In VSCO App

iPhone 7 Plus @ 3.99mm, ISO 20, 1/1500, f/1.8 – DNG Image Edited In VSCO App
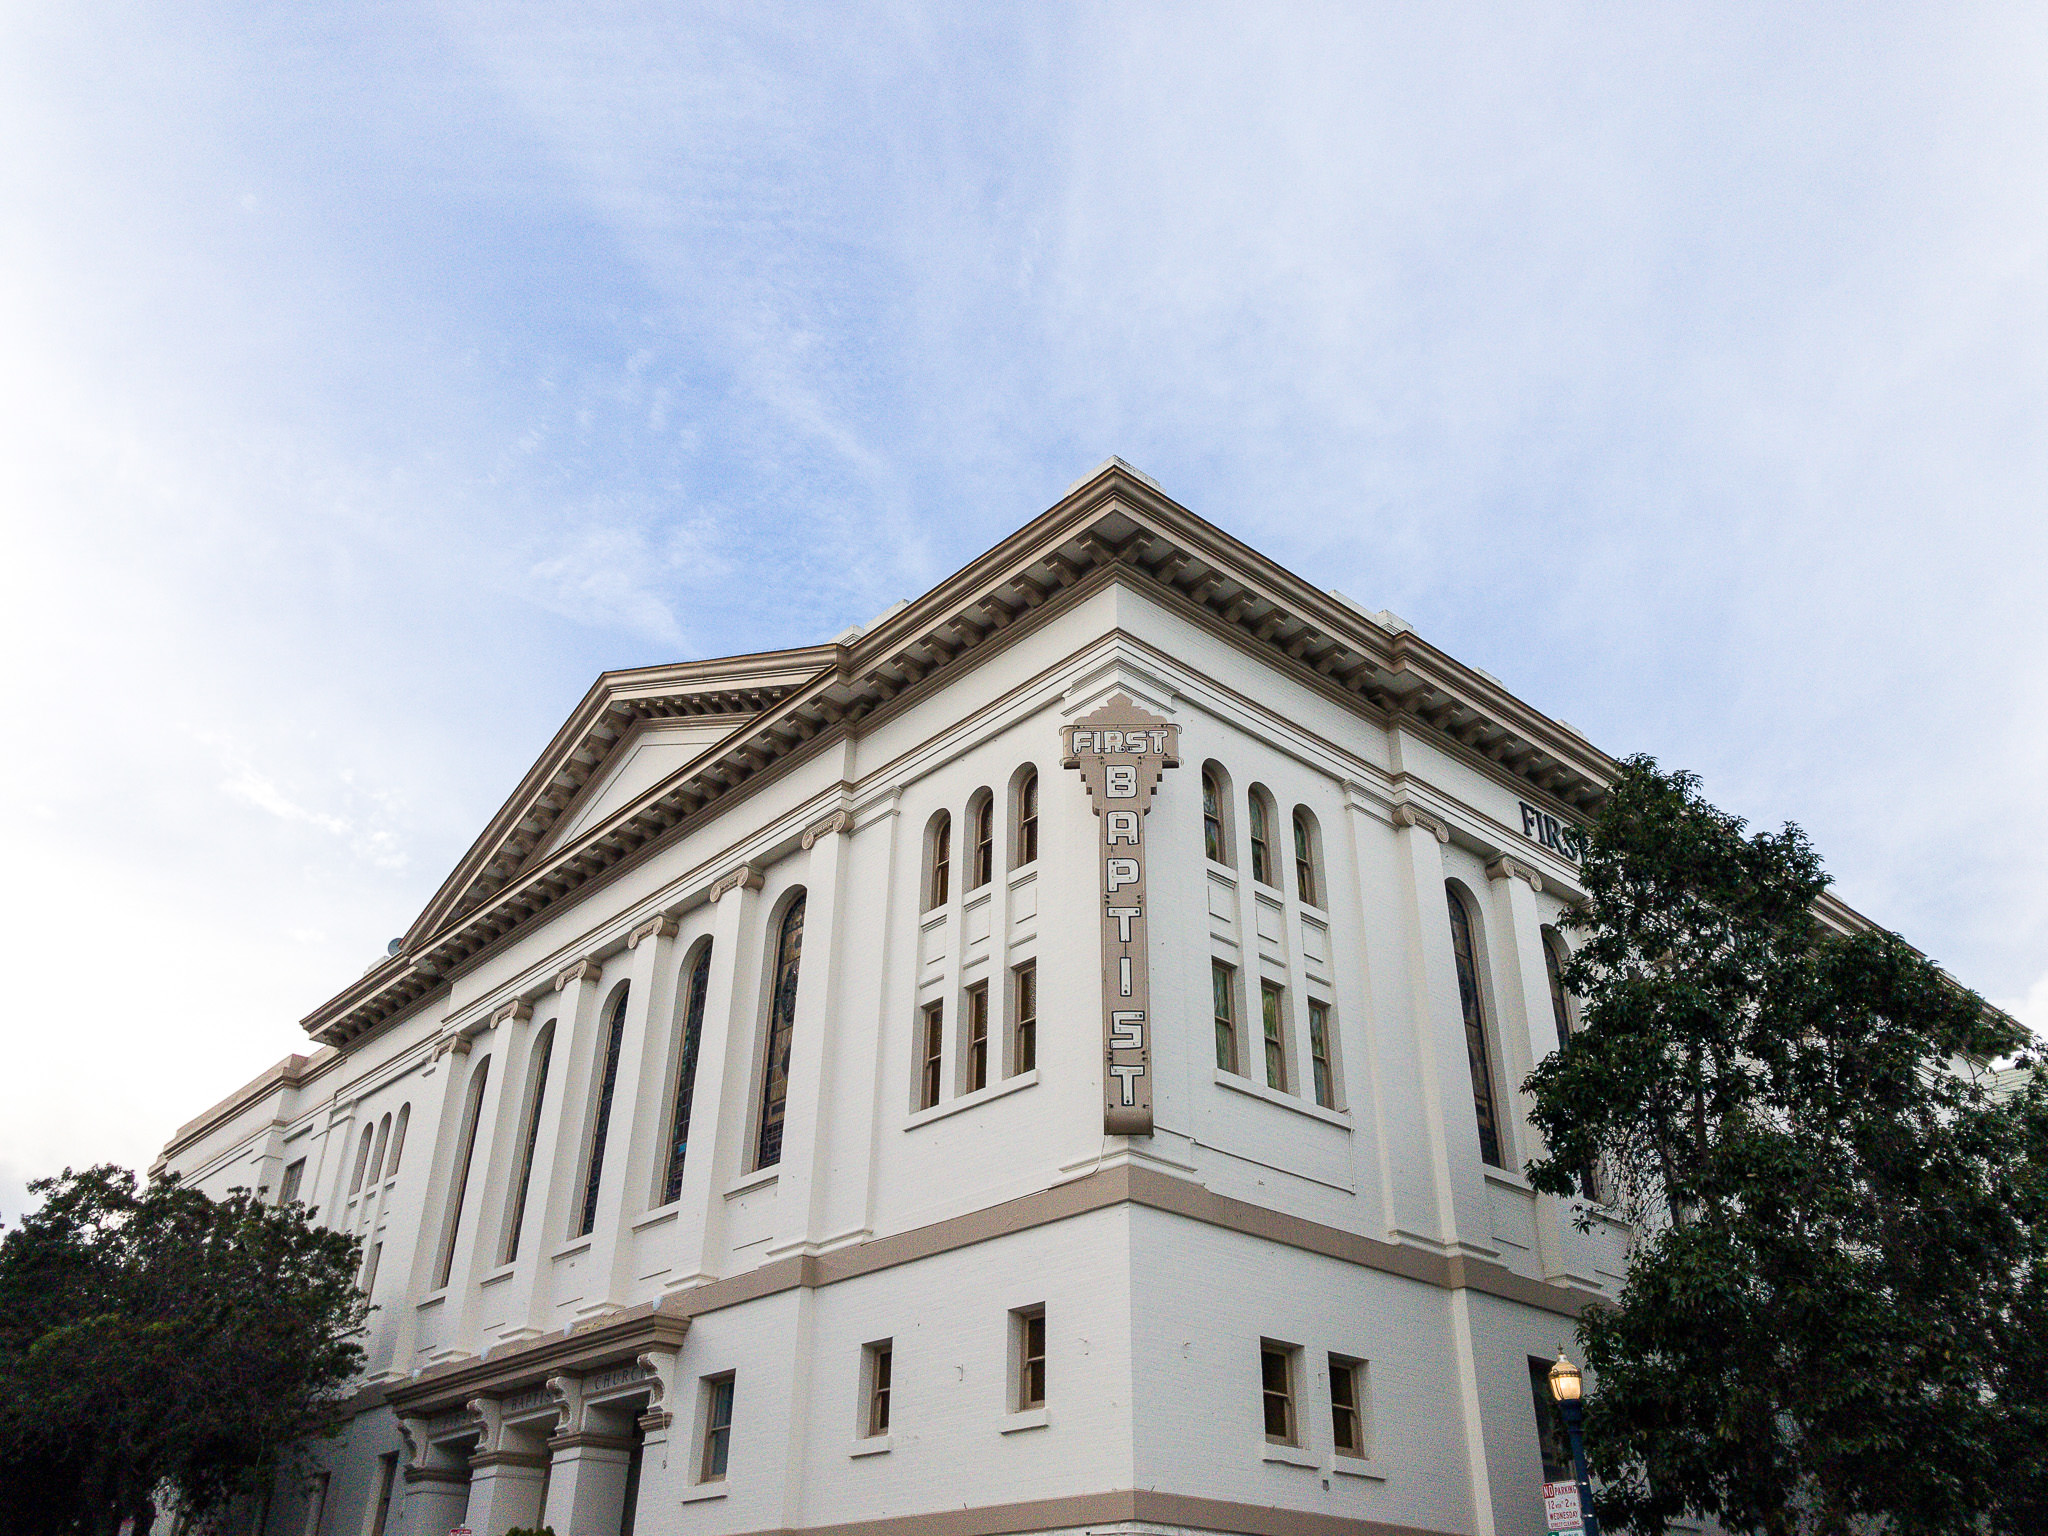
DNG Image Edited In Lightroom On A Computer

iPhone 7 Plus @ 3.99mm, ISO 20, 1/1500, f/1.8 – DNG Image Edited In Lightroom On A Computer

Here are the 100% crop side-by-side results of an edited DNG. One edit was done on my computer in Lightroom, the other on my phone using VSCO.
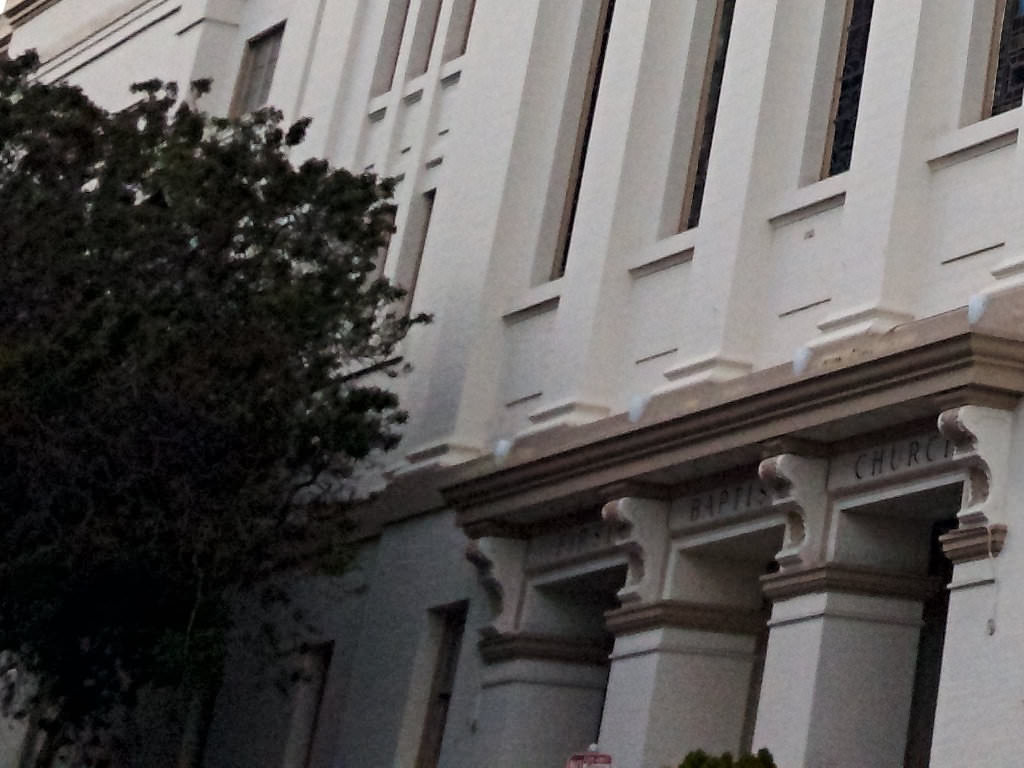
100-percent crop of DNG edited in Lightroom in VSCO

100-percent crop of DNG edited in VSCO app
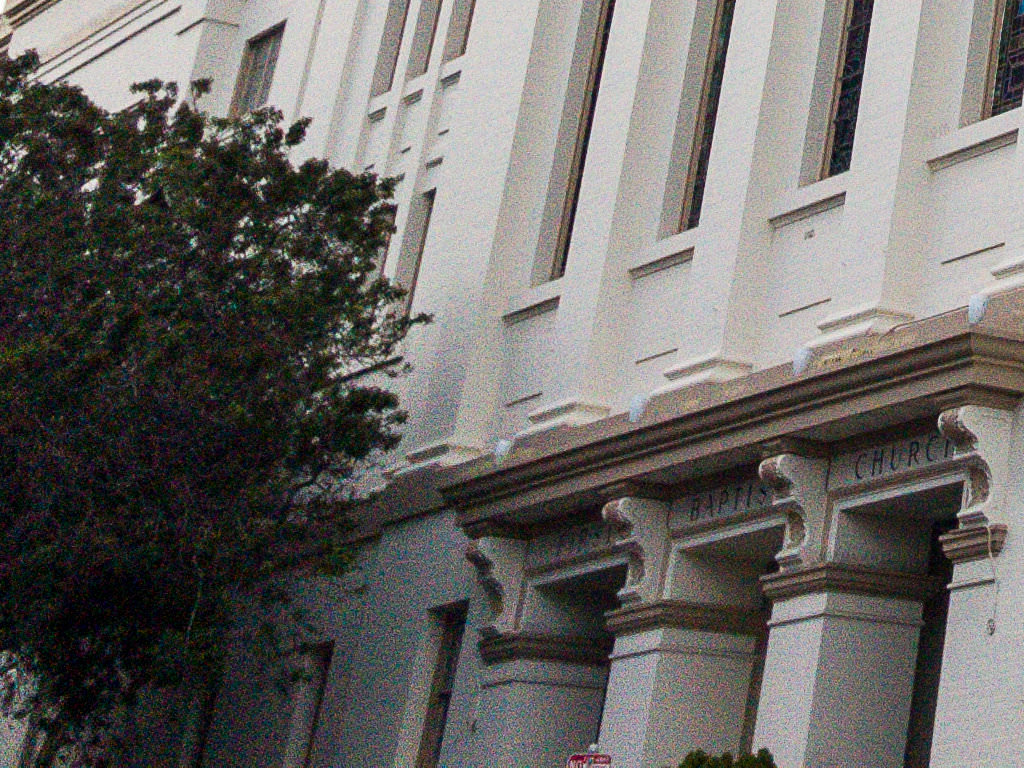
100-percent crop of DNG edited in Lightroom on a computer

100-percent crop of DNG edited in Lightroom on a computer

You can see that I was able to recover more of the highlight and shadow detail when I edited the same DNG file in Lightroom instead of VSCO. What really surprised me was how much noise is present in the image that was processed in Lightroom. Even though it says it was taken at ISO 20, there is a lot of noise in the shadow areas and even some in the sky. I guess this is why images processed in apps look so soft… it’s not the JPEG compression, but the noise reduction that gets applied.

4) Other Considerations

Non-Destructive Editing: One very important thing to note is that many apps like VSCO and Lightroom Mobile are non-destructive editing tools. The edits you make in them do not actually alter your original image. On the other hand, if you edit your image with the default editing app, chances are your original image will actually be altered. On my phone, the edits made with the default app are saved and can be reverted, but this might not be the case on all phone models. As a rule of thumb, if you have to import your image into the app, it should be non-destructive.

Spot/Blemish Removal: If you usually edit images on a computer, you’re probably used to having access to spot removal tools. Unfortunately, very few image editing apps have such tools. The only app I’ve found that includes full editing capabilities as well as a spot healing tool is Photoshop Express. They are very limited capabilities, but in a pinch can be useful.

Other Apps: The apps I’ve mentioned are by no means the only ones out there, they are just the ones that I find myself using the most. Here are a few others I’ve used in the past that you might try out: Afterlight, Snapseed and Priime.

5) Conclusions

There are a lot of different apps available for you to use to edit images on a cell phone. Your phone should include basic editing capabilities within the default camera app itself. If you want something a little more advanced, Lightroom Mobile is a great choice if you’re used to using Lightroom on your computer, or VSCO is a great choice if you like creating images with a bit more mood and toning to them.

If you plan to shoot in DNG, unless you’re a Lightroom CC subscriber, I’d highly suggest that you use an app besides Lightroom Mobile. To be honest, I don’t know if there’s even a need to shoot in DNG. I’m using the latest phone out there and there is so much noise in the images, even at ISO 20, you’ll need to add so much noise reduction your images will look about the same as if you’d just shot and edited a JPEG. While you might get better highlight and shadow recovery, I personally don’t think it’s worth it.

Regardless of whether you choose to shoot in JPEG or DNG, if you decide to edit images on your phone you’ll have a lot of different editing apps to choose from. Be sure to download a few different ones and try them out, as they all have something different to offer.

The post Cell Phone Photography – Part 2: Editing Images appeared first on Photography Life.


from Photography Life https://photographylife.com/cell-phone-photography-part-2-editing-images

Thursday, 2 February 2017

Great LGBT Events to Visit (Other than Pride)

people holding a rainbow flag, photo by William Murphy (flickr: @infomatique)
All travelers are different and I’ve included a LGBT column on the website to talk about issues that affect those members of our community. I want everyone to have the travel knowledge they need! In this semi-monthly column, we hear from voices in the LGBT community about their experiences on the road, safety tips, events, and overall advice for other LGBT travelers! Returning this month is our column leader, Adam from travelsofadam.com.

It was raining when I walked up to the park entrance, decked out in a brightly colored banner and a row of security staff checking bags. In front of me, a guy was wearing a pink tutu under a blue poncho and two girls to my right had faces painted with more colors than I could count. Ahead of me, I could hear the beats from a faraway stage. A little while later, the rain clouds disappeared and a rainbow lit up the sky. No, this wasn’t your typical music festival, nor was it a Gay Pride festival — it was Milkshake Festival in Amsterdam.

Milkshake Festival takes place the week before Amsterdam’s annual Gay Pride and is labeled as a festival “for all who love” (raises hand). Most major queer performers, from Peaches and Mykki Blanco to crossover indie acts like Hercules and the Love Affair, have performed here. There are bright colors, crazy costumes, incredible performances, half-naked dance parties, drugs, and people of all shapes and sizes. It’s wild and it’s wonderful! And it’s more than just a celebration of LGBT pride — it promotes and celebrates queer culture like only a multicultural, independent, and original festival can.


Gay Pride festivals in the West were once opportunities to be visible and publicly demand equal rights; as more and more of those rights have materialized (especially in the past few years), the political aspect of many Gay Prides has diminished. That’s not to say it’s totally gone (read on), but these days, a lot of our Gay Pride celebrations center around headline bands, parades, parties, and plenty of skin.

Gay Pride is a lot of fun — but the fun doesn’t have to stop there. All year long, there are dozens of festivals and events celebrating LGBT culture, sports, and arts, some specialized for different segments of our community or particular fields of interest. It’s a great way to experience a new destination, surrounded by like-minded travelers and locals. These are some of my other favorite events and festivals worth traveling for:

LGBT Film Festivals

sign at a lgbt film festival, photo by David Prasad (flickr: @niiicedave)
Even if you’re not a film aficionado (spoiler alert: I am!), film festivals are a great way to experience LGBT or queer culture. There are literally hundreds of LGBT-specific film festivals taking place around the world. From small towns like Bloomington, Indiana (Bloomington PRIDE Film Festival) to less-than-expected cities like Fort Worth, Texas (Q Cinema), these are often fun events to meet other LGBT locals and see outstanding cinema. And the best part? They happen year-round!

At the Q Cinema Film Festival this winter in Fort Worth, local and regional filmmakers from Ohio to Louisiana premiered their works. It was a small and casual affair at the Fort Worth Community Arts Center, catered by local businesses and an easy place to meet filmmakers, actors, and documentarians between screenings. “Professional lesbian” stand-up comic Vickie Shaw (who has performed on LOGO and Olivia Cruises and at HRC events) had the audience in tears from laughter. Featuring the best empanadas I’ve had in Texas, it was a fun weekend.

Bigger LGBT film festivals like the legendary OutFest in Los Angeles or BFI Flare in London are as popular for industry insiders as they are for local film fans and visitors. At these larger events, you generally need tickets in advance — especially for big-picture premieres. In February, the leading Berlinale International Film Festival presents the Teddy Awards for excellence in LGBT cinema; past Teddy winners — about murder, mystery, sexual desire, and everyday themes — have often been attended by A-list celebrities (cue James Franco, who seems to show up to every gay event).

Why visit an LGBT film festival? While more often than not big Hollywood productions don’t include LGBT characters (exception this Oscar season: Moonlight), at an LGBT film festival, you’ll find films touching on every aspect of queer identity and culture. (Check out my picks for independent gay cinema from 2016.) Besides, everyone loves to see a bit of themselves portrayed in the movies. Movies can also be the perfect kind of escapism, the chance to see different scenarios related to our own personal experiences or emotions.

Art, Music, and Theater Festivals


Sure, it’s a stereotype that a lot of those in the art, music, and theater industries might identify as LGBT, but that’s what makes these institutions so colorful. Around the world, there are many cultural festivals and events tailored specifically to LGBT artists and performers. Each May, the International Dublin Gay Theatre Festival celebrates LGBT artists, writers, and performers in the hometown of celebrated gay writer Oscar Wilde. Theater companies from around the world get the chance to show their work — including but not limited to musicals, dramas, comedies, and cabaret — over two weeks throughout Dublin. With both free and paid events, it’s a fun way to experience Ireland’s LGBT culture and history.

Afterward, a lot of artists bring their successful submissions to the Edinburgh Festival Fringe. Though not explicitly gay, it always includes plenty of LGBT artists. And naturally, because of the large number of international performers and creatives in Edinburgh during the month — whether as spectators or performers — there’s just a great big gay vibe in the city.

Gay Sporting Events


While a lot of the biggest gay events occur in the summertime, there are plenty of gay festivals each winter, too. Gay ski weeks are a thing: imagine drag queens in hot tubs, daytime adventures from skiing to snowshoeing (or lounging by the fireplace with a hot cup of cocoa), and steamy, late-night parties. European Gay Ski Week takes place in Switzerland each winter, while North America’s largest ski area celebrates Whistler Pride & Ski Week each January. There’s a definite party vibe to these ski events, but in such a relaxing and peaceful setting, it’s easy to enjoy as a couple or a single.

Gay sports don’t just happen in winter, though; there’s also the annual World OutGames that rotates locations around the world (this year it’s in Miami). At the OutGames, you’ll find tens of thousands of athletes competing in everything from beach volleyball to wrestling (and even chess!), as well as cultural happenings and a human rights conference (see below). At the OutGames 2013 in Antwerp, the entire city turned into a festival, with fit men and women storming the city. Suddenly, gay bars and clubs were crowded with LGBT tourists and the whole city was decked out with rainbow flags. The other major LGBT sporting event is the quadrennial Gay Games, taking place next in Paris in 2018, with a similar goal to promote equality through sport.

And if cowboys and cowgirls are more your style, there are the many gay rodeos in the United States organized by the International Gay Rodeo Association.

Attending any gay sporting event as an athlete is always fun (plus there’s the prospect of trophies and prizes), but usually these are big events that overtake towns and cities, turning them into temporary queer meccas and creating a way for anyone to enjoy somewhere new safely and comfortably out.

Lesbian & Transgender Festivals

lesbian skaters wearing rainbow colors, photo by Björn Söderqvist (flickr: @kapten)
Some segments of the LGBT community are regularly sidelined in many events and festivals. Lesbians have a handful of events around the world to look forward to each year, however — from the annual ELLA International Lesbian Festival each summer in Spain to The Dinah in Palm Springs. Both are heavily attended by international visitors and include music acts, parties, and more — all with a very festive vibe and in summery locations, so expect bikinis, sunglasses, and lots of swimming (or poolside lounging).

Since 2006, the National Transgender Charity has hosted an annual transgender festival called Sparkle in the Park in Manchester (arguably the UK’s gayest city), at the Sackville Gardens (where a National Transgender Memorial stands) in the city’s gay village; last year there were over 12,000 attendees. There’s free music, entertainment, and educational workshops. Alongside the festival, a “fringe” event features plenty of cabaret, music, theater, and comedy.

Political, Human Rights, and Tech Events & Conferences


In addition to the many fun festivals and events described, many LGBT events are also still entrenched in serious political activism. Even the gay sporting events like OutGames run alongside LGBT conferences dealing with activism and politics. And many Gay Pride festivals are attended by local political action groups, political parties, and activist organizations.

But there are also many conferences year-round by national and global organizations dealing exclusively with human rights. In Fort Lauderdale each autumn, the city hosts the Southern Comfort Conference where transgender activists and educators gather for learning and networking. Other activists and allies meet each year at conferences organized by OutRight International, the National LGBTQ Task Force, and the ILGA — offering community leaders from around the world a chance to meet and plan LGBT equality initiatives around the world.

Gay Circuit Parties

gay days orlando at walt disney world
There are mega-parties that take place annually around the world, catering to different segments. For example, Sitges Bear Week hosts thousands of bears on the Spanish beaches each September, while Provincetown attracts bears and their admirers for the annual Provincetown Bear Week each July. Then there are circuit parties, popular for a particular subset of gay men. While these mega dance-parties have been around for decades, it’s Barcelona’s annual Circuit Festival which has made the mega electronic-music parties popular again.

Barcelona’s Circuit Festival has become so big and so popular since starting up in 2007, the entire city seems to be overflowing with hunky gay men for weeks leading up to and following the festival. With beach and foam parties, all-day & night DJs, and (so it seems) a rule that requires men to go topless, similar gay circuit festivals are now popular around the world from Bangkok (GCircuit during Songkran) to Tel Aviv, Amsterdam and WE Party in Madrid.

Similar parties to the circuit festivals include Southern Decadence in New Orleans (friends swear by it being one of the best parties in Nola, the “gay Mardi Gras”) and White Party in Miami. And then there are the Gay Days Orlando — the first Saturday of June where tens of thousands of gays and lesbians descend upon the Magic Kingdom and at hotel pool parties throughout the city for sun and fun.

Other LGBT Events


Not all LGBT events are based around big parties, however. Just as the full LGBTQ spectrum includes so many varied sexualities and gender identities, it makes sense there’d be an equally wide range of events for every type of individual. In Sonoma each Spring there’s the Gay Wine Weekend for three days of tastings, dancing and food in a picturesque setting. In Slovenia, Pink Week is a week-long experience through the country including wine tastings, museum tours and culminating in a formal ball to benefit LGBT organizations in the country. Vienna’s annual Life Ball takes place in the Vienna City Hall and is one of the world’s biggest AIDS charity events, while Black Tie in Dallas, Texas similarly raises donations each year for both local and national LGBT organizations.

Events like the #UNIT Festival in Berlin or the Lesbians Who Tech summit (this year in San Francisco) promote LGBT technology and science for general audiences. In two of the world’s biggest tech hubs, these are events where technology and queer culture intersect, giving LGBT start-up employees and entrepreneurs the chance to network, brainstorm, and discuss ideas and innovations in related industries. Past presentation topics have included hackathons, feminism, and virtual reality — all from a queer perspective — and LGBTQ apps and queer history (or in some cases, both at once).

Family-friendly LGBT events are increasingly popular as well, including many zoos from Berlin to Washington, D.C. which open up for specific “gay days” to promote family equality. Check local LGBT community centers for the most up-to-date listings of similar events. Globally, Wikipedia has the most comprehensive list of LGBT events, while Travel Gay Europe and Travel Gay Asia both have up-to-date event, festival, and party listings for each respective continent. Sometimes events are canceled due to poor attendance, so always make sure to check with organizers when making travel plans.

****

To be LGBTQ is to be a part of a really diverse community. Luckily for us, there are so many different LGBT events for so many different niches and interests, it’s easy to find a cool festival or event abroad or at home. Traveling to an event like this is a great way to meet other like-minded travelers — those that share the same passions and interests — or to experience a new place through a comfortable or familiar lens.

P.S. –  If you would like to help underprivileged students travel more and expand their world view, we’re currently fundraising for a group of students to go volunteer in Ecuador. Help us reach our goal, change someone’s life by exposing them to the world of travel, and get some travel swag in the process. 

Photo Credits: 1, 3, 6, 8

The post Great LGBT Events to Visit (Other than Pride) appeared first on Nomadic Matt's Travel Site.


from Nomadic Matt's Travel Site http://www.nomadicmatt.com/travel-blogs/great-lgbt-events-around-the-world/

Tuesday, 31 January 2017

How to Use Telephoto Lenses

Telephoto lenses are wonderful tools for almost any genre of photography, but they aren’t necessarily easy to use. In particular, telephoto lenses will magnify any camera shake and provide a much thinner depth of field compared to wide angles. Don’t let that stop you, though. Telephotos have a unique way of showcasing the world — one which may be ideal for your photos. In this article, I’ll go in detail about telephoto lenses, including some of their benefits, possible ways to use them, and tips for dealing with their unique challenges. Although I personally tend to take landscape photos, the techniques in this article apply no matter what subjects you like to capture.

1) Focus on Details

Not surprisingly, telephoto lenses are very useful if you want to focus on smaller details in a given scene.

Because telephoto lenses have such a narrow field of view, they make it easier to capture just a thin slice of the world. In everything from dense forests to wide-open overlooks, a telephoto lens lets you isolate details far more easily than a medium or wide angle lens. (That’s not to say you can’t capture small details with a wide angle; some of my favorite images do just that. However, the narrow field of view that telephotos have typically makes it easier.)

What sorts of details? That depends upon the type of photography that you like to do. If you’re a portrait photographer, you can capture someone’s face more easily, without any surrounding elements. For landscape photography, you can focus on a single mountain peak and make it the most prominent item in your image. Also, don’t forget macro lenses, which are typically telephotos; they let you photograph even the tiniest of scenes.

This is perhaps the most important way in which I use telephoto lenses. It isn’t true in every landscape, but — more often than many people think — a single detail can be more impressive than an expansive scene. You just need to keep an eye out and a telephoto handy.

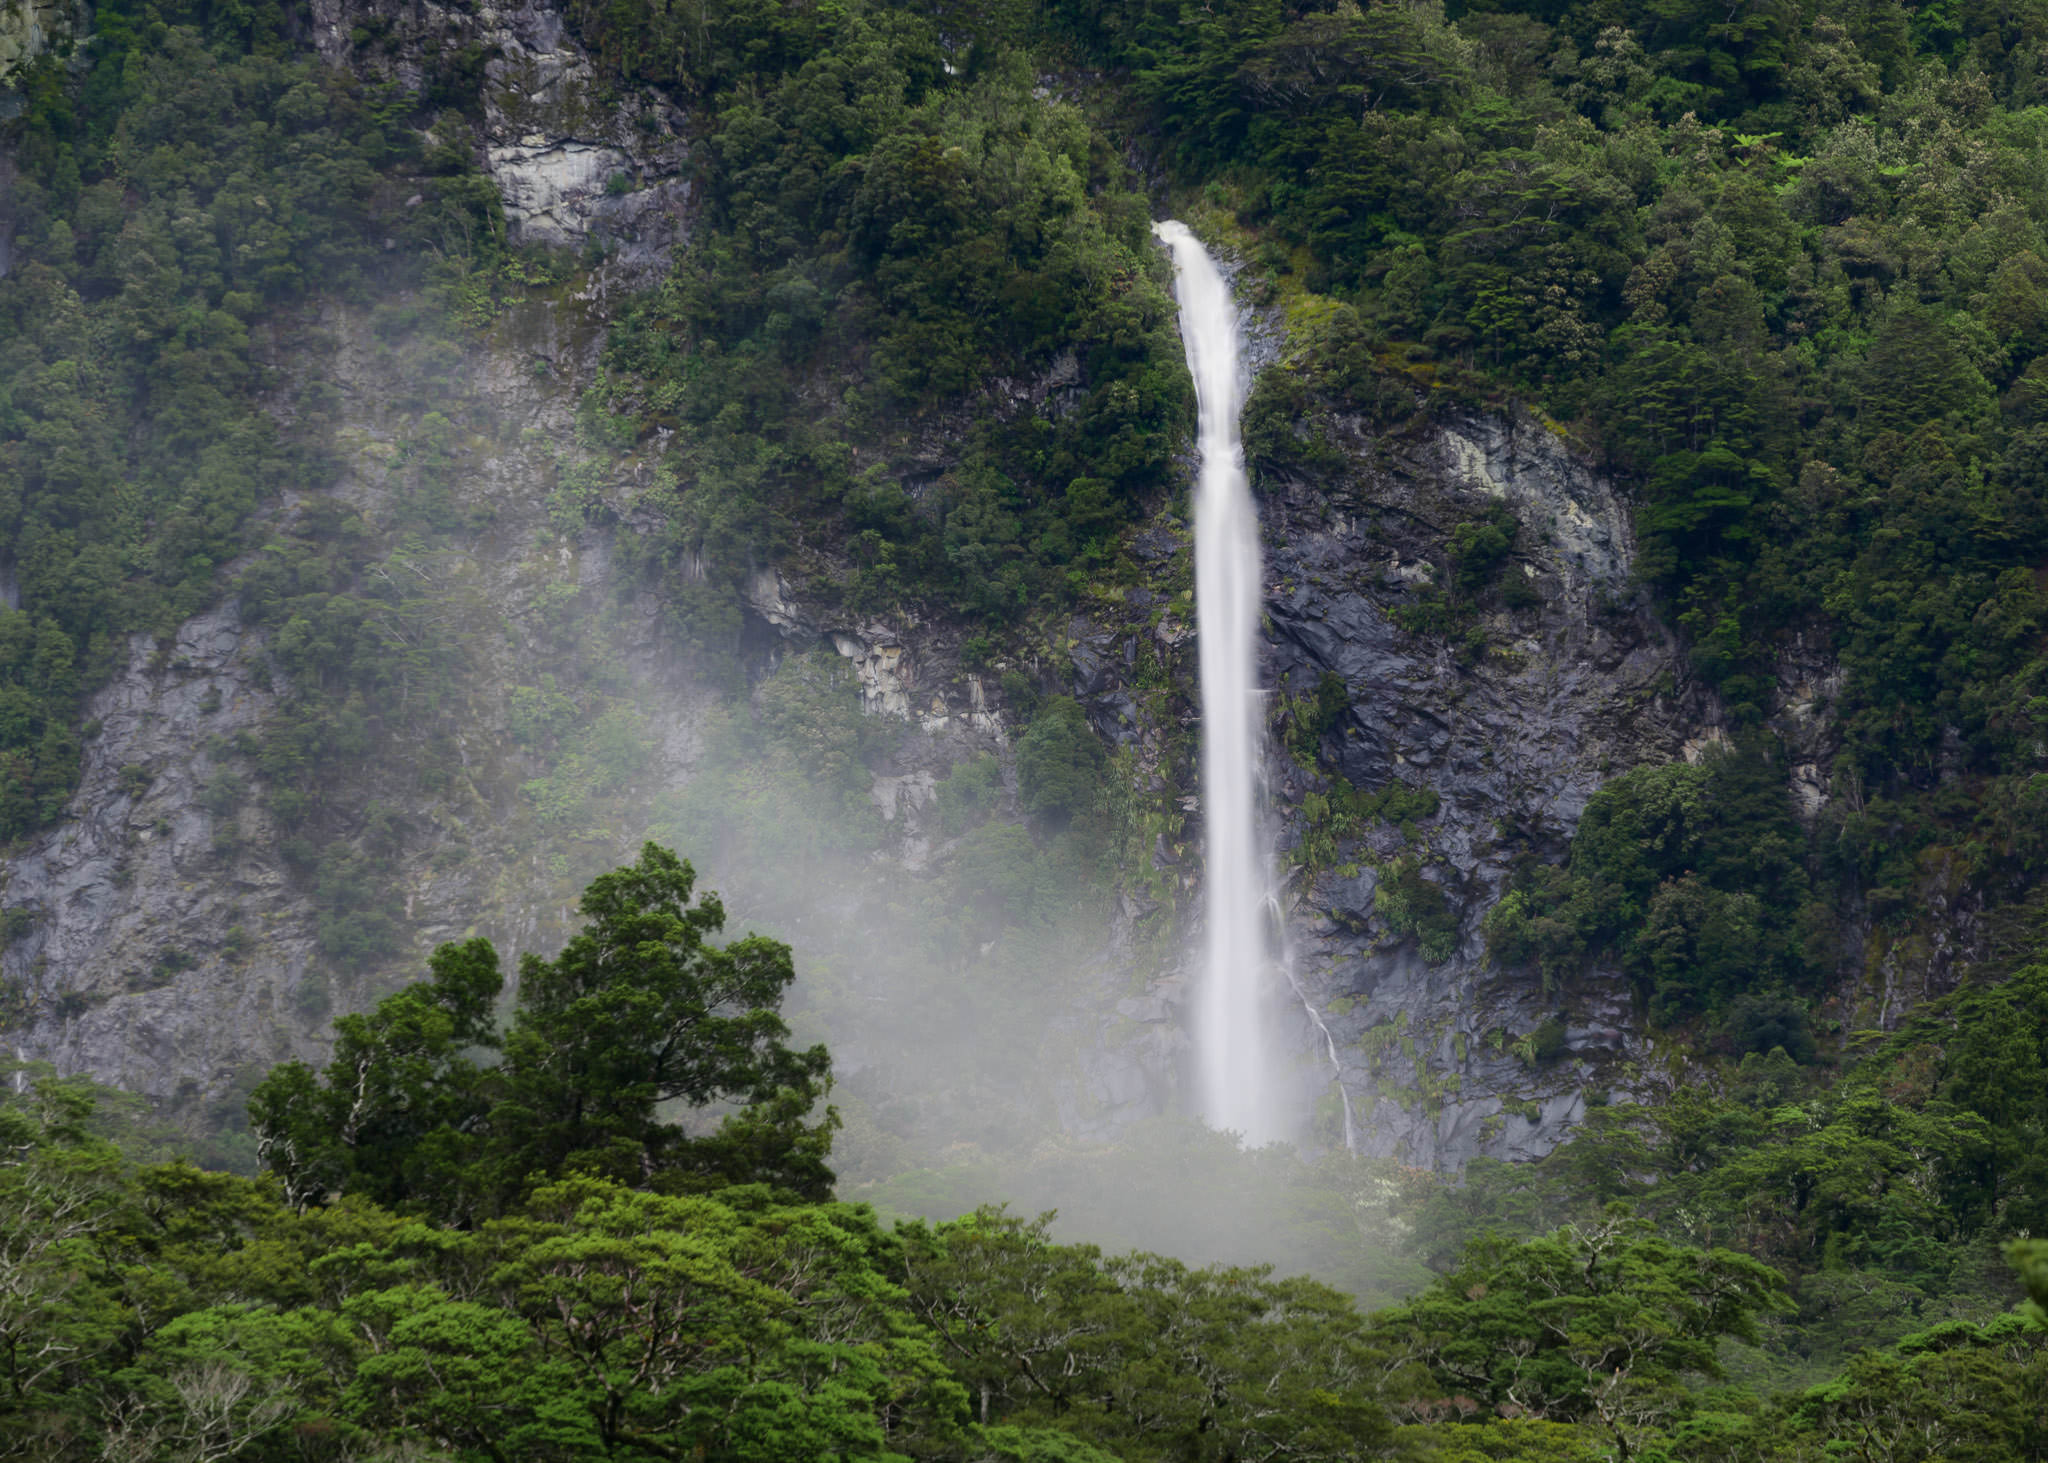
Spencer-Cox-Use-a-Telephoto

NIKON D800E + 70-200mm f/4 @ 185mm, ISO 100, 8/10, f/16.0

2) Create Abstract Photos

One of my personal favorite reasons to use a telephoto lens is to create abstract or semi-abstract photos.

Since telephotos can isolate details so well, in certain landscapes, you’ll be able to capture a small sliver of the scene that completely removes context — the definition of an abstract image. Other times, even if you can’t remove the context completely, you’ll still end up with a photo that focuses on shapes and patterns rather than a perfectly-literal image of a scene.

I’m a fan of abstract photos. They’re all about the basics: light, color, shapes, and composition. If your viewer can’t tell what a photo actually depicts, then the image becomes more about its underlying aesthetic qualities. For example, if you take an abstract photo at Yosemite, people’s first reactions will be “Wow, those shapes are really interesting” rather than “Cool, I also went to Yosemite!”

Of course, not all photos need to be abstract, and not all abstract photos must be taken with a telephoto lens. You can still capture abstracts with a wide-angle, particularly if you are able to position your camera very close to your subject. However, if abstracts are what you want to photograph, you should keep a long lens handy. It’s one of the best ways to isolate the shapes and forms of a scene.

Spencer-Cox-Use-a-Telephoto-2

NIKON D810 + 70-200mm f/2.8 @ 200mm, ISO 400, 1/500, f/5.6

2) Show a Sense of Scale

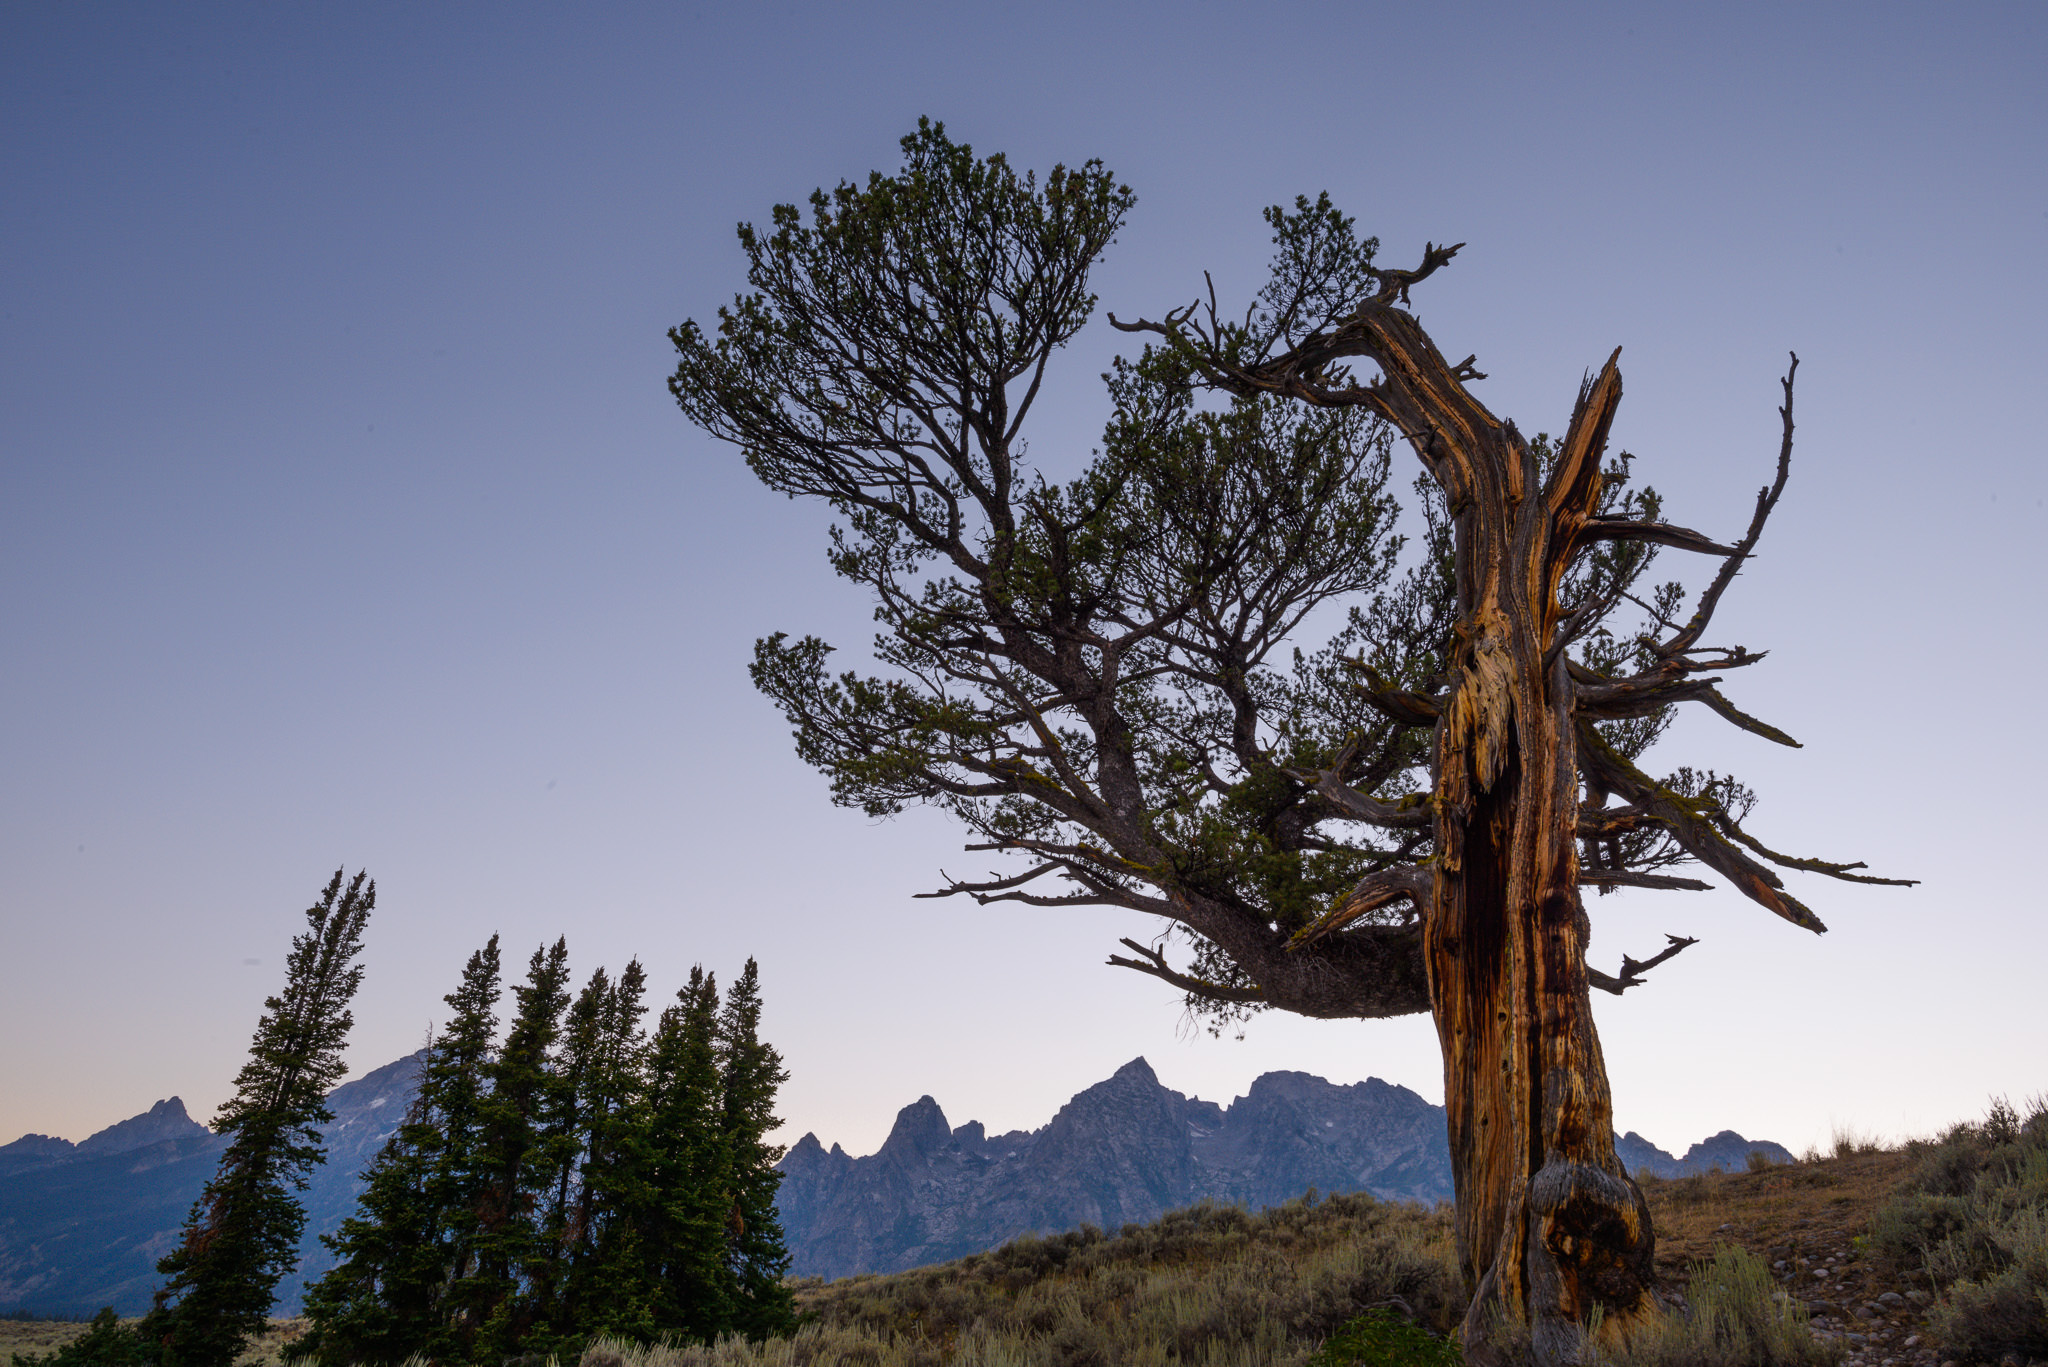
If you’re standing close to a tree with mountains in the distance, and you use a wide angle lens, the tree will appear quite large compared to the background:

Spencer-Cox-Use-a-Telephoto-3

NIKON D800E + 20mm f/1.8 @ 20mm, ISO 100, 1/4, f/16.0

This has to do with perspective. The closer that you are to an item, the larger it appears relative to its background. Although it may seem like it, this effect actually has nothing to do with the lens you use — it’s all about your camera position. However, if you are positioned very close to something and use a wide angle lens, then your field of view will be so wide that this relationship is much more obvious to viewers. (If this is confusing, Elizabeth wrote a full tutorial on lens compression and Nasim has an article about focal length and subject distortion that you should consider reading.)

The flip side of this coin is when you use a telephoto lens and stand much farther back. Then, items start to look their actual relative sizes. People in front of a mountain will appear huge if you stand two feet away from them and use a wide angle lens, but they’ll be tiny if you stand back and zoom in; instead, the mountain will appear larger.

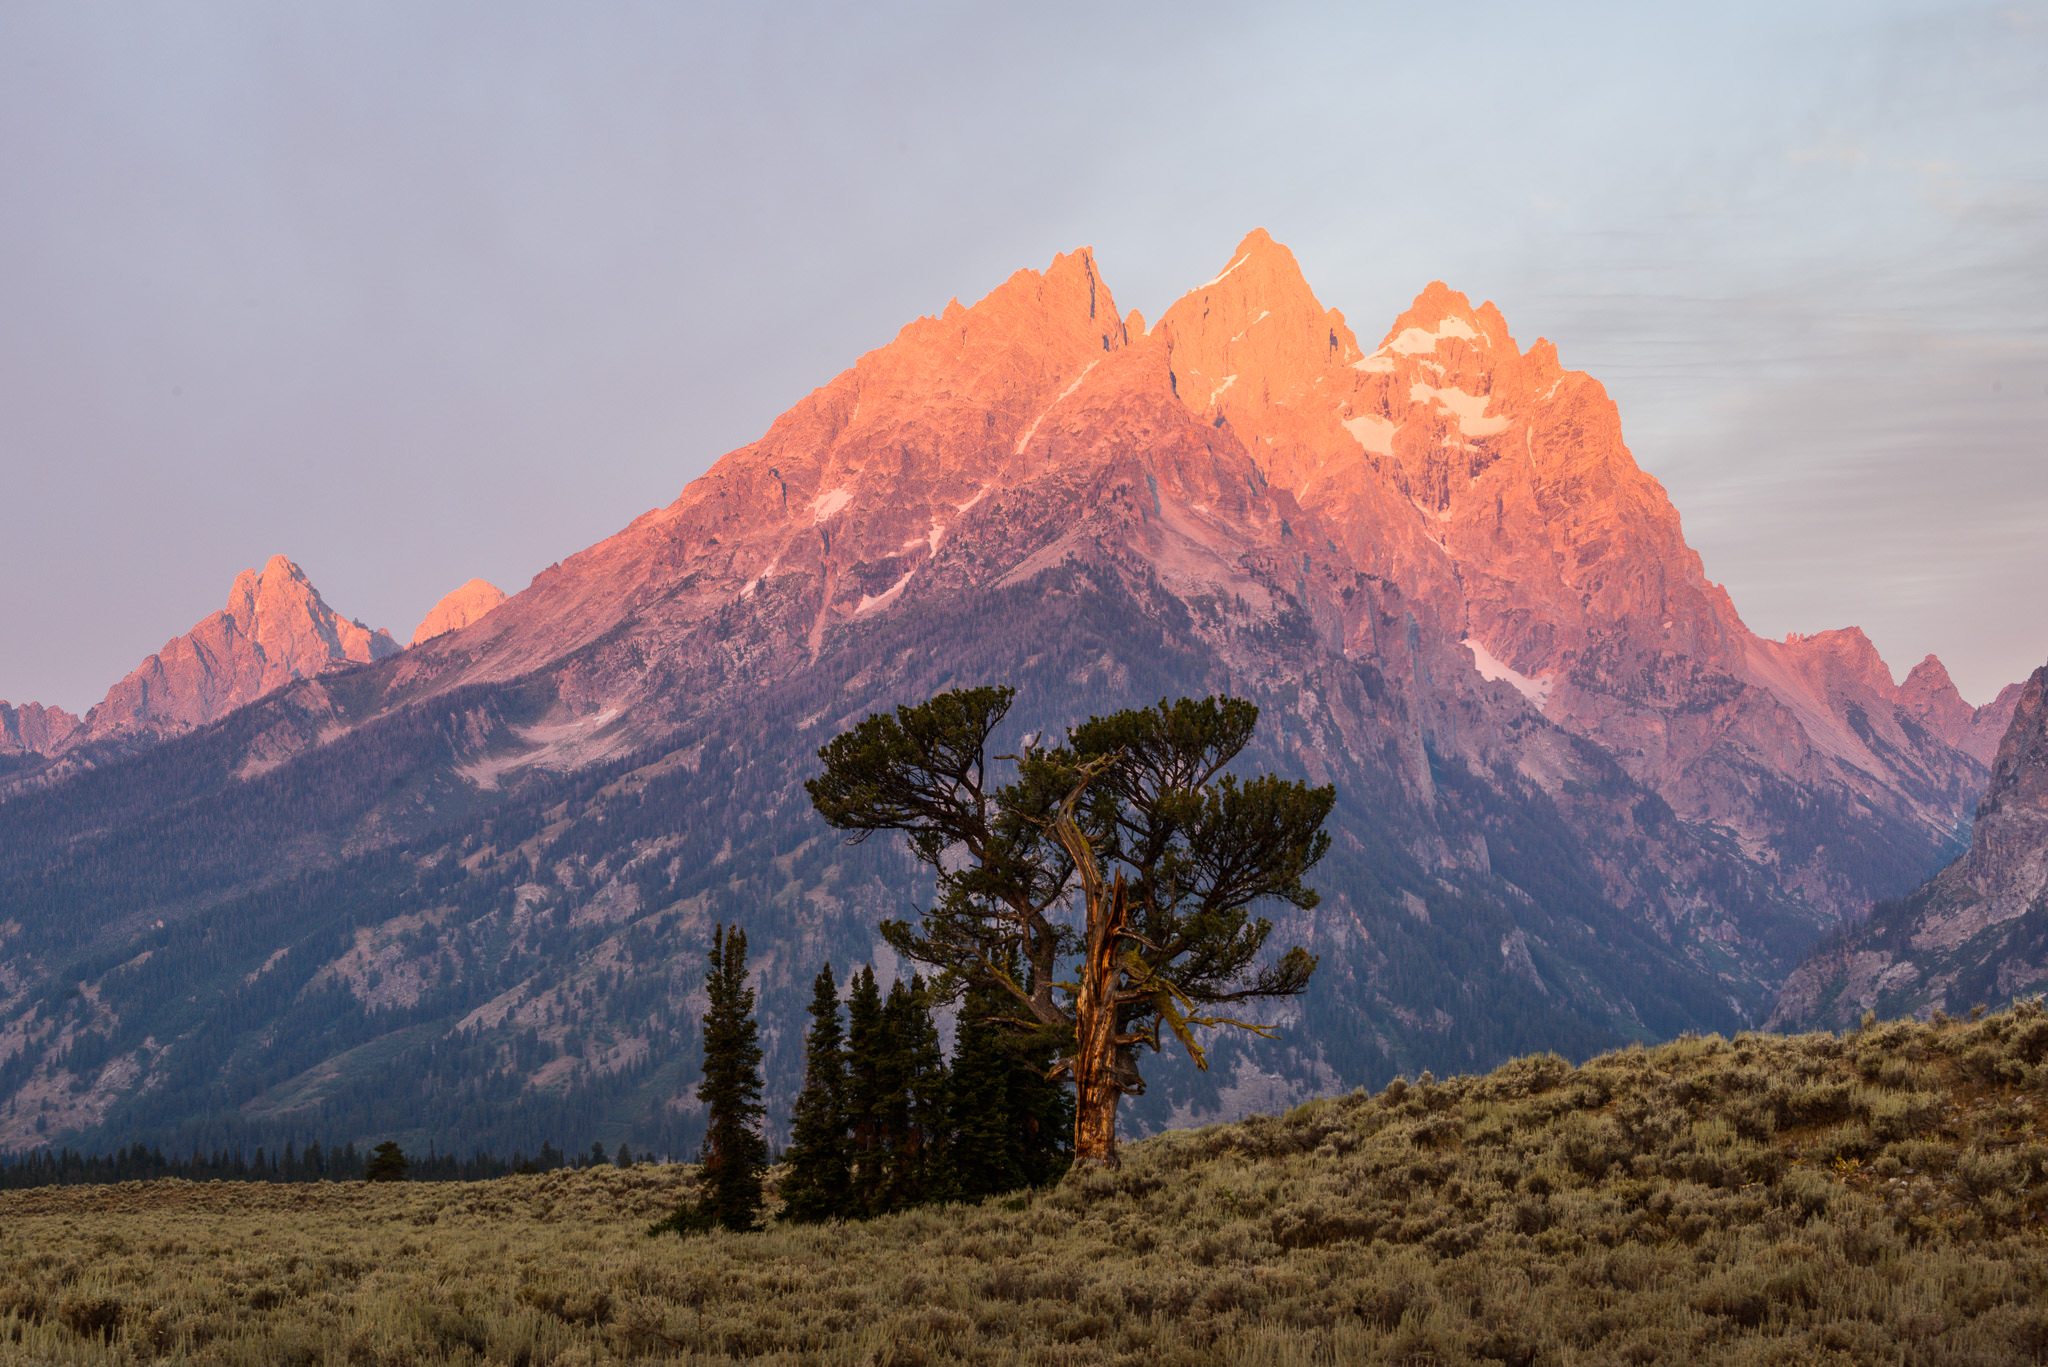
When I took the photo above, I wanted to focus on the interesting patterns in this tree. However, I soon realized that this perspective didn’t show the extreme scale of the mountains in the distance. So, I switched from my 20mm lens to my 70-200mm, and I walked farther back. Ultimately, I was able to capture this photo instead, which has a very different sense of scale:

Spencer-Cox-Use-a-Telephoto-4

NIKON D800E + 70-200mm f/4 @ 70mm, ISO 100, 6/10, f/16.0

This technique can be valuable in a number of different situations, from landscapes to sports, and everything in between. If I ever capture a mountain that doesn’t have enough power in an image, I always zoom in; or, if one of my foreground elements appears too large, I’ll step back and use a telephoto.

The extra sense of scale in these photos isn’t directly caused by your longer lens, but it indirectly is an important factor. Your photo’s perspective is determined by your camera position — which, if you use a telephoto, can be farther back than normal.

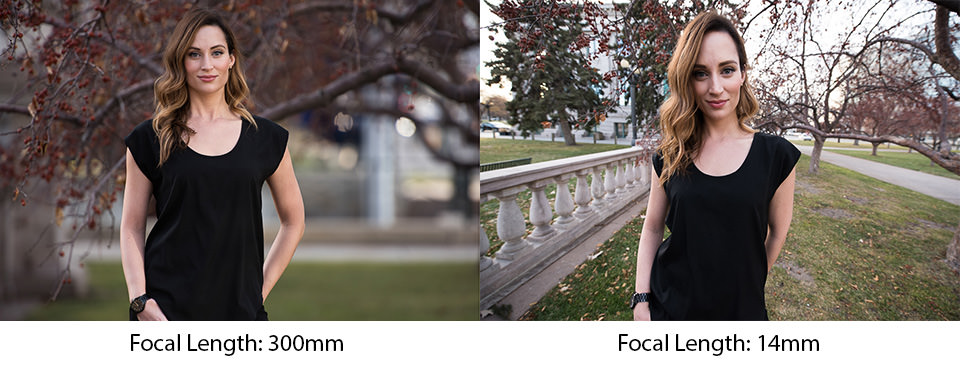
This effect is often used by portrait photographers in order to “flatten” their subject’s face and make their features look more like normal. See the comparison below (photos by Nasim):

Perspective-Distortion

Here, although the photographer’s position is what really caused the change in perspective, the 300mm telephoto lens made it possible to capture a head-and-shoulders portrait (without cropping) that had realistic proportions. The 14mm image, by comparison — where the photographer was only a couple feet from the model — looks much more exaggerated.

If your goal is to show the real-life relative sizes of the elements in your image as accurately as possible, your task is simple: zoom in, stand back, and compose your photo. Compared to a wide-angle at close range, you’ll notice a clear difference.

3) Getting Enough Depth of Field

As you zoom in, your depth of field will shrink dramatically.

With an ultra-wide lens — something like 14mm — it is incredibly easy to capture an entire landscape within your depth of field. Even a moderate aperture like f/5.6 will render the entire scene with extremely high levels of detail from eight feet to infinity.

However, just by zooming into 50mm — by most standards, not even a telephoto yet — you’d need an aperture of roughly f/22 in order to capture the same depth of field. (I got these numbers from my article on choosing the sharpest aperture.)

Telephoto lenses are amazing for landscape photography, but your subject needs to be quite far away if you want the whole scene to be sharp! You can sometimes focus stack if you don’t get quite what you want, but that can be a time-consuming technique, and it isn’t possible for some quickly-moving landscapes.

How do you get around this issue? If a small aperture like f/11 or f/16 doesn’t provide the depth of field you need, and you aren’t able to focus stack, you’re mostly out of options. Definitely try moving farther back, if possible, although that won’t be feasible everywhere.

Still, don’t let this stop you from taking landscape photos with a telephoto lens! I find that most telephoto-worthy landscapes are far enough away that depth of field isn’t a big issue — and, for most of the others, you’ll be able to focus stack instead.

4) Using Shallow Depth of Field to Your Advantage

Worst-case scenario — or, if you’re optimistic, best-case scenario — you’ll have to work with a shallow depth of field.

A shallow depth of field is one of the most compelling parts about photography, and, simultaneously, most annoying parts about telephoto lenses. If you want everything in your photo to appear sharp, this thin depth of field can be a headache; if you want to capture a softly-blurred background, it’s perfect.

As a landscape photographer, it’s typically unusual to capture photos of grand landscapes with an out-of-focus background. However, if you ever take pictures of wildlife or small details, it can be a great tool:

Spencer-Cox-Use-a-Telephoto-5

NIKON D800E + 70-200mm f/4 @ 175mm, ISO 100, 1/250, f/4.0

A shallow depth of field simplifies your photos. By highlighting your subject, it tells your viewer’s eye exactly where to look.

Since telephoto lenses have a naturally thinner depth of field (assuming that you stand in the same position), they are perfect for this type of photography. Use a wide aperture like f/2.8, get close to your subject, and zoom in. You’ll end up with a beautifully-blurred background.

5) Watch for Camera Shake

Telephoto lenses have an unfortunate habit of magnifying the camera-shake problems in your image.

For example, if you’re handholding a lens with poor technique, a wide angle lens may never show the problem — but a telephoto lens could reveal it immediately. Or, more difficult to control (but still fixable), a tripod shaking in the wind may cause blurry photos with a telephoto even when wider angles seem to be completely sharp.

If you use a telephoto, you need to be particularly careful with your overall setup. Any slight bit of shake will be magnified, and the problem only worsens as you use longer and longer lenses.

How do you remedy this problem? With a long lens, be willing to use a tripod to stabilize things as much as possible. Or, if you’re shooting something like sports or wildlife — where you may need to move your camera more quickly than a tripod allows — consider using a monopod instead. If it’s windy, try lowering the thinnest sections of the tripod to see if that improves your stability.

Most of all, check occasionally to make sure that your shots are sharp. Review your photo and zoom in all the way. Does the photo look good? If not, try to find places where you can eliminate blur from your setup. It won’t always be easy, but telephoto lenses provide such an interesting perspective that they are worth the effort.

6) Conclusion

Clearly, telephoto lenses are fantastic tools that can provide exactly the look you’re after, depending upon the scene.

People always seem surprised when I describe my 70-200mm as, perhaps, my favorite landscape lens. Some photographers simply don’t think of telephotos as a tool for nature photography — if it’s not a wide angle, it isn’t worth using. If this has been your outlook on things, you may be overlooking some beautiful potential images.

Of course, you don’t have to be a landscape photographer to enjoy using telephoto lenses. Portrait photographers often employ the “zoom in, stand back” rule in order to capture their subjects’ faces in a more flattering way. Or, if you’re a sports/wildlife photographer, a telephoto lens can help you focus on the smallest details of your scene, bringing your viewer face-to-face with a distant subject.

Telephoto lenses don’t work for every image, though. If you want to show a wide field of view, they certainly don’t work (unless you resort to a multi-row panorama). Or, if you’re trying to exaggerate the size of nearby objects — such as the foreground in a landscape — there are typically better tools for the job.

However, if you want to show people the details and scale of a distant scene or isolate your subject with a shallow depth of field, a telephoto should be at the top of your list. For many people, it will be the most-used lens in your kit.

(If you enjoyed this article, you may also want to read How to Use Wide Angle Lenses.)

The post How to Use Telephoto Lenses appeared first on Photography Life.


from Photography Life https://photographylife.com/how-to-use-telephoto-lenses